Asset Creation - Part 2: Block Mesh Plus
The purpose of the block mesh plus is to take the block mesh to the next level. Since the asset boundaries + general shape were already established during the block mesh phase, the rest of the team may have already started using the block mesh in their gray box level designs.
Now we can take the asset closer to the final shape and silhouette. Still using placeholder pieces and block-out techniques, the finished block mesh plus model should look reminiscent of the final model and be ready for approval by the art director before refining it. If the art director asks for major design changes after this, it shouldn't be difficult to iterate on since no detail work has been done yet.
It is also best to work non-destructively, using modifiers whenever possible to make style passes / changes easy and painless. Review the style guidelines before starting

Goals
- Update the block mesh model to get to the desired shape, silhouette and style of the model.
- Name all of content inside of the file appropriately.
- Re-run the 'export all' operator on the export collection, to update the mesh in the game asset.
- Update collision for the asset in-game if needed.
- Check in all of the changes to the respective repositories.
- Get feedback from the art director (Lexi aka Pixel)
Step-by-Step
Prepare / start the task:
- Check the Vikunja Art project page make sure the task is assigned to you.
- Move the task to the 'blockmesh + in progress' column, to let the team know you're actively working on it.
Check your Git working directory (pounce-art):
- Have the Working with Git page at the ready.
- Open the
pounce-artrepo in SourceGit. - Make sure you have no uncommitted files in the 'Local Changes' section.
- Make sure you have the
devbranch checked out. - Pull the latest changes from Origin.
Update the block mesh model:
You should...
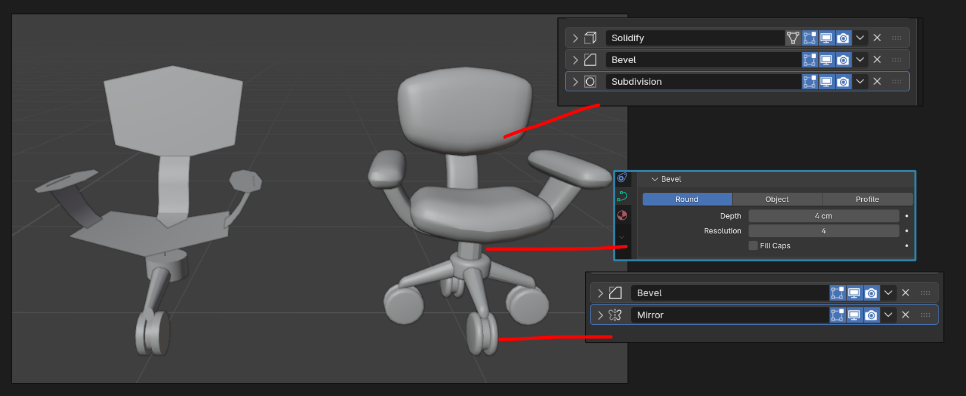
- Use techniques that are easy to iterate on:
- Make the model out of multiple objects that are easy to move around
- Mirror modifier for symmetrical parts
- Make pipes, tubes, hoses, etc out of curves with modifiers for thickness so they can be adjusted
- Repeated parts made from mesh instances
- Simple custom geometry nodes for mesh generation (if it's faster than doing it by hand)
- Focus on silhouette, proportions, and matching the style guide.
- Try to match the concept art (if concept art is provided).
- Save the .blend file when you're done
- For complex assets it's okay to do multiple commits to the pounce-art repo as long as each one represents tangible progress. Please don't check in every time you move a vertex or two, these files sizes add up fast with each commit.
You should not...
- Add small details / wear and tear
- Spend time on final topology / edge flow
- UV unwrap (automatic smart UV project is fine since it doesn't take any time).
- Make materials / textures
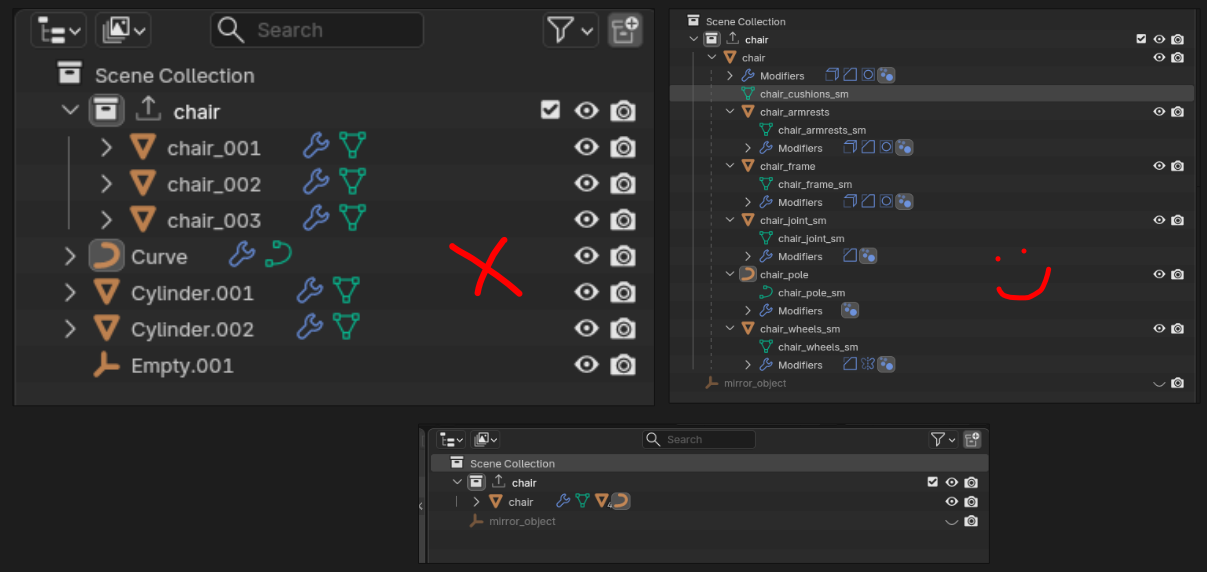
Clean up the scene:
-
Same as we did in the Block Mesh phase, but there might be new mesh pieces now, so double check everything.
-
Ensure asset is centered and sitting on the floor (not below the grid).
-
Make sure that you're oriented correctly forward.
-
Negative Y axis is forward, Positive Z is up (Note: these axes will be different inside of Godot).
-
Tip: Add a Suzanne monkey to the scene, check which was she if facing; Your mesh should face the same direction.
-
-
Apply all transforms.
-
Name all objects and mesh data.
-
Remove lights, camera, annotations, and other unneeded junk.
-
Tip: Use the "Blender file" view in the Outliner to help find and remove junk.
-
You can also use File -> clean up -> purge unused data
-
Do not pack textures or other large assets into the .blend file
-
Export the model:
- The great thing about the export collection that was set up in the block mesh phase, is that it's already ready to go, including the correct file path. Just re-run the exporter and overwrite the in-game asset.
Update collision:
- If there were substantial changes to the model the collision from the first version might not line up correctly anymore. Take a moment to update that in-game
Commit changes / complete the task:
All changes to the .blend file need to be checked into the pounce-art repository. And the newly exported mesh / collision update need to be checked into the pounce-game repository.
Now that the asset has been pushed to the server, the art director will have access to it. Contact Lexi to let her know it's ready for review. If she has feedback for you, make the appropriate adjustments and repeat steps 1-5 as needed.
-
Commit to the
pounce-artrepo:- Make sure you're in the right branch:
dev - Stage only the .blend file for the newly created asset.
- Make sure you haven't staged irrelevant files.
- Write a commit message:
- Prefix the message with the name of the asset and a colon.
- e.g. "crate wood: Create block mesh"
- Prefix the message with the name of the asset and a colon.
- Push the change to origin.
- If it prompts you for credentials, enter your username and password for git.bugjam.dev
- Make sure you're in the right branch:
-
Commit to the
pounce-gamerepo:- Make sure you're in the right branch:
dev - Stage the files for the newly imported asset e.g.:
art_assets/props/crate_wood/crate_wood.bin- The binary mesh data for the exported gltf file.art_assets/props/crate_wood/crate_wood.gltf- The text header file for the exported gltf file.entities/props/crate_wood.tscn- The text-based scene file that contains the entity and it's collision- wont appear in local changes if you haven't made any updates to the bounding box- Make sure you haven't staged other irrelevant files.
- Make sure you're in the right branch:
art_assets/props/crate_wood/crate_wood.gltf.import - if you see a new import file in your local changes STOP and ask for tech help in the bugjam chat, this means that a file path is incorrect somewhere and your new export isn't directed to the entity we made in godot last step
-
- Write a commit message:
- Prefix the message with the name of the asset and a colon.
- e.g. "crate wood: block mesh +"
- Prefix the message with the name of the asset and a colon.
- Push the change to origin.
- If it prompts you for credentials, enter your username and password for git.bugjam.dev
- If it prompts you for credentials, enter your username and password for git.bugjam.dev
- Tell Lexi you're finished with that asset, and get approval to move on to the high resolution mesh
- this is the stage where you will most likely get a drawover+ notes for changes to make before moving to high res, repeat the steps to export + push after making those changes if needed until it's approved and then check off "blockmesh +" on vikunja task and move to "high-res in progress"
- Write a commit message:
No comments to display
No comments to display