Asset Creation - Part 1: Block Mesh
The purpose of the block mesh is to spend less than 20 minutes to create an extremely rough block out version of the model that can be used as a stand-in version of the asset. This allows us to get an early version in the game asap so that the level designers and programmers aren't blocked in their ability to do there work.
Goals
- Save a file into the correct location with the correct naming convention.
- Block out and extremely rough version of the model that vaguely looks like it could be the asset.
- Ensure scales and proportions are correct.
- Name all of content inside of the file appropriately.
- Set up an export collection, and point the file path to the in-game location for the asset.
- Export it into the appropriate game folder and establish it as an asset in the game.
- Create collision for the asset in-game.
Step-by-Step
1.) Prepare / start the task:
- Check the Vikunja Art project page to see if you were given a task / find a task that you can do from the to-do list.
- Refresh the page and make sure nobody else is already working on the given task before you assign yourself.
- Assign the task to yourself:
- Assign to user -> Type your name, accept.
- Move the task to the 'in progress' column, to let the team know you're actively working on it.
2.) Check your Git working directory (pounce-art):
- Have the Working with Git page at the ready.
- Open the
pounce-artrepo in SourceGit. - Make sure you have no uncommitted files in the 'Local Changes' section.
- Go to the 'History' section and sure you have the
devbranch checked out. - If you don't already have a local
devbranch, right click onorigin/devand choose "Checkout origin/dev...
dev branch.Pull the latest changes from origin.
Check that you have DEV as your working branch- not main!
3.) Make the Blender file:
Have the Game folder structure at the ready.
Start in thepounce-art repository.
- Determine the asset type:
- characters - A rigged an animated character (robot, security camera, tanuki)
- environments - Static assets to build the environment (walls, floors, trim, windowsills)
- props - Items that can potentially be moved around in the game (vase, crate, sign, coins, statues, diamonds)
if you are making a prop, you'd navigate to pounce/pounce-art/art-assets/props
- e.g.
pounce-art/art_assets/props/crate_wood - Read more about naming conventions and files paths
Make the Block Mesh:
- e.g.
pounce-art/art_assets/props/crate_wood/crate_wood.blend - Follow the Naming Conventions.
- Do NOT include things like "WIP" or "Blockmesh" in the name, always use the final name for the
asset.asset
- Do NOT include things like "WIP" or "Blockmesh" in the name, always use the final name for the
choose asset type
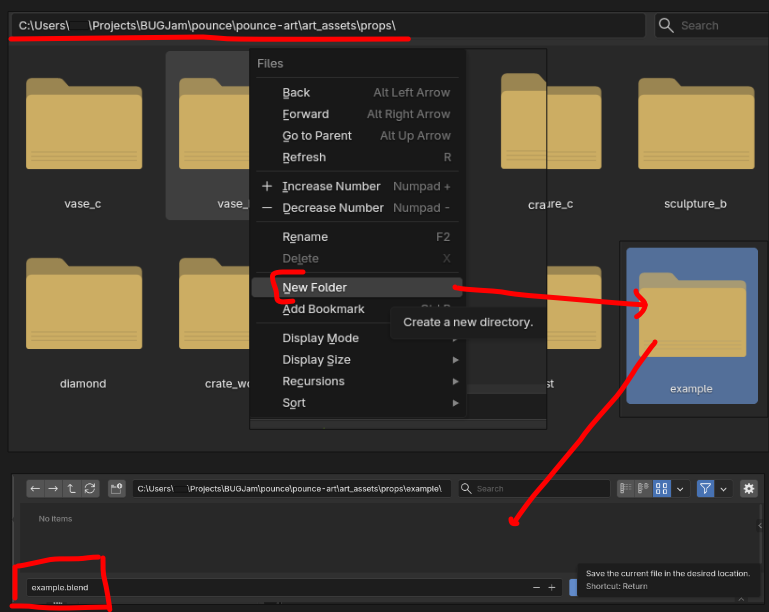
create new folder in correct location named after the asset
save the .blend in that new folder named after the asset ( example.blend / wood_crate.blend)
4.) Make the Block Mesh:
A block mesh functions as a bounding box for your asset, this allows us to apply physics to the object, and start using it to develop scenes + game mechanics right away.
- Use modeling tools to create an extremely rough block out of the mesh (don't spend more than
1510 minutes):- Keep it extremely simple, focus on scale and proportions.
- Keep in mind the point is to establish the bounds /size / dimensions / proportions of the model.
- Match the dimensions that were given in the task assignment.
- You can use the sidebar's item tab to type in exact dimensions.
- Use primitive shapes.
- For a crate, use a cube.
- For a fire extinguisher, use a cylinder with a sphere on top.
- Keep the poly count low so we don't bog down performance in the game.
- Make sure all content inside of the .blend file is organized and named correctly.
- Keep it extremely simple, focus on scale and proportions.
- Ensure
Clean upthat the scene:
object - Negative Y axis is forward, Positive Z is up (Note: these axes will be different inside of Godot).
- Tip: Add a Suzanne monkey to the scene, check which was she if facing; Your mesh should face the same direction.
Create something very simple that is the size + approximate shape of your asset (no more than 15 minutes)
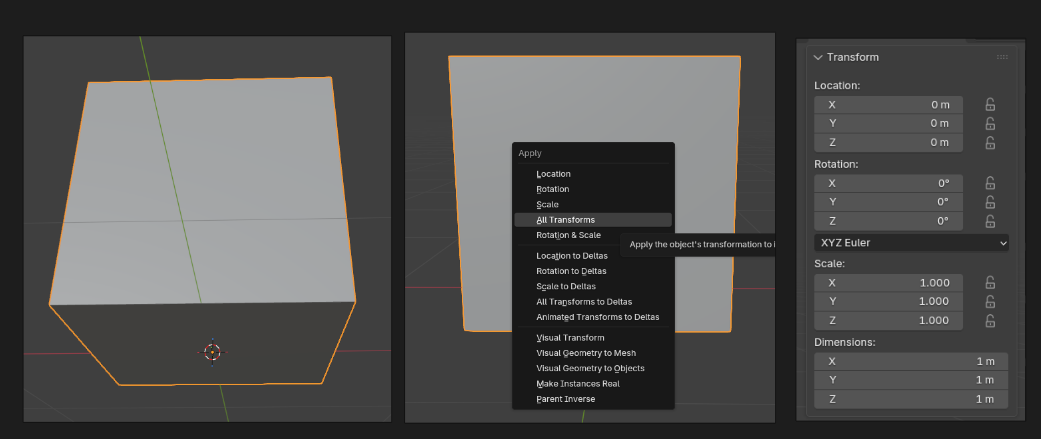
Set the objects origin to the lowest center point of the object
Check that the object is sitting on the floor and not clipping below
Apply all transforms
5.) Create a collection for the asset + clean up outliner:
Create a new collection + name it after your asset
move the block mesh into this collection

- Tip: Use the "Blender file" view in the Outliner to help find and remove junk.
- You can also use File -> clean up -> purge unused data
Create a collection for the asset:
6.)
You only have to set this up once during the block mesh phase. Subsequent phases will re-use the same settings.
- Select the asset's collection, go to the 'Collection' tab in the 'Properties' editor.
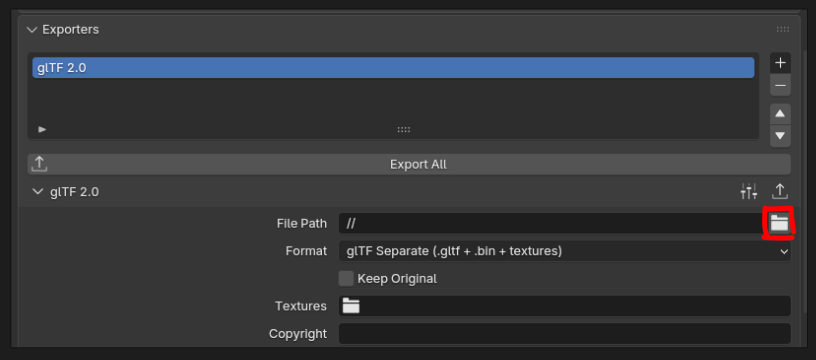
- Find the 'Exporters' sub-section, click the '+' button on the right, and choose 'glTF 2.0'
- Set the 'File Path':
- Point the path to the equivalent folder in the pounce-game repo
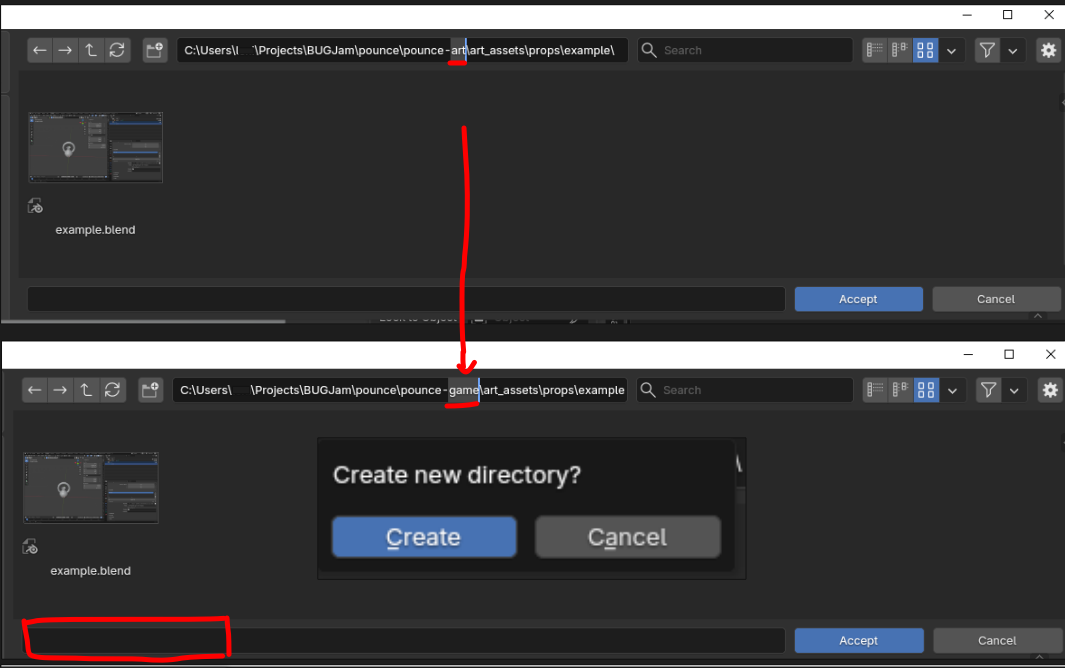
- TIP: start with the current .blend file's location by typing two forward slashes "//" for the File Path, then click the browse button (// is short hand for the current .blend file location.)
- Once the file browser opens to the location of the current .blend file, swap the "-art" for "-game" in the file path to send it over to the other repo.
- Use the default 'Relative Path' option, it will look like this:
//../../../../pounce-game/art_assets/props/crate_wood/crate_wood.gltf
- Do NOT use absolute file paths, which look like this:
/home/xgreer/Projects/BUGJam/pounce/pounce-game/art_assets/props/crate_wood/crate_wood.gltf
- Make sure you add the ".gltf" file extension
- Point the path to the equivalent folder in the pounce-game repo
- Set the 'Format': to 'glTF Separate (.gltf + .bin + textures)'
- Enable 'Collection' -> 'Export at Collection Center'
- Enable 'Data' -> 'Mesh' -> 'Apply Modifiers'
- Set 'Data' -> 'Material' -> 'Materials' to 'Placeholder'
- Note: We will handle proper material assignments in Godot during later asset creation phases.
- For static meshes (things without animated bones):
- Uncheck 'Data' -> 'Shape Keys'
- Uncheck 'Data' -> 'Skinning'
- Uncheck 'Data' -> 'Animation'
- For skeletal meshes (things with animated bones):
- Check 'Data' -> 'Armature' -> 'Use Rest Position Armature'
- Check 'Data' -> 'Armature' -> 'Export Deformation Bones Only'
- Check 'Data' -> 'Armature' -> 'Remove Armature Object'
Check
select collection and add a new exporter in the properties panel under 'collection properties'
in file path option type "//" to direct the file to the relative path
select the little file icon to specify the file path, replace "pounce-art" with "pounce-game" and create new directory
in this new directory name the file the same as the asset + but with '.gltf' ( example.gltf | wood_crate.gltf)
double check settings and ensure that the format is set to glTF Separate NOT glb
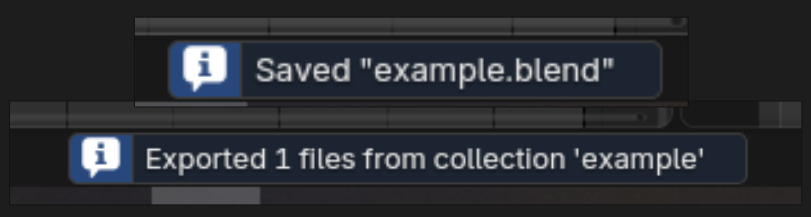
Click the 'Export All' button in the collection exporters section + save your Gitblend workingfile
If there are multiple assets in this .blend file, make a collection for each asset (pounce-game):a handle that is a separate object on a mug is not a new asset, a new asset would be a mug + a plate, the mug would need a collection and the plate would need a colelction, the mug collection would hold both the mug object and the handle object) . + each new collection will need its own exporter
7.) Add blockmesh to game
IF YOU HAVENT OPENED THE GAME YET->
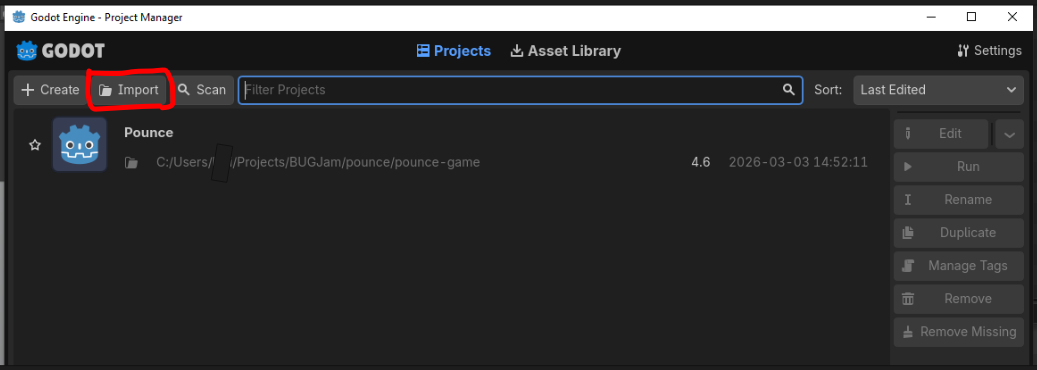
- Open the
pounce-gamerepo in SourceGit.
Make sure you have the
dev branch checked out.
Pull the latest changes from Origin. Open godot 4.6.1 Click "import" and navigate to the pounce game under pounce/pounce-game Open the 'Pounce' project in Godot
Set
IF upYOU theALREADY entityHAVE sceneTHE inGAME Godot
>
- Open the 'Pounce' project in
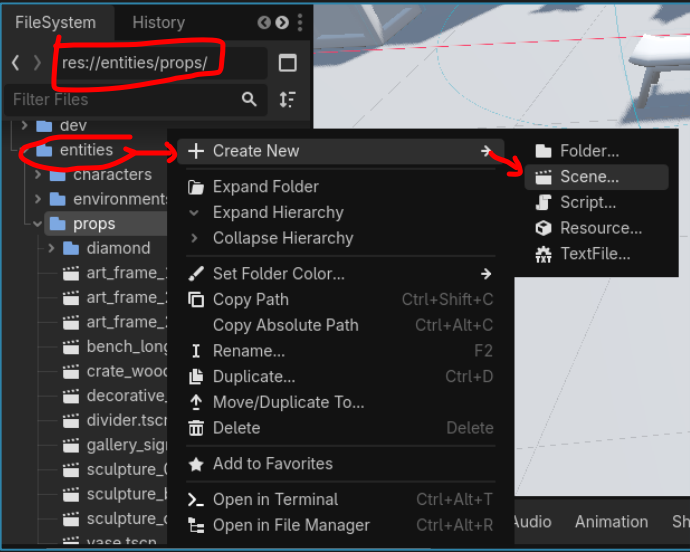
Godot.Godot - In
Blendergodot's-fileClicksystem (lower left) navigate to a folder called entities
- In Godot's FileSystem, navigate to the
entitiesfolder - Open the folder for your asset type:
- characters
- environments
- props
- Right click, and choose 'Create New' -> 'Scene...'
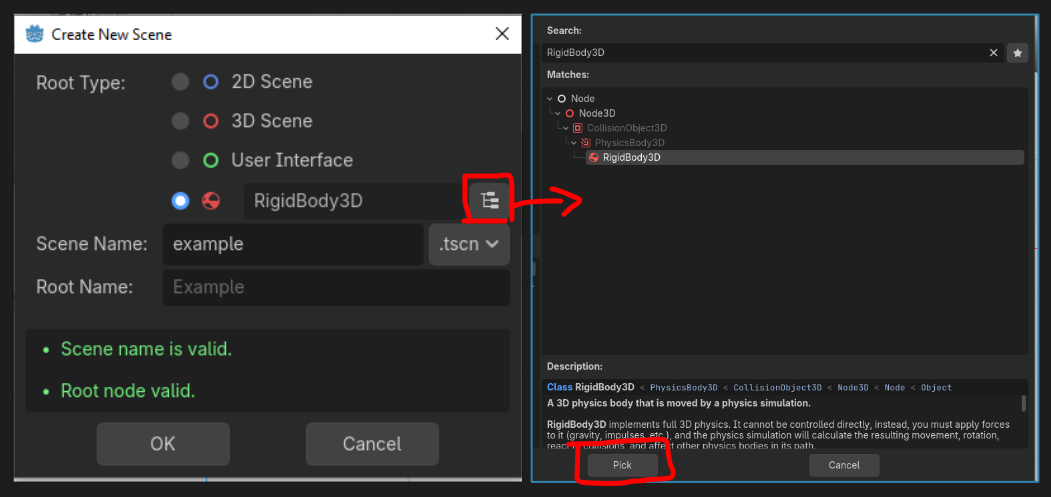
- In the 'Create New Scene' dialogue:
- Select the fourth circle option to select a custom root node.
- Set the 'Scene Name' to match your asset:
- e.g. "crate_wood"
- Click the "Pick Root Node Type" button to the right of the fourth circle option (Its icon looks like a file hierarchy)
- Choose the appropriate node type:
- CharacterBody3D - For characters.
- StaticBody3D - For environment art that doesn't move.
- RigidBody3D - For props that can be pushed around.
- Click the 'Pick' button.
- Choose the appropriate node type:
- Click the 'OK' button.
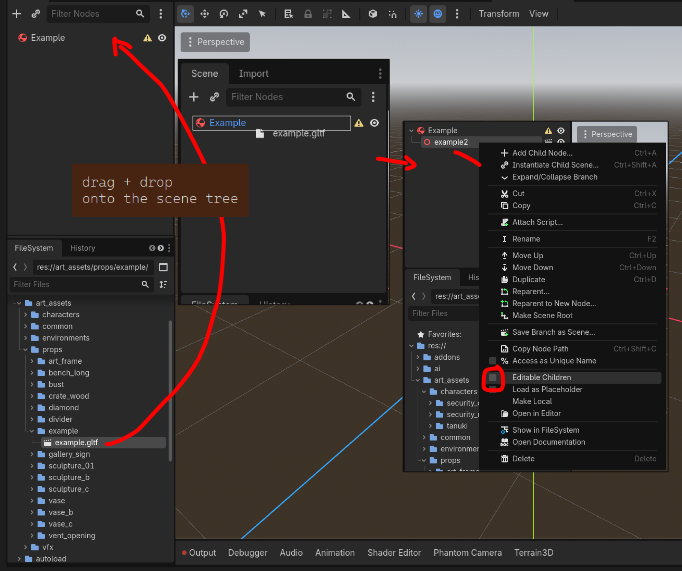
Set up Collision for the entity:
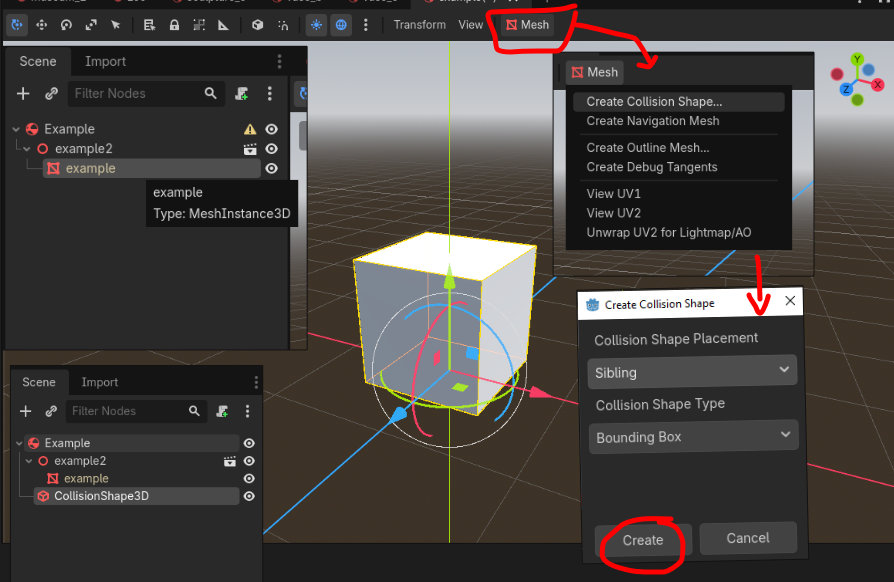
RightOnceclickyou've selected editable children you will be able to edit the mesh data on the object (a red symbol that looks like a box with a slanted line)
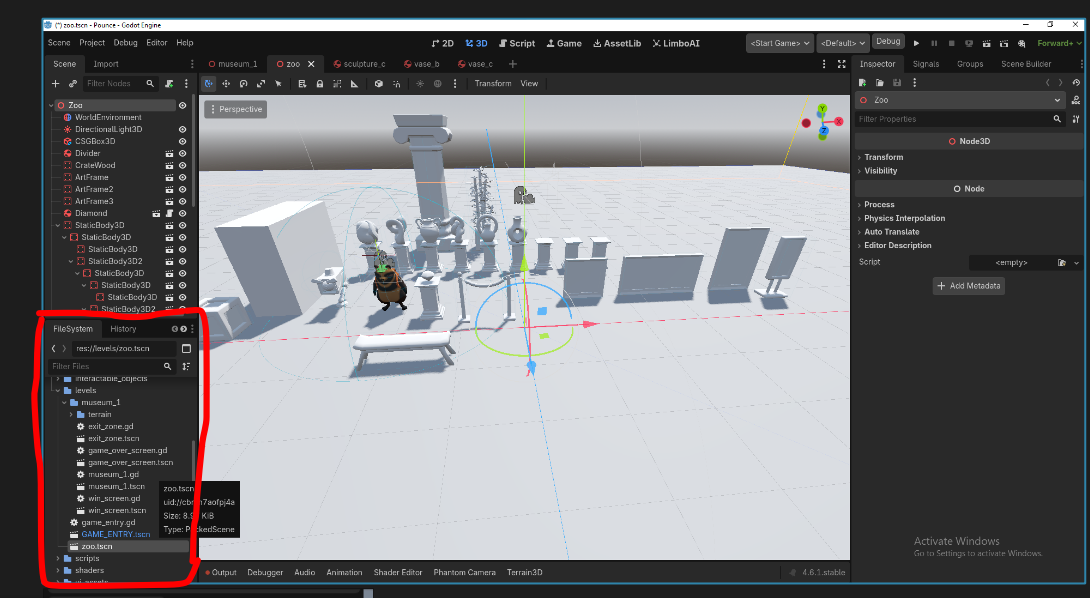
Add to Zoo Scene
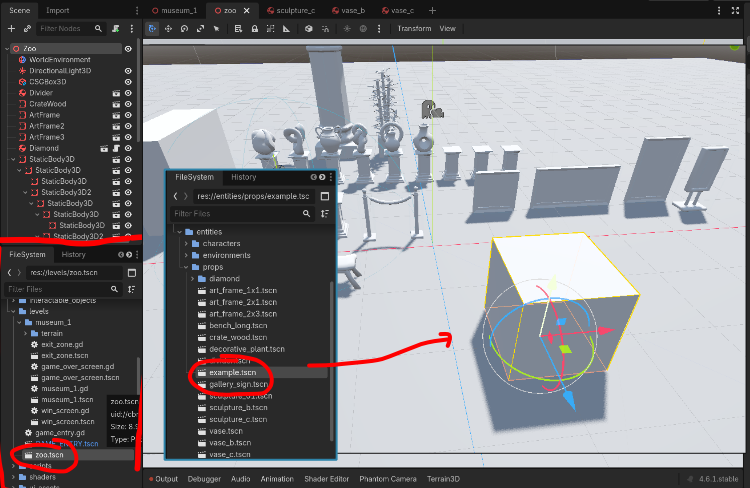
Under levels in the file system, navigate to 'zoo.tscn' and open it to view the scene with all of the game assets, then go to entities in the file system, locate your new asset tscn and click and drag it into the zoo scene to see it next to everything in the game! (yay!)
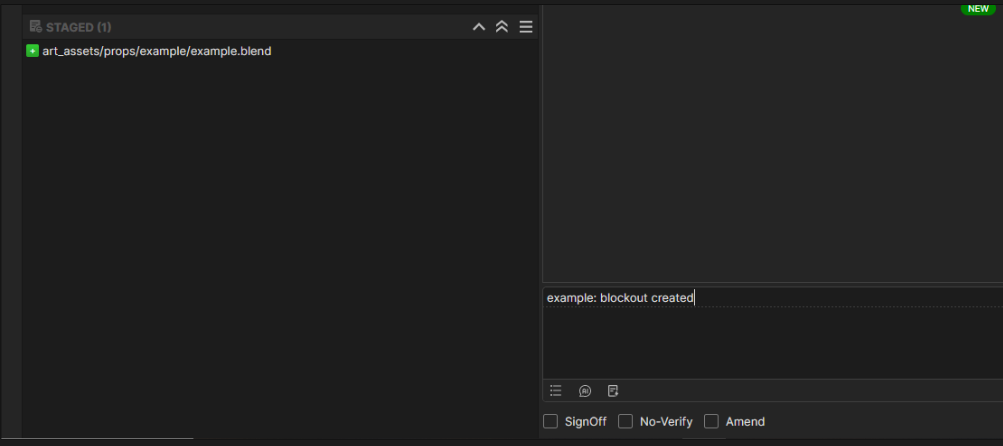
8.) Commit changes / complete the task:
CommitGo to the
pounce-artrepo:- Make sure you're in the right branch:
dev - Go to the 'Local Changes' section and and stage the .blend file for the newly created asset.
- Make sure you haven't staged irrelevant files.
- Write a commit message:
- Prefix the message with the name of the asset and a colon.
- e.g. "crate wood: Create block mesh"
- Prefix the message with the name of the asset and a colon.
- Push the change to origin.
- If it prompts you for credentials, enter your username and password for git.bugjam.dev
- Make sure you're in the right branch:
Commit to the pounce-game repo:
- Make sure you're in the right branch:
dev - Stage the files for the newly imported asset e.g.: THERE SHOULD BE 5 if you followed above steps
art_assets/props/crate_wood/crate_wood.bin- The binary mesh data for the exported gltf file.levels/zoo.tscn- This shows when you added the new entity to the zoo scene
art_assets/props/crate_wood/crate_wood.gltf- The text header file for the exported gltf file.art_assets/props/crate_wood/crate_wood.gltf.import- Godot import settings and UID for the asset.entities/props/crate_wood.tscn- The text-based scene file that contains the entity and it's collision.- Make sure you haven't staged other irrelevant files.
- Prefix the message with the name of the asset and a colon.
- e.g. "crate wood: Import block mesh, set up crate_wood.tscn entity"
- If it prompts you for credentials, enter your username and password for git.bugjam.dev
- Check the box for "Block Mesh" in the task description.
- Tell Lexi you're finished with that asset, and get approval to move on to Block Mesh Plus (please DM her or just ping her in the chat)