
Scale and Proportions

The purpose of the block mesh is to spend less than 20 minutes to create an extremely rough block out version of the model that can be  used as a stand-in version of the asset. This allows us to get an early version in the game asap so that the level designers and programmers aren't blocked in their ability to do there work.

Goals

  1. Save a file into the correct location with the correct naming convention.
  2. Block out and extremely rough version of the model that vaguely looks like it could be the asset.
  3. Ensure scales and proportions are correct.
  4. Name all of content inside of the file appropriately.
  5. Set up an export collection, and point the file path to the in-game location for the asset.
  6. Export it into the appropriate game folder and establish it as an asset in the game.
  7. Create collision for the asset in-game.

Name file and place in the appropriate directory

Name

All art files should use `snake_case` all lower case letters, with underscores to separate words. absolutely no spaces in file names, this can break tools and pipelines.

Multi-part assets should be named with the primary part appearing in the name first e.g. dog_main, dog_collar, dog_shoes 'dog' is the descriptive part here so it comes first so that all parts are sorted together in the file system.

Directory

All art production files will be created inside of the pounce-art repository. The output of these files will be exported into the pounce-game repository. The file paths for these files will match 1:1 between the two repositories. See the game folder structure page for more info.

All art assets should go inside of the art_assets folder within each repository.

Your prop should be categorized into the appropriate sub-folder based on its type:

  • props
  • environments
  • characters

Within this sub folder, you should create a folder named after the specific asset. All files for creating that asset should be saved in that folder. If you have reference images, make a reference folder inside of that asset's folder. In most cases, it should be one asset per .blend file.  It's okay to create multiple assets within the same .blend file if they are logically grouped and it makes sense to make them together all at the same time e.g. a bunch of rocks, or a fence post + fence scaffolding.

BUGJam
└── pounce
  └── pounce-art
    └── art_assets
      ├── characters
      │ └── example_character
      │   ├── example_character.blend
      │   └── reference
      │     ├── reference.pur
      │     └── reference_image.png
      ├── environments
      │ └── example_environment
      │   └── example_environment.blend
      └── props
        └── example_prop
          └── example_prop.blend
Examples

A reflective mirror object that's used as a puzzle element in the game would go here:

BUGJam/pounce/pounce-art/art_assets/props/mirror/mirror.blend

The Tanuki character that the player will play as would go here:

BUGJam/pounce/pounce-art/art_assets/characters/tanuki/tanuki.blend

Scales and proportions

We will be working with standard blenderBlender units aka meters. One meter is one blenderBlender unit. One meter is also 100cm, so working from measurements like the ones attached is easier than it seems if you're used to imperial! 

image.pngimage.png

image.pngimage.png

image.png

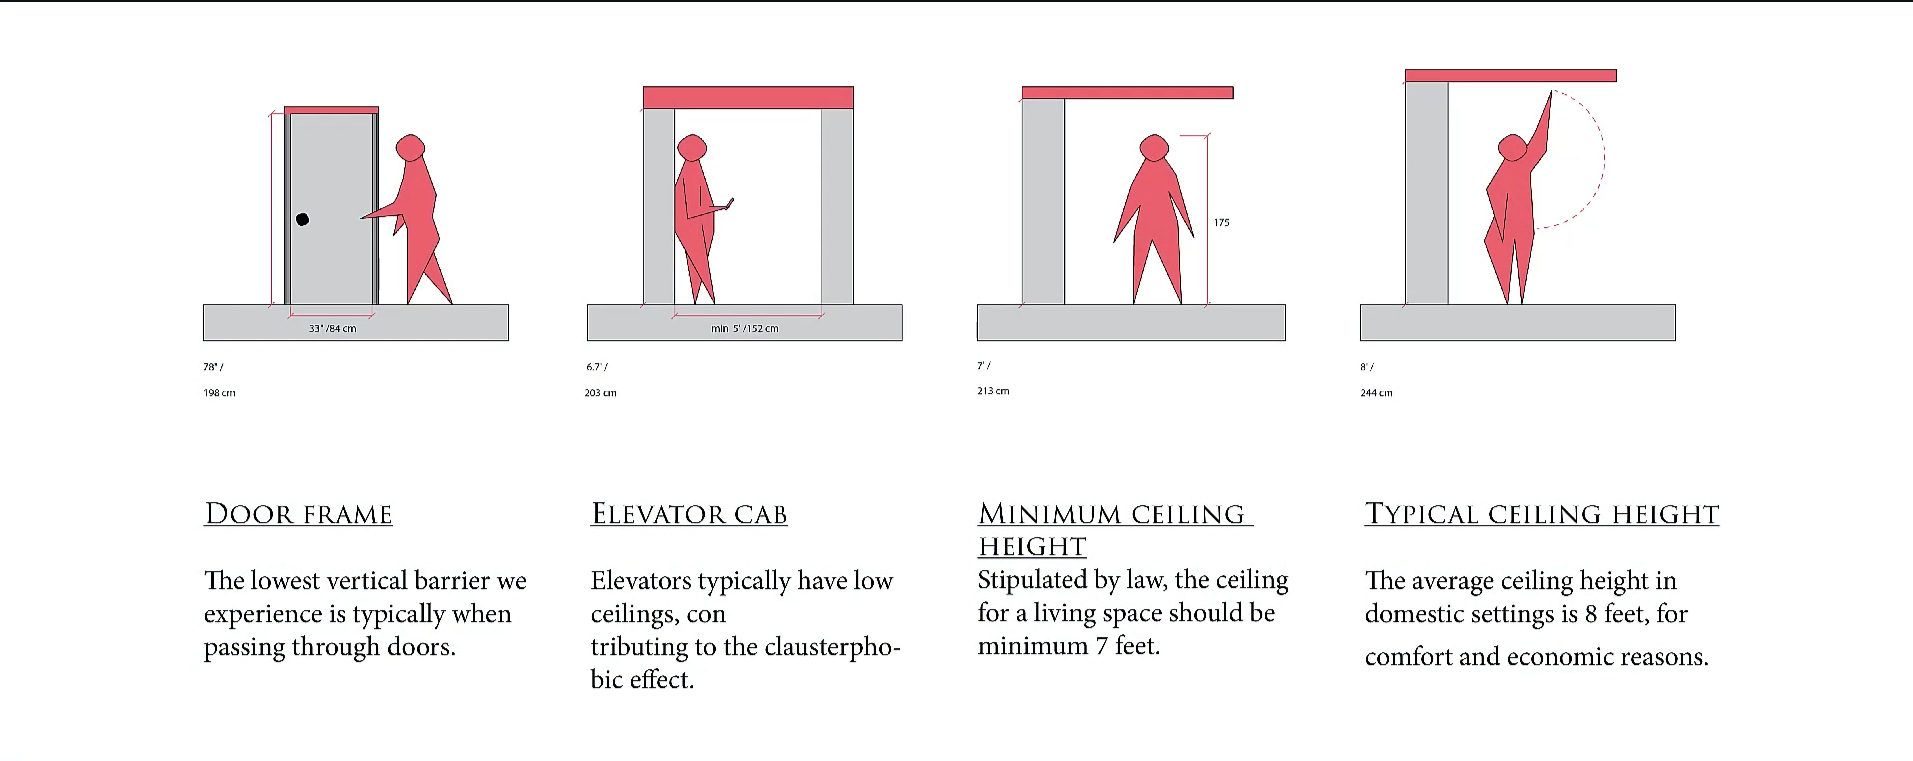
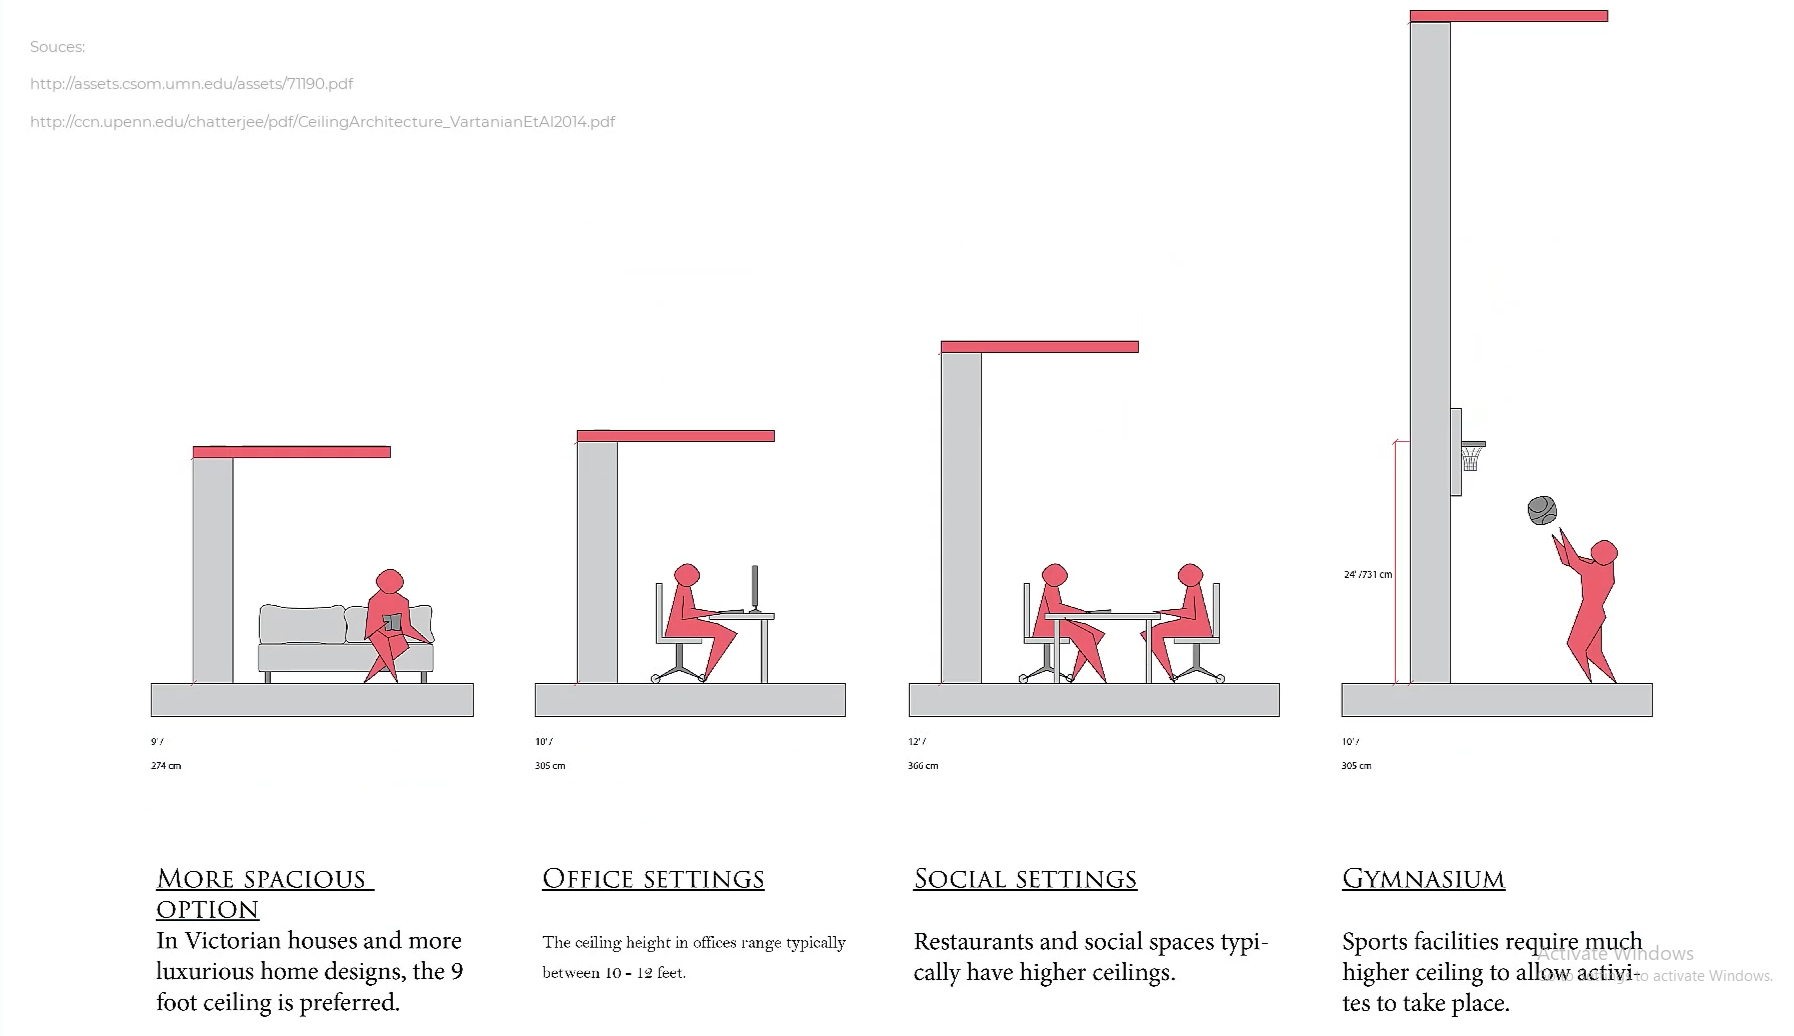
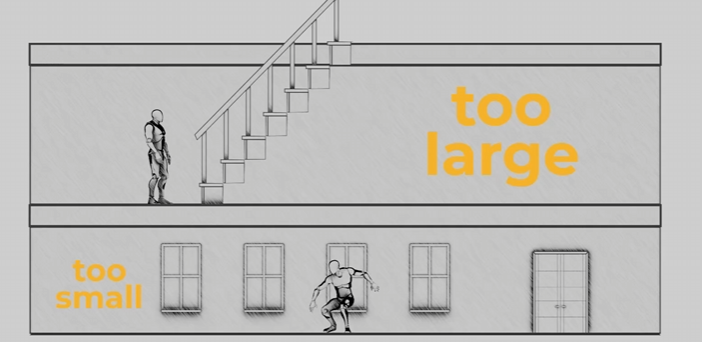
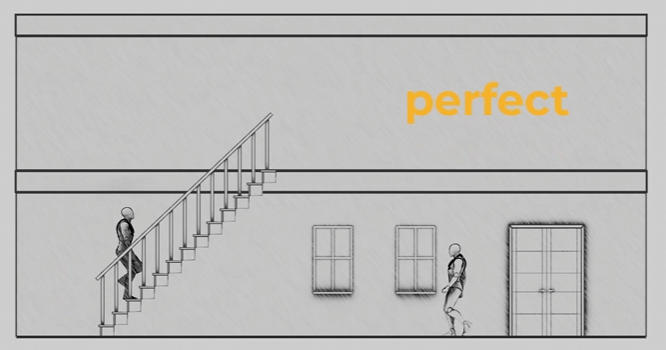
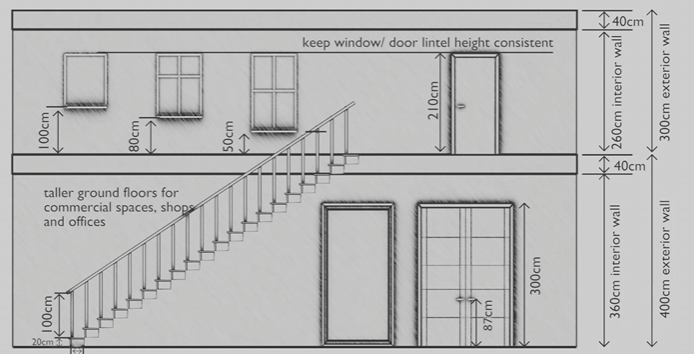
For scale, please also utilize a "main_character" mesh (attached) to compare to your mesh whenever possible! When working, we will start with a blockout for your objects/ character that will be tested in the game engine.

reference photos sourced Schoolism. Life – Lesson 71. Schoolism. Accessed 2/11/26. https://schoolism.com/s/life/course/lessons/71

Step-by-Step

Prepare / start on the task:

  • Check the Vikunja Art project page to see if you were given a task / find a task that you can do from the to-do list.
    • Refresh the page and make sure nobody else is already working on the given task before you assign yourself.
    • Assign the task to yourself:
      • Assign to user -> Type your name, accept.
    • Move the task to the 'in progress' column, to let the team know you're actively working on it.

Check your Git working directory:

  • Have the Working with Git page at the ready.
  • Open SourceGit.
  • Make sure you have no uncommitted files in the Local Changes section.
  • Make sure you have the dev branch checked out.
  • Pull the latest changes from Origin.

Make the Blender file:

  • Have the Game folder structure  at the ready.
  • Start in the pounce-art repository.
  • Determine the asset type:
    • characters - A rigged an animated character (robot, security camera, tanuki)
    • environments - Static assets to build the environment (walls, floors, trim, windowsills)
    • props - Items that can potentially be moved around in the game (vase, crate, sign, coins, statues, diamonds)
  • Create the folders for your asset.
    • e.g. pounce-art/art_assets/props/crate_wood

Make the Block Mesh:

  • Have the Style Guidelines  at the ready.
  • Open Blender and immediately save the file into asset folder that you created a moment ago.
    • e.g. pounce-art/art_assets/props/crate_wood/crate_wood.blend
    • Follow the Naming Conventions.
      • Do NOT include things like "WIP" or "Blockmesh" in the name, always use the final name for the asset.
  • Use modeling tools to create an extremely rough block out of the mesh (don't spend more than 15 minutes):
    • Keep it extremely simple, focus on scale and proportions.
      • Keep in mind the point is to establish the bounds /size / dimensions / proportions of the model.
    • Match the dimensions that were given in the task assignment.
      • You can use the sidebar's item tab to type in exact dimensions.
    • Use primitive shapes.
      • For a crate, use a cube.
      • For a fire extinguisher, use a cylinder with a sphere on top.
    • Keep the poly count low so we don't bog down performance in the game.
    • Make sure all content inside of the .blend file is organized and named correctly. 

Clean up the scene:

  • Ensure asset is centered and sitting on the floor (not below the grid). 
  • Make sure that you're oriented correctly forward.
    • Negative Y axis is forward, Positive Z is up (Note: these axes will be different inside of Godot).
    • Tip: Add a Suzanne monkey to the scene, check which was she if facing; Your mesh should face the same direction.
  • Apply all transforms.
  • Name all objects and mesh data.
  • Remove lights, camera, annotations, and other unneeded junk.
    • Tip: Use the "Blender file" view in the Outliner to help find and remove junk.
    • You can also use File -> clean up -> purge unused data
  • Do not pack textures or other large assets into the .blend file

Create a collection for the asset:

  • Name the collection
  • move the block mesh into this collection
  • If there are multiple assets in this .blend file, make a collection for each asset.
    • Only put multiple assets in a single file if the are logically linked. e.g.
      • A set of gears - small, medium, large.
      • A set of rocks - different shapes and sizes.
      • Fence posts - posts, boards, scaffolding.
  • Set up the collection exporter (for each asset collection).
    • Select the asset's collection, go to the 'Collection' tab in the Properties editor.
    • Find the 'Exporters' sub-section, click the "+" button on the right, and choose "glTF 2.0"
    • Set the "File Path": 
      • Swap the "-art" for "-game" in the file path to send it over to the other repo.
      • Use the default 'Relative Path' option, it will look like this: 
        • //../../../../pounce-game/art_assets/props/crate_wood/crate_wood.gltf
      • Do NOT use absolute file paths, which look like this:
        • /home/xgreer/Projects/BUGJam/pounce/pounce-game/art_assets/props/crate_wood/crate_wood.gltf
      • Make sure you add the ".gltf" file extension
    • Enable 'Data' -> 'Mesh' -> 'Apply Modifiers'
    • Set 'Material' -> 'Materials' to 'Placeholder'

Export and set up the entity

[INSTRUCTIONS COMING SOON]

WIP BELOW THIS POINT!!!!

Checking in:

  • Commit the block mesh .blend file to pounce-art dev
  • Push
  • Commit the imported asset to pounce-game dev
  • Push
  • Move a the Vikunja task to 'in-review'