Art Asset Workflow
- Art Asset - Overview / Guidelines
- Naming Conventions
- Asset Creation - Part 1: Block Mesh
- Asset Creation - Part 2: Block Mesh Plus
- Asset Creation - Part 3: High Resolution Mesh
- Asset Creation - Part 4: Low Resolution / Game-Ready Mesh
- Asset Creation - Part 5: Baking Mesh Maps
- Asset Creation Part 6: Applying Textures
Art Asset - Overview / Guidelines
What is an Asset?
In a production pipeline, (both animated films and video games), art assets are finished pieces that are ready to be used in a scene. Creating an asset is more than making a model and submitting a .blend file. A completed asset involves all of the surrounding work to enable the next person in the pipeline to effectively drag-and-drop the asset into the scene, and have everything just work.
What's expected?
For a 3D game, a finished asset includes:
Art Source Content:
- A .blend source file for the high-res model checked into the `art-source` repository:
- file in the right place with the correct 'snake_case' naming convention.
- A collection inside the file named correctly for the asset.
- A .blend source file for the low-res model checked into the `art-source` repository:
- file in the right place with the correct 'snake_case' naming convention.
- A collection inside the file named correctly for the asset.
- A "collection exporter" set up for the asset saved with the correct export settings, with the export path pointed at the correct location in the `game` repository.
- UV unwrapped correctly.
- Materials assigned correctly.
- Topology prepared for game:
- No n-gons
- Reasonable polycount
- other validation. - TODO add more about validation.
- A set of input 'mesh maps' saved as .png files in the same folder:
- asset_name_mesh_id.png - ID map
- asset_name_mesh_world_normal.png - High-res world space normal (16 bit depth).
- asset_name_mesh_tangent_normal.png - High-res tangent space normal (16 bit depth).
- asset_name_mesh_ao.png - High-res ambient occlusion
- asset_name_mesh_curvature.png - High-res curvature
- A textures set of baked output textures channel packed and saved as .png files in the same folder:
- asset_name_abedo.png - (Color map aka "Base Color")
- asset_name_normal.png - (16 bit)
- asset_name_orm.png (Channel packed Occlusion, Roughness, Metallic).
In-Game Content:
- A pair of asset_name.gltf + asset_name.bin files exported into the `game` repository via the "export collection" in the source .blend file.
- One or more materials for the model:
- asset_name_mat.tres
- OR e.g:
- asset_name_head_mat.tres
- asset_name_body_mat.tres
- asset_name_armor_mat.tres
- All textures from the model's texture set imported with the correct settings:
- asset_name_albedo.png
- asset_name_normal.png
- asset_name_orm.png
- A scene for the asset:
- asset_name.tscn
- Simple colliders assigned:
- SphereShape3D
- BoxShape3D
- CapsuleShape3D
- CylinderShape3D - NOTE: this is reportedly buggy, we need to test it before approval, use Capsule instead.
- If absolutely necessary:
- ConvexPolygonShape3D
- ConcavePolygonShape3D
- LODs created or generated for the model.
Naming Conventions
All art files should use `snake_case`: all lower case letters, with underscores to separate words.
Exceptions:
* It's okay to leave reference images with their default name, just keep them in the `reference` folder next to the asset.
All content within a .blend file should be named correctly.
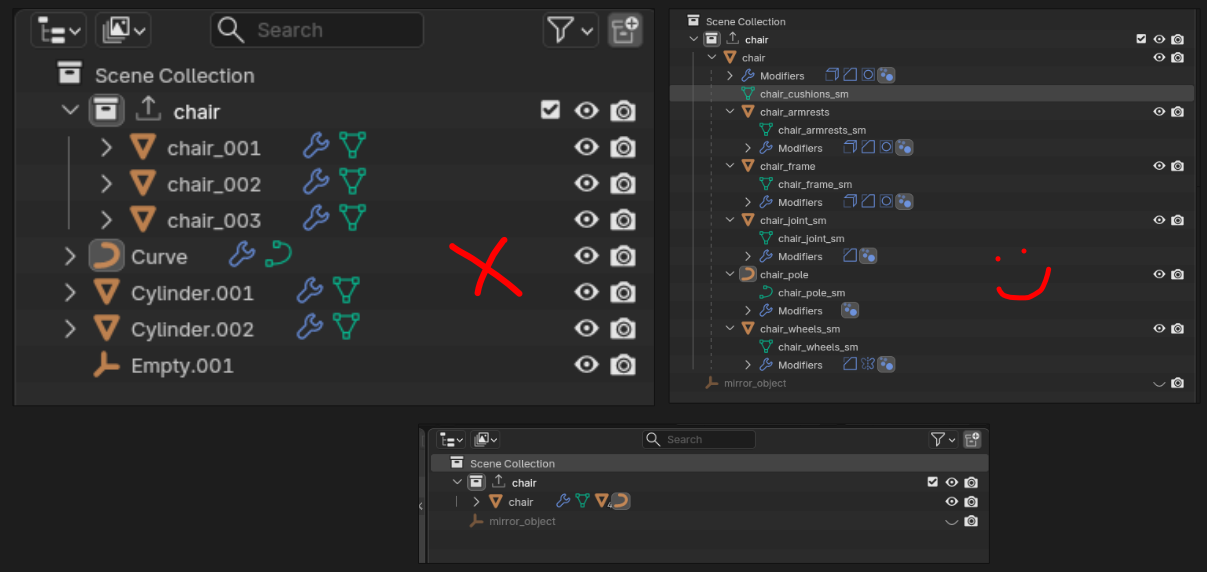
Please name EVERYTHING in your outliner DO NOT leave things as "cube.001/cube.002" when naming in your outliner, use the conventions asset_name_suffix with one of the following suffixes. (e.g. fire_extinguister_sm)
# In .Blend Files:
"_sm" - static mesh
"_sk" - skeletal mesh
"_mat" - material
"_basecolor" - base color texture
"_normal" - normal map texture
"_ao" - ambient occlusion texture (mesh map)
"_curvature" - curvature texture (mesh map)
"_orm" - channel-packed texture containing Ambient Occlusion, Roughness, and Metallic maps
# Blender Output Maps:
"_albedo.png"
"_normal.png"
"_orm.png"
# Blender File export:
".gltf"
".bin"
All artwork for the game (characters/ materials/ props/ etc) will be submitted as .blend files to the GIT repo
[BAD EXAMPLES]: cube.001 / New Material Ball / 111.blend
Name file and place in the appropriate directory
Name
All art files should use `snake_case` all lower case letters, with underscores to separate words. absolutely no spaces in file names, this can break tools and pipelines.
Multi-part assets should be named with the primary part appearing in the name first e.g. dog_main, dog_collar, dog_shoes 'dog' is the descriptive part here so it comes first so that all parts are sorted together in the file system.
Directory
All art production files will be created inside of the pounce-art repository. The output of these files will be exported into the pounce-game repository. The file paths for these files will match 1:1 between the two repositories. See the game folder structure page for more info.
All art assets should go inside of the art_assets folder within each repository.
Your prop should be categorized into the appropriate sub-folder based on its type:
- props
- environments
- characters
Within this sub folder, you should create a folder named after the specific asset. All files for creating that asset should be saved in that folder. If you have reference images, make a reference folder inside of that asset's folder. In most cases, it should be one asset per .blend file. It's okay to create multiple assets within the same .blend file if they are logically grouped and it makes sense to make them together all at the same time e.g. a bunch of rocks, or a fence post + fence scaffolding.
BUGJam
└── pounce
└── pounce-art
└── art_assets
├── characters
│ └── example_character
│ ├── example_character.blend
│ └── reference
│ ├── reference.pur
│ └── reference_image.png
├── environments
│ └── example_environment
│ └── example_environment.blend
└── props
└── example_prop
└── example_prop.blendExamples
A reflective mirror object that's used as a puzzle element in the game would go here:
BUGJam/pounce/pounce-art/art_assets/props/mirror/mirror.blend
The Tanuki character that the player will play as would go here:
BUGJam/pounce/pounce-art/art_assets/characters/tanuki/tanuki.blend
| In Blender Mesh |
tanuki_sk |
| In Blender Material | tanuki_mat |
| Blender Textures | tanuki_basecolor.png |
| tanuki_normal.png | |
| tanuki_ao.png | |
| tanuki_curvature.png | |
| tanuki_orm.png | |
| Blender Output Textures | tanuki_albedo.png |
| tanuki_normal.png | |
| tanuki_orm.png |
Asset Creation - Part 1: Block Mesh
The purpose of the block mesh is to spend less than 15 minutes to create an extremely rough block out version of the model that can be used as a stand-in version of the asset. This allows us to get an early version in the game asap so that the level designers and programmers aren't blocked in their ability to do their work.
Goals
- Save a file into the correct location with the correct naming convention.
- Block out an extremely rough version of the model that vaguely looks like it could be the asset.
- Ensure scales and proportions are correct.
- Name all of content inside of the file appropriately.
- Set up an export collection, and point the file path to the in-game location for the asset.
- Export it into the appropriate game folder and establish it as an asset in the game.
- Create collision for the asset in-game.
Step-by-Step
1.) Prepare / start the task:
- Check the Vikunja Art project page to see if you were given a task / find a task that you can do from the to-do list.
- Refresh the page and make sure nobody else is already working on the given task before you assign it to yourself.
- Assign the task to yourself:
- Assign to user -> Type your name, accept.
- Move the task to the 'in progress' column, to let the team know you're actively working on it.
2.) Check your Git working directory (pounce-art):
- Have the Working with Git page at the ready.
- Open the
pounce-artrepo in SourceGit. - Make sure you have no uncommitted files in the 'Local Changes' section.
- Go to the 'History' section and sure you have the
devbranch checked out. If you don't already have a localdevbranch, right click onorigin/devand choose "Checkout origin/dev..." - Use the default settings and click 'OK' to create local copy of the
devbranch. - Pull the latest changes from origin.
-
Check that you have `dev` as your working branch- not `main`!
3.) Make the Blender file:
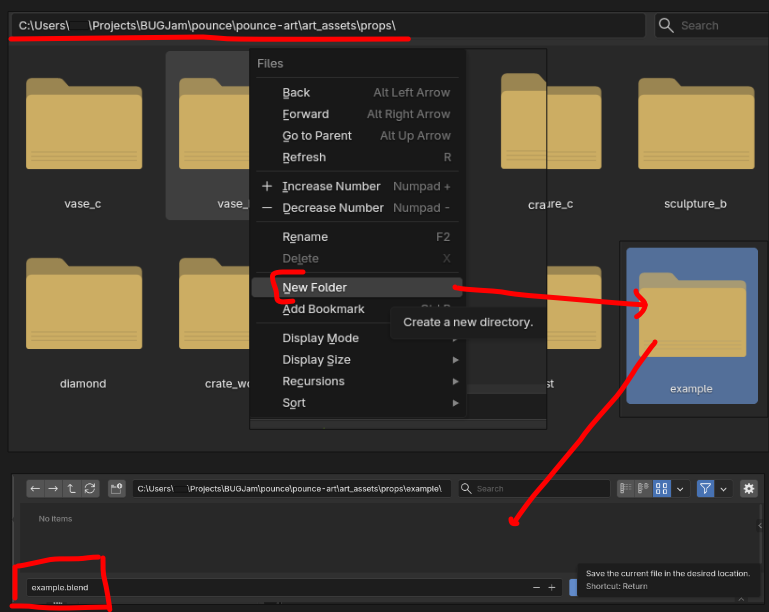
Have the Game folder structure at the ready. Start in the pounce-art repository.
- Determine the asset type:
- characters - A rigged an animated character (robot, security camera, tanuki)
- environments - Static assets to build the environment (walls, floors, trim, windowsills)
- props - Items that can potentially be moved around in the game (vase, crate, sign, coins, statues, diamonds)
If you are making a prop, you'd navigate to" pounce/pounce-art/art_assets/props
- Create the folders for your asset.
- e.g.
pounce-art/art_assets/props/crate_wood - Read more about naming conventions and files paths
- Immediately save the file into asset folder that you created a moment ago.
- e.g.
pounce-art/art_assets/props/crate_wood/crate_wood.blend - Follow the Naming Conventions.
- Do NOT include things like "WIP" or "Blockmesh" in the name, always use the final name for the asset
- e.g.
- e.g.
-
choose asset type
-
create new folder in correct location named after the asset
-
save the .blend in that new folder named after the asset ( example.blend / wood_crate.blend)
4.) Make the Block Mesh:
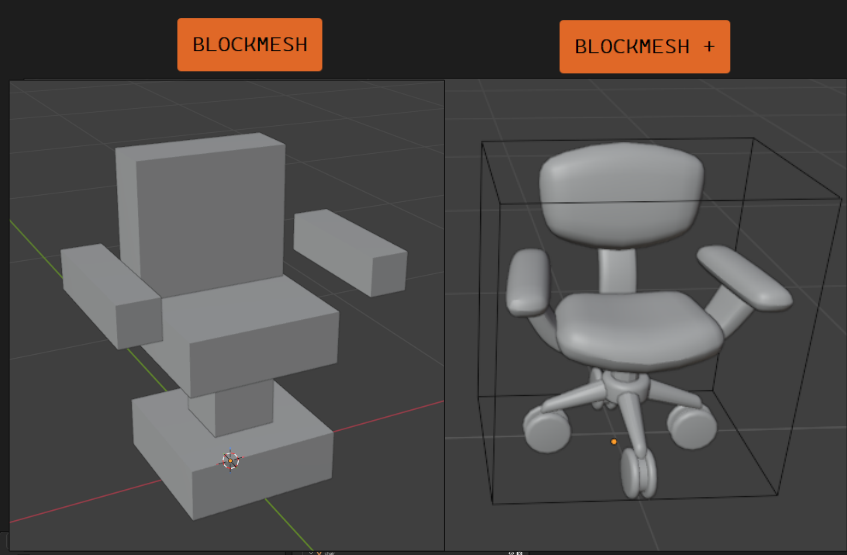
A block mesh functions as a bounding box + rough shape for your asset, this allows us to apply physics to the object, and start using it to develop scenes + game mechanics right away. You should be able to tell what it is by glancing at it- but its far from detailed- like this chair
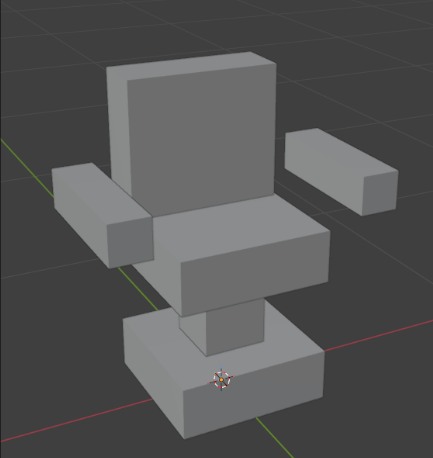
- Use modeling tools to create an extremely rough block out of the mesh (don't spend more than 10 minutes):
- Keep it extremely simple, focus on scale and proportions.
- Keep in mind the point is to establish the bounds /size / dimensions / proportions of the model.
- Match the dimensions that were given in the task assignment.
- You can use the sidebar's item tab to type in exact dimensions.
- Use primitive shapes.
- For a crate, use a cube.
- For a fire extinguisher, use a cylinder with a sphere on top.
- Keep the poly count low so we don't bog down performance in the game.
- Make sure all content inside of the .blend file is organized and named correctly.
- Ensure that the object is located at the world center with the bottom of the mesh sitting on the floor (z 0) and that the origin point of the object is at it's lowest center point- blender's default where the origin point is in the exact center of the mesh will cause the object to clip through the floor in the game engine
- Ensure asset is centered and sitting on the floor (not below the grid).
- Make sure that you're oriented correctly forward.
- Negative Y axis is forward, Positive Z is up (Note: these axes will be different inside of Godot).
- Tip: Add a Suzanne monkey to the scene, check which was she if facing; Your mesh should face the same direction.
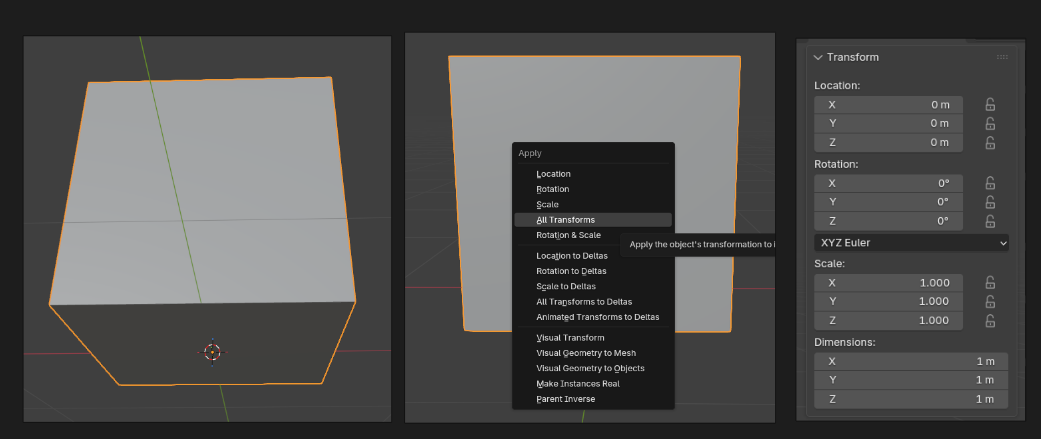
- Apply all transforms.
- Keep it extremely simple, focus on scale and proportions.
-
Create something very simple that is the size + approximate shape of your asset (no more than 15 minutes)
-
Set the objects origin to the lowest center point of the object
-
Check that the object is sitting on the floor and not clipping below
-
Apply all transforms
5.) Create a collection for the asset + clean up outliner:
-
Create a new collection + name it after your asset
-
move the block mesh into this collection

-
- Name all objects and mesh data with _sm (see example above)
- Remove lights, camera, annotations, and other unneeded junk.
- Tip: Use the "Blender file" view in the Outliner to help find and remove junk.
- You can also use File -> clean up -> purge unused data
- Do not pack textures or other large assets into the .blend file
6.) Set up the collection exporter
You only have to set this up once during the block mesh phase. Subsequent phases will re-use the same settings.
-
- Select the asset's collection, go to the 'Collection' tab in the 'Properties' editor.
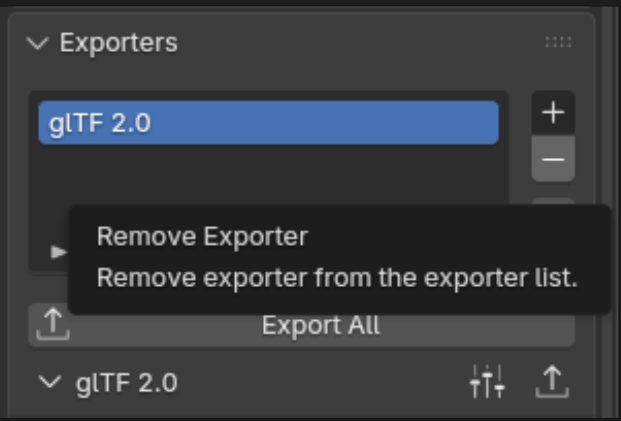
- Find the 'Exporters' sub-section, click the '+' button on the right, and choose 'glTF 2.0'
- Set the 'File Path':
- Point the path to the equivalent folder in the pounce-game repo
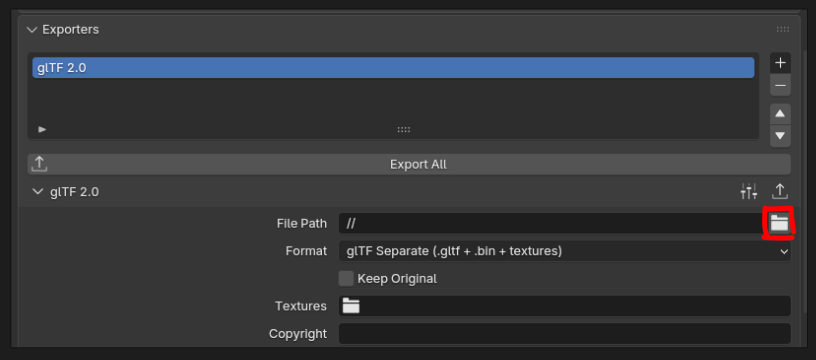
- TIP: start with the current .blend file's location by typing two forward slashes "//" for the File Path, then click the browse button (// is short hand for the current .blend file location.)
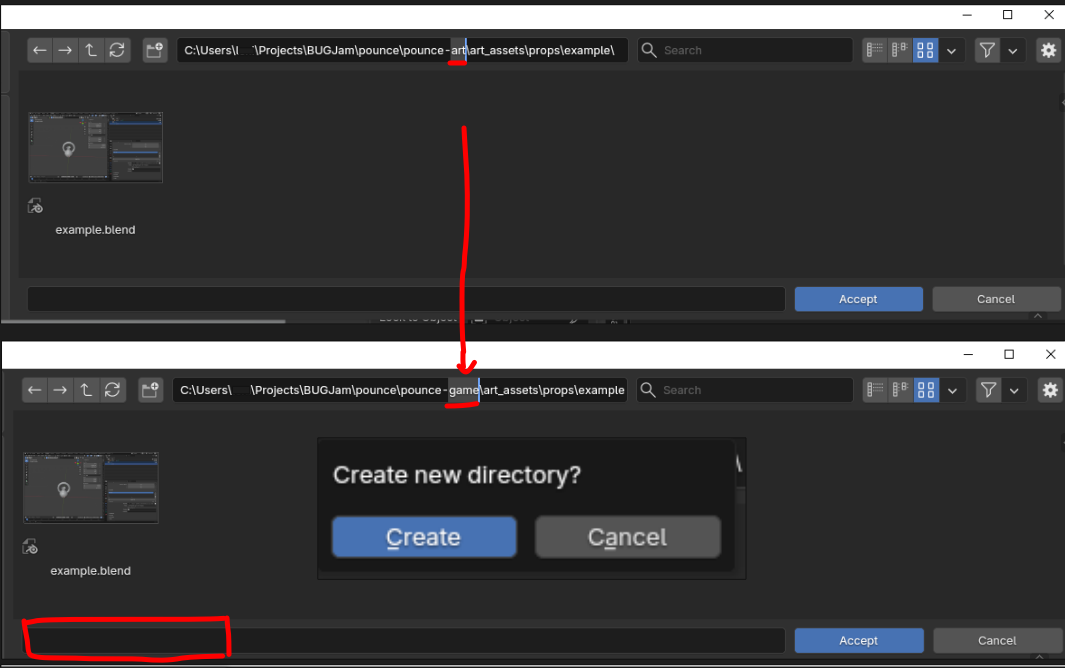
- Once the file browser opens to the location of the current .blend file, swap the "-art" for "-game" in the file path to send it over to the other repo.
- Use the default 'Relative Path' option, it will look like this:
//../../../../pounce-game/art_assets/props/crate_wood/crate_wood.gltf
- Do NOT use absolute file paths, which look like this:
/home/xgreer/Projects/BUGJam/pounce/pounce-game/art_assets/props/crate_wood/crate_wood.gltf
- Make sure you add the ".gltf" file extension
- Point the path to the equivalent folder in the pounce-game repo
- Set the 'Format': to 'glTF Separate (.gltf + .bin + textures)'
- Enable 'Collection' -> 'Export at Collection Center'
- Enable 'Data' -> 'Mesh' -> 'Apply Modifiers'
- Set 'Data' -> 'Material' -> 'Materials' to 'Placeholder'
- Note: We will handle proper material assignments in Godot during later asset creation phases.
- For static meshes (things without animated bones):
- Uncheck 'Data' -> 'Shape Keys'
- Uncheck 'Data' -> 'Skinning'
- Uncheck 'Data' -> 'Animation'
- For skeletal meshes (things with animated bones):
- Check 'Data' -> 'Armature' -> 'Use Rest Position Armature'
- Check 'Data' -> 'Armature' -> 'Export Deformation Bones Only'
- Check 'Data' -> 'Armature' -> 'Remove Armature Object'
- Save the .blend file.
- Don't commit to the repo yet, follow the next steps and make sure the export works first.
-
select collection and add a new exporter in the properties panel under 'collection properties'
-
in file path option type "//" to direct the file to the relative path
-
select the little file icon to specify the file path, replace "pounce-art" with "pounce-game" and create new directory
-
in this new directory name the file the same as the asset + but with '.gltf' ( example.gltf | wood_crate.gltf)
-
double check settings and ensure that the format is set to glTF Separate NOT glb
-
Click the 'Export All' button in the collection exporters section + save your blend file
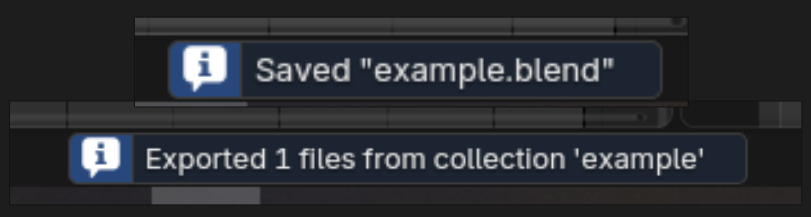
If there are multiple assets in this .blend file, make a collection for each asset (a handle that is a separate object on a mug is not a new asset, a new asset would be a mug + a plate, the mug would need a collection and the plate would need a collection, the mug collection would hold both the mug object and the handle object) . + each new collection will need its own exporter
7.) Add block mesh to game
IF YOU HAVEN'T OPENED THE GAME YET->
- Open the
pounce-gamerepo in SourceGit. - Make sure you have the
devbranch checked out. - Pull the latest changes from Origin/ Dev
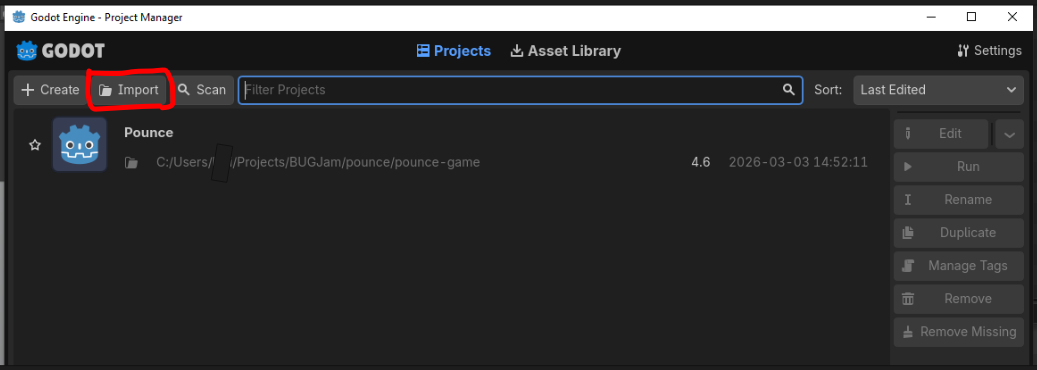
- Open Godot 4.6.1
- Click "import" and navigate to the pounce game under pounce/pounce-game
- Open the 'Pounce' project in Godot
IF YOU ALREADY HAVE THE GAME ->
- Open the 'Pounce' project in Godot
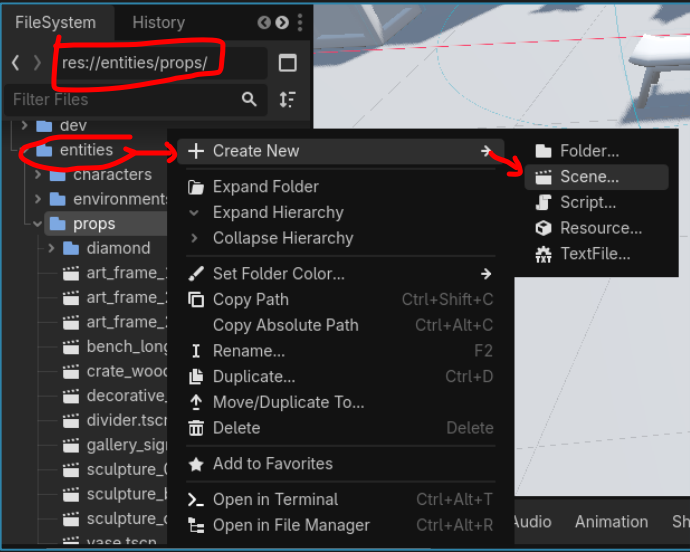
- In Godot's file system (lower left) navigate to a folder called entities
- Select the subfolder corresponding to your prop (environment / prop/ character) and right click + select "create new scene"
- In the Make an entity for your newly imported asset:
- In Godot's FileSystem, navigate to the
entitiesfolder - Open the folder for your asset type:
- characters
- environments
- props
- Right click, and choose 'Create New' -> 'Scene...'
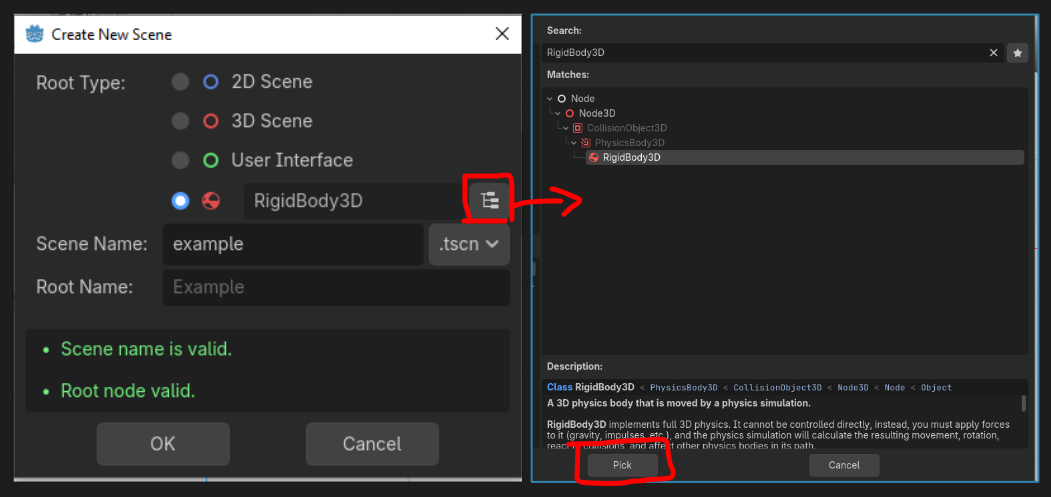
- In the 'Create New Scene' dialogue:
- Select the fourth circle option to select a custom root node.
- Set the 'Scene Name' to match your asset:
- e.g. "crate_wood"
- Click the "Pick Root Node Type" button to the right of the fourth circle option (Its icon looks like a file hierarchy)
- Choose the appropriate node type:
- CharacterBody3D - For characters.
- StaticBody3D - For environment art that doesn't move.
- RigidBody3D - For props that can be pushed around.
- Click the 'Pick' button.
- Choose the appropriate node type:
- Click the 'OK' button.
- In Godot's FileSystem, navigate to the
- Double click to open the newly created entity scene.
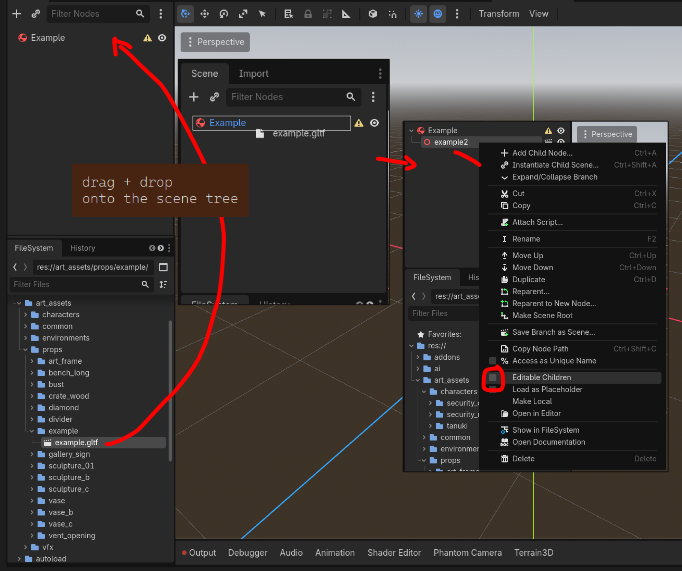
- Drag the .gltf file into the scene tree
- Right click on the node that you just dragged in, and choose 'Editable Children'
Set up Collision for the entity:
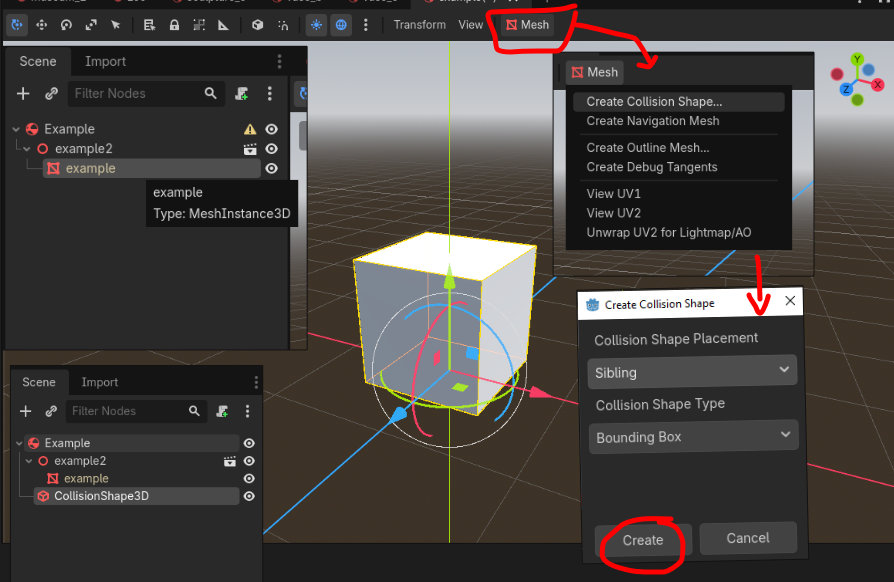
- Once you've selected editable children you will be able to edit the mesh data on the object (a red symbol that looks like a box with a slanted line)
- With the mesh data (red box) selected in the scene tree, a new mesh button will appear over the viewport
- Click that mesh button and select "create collision shape"
- In the pop-up, select 'sibling' and 'bounding box' + hit create
- Sometimes there will be little yellow warning signs in the scene tree, if that happens just click + drag the new collision shape onto the top object in the collection so that it clips in to the correct hierarchy (it will look like the example above)
- Save the .tscn file with ctrl + s
Add to Zoo Scene
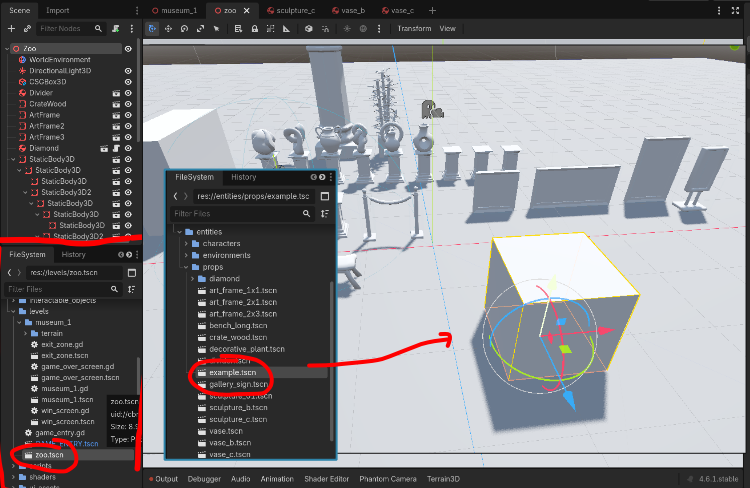
Under levels in the file system, navigate to 'zoo.tscn' and open it to view the scene with all of the game assets, then go to entities in the file system, locate your new asset tscn and click and drag it into the zoo scene to see it next to everything in the game! (yay!)
8.) Commit changes / complete the task:
-
Go to the
pounce-artrepo:- Make sure you're in the right branch:
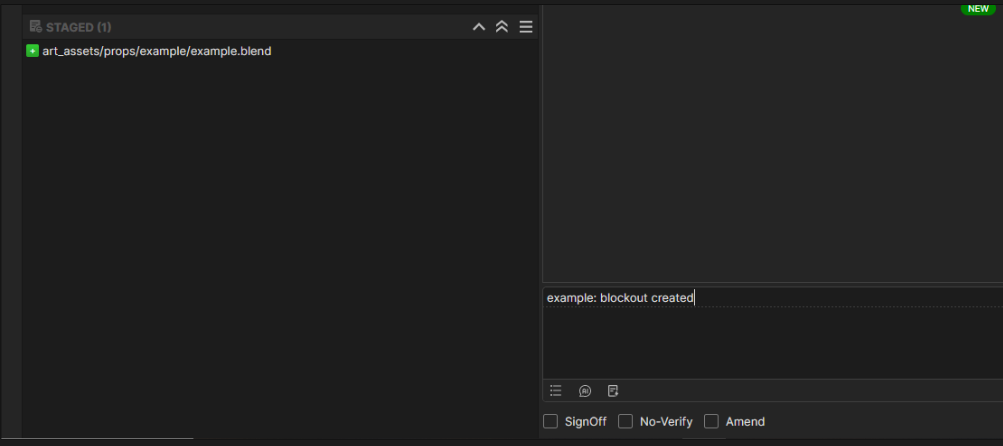
dev - Go to the 'Local Changes' section and and stage the .blend file for the newly created asset.
- Make sure you haven't staged irrelevant files.
- Write a commit message:
- Prefix the message with the name of the asset and a colon.
- e.g. "crate wood: Create block mesh"
- Prefix the message with the name of the asset and a colon.
- Push the change to origin.
- If it prompts you for credentials, enter your username and password for git.bugjam.dev
- Make sure you're in the right branch:
-
Commit to the
pounce-gamerepo:- Make sure you're in the right branch:
dev - Stage the files for the newly imported asset e.g.: THERE SHOULD BE 5 if you followed above steps
art_assets/props/crate_wood/crate_wood.bin- The binary mesh data for the exported gltf file.levels/zoo.tscn- This shows when you added the new entity to the zoo sceneart_assets/props/crate_wood/crate_wood.gltf- The text header file for the exported gltf file.art_assets/props/crate_wood/crate_wood.gltf.import- Godot import settings and UID for the asset.entities/props/crate_wood.tscn- The text-based scene file that contains the entity and it's collision.- Make sure you haven't staged other irrelevant files.
- Write a commit message:
- Prefix the message with the name of the asset and a colon.
- e.g. "crate wood: Import block mesh, set up crate_wood.tscn entity"
- Prefix the message with the name of the asset and a colon.
- Push the change to origin.
- If it prompts you for credentials, enter your username and password for git.bugjam.dev
- If it prompts you for credentials, enter your username and password for git.bugjam.dev
- Make sure you're in the right branch:
- Move a the Vikunja task to 'blockout+ in progress'
- Check the box for "Block Mesh" in the task description.
- Tell Lexi you're finished with that asset, and get approval to move on to Block Mesh Plus (please DM her or just ping her in the chat)
- congratulate yourself! that was a ton of steps!
Asset Creation - Part 2: Block Mesh Plus
The purpose of the block mesh plus is to take the block mesh to the next level. Since the asset boundaries + general shape were already established during the block mesh phase, the rest of the team may have already started using the block mesh in their gray box level designs.
Now we can take the asset closer to the final shape and silhouette. Still using placeholder pieces and block-out techniques, the finished block mesh plus model should look reminiscent of the final model and be ready for approval by the art director before refining it. If the art director asks for major design changes after this, it shouldn't be difficult to iterate on since no detail work has been done yet.
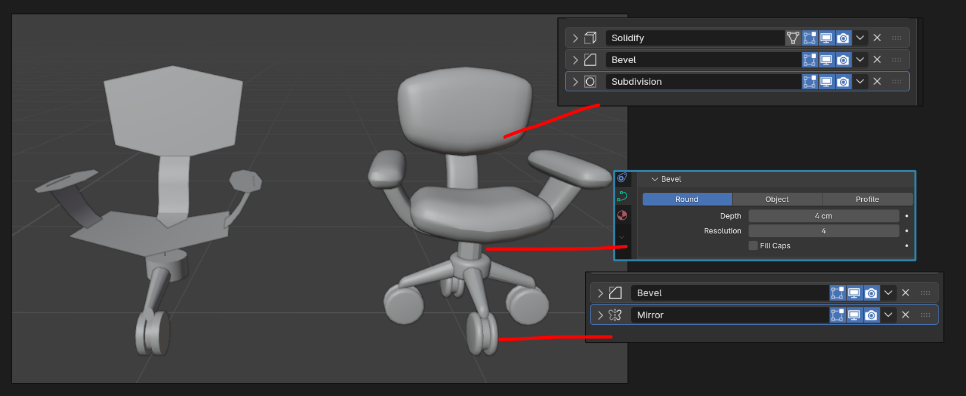
It is also best to work non-destructively, using modifiers whenever possible to make style passes / changes easy and painless. Review the style guidelines before starting
Goals
- Update the block mesh model to get to the desired shape, silhouette and style of the model.
- Name all of content inside of the file appropriately.
- Re-run the 'export all' operator on the export collection, to update the mesh in the game asset.
- Update collision for the asset in-game if needed.
- Check in all of the changes to the respective repositories.
- Get feedback from the art director (Lexi aka Pixel)
Step-by-Step
Prepare / start the task:
- Check the Vikunja Art project page make sure the task is assigned to you.
- Move the task to the 'blockmesh + in progress' column, to let the team know you're actively working on it.
Check your Git working directory (pounce-art):
- Have the Working with Git page at the ready.
- Open the
pounce-artrepo in SourceGit. - Make sure you have no uncommitted files in the 'Local Changes' section.
- Make sure you have the
devbranch checked out. - Pull the latest changes from Origin.
Update the block mesh model:
You should...
- Use techniques that are easy to iterate on:
- Make the model out of multiple objects that are easy to move around
- Mirror modifier for symmetrical parts
- Make pipes, tubes, hoses, etc out of curves with modifiers for thickness so they can be adjusted
- Repeated parts made from mesh instances
- Simple custom geometry nodes for mesh generation (if it's faster than doing it by hand)
- Focus on silhouette, proportions, and matching the style guide.
- Try to match the concept art (if concept art is provided).
- Save the .blend file when you're done
- For complex assets it's okay to do multiple commits to the pounce-art repo as long as each one represents tangible progress. Please don't check in every time you move a vertex or two, these files sizes add up fast with each commit.
You should not...
- Add small details / wear and tear
- Spend time on final topology / edge flow
- UV unwrap (automatic smart UV project is fine since it doesn't take any time).
- Make materials / textures
Clean up the scene:
-
Same as we did in the Block Mesh phase, but there might be new mesh pieces now, so double check everything.
-
Ensure asset is centered and sitting on the floor (not below the grid).
-
Make sure that you're oriented correctly forward.
-
Negative Y axis is forward, Positive Z is up (Note: these axes will be different inside of Godot).
-
Tip: Add a Suzanne monkey to the scene, check which was she if facing; Your mesh should face the same direction.
-
-
Apply all transforms.
-
Name all objects and mesh data.
-
Remove lights, camera, annotations, and other unneeded junk.
-
Tip: Use the "Blender file" view in the Outliner to help find and remove junk.
-
You can also use File -> clean up -> purge unused data
-
Do not pack textures or other large assets into the .blend file
-
Export the model:
- The great thing about the export collection that was set up in the block mesh phase, is that it's already ready to go, including the correct file path. Just re-run the exporter and overwrite the in-game asset.
Update collision:
- If there were substantial changes to the model the collision from the first version might not line up correctly anymore. Take a moment to update that in-game
Commit changes / complete the task:
All changes to the .blend file need to be checked into the pounce-art repository. And the newly exported mesh / collision update need to be checked into the pounce-game repository.
Now that the asset has been pushed to the server, the art director will have access to it. Contact Lexi to let her know it's ready for review. If she has feedback for you, make the appropriate adjustments and repeat steps 1-5 as needed.
-
Commit to the
pounce-artrepo:- Make sure you're in the right branch:
dev - Stage only the .blend file for the newly created asset.
- Make sure you haven't staged irrelevant files.
- Write a commit message:
- Prefix the message with the name of the asset and a colon.
- e.g. "crate wood: Create block mesh"
- Prefix the message with the name of the asset and a colon.
- Push the change to origin.
- If it prompts you for credentials, enter your username and password for git.bugjam.dev
- Make sure you're in the right branch:
-
Commit to the
pounce-gamerepo:- Make sure you're in the right branch:
dev - Stage the files for the newly imported asset e.g.:
art_assets/props/crate_wood/crate_wood.bin- The binary mesh data for the exported gltf file.art_assets/props/crate_wood/crate_wood.gltf- The text header file for the exported gltf file.entities/props/crate_wood.tscn- The text-based scene file that contains the entity and it's collision- wont appear in local changes if you haven't made any updates to the bounding box- Make sure you haven't staged other irrelevant files.
- Make sure you're in the right branch:
art_assets/props/crate_wood/crate_wood.gltf.import - if you see a new import file in your local changes STOP and ask for tech help in the bugjam chat, this means that a file path is incorrect somewhere and your new export isn't directed to the entity we made in godot last step
-
- Write a commit message:
- Prefix the message with the name of the asset and a colon.
- e.g. "crate wood: block mesh +"
- Prefix the message with the name of the asset and a colon.
- Push the change to origin.
- If it prompts you for credentials, enter your username and password for git.bugjam.dev
- If it prompts you for credentials, enter your username and password for git.bugjam.dev
- Tell Lexi you're finished with that asset, and get approval to move on to the high resolution mesh
- this is the stage where you will most likely get a drawover+ notes for changes to make before moving to high res, repeat the steps to export + push after making those changes if needed until it's approved and then check off "blockmesh +" on vikunja task and move to "high-res in progress"
- Write a commit message:
Asset Creation - Part 3: High Resolution Mesh
Once the block mesh plus has been approved, it's time to refine it into a high quality high resolution mesh. There are multiple ways to do this depending on the asset you're trying to make: hard surface models tend to rely on subdivision surface workflows and geometry nodes, while organic forms tend to rely on sculpting. We should use whatever combination of techniques are appropriate.
Goals
- Create a high resolution mesh that will eventually be used to bake normals and other mesh maps.
- Save the file as a new file with the "_high" suffix: asset_high.blend
1: Create a new file for the high resolution mesh
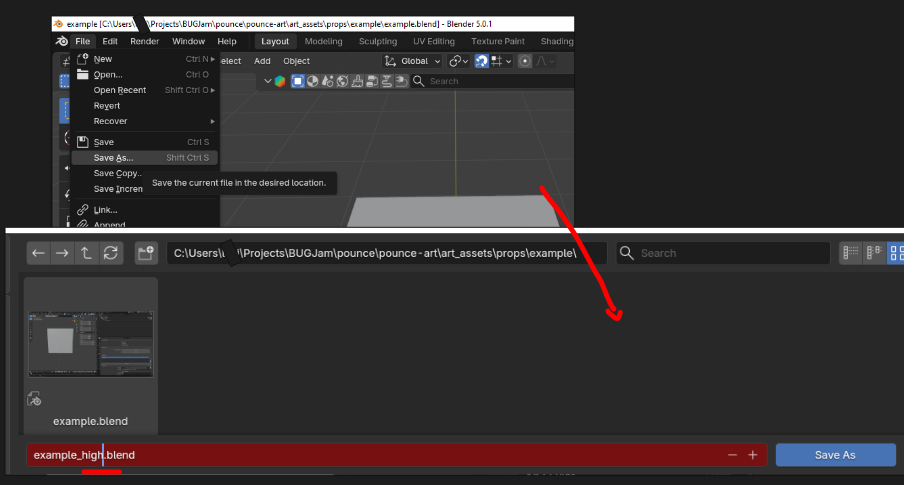
Starting from your blockout+ blend file - go to file > save as> and add '_high" to the file name, this creates a dupicate working file
This high poly mesh will NEVER be put into the game, so you can delete the collection exporter inside of this file, as well as updating the mesh data in your outliner with the suffix '_high'
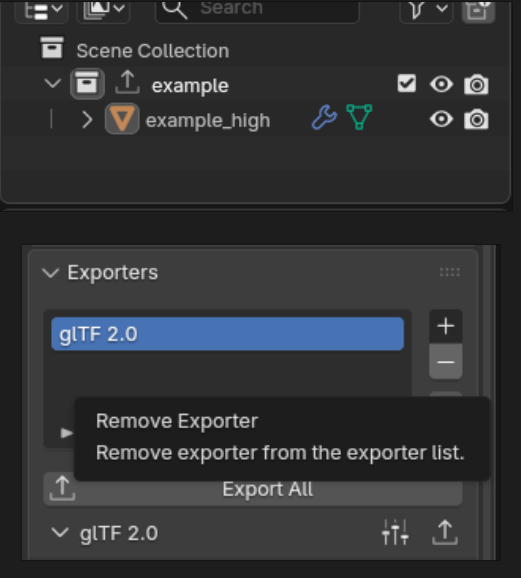
2: Create High Resolution Mesh
-
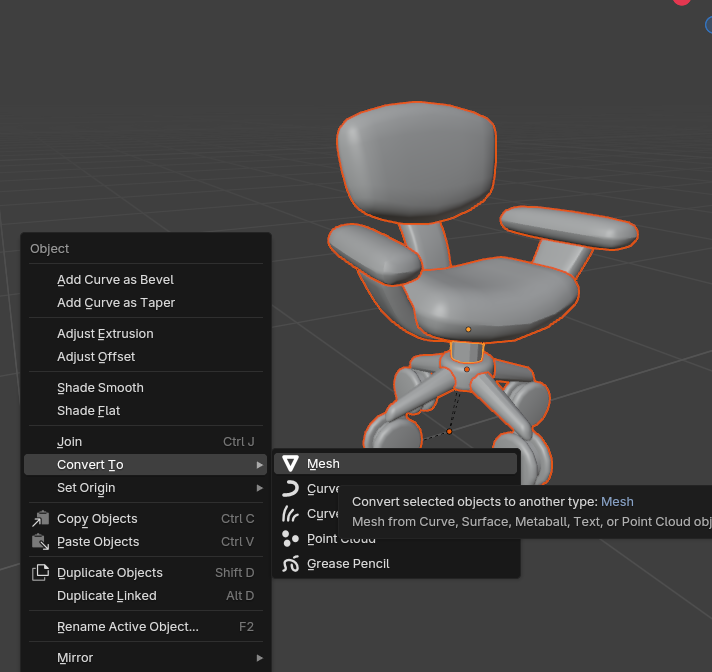
start by applying all current modifiers to your mesh (excluding instances) If you are working on a symmetrical mesh, use the mirroring effect in the sculpt workspace, and go ahead and apply any mirror modifiers
-
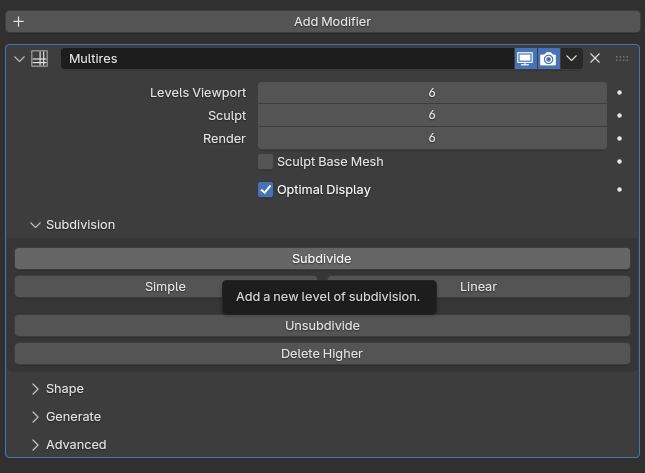
apply a multires modifier with 3-6 iterations, this increases the polygon count to a level that is appropriate for sculpting (if you find you need more when you are sculpting, just hit 'subdivide' again)
-
switch to the sculpting workspace
-
sculpt + detail your model adhereing to the style guide + following notes
-
double check origin + reapply transforms
-
set object(s) to 'shade smooth'

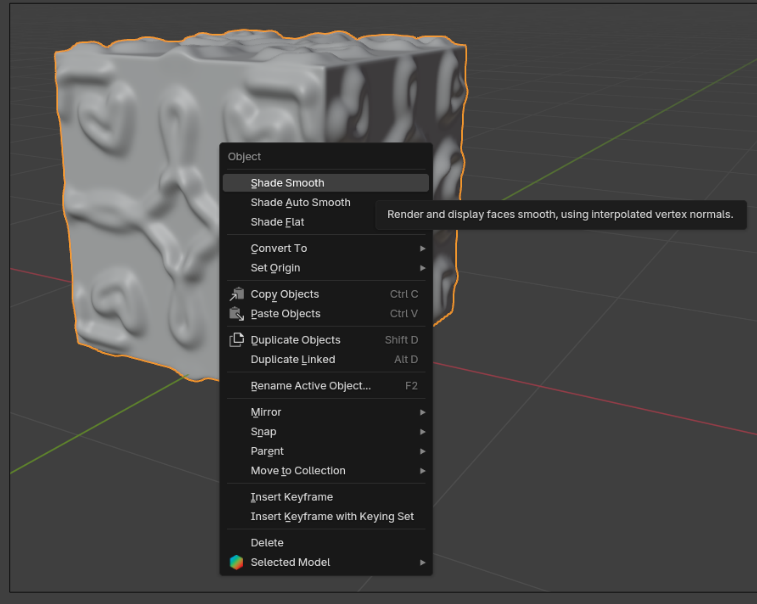
Hit ctrl + S frequently while working on the high poly mesh + sculpting! it is a very likely time for blender to crash and you don't want to lose work! when you are done, only the most recent save will get pushed to the repo so dont worry!
Polygon Notes:
We are going to be using a high - low polygon workflow, which means you can go pretty high when working on the details of your model! Poly counts + budgets arent a thing in this step, but please be considerate of the server's capacity and dont add 20 subdivs just because you can, add as many as you need to capture the details you want, but start low and go up instead of just throwing on 1 million faces
Just make sure there is enough to create a smooth surface- see below: when you see shading artifacts and little jagged edges, thats a sign to increase your subdivision level
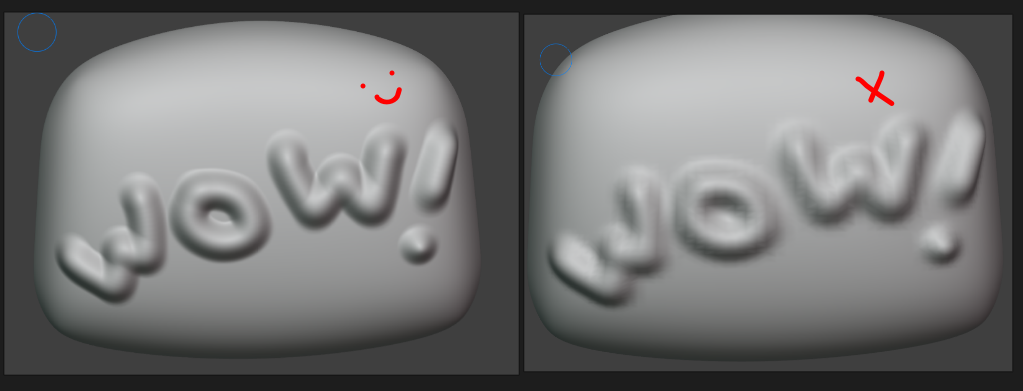
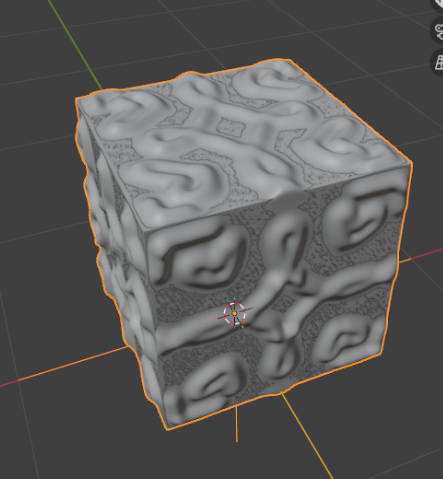
A good high res sculpt adds detail (like dents, wrinkles, seams, fur, etc.) without making noticeable changed to the silhouette or size of the object
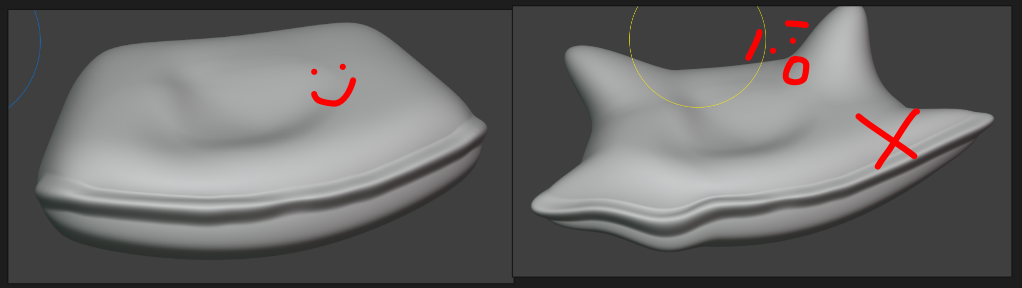
3.) Push to the repository
Commit changes / complete the task:
All changes to the .blend file need to be checked into the pounce-art repository. And the newly exported mesh / collision update need to be checked into the pounce-game repository.
Now that the asset has been pushed to the server, the art director will have access to it. Contact Lexi to let her know it's ready for review. If she has feedback for you, make the appropriate adjustments and repeat steps 1-5 as needed.
-
Commit to the
pounce-artrepo:- Make sure you're in the right branch:
dev - Stage only the .blend file for the newly created asset.
- Make sure you haven't staged irrelevant files.
- Write a commit message:
- Prefix the message with the name of the asset and a colon.
- e.g. "crate_wood: Create high res pass"
- e.g. "crate_wood: Create high res pass"
- Prefix the message with the name of the asset and a colon.
- Push the change to origin / DEV.
- If it prompts you for credentials, enter your username and password for git.bugjam.dev
- Make sure you're in the right branch:
Asset Creation - Part 4: Low Resolution / Game-Ready Mesh
Since the high resolution mesh often has hundreds of thousands, if not millions of polygons, it can't be used in-game. We need to create a low-resolution version of the mesh. Usually the involves re-topology, but we can usually get a good start by copying the high resolution mesh and removing and subdivision / multi-resolution modifiers - or working from our blockout + file
Goals
- Replace the old block mesh plus file with a mesh that has the final topology that will be used in the game.
- Name all of content inside of the file appropriately.
- UV Unwrap
- Set up materials
- re-export to game.
1: Create a new file for the low resolution mesh
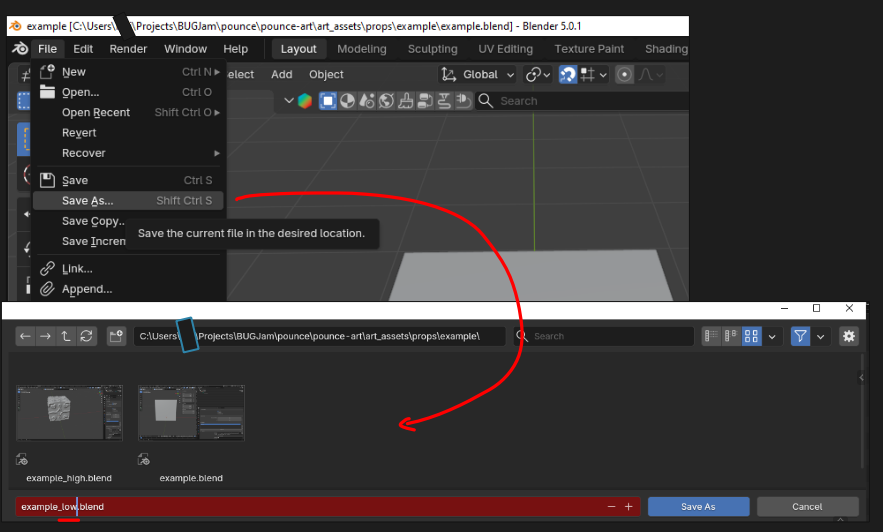
Starting from your blockout+ blend file - go to file > save as> and add '_low" to the file name, this creates a duplicate working file
This will not be put into the game, so you can delete the collection exporter inside of this file
2.) Link the High- Res Mesh to this file
In blender, go to file > Link and and a popup showing your asset's folder should appear. Double click the folder to show data inside the _high blend file
go to objects > and select the object for your high resolution mesh
Link the OBJECT data from the high resolution file
your high res mesh should appear in the same location as your blockout with some z-fighting (this is a great sign). Because it is linked in, you wont be able to edit the high resolution mesh in this file, only your new low resolution mesh.
3.) Apply Modifiers + Optimize Topology
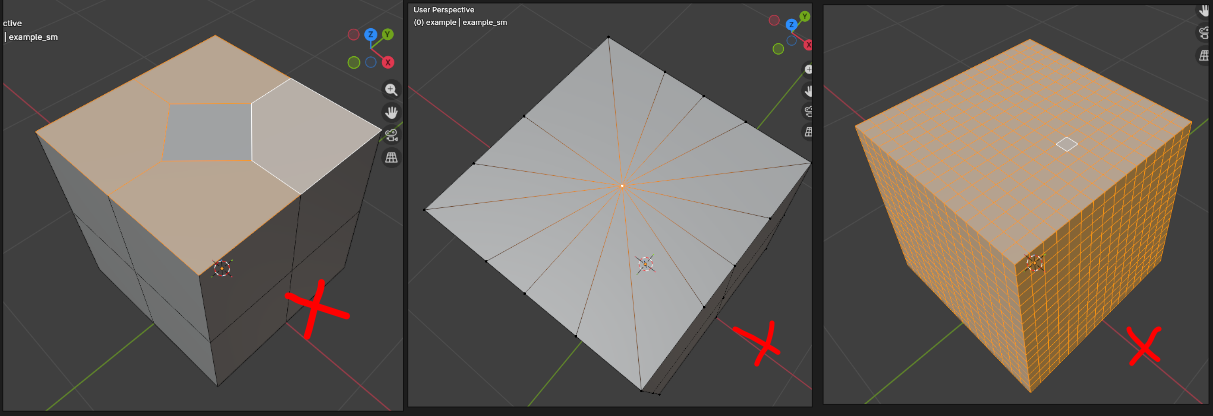
Identify where your topology needs to be repaired! Signs of bad topo are N-gons (left), poles (middle), and unnecessary loops (right)
NGONS
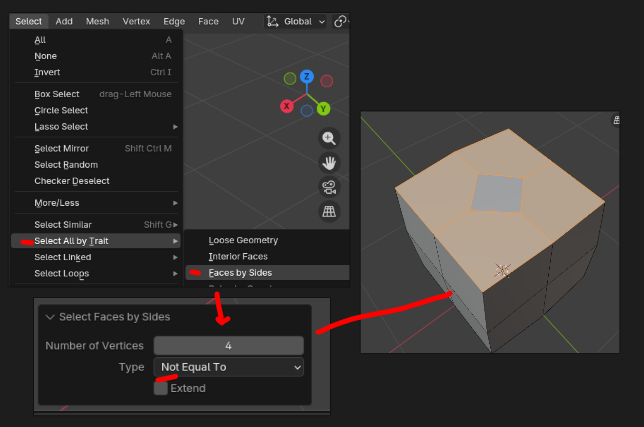
An N-gon is a face with more than 4 vertices. The easiest way to spot them is to use select > all by trait > faces by sides > not equal to and set to 4. (triangles are okay sometimes, but should be minimized or avoided when possible.
N-Gons are often caused by beveling and boolean modifiers, if those were part of your workflow always check using the above selection
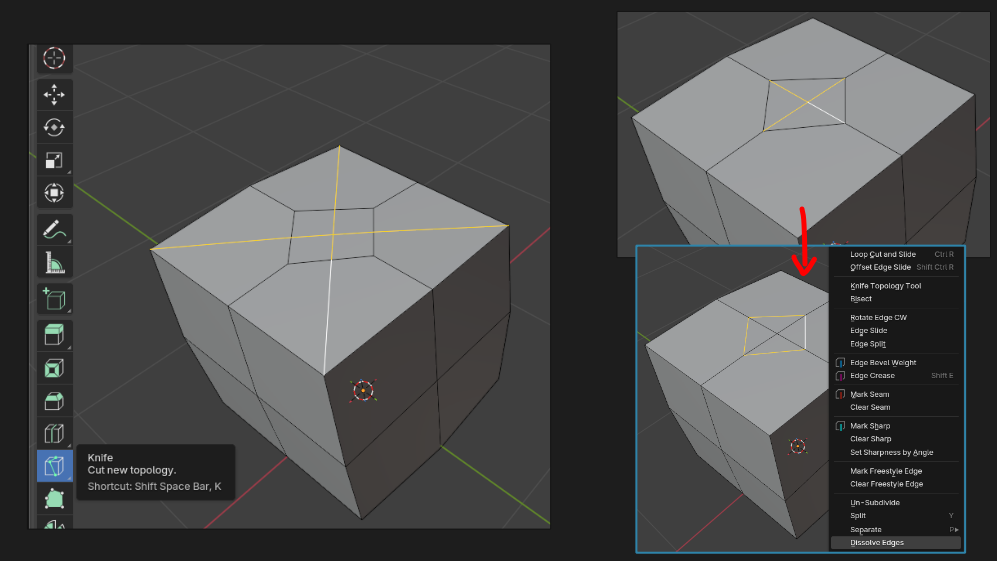
Solutions include cutting strategically with the knife tool to turn n-gons into quads (left), or re-directing edges + dissolving unnecessary cuts (right)
every time you use the knife tool make sure you are in vertex mode (1) so that the knife can snap to vertices, this is an imperfect system so always cleanup afterward by hitting m > merge by distance
POLES

poles are points where many triangle meet, that are often made by poking faces, insetting circles, and merging many vertices. They are fixed by selcting the entire series of triangles and selecting face > grid fill
keep the span low unless the extra faces are necessary for a rounded part
UNNECESSARY LOOPS
The goal is to have as few faces as possible without changing the silhouette, a cylinder that has 32 segments could be reduced to 16 for example, without significantly affecting the shape of the object. Similarly, a shape with lots of supporting loops can be reduced carefully, to leave only what is necessary for the silhouette of the object- this is also referred to as optimizing the mesh
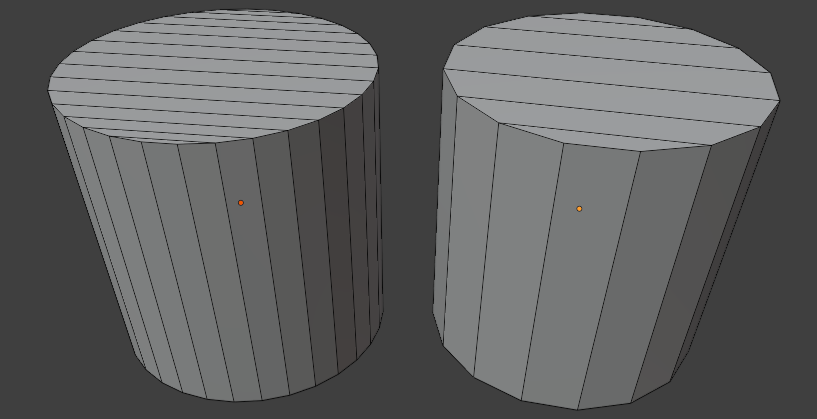
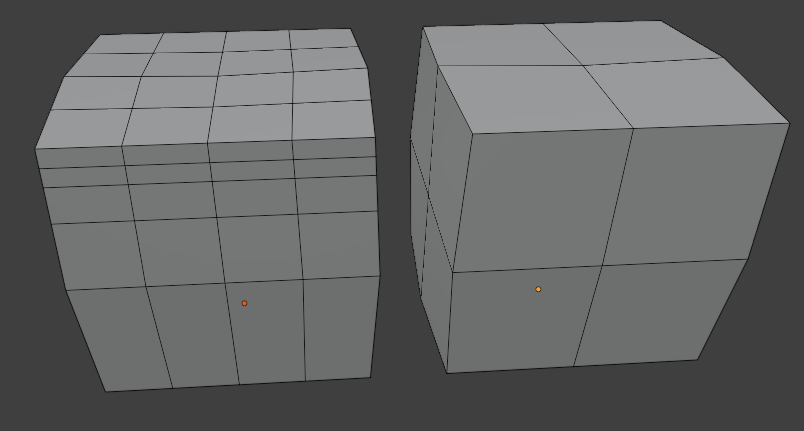
keep high poly toggled on with "retopo" enables in viewport to see where the geometry is necessary or unneeded. Also consider using a second viewport set to flat shading, with a black object + white background to easily check the silouette
3.) UV- Unwrapping
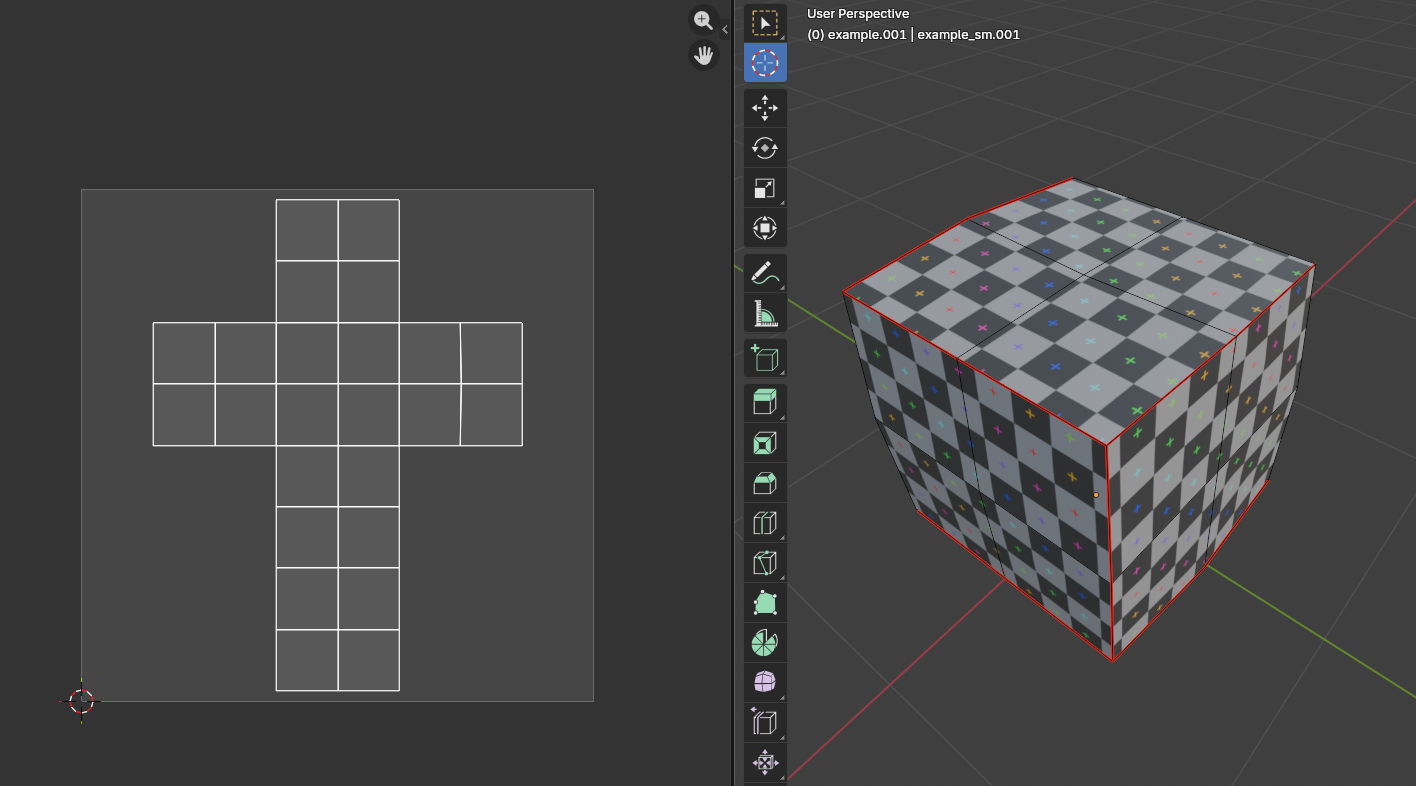
Now that your low poly mesh is done, its time to unwrap and prepare it for baking, to unwrap, cut seams on the low poly mesh strategically so that it can unwrap with minimal stretching.
Apply a checkerboard pattern to preview scale of the UV map and trouble areas, but make sure you delete the checker material after use to clean up the blend file.
A good UV map has all islands within the image space, with no faces or islands hanging outside, or overlapping
It should also be optimized, meaning you use "average islands scale" and arrange elements so there isnt excessive crowding in corners of the texture space. Also ensure that there are enough seams so that the unwrapped face isnt crammed to a small area, this allows the resolution of the texture maps to remain consistent

too close to the edge + overhanging the texture space. Fix by moving or scaling island

inconsistent island / face scale: fix with average islands scale
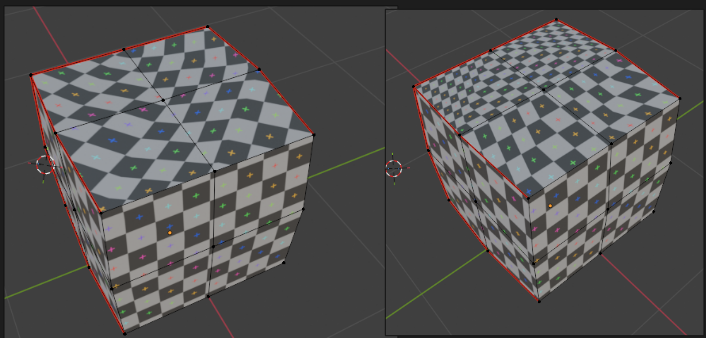
stretching / warping: fix by adjusting seam placement + re-unwrapping
4.) Push to the repository
Commit changes / complete the task:
All changes to the .blend file need to be checked into the pounce-art repository. And the newly exported mesh / collision update need to be checked into the pounce-game repository.
Now that the asset has been pushed to the server, the art director will have access to it. Contact Lexi to let her know it's ready for review. If she has feedback for you, make the appropriate adjustments and repeat steps 1-4 as needed.
-
Commit to the
pounce-artrepo:- Make sure you're in the right branch:
dev - Stage only the .blend file for the newly created asset.
- Make sure you haven't staged irrelevant files.
- Write a commit message:
- Prefix the message with the name of the asset and a colon.
- e.g. "crate_wood: Create low poly"
- e.g. "crate_wood: Create low poly"
- Prefix the message with the name of the asset and a colon.
- Push the change to origin / DEV.
- If it prompts you for credentials, enter your username and password for git.bugjam.dev
- Make sure you're in the right branch:
Asset Creation - Part 5: Baking Mesh Maps
For the materials we will extract information from the high resolution model and apply it to the low resolution model. This information can be used to mix materials and make the assets look professional.
Goals
- Bake mesh maps from the high poly to the low poly mesh
- Use mesh maps to mix PBR materials / create smart materials
- Export final texture set
- Create in-game materials
1) Start in your asset_low file with the high resolution mesh linked
If you followed last steps, this is very easy to do! If not, revist the last page andmake sure your assset_low file is completely ready to bake. that means it has
- Optimized + Clean Topology
- It is already UV unwrapped
- The High res mesh is linked in and overlapping the low res mesh
2) Make sure you have a current working version of the bakery
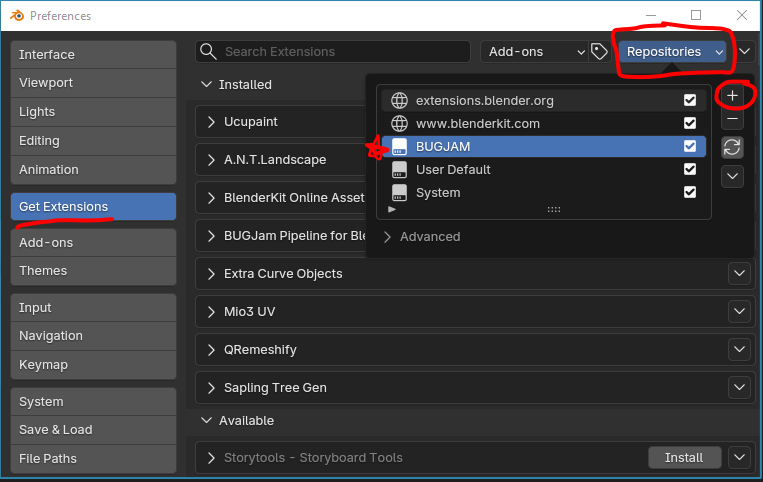
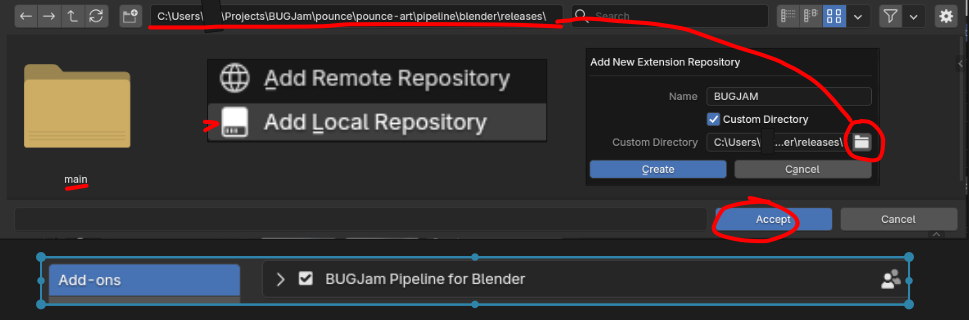
To make sure you have the most up to date version of the bakery
Edit > Preferences > Get Extensions , then in the repositories menu, hit the little plus icon
Select "Add Local Repository", name it "BUGJAM", check "custom directory" and then, after clicking the file icon, you can select the directory with the blender pipeline that should look as follows
Users............\BUGJam\pounce\pounce-art\pipeline\blender\releases\
Hit Create, done! You should see 'BUGJam Pipeline for Blender Users" now listed as installed
IF it is greyed out, navigate to your add-ons (still within preferences) and check the box next to the pipeline to enable it
Hit "save preferences" and then restart blender
if you have manually downloaded the bakery as a zip file, delete it or disable it in blender add-ons and follow this installation path instead, this way bug fixes come through automatically
3) Set up the Bakery + Bake
Make sure both objects are set to 'shade smooth'
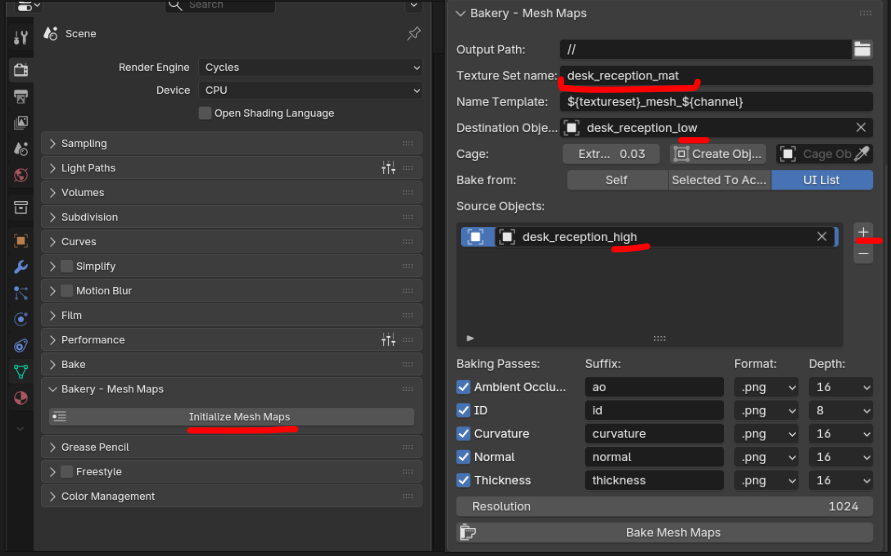
At this step, the bakery will be located in your render properties panel, scroll down to bakery - mesh maps and hit "initialize"
Then, setup is fairly simple, check that output path is going to the same folder as your blend file
then name the texture set the same as your object but with '_mat'
DO NOT change the name template
Under destination object, select your _low mesh | Under source object, select your _high mesh
SAVE YOUR BLENDER FILE FIRST then hit 'bake mesh maps, this can take up to 5 minutes but if it is taking longer reach out for support
4) Check your maps
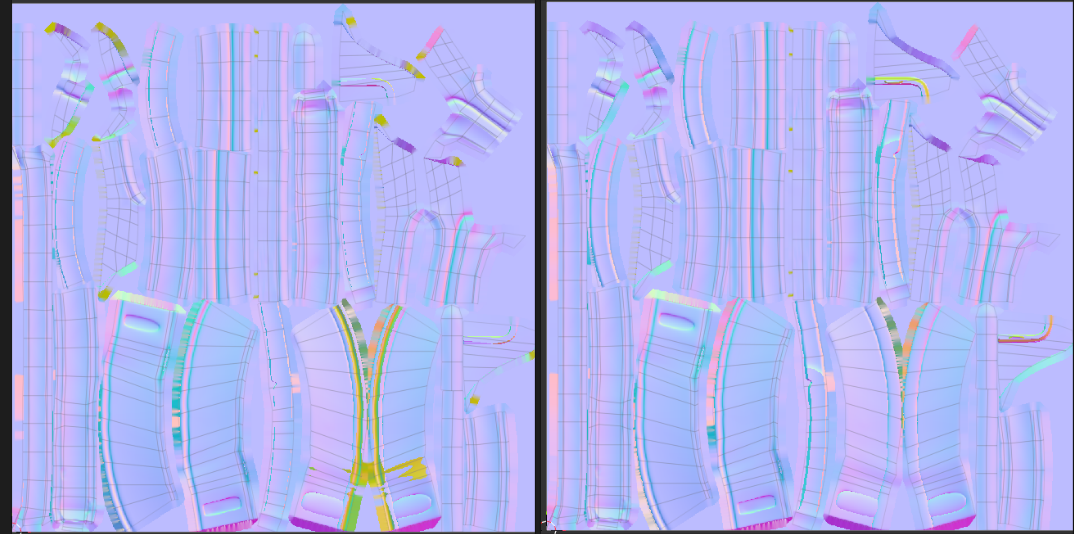
The easiest way to spot changes is with your normal map, if you see lots of yellow, that means the bake missed those areas, this is easy to fix by increasing the extrusion amount a little bit, or by double checking your UV maps.
A tiny but of 'mustard' is expected in areas that overlap or fold over themselves in the mesh, but minimize it as much as possible.
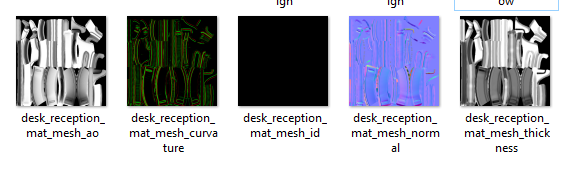
If all has gone well, you should have 5 maps baked into your asset folder. Save your .blend file again
Go ahead and make a push to the repo with these to make sure nothing gets lost. The commit message can be "Mesh Maps Baked"
Asset Creation Part 6: Applying Textures
1) open your original .blend file
Go ahead and delete the original blockmesh
Import your low poly mesh by going to file > append
select the _low.blend version of the asset, then navigate to objects and select the object
2) Set up the asset library
In edit > preferences > file paths
hit '+' to add a new asset library path, and navigate to the texture library for this project
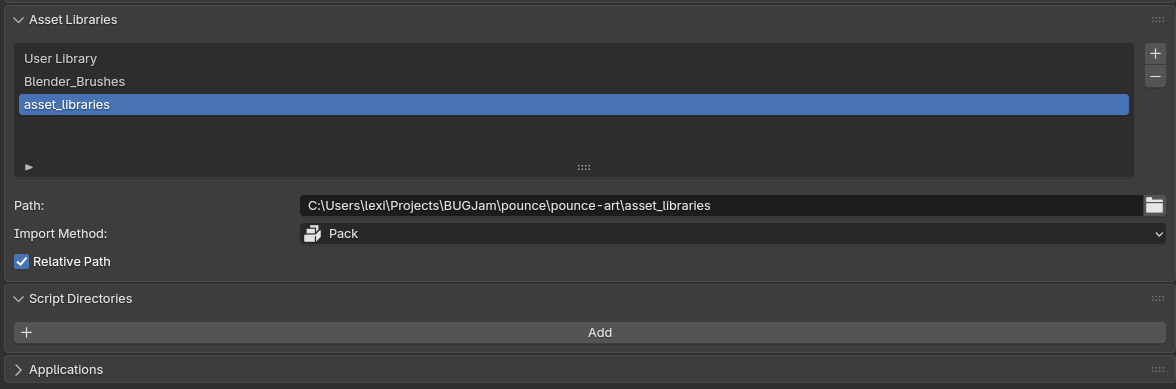
users...\BUGJam\pounce\pounce-art\asset_libraries
then save your preferences
3) Set up shading workspace
delete everything except for the material output in the existing texture that should have been created with the bakery
rename the texture to asset_mat
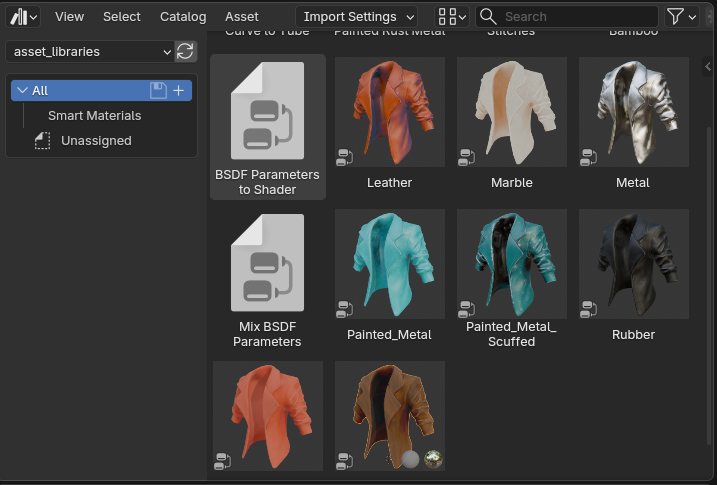
then in the upper left viewport, toggle to asset browser, and select the "asset libraries" library- you should see a bunch of cool textured jackets!
in your mostly empty material, right click and select 'setup mesh map nodes'
shift+click to select all 5 baked texture maps and import them (make sure to uncheck relative path)
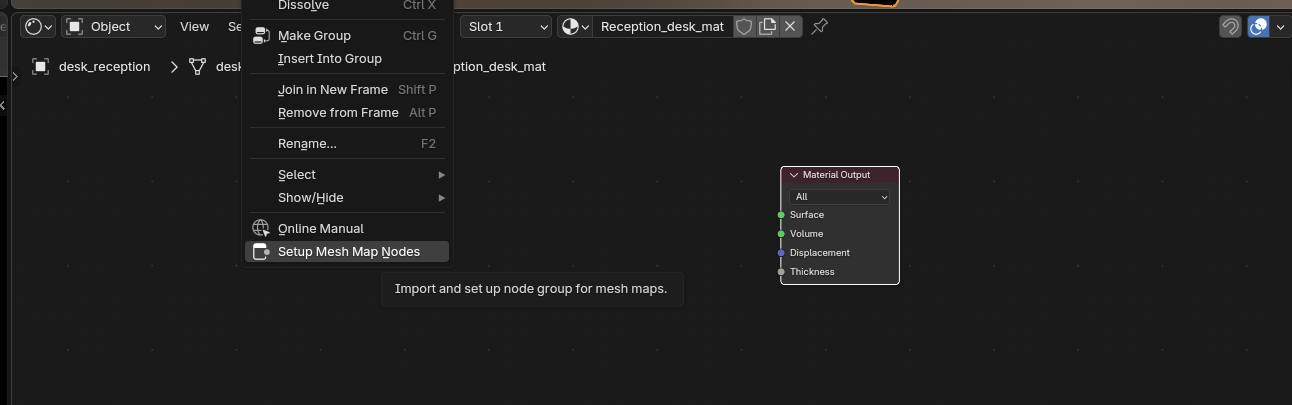
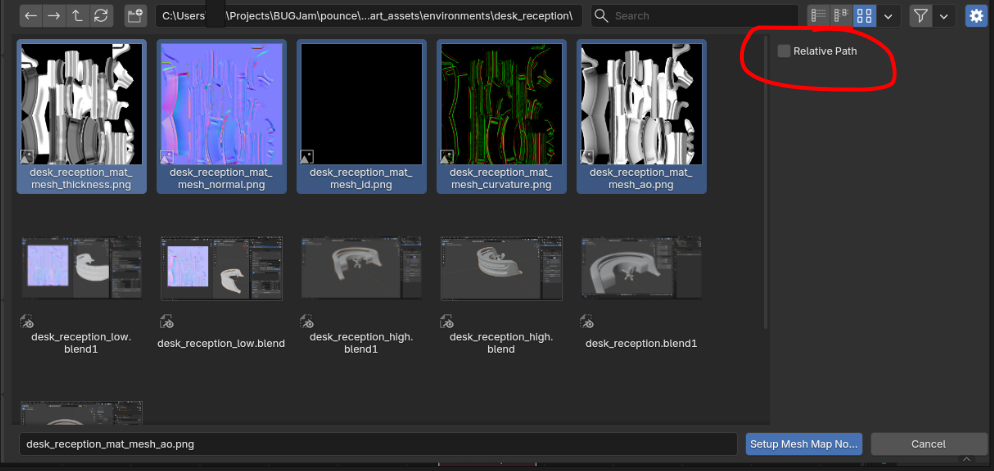
You should have two nodes now, the texture bundle, and the output
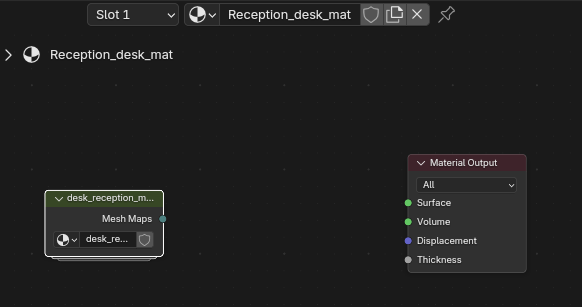
Now, back in your asset browser- drag and drop the BSDF parameter to shader node group into the shader graph and conenct it to the material output
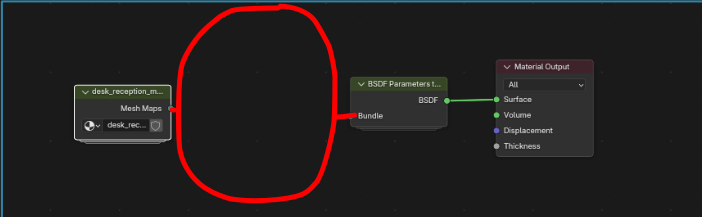
4) Set Up Material
with that added, the area in between is where you can drag + drop desired materials from the asset library! just connect the mesh maps to material node to BSDF parameters node- then you can edit the color of the material you'd like to use from the library
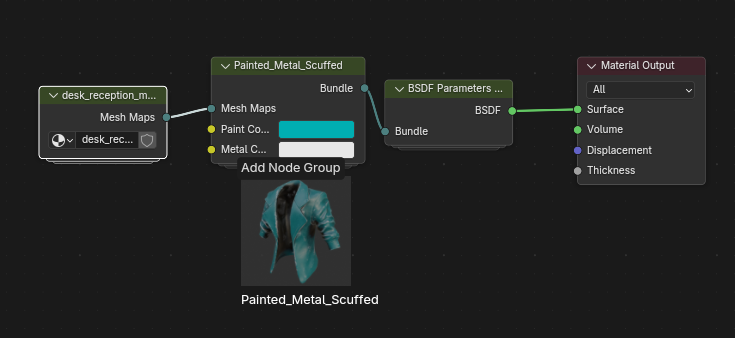
5) Bake Texture Set
in the material properties panel, there is another bakery option called "texture set" go ahead and click initialize when you are happy with the texture + color of your object
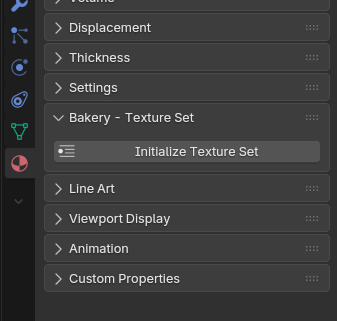
make sure to set up the file path like the original exporter, with it set to pounce 'game' instead of pounce 'art' and name it asset_mat
DO NOT edit the name template
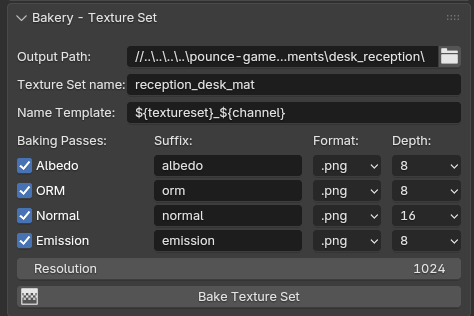
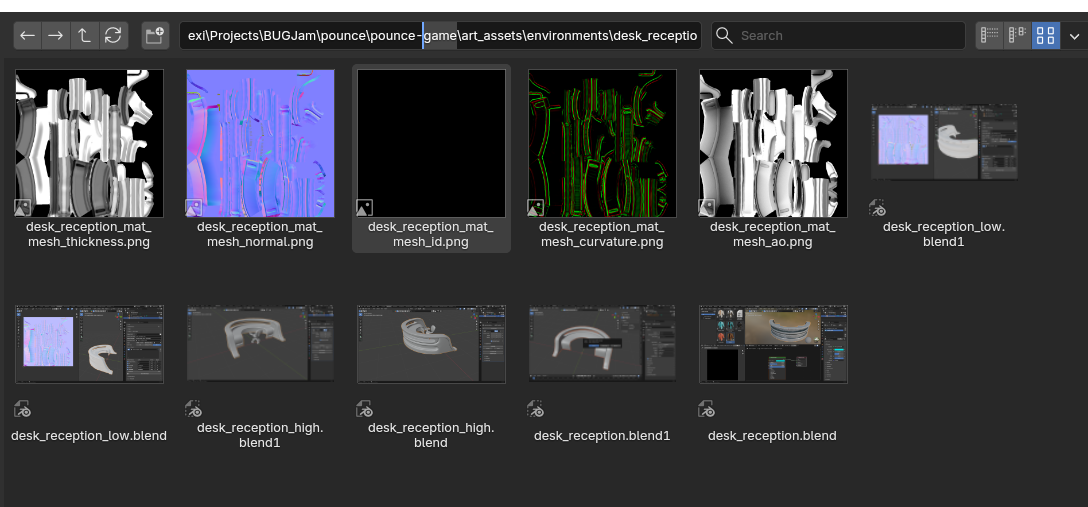
and hit bake!