# BUGJam
Documentation for the first BUGJam!
# Welcome to BUGJam!
### Come jam with us!
[](http://192.168.0.158:40214/uploads/images/gallery/2025-12/bug-jam-poster-prototype.jpg)
Check out the [FAQ](https://docs.bugjam.dev/books/bugjam/page/faq "FAQ")
Read the [Rules for Participating in BUGJam](https://docs.bugjam.dev/books/bugjam/page/rules-for-participating-in-bugjam "Rules for Participating in BUGJam")
# FAQ
## BUGJam FAQ
Frequently Asked Questions.
#### What is BUGJam?
This will be a month-long event where we work together to produce a single minimal viable polished game project with our collective skills using free and open source software.
#### Why is it called BUGJam?
The Seattle Blender User Group (SeaBUG) and the Vancouver Blender User Group (VanBUG) have been sharing Blender knowledge for all purposes. We have many users interested in game development, which includes participation in game jams.
Blender User Groups "BUG" + Game Jam "Jam" = BUGJam.
#### What's the point?
I (Xury) am a professional game developer, professor, tutorial maker, and I wear many other hats. For well over a decade I've shared my knowledge and skills with people that want to create 3D art, films, and video games. My career in the AAA game industry has given me access to professional workflows that I want to share, but these workflows can't be taught properly in isolation.
BUGJam is intended to be an environment where members of the group will have a chance to practice professional workflows and learn skills that can help you develop projects in a sustainable and technically correct way. These skills could possibly help you land a role in professional game development, since you would be expected to have these skills. (This by no means guarantees getting a job in the game industry, sorry I don't have that kind of influence).
#### Do you have an ulterior motive for doing this?
I want to prove out some of these professional workflows with a FOSS software stack. I want to know for sure that these tools will scale to a medium sized team. A lot of the software I have experience with in the AAA industry is proprietary with prohibitively expensive enterprise licenses. I hate telling people to use that software for their personal projects or their indie studios because it costs a fortune, and gets enshitified over time even if you pay for it. I'm a firm believer in FOSS, and I want first-hand experience with how these alternative tools can support a small team.
#### What's the difference between this and a game jam?
Traditional game jams have a focus on moving fast and breaking things. They are a great way to develop skills, but they don't necessarily provide any mentorship, so there's a lot more "breaking things" than there should be. If you don't already know professional workflows, a traditional game jam doesn't really do much to help that. So, rather than dozens of teams competing, this will be one group working and learning together under the guidance of a few members of the group that have professional experience.
#### This sounds more like a 'workflow jam', than a game jam.
We will make a game, but part of my inspiration for the structure of BUGJam are the game design classes that I took for my bachelor's degree. We had 15 students in our cohort who took the classes together. Each quarter we worked on projects (1-3 months per project). These projects allowed our small team to learn the workflows needed to properly produce a game. It was a great time and I want to share that experience with you while we learn and build something awesome together!
#### What "professional workflows" will BUGJam use?
- Most importantly we will use a "[Version Control System](https://docs.godotengine.org/en/latest/tutorials/best_practices/version_control_systems.html)" (VCS) AKA "Source Control" / "Source Code Management" (SCM), to manage all files in the project. Professional game development typically uses either **Perforce** or **Git**. - We will be using Git, as it is free and open source. While it's less popular for game development than Perforce is, it is a tool that you can continue to use for free in your personal projects after you learn to use it during BUGJam.
- We will be documenting the design of the game, defining standards for our work, and writing tutorials for our processes. Professionally, this type of documentation is typically done in **Confluence.** However, **BookStack** is a free and open source alternative, which you're already looking at on this webpage right now!
- We will be tracking tasks for the project, a popular professional solution for this is **Jira**. Again we will be using a free and open source alternative called **Vikunja**.
#### What skill level do I need to have?
BUGJam will be for intermediate-to-advanced users. We will be teaching many workflows during the jam, so don't worry.
However, if you've never made a 3D model before, you probably won't be able to keep up on the art team. If you've never programmed at all in any programming language before, you probably won't be able to keep up on the programming team.
#### What game engine and other software will we be using?
We are going to try to use as much Free and Open Source Software (FOSS) as possible.
See the: [software list](https://docs.bugjam.dev/books/bugjam/page/software-list "Software List").
#### How long will the jam last?
A little over a month: Four weeks + a few extra optional buffer days at the end. Since we're focusing on quality over quantity, a lot of our time will be spent making sure everyone uses professional workflows. A period shorter than a month won't be conducive to that effort.
#### When is the jam?
The jam kicks off on Thursday February 12th, and runs through Thursday March 12th.
[https://docs.bugjam.dev/books/bugjam/page/schedule](https://docs.bugjam.dev/books/bugjam/page/schedule)
#### What kind of commitment do I need to make?
Since the goal is to mimic a professional environment, we need to be able to rely on each other. Some commitment will be expected, read more here: [Rules for participating in BUGJam](https://docs.bugjam.dev/books/bugjam/page/rules-for-participating-in-bugjam "Rules for Participating in BUGJam")
#### What kind of game are we making?
Members who commit to work on the project will have a chance to [pitch their idea for the game](https://docs.bugjam.dev/books/bugjam/page/pitch-requirements "Pitching your game idea").
#### What constraints will there be for the project?
See the list of constraints here: [https://docs.bugjam.dev/link/5#bkmrk-constraints%3A](https://docs.bugjam.dev/link/5#bkmrk-constraints%3A)
# Team
Name
Discord handle / username
Skills / interests
Favorite... food? Color?
Steven N
notme84
coding / production
all breads and green
Emily
Hellpug
Drawing, modeling
oranges I dunno
Devone Reynolds
devonereynolds
Production and Tech
Fish Sticks and Green 💚
Lexi
P\_ixeL
Art Direction
coconut | blue 💙
Nate Moore
TranquilMarmot
Programming, modeling, vector graphics
bagels, green (but not green bagels)
Maera Fau Embers
KITSUNEMAESTRO
Environment and prop modeling, shaders and materials, composition
I like all colors but I especially like gold. big fan of mangos and tropical fruit :3
Turkey Pot Pie
The orange that you see when the sun shines through an orange slice
Joseph Masaki
vertenflow
Shaders, Modeling, Texturing, Programing
Blue
Pat/Paco
Pat/Paco/Pacorp
everything
food in general, orange
Sean
Sean/Robocognito
modeling, particle effects
sushi, viridian green #009698
David
davidc1874
pipeline tools, shader
blue and black
# Rules for participating in BUGJam
#### Agree to these terms:
- I will commit to a minimum of 40 hours worth of work across the one month duration of the jam.
- Note: 40 hours total, not per week. - extra is appreciated though.
- BUGJam is intended to be a learning experience, time spent learning workflows counts toward to 40 hours.
- Here's some examples of how you can put in your time:
- 2 hours in the evening of every week day.
- OR 5 hours on every weekend day.
- I will commit to joining the weekly meetings to discuss the project, and receive task assignments.
- I will perform my tasks utilizing the expected tools and pipelines:
- Write documentation on BookStack
- Use Git for handling all files
- Check Vikunja for task assignments
- Other workflows as outlined in your tasks.
- I will do the tasks that I've been assigned, and implement feedback from the appropriate people:
- Art assets will be reviewed by the art director.
- Code will go through code review on Forgejo.
- I will communicate with the team if I run into issues or need help learning the tools.
- I understand that the content produced during the jam will be released under the following licenses:
- Code -> MIT
- Assets -> CC-BY
- Documentation -> CC-BY-SA
- I understand that my time is volunteered, and no compensation (financial or other) will be granted for my time.
- Note: you will be credited for your work, and you can put it in your portfolio.
- I understand that I will NOT retain the exclusive rights to the intellectual property that is produced here.
- Character designs, and the game concept will belong to the group as a whole, even if it was your pitch. This means don't go behind the team's back and try to sell the game, or make another project using the properties, designs, or assets without receiving prior written consent from from the whole team.
- Note: Re-using other parts of the game including code, tools, geometry nodes, project settings etc, is allowed and encouraged. You may take code from this project and use it to make your own projects later.
- I will not undermine the project, or cause turmoil among the team.
- I will not upload pirated, unlicensed, or otherwise illegal content to the server.
- Note: Stock images, including those watermarks are okay for pitches and documentation, but should not end up in the actual game repositories.
- I understand that all content for the jam is being hosted on Xury's personal server, I am trusting him with this data.
- Xury will not sell your personal data, or misuse the data.
- The data will be backed up from time-to-time including off-site backups.
- The data may be backed up to other BUGJam members' personal severs if they volunteer.
- I understand that if I fail to uphold these commitments I may be removed from the project.
#### Do the following:
- Read the [FAQ](https://docs.bugjam.dev/books/bugjam/page/faq "FAQ")
- Ask Xury for an account if you don't already have one.
- Sign into your accounts on each of the services:
- [https://docs.bugjam.dev](https://docs.bugjam.dev)
- [https://tasks.bugjam.dev](https://tasks.bugjam.dev)
- [https://git.bugjam.dev](https://git.bugjam.dev)
- Reset the default passwords for each account and store them in a password manager.
- Download the [applicable software](https://docs.bugjam.dev/books/bugjam/page/software-list "Software List") (tutorials will be provided soon.)
#### (Optional) Make a pitch:
- If you make the commitments listed above, you will be allowed to [pitch a game idea](https://docs.bugjam.dev/books/bugjam/page/pitch-requirements "Pitching your game idea") at the start of the jam.
- Understand that game development is a group effort. Even if your pitch is chosen, the design will evolve as the team contributes to the project.
# Software list
Here's a list of software we will be using for BUGJam.
Whenever possible, we will be using Free and Open Source Software (FOSS).
We can discuss using other software as needed, but in general we're going to avoid software from Adobe, Autodesk, or any other company that detracts from the FOSS ecosystem.
### Operating Systems:
We're building our software stack to be cross-platform.
You can use any of the major operating systems to participate in BUGJam:
- **Windows**
- **Mac**
- **Linux** - Do it! Come join us! FOSS is boss!
### Game Engine:
##### Required:
- **[Godot 4.6.1](https://godotengine.org/article/maintenance-release-godot-4-6-1/)** - The core of the game!
### Code:
Godot supports multiple programming language extensions, however, we will be sticking with the native GDScript since it is well supported, easy to use, and easier to deploy to the web and other platforms. Python will be used for our tools and pipelines.
We will be running all code through an automatic code formatter. See more in [Coding Standards](https://docs.bugjam.dev/books/bugjam/chapter/coding-standards "Coding Standards")
##### Required:
- [GDScript](https://docs.godotengine.org/en/stable/tutorials/scripting/gdscript/gdscript_basics.html) + [GDScript Formatter](https://www.gdquest.com/library/gdscript_formatter/)
- [Python 3.11](https://www.python.org/downloads/release/python-31114/) + [Ruff](https://docs.astral.sh/ruff/)
##### Optional:
- **Rust** - Not sure what we'll need it for, but Scott would be upset if I didn't list it here.
##### Banned:
- **C#** - Even though I love it, and one of my favorite game developers once said it was "[*the best language ever invented*](https://www.allamericanspeakers.com/celebritytalentbios/Zach+Barth/439986)". The reality is the coding environment is made much more difficult to set up and deploy. C# also belongs to Microsoft and they are already: [enshitifying it](https://github.com/microsoft/vscode-dotnettools/issues/697)
- NOTE: If we find third-party tools that we absolutely need C# for, then we can discuss adding that to the project. But our team should not be coding in C#.
#### Installing GDScript Formatter
- Open the project
- Open a script
- *In the code editor*, select **Format -> Install or Update Formatter**
- Reload the project with **Project -> Reload Current Project**
- Turn on auto formatting...
- Go to **Editor Settings**
- Enable **"Advanced Settings"** in the top right
- Scroll to the bottom to find "**Gdquest GDScript Formatter**"
- Enable "**Format on save**"
### Source Control:
##### Required:
- **[Git](https://git-scm.com/)** - Our version control for code, art, and everything!- YOU WILL LEARN TO USE IT!!!
- **[Git LFS](https://git-lfs.com/)** - Large file storage for art assets
##### Recommended:
- [**SourceGit**](https://sourcegit-scm.github.io/) - Still a little rough around the edges as it is in rapid development, but it's one of the best FOSS options.
- Note: Doesn't have it's own merge tool.
##### Optional:
- **[Sublime Merge](https://www.sublimemerge.com/)** - Not FOSS, but easy to learn and use.
- Any other full-featured [Git GUI](https://git-scm.com/tools/guis) you're comfortable with. - If you're new to Git you should use one of the two listed above.
##### Banned:
- **Perforce** - It's not FOSS, it's expensive as hell, and it can't be used interchangeably with Git.
- **GitHub Desktop** - It's too minimal for a Git GUI, and it tries everything it can to rope you into Microsoft's ecosystem and compromises what we're trying to do here.
### Integrated Development Environment (IDE):
##### Required:
- Godot's built-in code editor. (**YOU MUST USE THE GDSCRIPT FORMATTER!!!**)
##### Optional:
- **[VSCode](https://code.visualstudio.com/)** - (It's from Microsoft and gets worse all the time, but it's still one of the best options right now).
- Extensions required:
- [godot-tools](https://marketplace.visualstudio.com/items?itemName=geequlim.godot-tools) to actually connect to Godot
- [godot-format](https://marketplace.visualstudio.com/items?itemName=DoHe.godot-format) to use GDScript-Formatter
- [**Zed**](https://zed.dev/) - Still an up-and-coming tool, but seems to be a great option, seems to be going for what VSCode once was.
- Extension required:
- [GDScript](https://github.com/grndctrl/zed-gdscript) (search "GDScript" in the extensions page)
- [Follow instructions here to use GDScript-Formatter](https://github.com/GDQuest/zed-gdscript?tab=readme-ov-file#with-gdscript-formatter)
- **[Sublime Text](https://www.sublimetext.com/)** - A great editor, but it's not FOSS.
- [**Neovim**](https://neovim.io/) - A super customizable editor, but not easy to pick up.
### Art Tools:
Our bread and butter for doing what we love in the Blender User Groups.
##### Required:
- **[Blender 5.0.1](https://www.blender.org/download/)** - Most of our art process will use Blender, but we may use external tools for materials and textures.
##### Optional:
- **[Material Maker](https://www.materialmaker.org/)** - A Godot based material creation suite similar to Substance Designer.
- **[ArmorPaint](https://armorpaint.org/)** - An upcoming alternative to Substance Painter.
- **[Krita](https://krita.org/en/)** - FOSS 2D art application.
- **[Gimp](https://www.gimp.org/)** - Typically regarded as not as good as Photoshop, It is a FOSS option which had some major improvements recently.
- **[Photopea](https://www.photopea.com/)** - Free browser-based Photoshop alternative.
- [**Affinity Studio**](https://www.affinity.studio/) - Not FOSS, free (for now) with a Canva account. Excellent software, could be enshitified any day now. :(
- I would encourage you to try other options, but it's on this list because it really is that good, and Gimp just... isn't.
- [**Inkscape**](https://inkscape.org/) - FOSS Vector art, great for making logos, UI Elements, or SVG icons.
- **[Graphite](https://graphite.art/)** - up-and-coming node based vector / raster art tool. Very exciting but the desktop app and raster support haven't landed yet.
##### Banned:
- Anything that uses AI to generate the "art" - NO SLOP.
- Anything that requires paying for a subscription.
- Anything that won't let you save the files locally and requires cloud-storage for the files.
- Anything from Maxon - That includes ZBrush, sorry.
- Anything from Adobe - That includes Substance Designer / Painter, sorry.
- Anything from Autodesk - not sorry.
---
Everything from here onward is handled for you, you don't have to read it. But, you can learn about what's running BUGJam behind the scenes here.
### Server Software:
If you're curious of how the self-hosted server tools are being deployed, here are some links.
- **[TrueNAS: Community Edition](https://www.truenas.com/truenas-community-edition/)** - Operating system for running the server, storage, and apps.
- **[Porkbun](https://porkbun.com/)** - DNS records for registering the bugjam.dev website.
- **[RackNerd](https://www.racknerd.com/)** - Virtual Private Server (VPS) for hosting Pangolin offsite for secure connections.
- **[Pangolin](https://pangolin.net/)** (VPS side) / **[Newt](https://apps.truenas.com/catalog/newt/)** (TrueNAS app)- Secure tunneling into the server.
### Self-Hosted Project Management:
The project will be handled by a series of tools running on a self-hosted server.
We are self-hosting instances of these applications, but if you want to learn more about their official projects, here are the links:
- **[Heimdall](https://github.com/linuxserver/Heimdall)** - Home page for the server: [https://bugjam.dev/](https://bugjam.dev/)
- **[Forgejo](https://forgejo.org/)** - CI / CD hosting service for the Git repositories: [https://git.bugjam.dev/](https://git.bugjam.dev/)
- **[BookStack](https://www.bookstackapp.com/)** - Documentation for the project: [https://docs.bugjam.dev/](https://docs.bugjam.dev/)
- **[Vikunja](https://vikunja.io/)** - Project and task management: [https://tasks.bugjam.dev/](https://tasks.bugjam.dev/)
# The Pipeline
# Goals and Non Goals
## Goals
- Create tools and processes to support the production teams for the BUGJam participants.
- Iterate on the tools to improve them for the next BUGJam and beyond.
- Teach developers, artists, production managers, etc about studio pipelines and what they can do.
- Produce open source code that can be used in other projects.
## Non-Goals
- Support non-open source tools such as Maya or Photoshop. The pipeline **should** be able to support them and not be completely designed around Blender and Godot, but no effort will be made to support applications outside of the BUGJam list of supported applications.
- Support project sizes outside of the BUGJam projects. The pipeline **should** be built in a way to allow it to scale to larger projects, but no effort will be made to support projects beyond the scope of the BUGJams.
- Monetize the pipeline. If that were to happen, then there would need to be a discussion with all the contributors.
- Have a fully functional pipeline right away. This is all done by volunteers and the pipeline will grow as production lessons are learned and people contribute.
# Design
The goal of the pipeline is to support the production team working on the BUGJam. While we will not be able to have a full pipeline from the start, we can at least start off with a small pipeline and grow it and this document. All contributions to the proposed long term designs are highly welcome.
## Production Flows
### Games
### Film/Episodic
## Infrastructure
Each phase represents a different BUGJam project.
### Phase 1: Minimal Game Pipeline
- Deploy: We need to be able to deploy the pipeline to each jam participant.
- Possible solutions
- Python wheels and upload to the Forgejo package repository, then creating a virtual environment for each of the applications and installing the packages from the Forgejo repository and PyPI.
- Rez
- Bootstrap: We need to be able to launch the applications in our environment with the proper environment variables, application flags, resources, etc.
- Possible solutions
- Shell scripts
- Launcher application
- Asset Workspace: We need to be able to create a location for an asset to save to.
- Possible solutions
- A small utility in Blender to create asset directories based on a given name
- Publish: We need to be able to publish and sync work from production members.
- Possible solutions
- Plain Git commands
### Phase 2
- Entities tracking: We need to be able to track entities and start to know more about what everything is/what needs to be done.
- Possible solutions
- Kitsu
- Roll our own entities database
- Context management: We should keep track of the current context someone is in when using their DCC so we can easily manage the environment (for example, have the asset library default to show only assets that are part of the shot).
- Possible solutions
- Roll our own context manager
- Publish: The publish tool will need to become more production friendly and handle tracking
- Possible solutions
- Pyblish
- Roll our own
- Validations: We should have validations happen at every step of the pipeline.
- Possible solutions
- Pyblish
- Scott's checks framework
- Roll our own
- Workspace: We should support creating loading scenes via a workspace loader
- Possible solutions
- Roll our own
### Phase 3
- Metadata: We should start tracking more information about assets, shots, etc. This may include sidecar files for all of the publishes
- Possible solutions
- Universal Scene Description
- Roll our own (sqlite, json, etc)
- Metrics/Error tracking: While we need to make sure we're extremely careful about collecting potentially personal identifying information, being able to track errors and bottlenecks is extremely useful. This would need to be a big discussion with everyone about who gets access to the data (assuming that people are comfortable with the information being stored), and how to do this in a way that'll make people feel comfortable (show them what information would be transmitted, opt into data collection, etc).
- Shot/Map assembler: We should have some automation that could create a new shot/map from scratch in our DCCs using assets that are assigned to the shot.
- Asset library: While Blender does have an asset library, we can add some logic that connects to the asset database, and handle different cases (loading assets to work on or work with).
# Game folder structure
This is the guide on how to name things, where to put them, and over-all how we intend to organize the project files.
### Considerations
The game project's file structure should achieve several key things:
- Organize multiple repositories into folder structures that can co-exist.
- One directory for the Godot project, a separate directory for the art source files that are created outside of the engine.
- These directories will each be a Git repository and should conform to the hyphenated naming convention.
- These names should make sense in and out of context, the top-level folder name should make sense when viewed as a tab in a Git GUI e.g:
- **example-game**
- **example-art**
- **example-audio**
- Splitting the repositories avoids having to sync large amounts of irrelevant content for your role on the project:
- Programmers / Dev Ops / Build Bots should only need to sync the **example-game** repository.
- Artists / Animators can sync **example-art** along side the **example-game** repository.
- Musicians / Foley Artists can sync **example-audio** along side the **example-game** repository.
- The folder structures should work without using Git sub-modules, since sub-modules add a lot of complexity and confusion without really adding value.
- The folder structures in these directories should mimic each other 1:1
- Tools and pipelines should be able to export / import content by simply swapping the root, e.g:
- **example-art**/art\_assets/characters/main\_character/main\_character\_diffuse.png
- |--->**example-game**/art\_assets/characters/main\_character/main\_character\_diffuse.png
- Ship-able game content should be the only thing going into the Godot project resource folder in the game repo.
- Art source content from tools like Blender, Gimp, Krita, etc... should be kept in the art repo.
- Music production files for a DAW should be kept in the audio repo.
### Naming Conventions
- The repositories should use **lowercase-hyphenated-case**
- Files and folders should use **snake\_case** unless otherwise required by third-party tools or conventions for the specific file e.g. README.md
- No spaces in file names.
- All directories should be plural:
- "characters" not "character"
- "environments" not "environment"
### Compromises
No folder structure is perfect, but this structure should lead to the fewest problems. Here is a list of known compromises we've decided to accept:
Top level folder names repeat the game's name even though they are already inside of a top-level folder named after the game:
- **example**
- **example-game**
- **example-art**
- **example-audio**
While this introduces redundancy, folders don't cost anything, so this is okay.
Some intermediate sub-folders are empty and seem to be useless, but they keep the hierarchies between directories in perfect sync. For instance, **example-art** may never end up with content directly inside of it, most if not all content will be inside of its first sub-folder **art\_assets** i.e. example-art/art\_assets/ This is on purpose, since it ensures the game content is at the same hierarchical indentation level to the source content, making pipelines and paths extremely easy to work with; just swap the root and you're done!
You ought to have a directory on your computer for "**BUGJam**" projects. You can place this anywhere on your computer with a few considerations:
- Do not sync this directory with OneDrive, iCloud, Google Drive, or any other backup tool, this will break the Git repositories inside the folder since these services interfere with Git.
- Don't nest the folder too deep so you avoid file name length issues:
- Good (Windows style path): `C:\Users\xgreer\Projects\BUGJam`
- Good (MacOS / Linux): `/home/xgreer/Projects/BUGJam`
- Bad: `/home/xgreer/Projects/Extra Projects/Seattle Blender User Group/Game Projects/BUGJam`
Within the BUGJam directory there will be folders for each BUGJam project. For a project called '**Genesis**' we will have a project folder called 'genesis' that serves as the root for all content necessary to develop the game.
### File Tree Structure Example
```markdown
BUGJam
├── genesis
│ ├── genesis-art
│ │ ├── .forgejo
│ │ │ └── banner
│ │ │ └── genesis_art_banner.png
│ │ ├── art_assets
│ │ │ └── characters
│ │ │ ├── main_character
│ │ │ │ ├── animations
│ │ │ │ │ └── idle.blend
│ │ │ │ ├── main_character_diffuse.png
│ │ │ │ └── main_character_rig.blend
│ │ │ └── monster
│ │ │ ├── animations
│ │ │ │ └── walk.blend
│ │ │ ├── monster_diffuse.png
│ │ │ └── monster_rig.blend
│ │ ├── audio_assets
│ │ │ ├── dialogue
│ │ │ ├── music
│ │ │ └── sound_effects
│ │ └── pipeline
│ │ ├── addons
│ │ ├── extensions
│ │ └── scripts
│ └── genesis-game
│ ├── .forgejo
│ │ └── banner
│ │ └── genesis_game_banner.png
│ ├── addons
│ ├── art_assets
│ │ ├── characters
│ │ │ ├── main_character
│ │ │ │ ├── main_character_mat.tres
│ │ │ │ ├── main_character_diffuse.png
│ │ │ │ ├── main_character_diffuse.png.import
│ │ │ │ ├── main_character_rig.bin
│ │ │ │ ├── main_character_rig.gltf
│ │ │ │ └── main_character_rig.gltf.import
│ │ │ └── monster
│ │ │ ├── monster_mat.tres
│ │ │ ├── monster_diffuse.png
│ │ │ ├── monster_rig.bin
│ │ │ ├── monster_rig.gltf
│ │ │ └── monster_rig.gltf.import
│ │ ├── common
│ │ │ └── textures
│ │ │ └── blue_noise_64.png
│ │ ├── environments
│ │ │ ├── rock
│ │ │ │ └── [...]
│ │ │ └── wall
│ │ │ └── [...]
│ │ └── interactables
│ │ ├── coin
│ │ │ └── [...]
│ │ └── door
│ │ └── [...]
│ ├── audio_assets
│ │ ├── dialogue
│ │ ├── music
│ │ └── sound_effects
│ ├── entities
│ │ ├── characters
│ │ │ ├── main_character.tscn
│ │ │ └── monster.tscn
│ │ ├── environments
│ │ │ ├── rock.tscn
│ │ │ └── wall.tscn
│ │ └── puzzle_elements
│ │ ├── button.tscn
│ │ └── pusher.tscn
│ ├── levels
│ │ ├── level_packs
│ │ │ ├── world1.gd
│ │ │ └── world2.gd
│ │ ├── epilogue.tscn
│ │ ├── intro.tscn
│ │ └── open_world.tscn
│ ├── scripts
│ │ └── player.gd
│ ├── shaders
│ │ └── iris.gdshader
│ ├── ui
│ │ └── icons.png
│ ├── .gitignore
│ ├── icon.png
│ ├── project.godot
│ └── README.md
└── logo
```
# Godot Tools
WIP Page on tools in Godot
In the top right are a few non-standard elements:
Left-most chooses which level gets launched with F5 (which technically is GAME\_ENTRY but then immediately loads something else). By editing `ignore/debug\_config.tres`, you can scenes. The advantages of this are that it's per-user, very convenient to change levels, only runs when launching from the editor so you can't accidentally set the wrong level and makes it much more convenient than F6 because you might be also working on a prop/player/whatever and it's really annoying having to click back to the level for each tweak.
TBD Spawn selector / toggles
# Code Organization and Rules
This document is currently an unorganized scratch pad of thoughts on what the future pipeline should look like. Discussions are very welcome.
The intention of the core pipeline design is to lower developer friction when developing, easy to deploy, and support arbitrary front ends (Blender, Godot, Krita, small CLIs, etc).
## Rules
The rules should be followed unless it makes more sense to not follow them. They are there to make it easier to reason about the code and where code should live.
- API first: All functionality should be independent of UI, and the UI code should only handle displaying and manipulating the data that gets passed to/from the APIs. This is to allow for greater reuse of functionality across the pipeline. Blender's operators are considered UIs in this context. Functionality that have to be in the lower API includes business logic such as communicating with a database, creating meshes, modifying a scene, etc. Functionality that can live in the UI include transforming the data into a human readable format (unless it is a very generic task that will likely be shared such as converting a number into a distance, size, temperature, etc with units), extracting information from a Blender context to pass into the API, etc.
- Invalid states should be impossible: If a tool expects a certain state, and that state is invalid, then that tool must not allow the user to progress until the state is valid. For example, if a publish requires a valid object or collection to be selected, and for comments, then the publish button must be disabled until the conditions are valid. The API should also not assume the data is valid and validate/throw an error. We could use the new type pattern (See [https://doc.rust-lang.org/rust-by-example/generics/new\_types.html](https://doc.rust-lang.org/rust-by-example/generics/new_types.html) for an example) to do the validations up front and encode them in a class that must remain valid at all times.
- Code should live in their appropriate place: Generic code that does not interact with applications should live in the core, where application specific code should live in the application areas. For example, the generic publish code should live in the core pipeline, where application specific publishing such as rigs, animation, geometry, etc should live in the application area. Also, the libraries are split between the absolute core such as path resolution, and more specific such as turntable generation and management.
- Static where possible, dynamic when necessary: Whenever possible, the code should be static. This could mean functionality, environment resolution, static types, etc. Static code is easier to manage. Code should only be dynamic when static could not solve the issue better than dynamic.
- Simple: We should strive for simplicity both for lower maintenance work and easier reuse.
## Project Structure
```
/pipeline/
blender/
src/
operators/
ui/
pipeblend/
core/
{tool_lib}/
__init__.py
core/
src/
pipecore/
core/
{tool_lib}/
__init__.py
```
# Coding Standards
# Coding Style
Every developer has opinions about the way they want their code to look: tabs vs spaces, single quotes vs double quotes, 80 char line length vs 120. Languages often provide guides on how you're meant to style your code. Python has "[PEP 8](https://peps.python.org/pep-0008/)" and GDScript has a [style guide](https://docs.godotengine.org/en/latest/tutorials/scripting/gdscript/gdscript_styleguide.html).
The problem with these languages is that they don't enforce their own code styles. This means, every developer on a team will probably have slightly different styles. This is a problem when working with a version control system like Git. Every change is tracked, no matter how minor. If three developers touch the same script, we need to be able to see the meaningful diff between the changes, without conflating those changes with style changes. See why this matters here: [Bad Diff vs Good Diff](https://docs.bugjam.dev/books/bugjam/page/bad-diff-vs-good-diff "Bad Diff vs Good Diff")
For this reason, among other benefits, BUGJam will require the use of automatic code formatting tools. Formatting tools are designed to automatically fix all of these style choices so that they adhere to the style guide of the language. Modern implementations of these tools run incredibly fast, and can be configured to automatically format your code upon saving the file, so you'll never end up in a situation where your code is unformulated. The remove all opinions from the style of the code and allow you to focus on just the functionality. This also reduces the learning curve for these programming languages. Just imagine never needing to commit a single brain cell to this question: "*Should the space come before or after the colon in the function signature?*". The answer is: "*I don't know, the formatter will fix it*".
### GDScript
Godot does not have an official formatter, but luckily [GDQuest built a formatter](https://www.gdquest.com/library/gdscript_formatter/) that they've been using in production for a few years, and my short experience with it so far has been great.
TODO put in setup instructions and features you have to turn on
### Python
Similarly, Python has turned to the community to create their formatting tools. Many tools have come and gone, but the modern standard is a suite of tools from [Astral](https://astral.sh/) in particular the [Ruff formatter](https://docs.astral.sh/ruff/). Their other tools are phenomenal too.
TODO put in setup instructions and features you have to turn on
# Bad Diff vs Good Diff
### Bad Diff
Here's an example of a diff that contains style changes at the same time as a functional change. Can you find the needle in the haystack:
[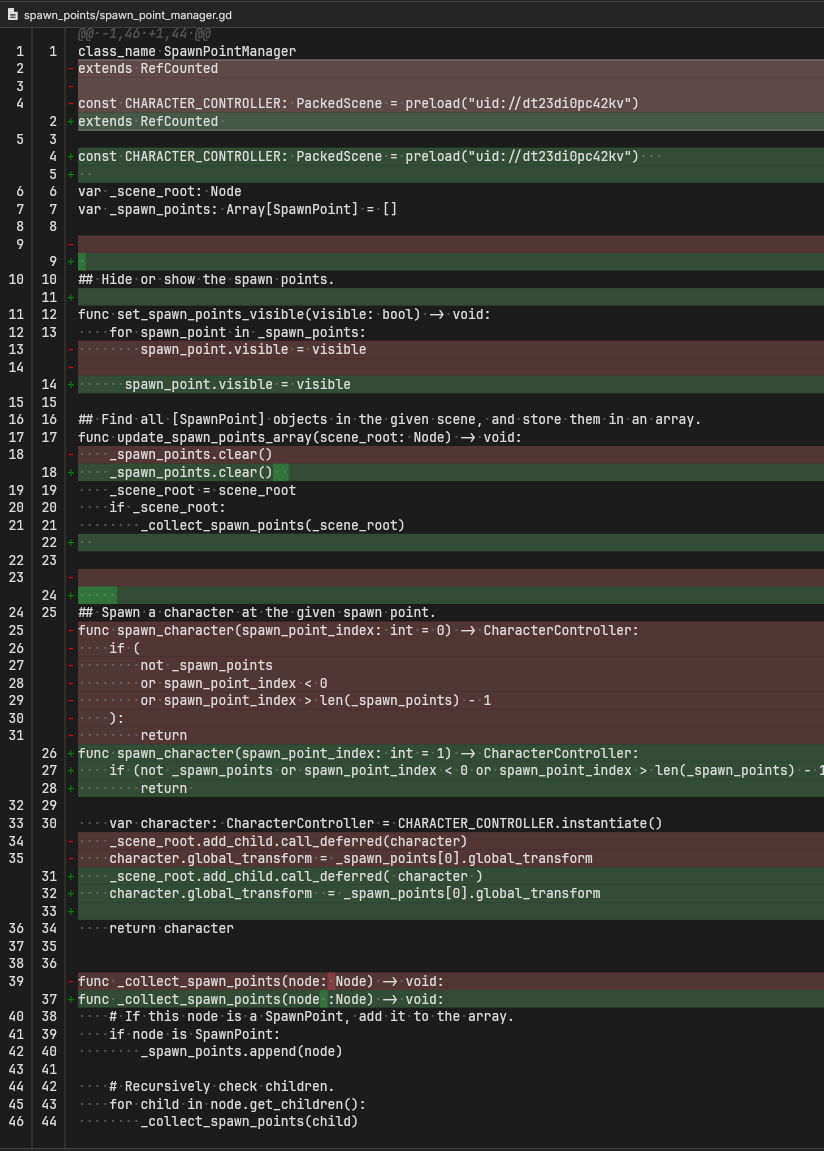](https://docs.bugjam.dev/uploads/images/gallery/2025-12/image.png)
Good luck finding what changed. Could you approve that code review saying you understand what happened with a straight face?
And that's a simple example, it gets much worse.
### Good Diff
Here's the exact same functional change without the style changes:
[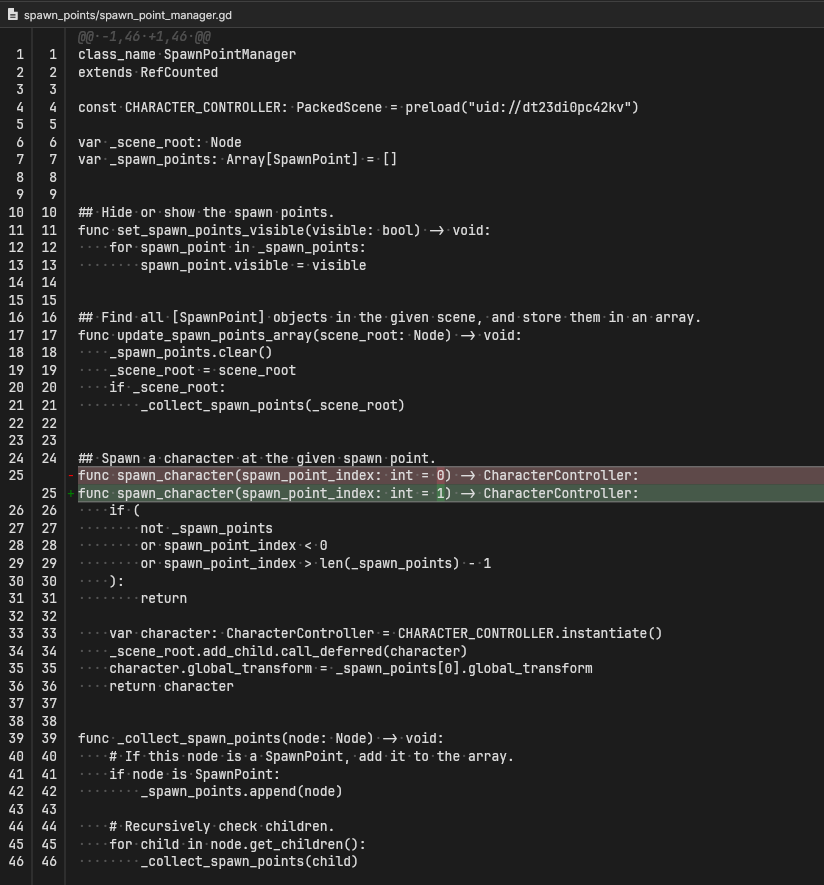](https://docs.bugjam.dev/uploads/images/gallery/2025-12/obVimage.png)
Not only does this make way more sense to look at, but it also ensures that there will be far fewer merge conflicts because your changes only touch one area of the code.
# Art
# Resources
# Style Guidelines
### Scale + Proportions
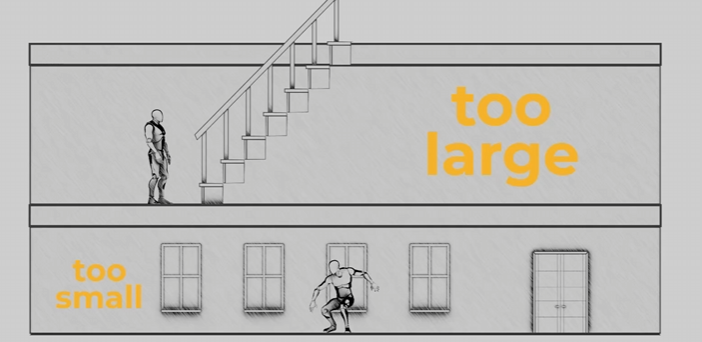
[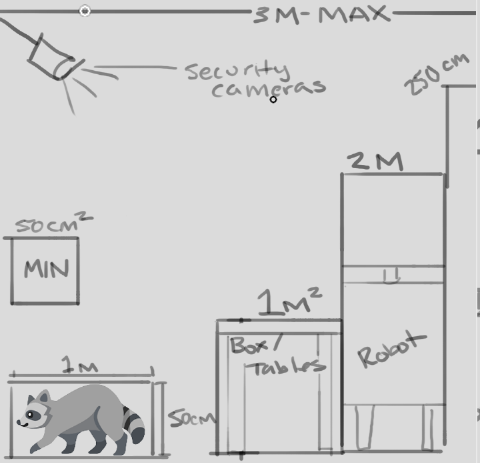](https://docs.bugjam.dev/uploads/images/gallery/2026-02/9QFimage.png)[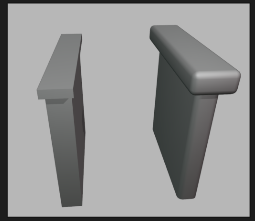](https://docs.bugjam.dev/uploads/images/gallery/2026-02/ZOHimage.png)
All proportions will be very exaggerated in order for the tiny tanuki to navigate the environment. interactive elements will be placed within 3m of the floor. The main playable character has a size of 100cm x 50cm- all reachable surfaces will be 100cm tall (table tops / switches / crates/ etc )
Larger characters and elements, like the security robots, should be a max of 2m tall. Security cameras should be placed at 3m above the ground to be visible to the tanuki but out of reach. Non-interactive elements will be a max of 250cm tall to fit within frame
Props that the tanuki can transform into should fit within 50cm-100cm
No props should be smaller than 25cm or larger than 3m
When translating elements to the game style, proportions will be exaggerated for a playful effect. See the example above^ whenever there are areas that can be exaggerated without losing their silhouette, they should be exaggerated. Below are examples of how similar games have pulled off this scale exaggeration- the goose and the cat would be much smaller, but the worlds don't feel "looming" or overly giant around them.
[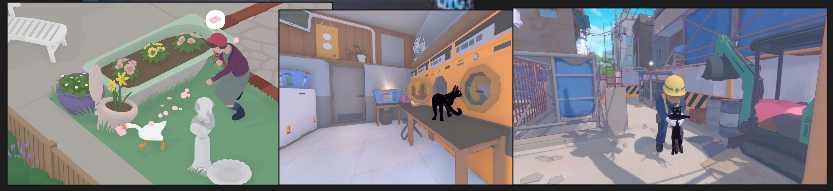](https://docs.bugjam.dev/uploads/images/gallery/2026-02/Ld3image.png)
### Granularity + Detail
[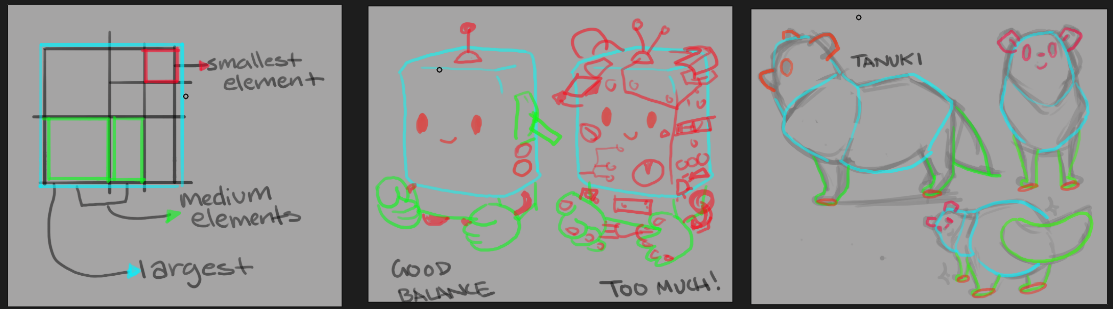](https://docs.bugjam.dev/uploads/images/gallery/2026-02/mmqimage.png)
Designs should be sorted into large, medium, and small elements- finding a balance between them. There should be a main form that is the largest element and make up 75% of the object or character's silhouette. Medium elements should be 25%-33% of the size of the largest shape, and take up about 20% of the silhouette. Small elements should only have a very minimal impact on the characters main silhouette, 5%. See the example above, the robot on the left is easy to read at a glance, and still includes cute details - like a few buttons and levers. However the robot on the right is too busy to understand, with too much visual information and the main shape gets lost. For our game, we want to keep a good balance and use small elements that are no smaller than what is pictured above, and used sparingly to tell a story- not to overwhelm the viewer.
This is a very simplified style, so start by seeing what the **least** possible amount of information is necessary in order to communicate the object or character, and build up from there
### Edges + Beveling
[](https://docs.bugjam.dev/uploads/images/gallery/2026-02/u6gimage.png)
1m = 0.1m bevel distance
2m = 0.2m bevel distance
3m = 0.3m bevel distance
This game will be a very soft, inviting , and playful environment. Because of this, edges will be rounded off but there is a level of standardization necessary to keep the game cohesive. On the left you can see 3 cubes, one that is super round, one that is a little beveled but still sharp, and one that has completely sharp edges. You can see these each have a different feel to them. On the right is the level of softness we will be using for our game- 10%. so, if you love numbers you can take that literally, and apply a 0.1 bevel to a 1m cube, or using the reference on the right, try to match that amount- using an orthographic view is very helpful when setting this up, or ideally a bevel modifier, where you can easily and non destructively adjust the bevel proportionately to the shape.
This applies mostly to prop building, like shelves and architecture- but if you are doing organic modeling please still keep this in mind and don't include any hard edges or sharp corners
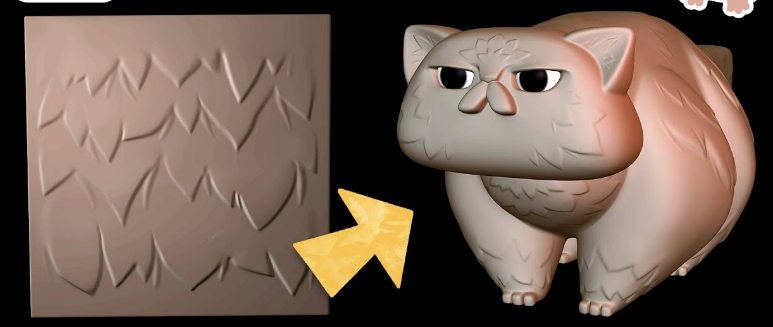
### High Poly Sculpt Pass
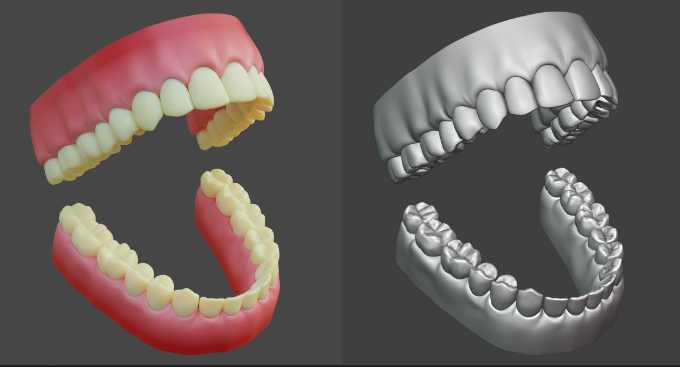
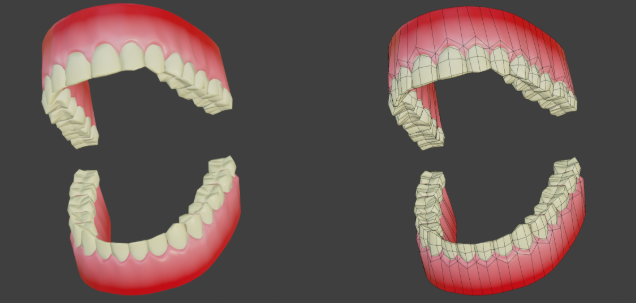
All assets will include a high poly sculpt pass! DONT BE OVERWHELMED this is still a very stylized game, NO ONE should be doing hyperrealism but we are going to learn a high to low poly baking workflow, what this means is that when we make each element- we will be adding some smaller details in a sculpt pass that add more interest + history to the item / character. For example, when making the tanuki, the sculpt pass will include adding some areas of chunky fur, or if you are making a crate, finding areas to add a chipped piece of wood, a dent in the side of a can, or a chipped corner on a table. These details will be baked onto the mesh later
We are going to be using a high - low polygon workflow, which means you can go pretty high when working on the details of your model! If your computer can handle it- go for it! Please see Xury's punk character series to understand this workflow in depth. Included example is this pair of teeth by Xury- see the difference in the original sculpt vs final game model
[](https://docs.bugjam.dev/uploads/images/gallery/2026-02/X5Uimage.png)
[](https://docs.bugjam.dev/uploads/images/gallery/2026-02/NzHimage.png)
[](https://docs.bugjam.dev/uploads/images/gallery/2026-03/n9uimage.png)
[](https://docs.bugjam.dev/uploads/images/gallery/2026-02/JW8image.png)
### Materials
WIP
# Scale and Proportions
We will be working with standard Blender units aka meters. One meter is one Blender unit. One meter is also 100cm, so working from measurements like the ones attached is easier than it seems if you're used to imperial!
[](https://docs.bugjam.dev/uploads/images/gallery/2026-02/H2Oimage.png)[](https://docs.bugjam.dev/uploads/images/gallery/2026-02/oauimage.png)
[](https://docs.bugjam.dev/uploads/images/gallery/2026-02/LNtimage.png)[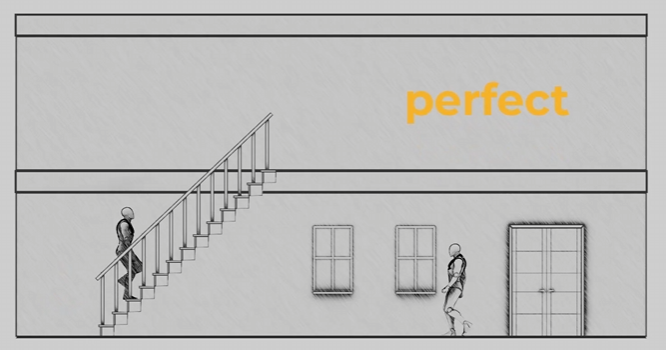](https://docs.bugjam.dev/uploads/images/gallery/2026-02/fBUimage.png)
[](https://docs.bugjam.dev/uploads/images/gallery/2026-02/KLvimage.png)
For scale, please also utilize a "main\_character" mesh (attached) to compare to your mesh whenever possible! When working, we will start with a blockout for your objects/ character that will be tested in the game engine.
*reference photos sourced Schoolism. Life – Lesson 71. Schoolism. Accessed 2/11/26. [https://schoolism.com/s/life/course/lessons/71](https://schoolism.com/s/life/course/lessons/71)*
# Materials List
Pre approved textures and materials through blenderkit! Please make sure you use materials from this list!
\*\*\*list coming soon!\*\*\*\*
# WIP: Basic Requirements For The Projects Goals
**tanuki night at the meowseum requirements as described by Alice , with Embers goals in mind**
we should select a few real world museums to blend styles from to make our unique museum
the style of post fall modernism,
a place once for public use, now faded into disuse with the fall of mankind.
but the security robots remain roaming the halls.
renewable power means they might guard this place forever.
Concept art , style agreement, modeling scope decided
blender needs
1 tanuki model
concept
model
rig
animation
1 guard bot
concept
model
rig
animation
1 basic level modular pack begun.
floor tiles,
wall tiles,
window frames,
props
concept ,style, reference needed for all
vase
statue
pole that you hang
the velvet rope on
the velvet rope
painting frames
diamond
pedestal
ceiling lights
display cases
anything that would go in a case
take your pick
go wild
security camera
laser emitter
mirror deflector.
the outside of the museum where you get put before selecting an entrance
needs foliage, trees, grass, pavement and such.
to begin imagine our museum is nothing but, vases paintings and a diamond.
variety of objects increase as people claim a desire to add something.
personally i think making parody of real pieces of art is fun.
like a simpler or funny version of the original.
or when you turn into something, you are like the original.
but with like little cute ears and theres a racoon face on the object.
godot needs:
player capsule controller,
idle,walk,run state machine
guard,
idle walk run state machine
navmesh
grey box level layout basics.
security camera set up.
Tooling pipeline requests:
a way to turn out modular architectural kit , into a level, faster.
aka snapping scripts based on object selected, not sure what blender is capable of.
might already exist.
week one should end with a grey box level of no specific design
explored by one capsule collider 3rd person action character controller.
we should have a clear concept of the museums look,
we should have v1 of our guard bot and camera drawn,
and maybe modeled but not animated and textured,
that we can place into the scene
and start building things like vision cones, follow systems,
work out the code for navigating the nav mesh,
before we start loading the scene with production models we should focus on basic function and form
in preparation for week 2 we could aim to have modeled, rigged ,and animations roughed out for our two animated characters.
and some agreed form for the the layout of our museum formed through greyboxing the space out. and doing flat floorplan drawings.
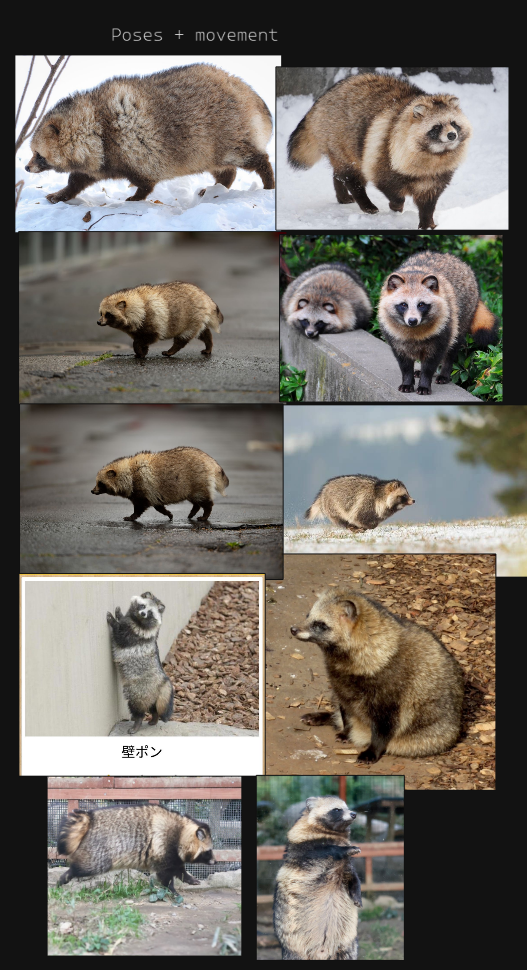
# Mood boards add your own!
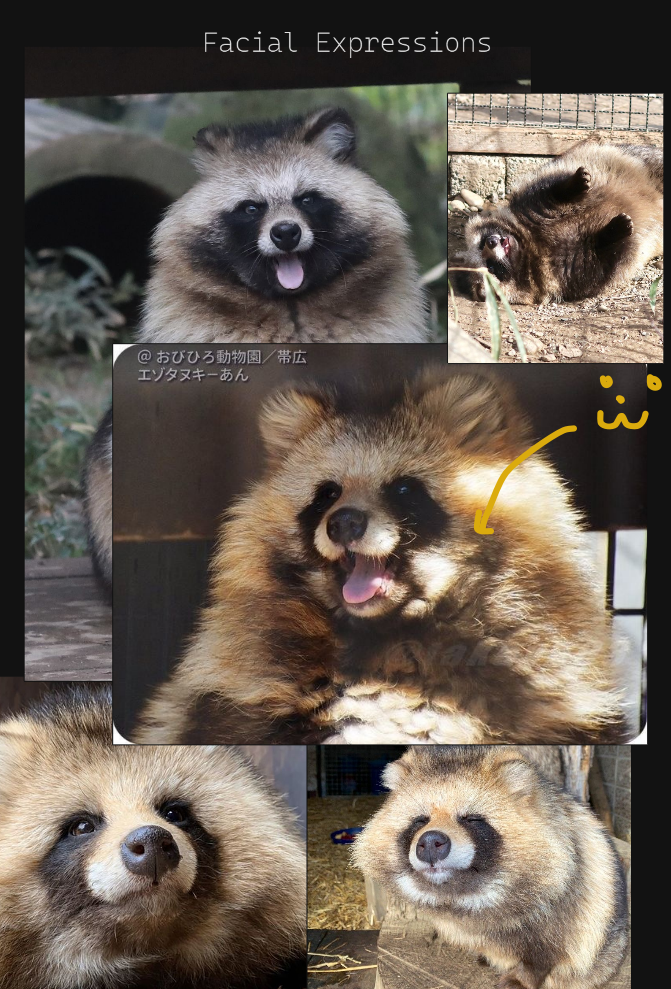
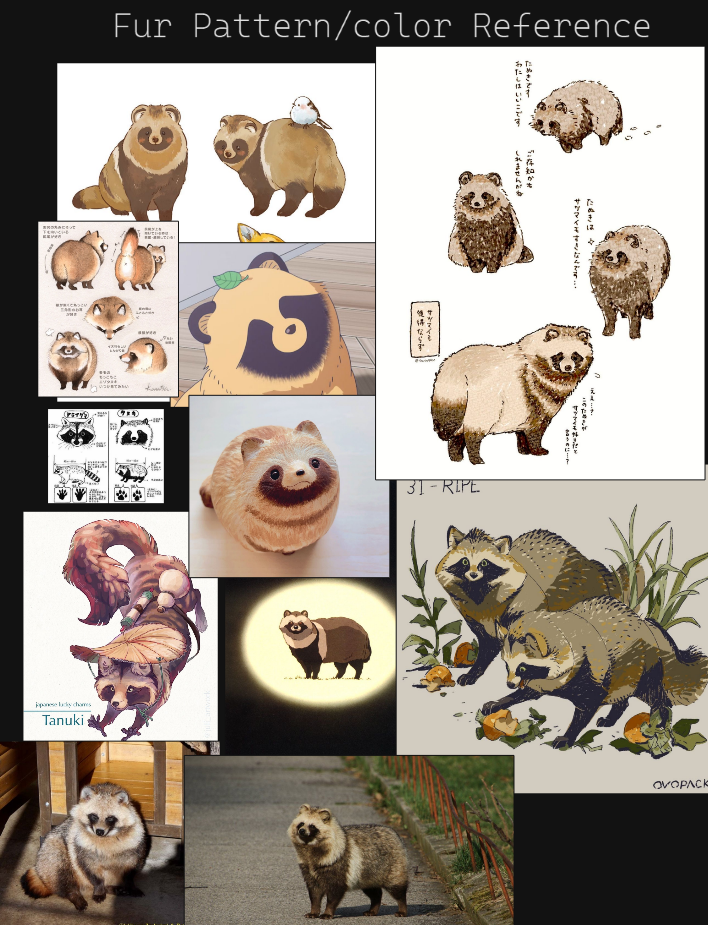
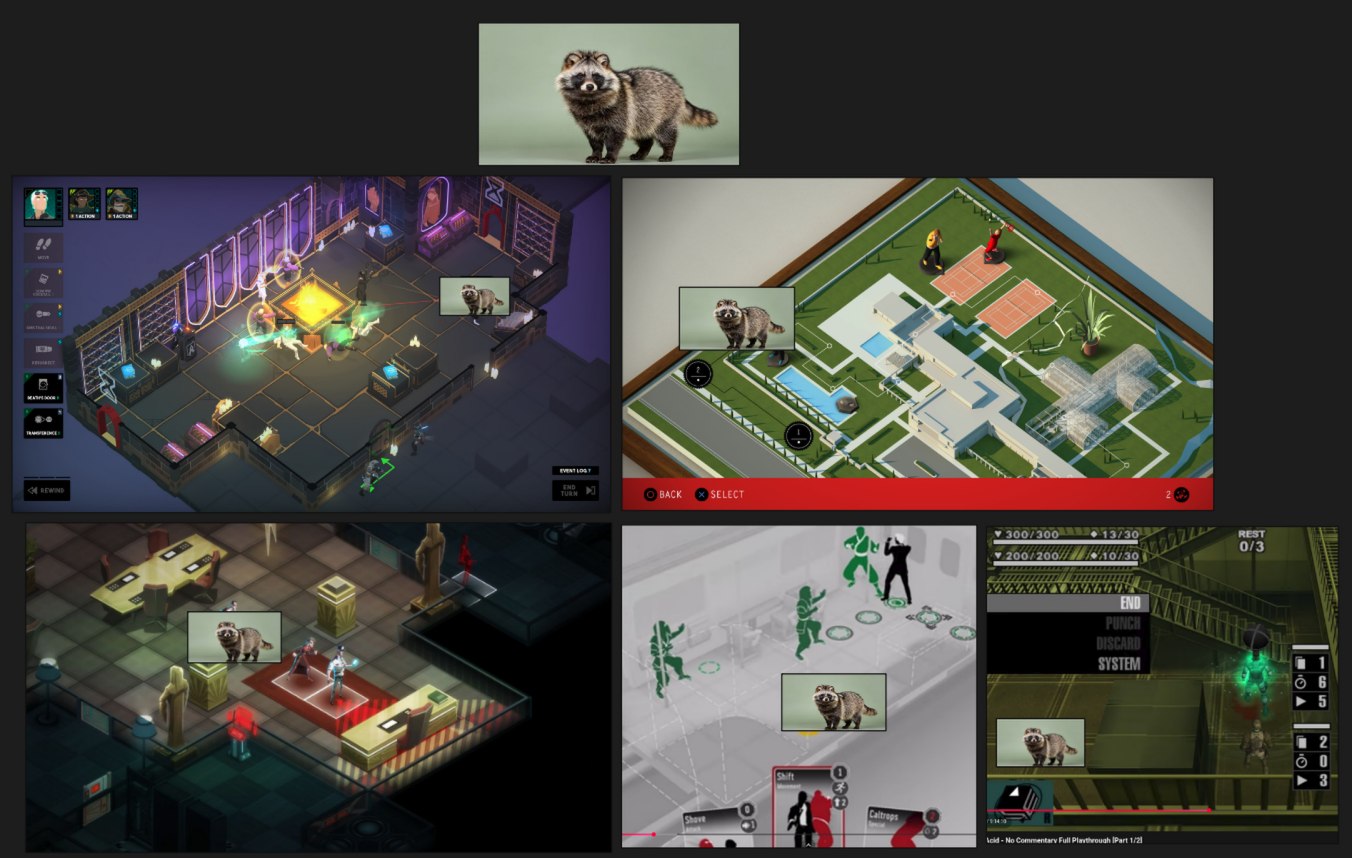
We have to decide what our tanuki would look like!
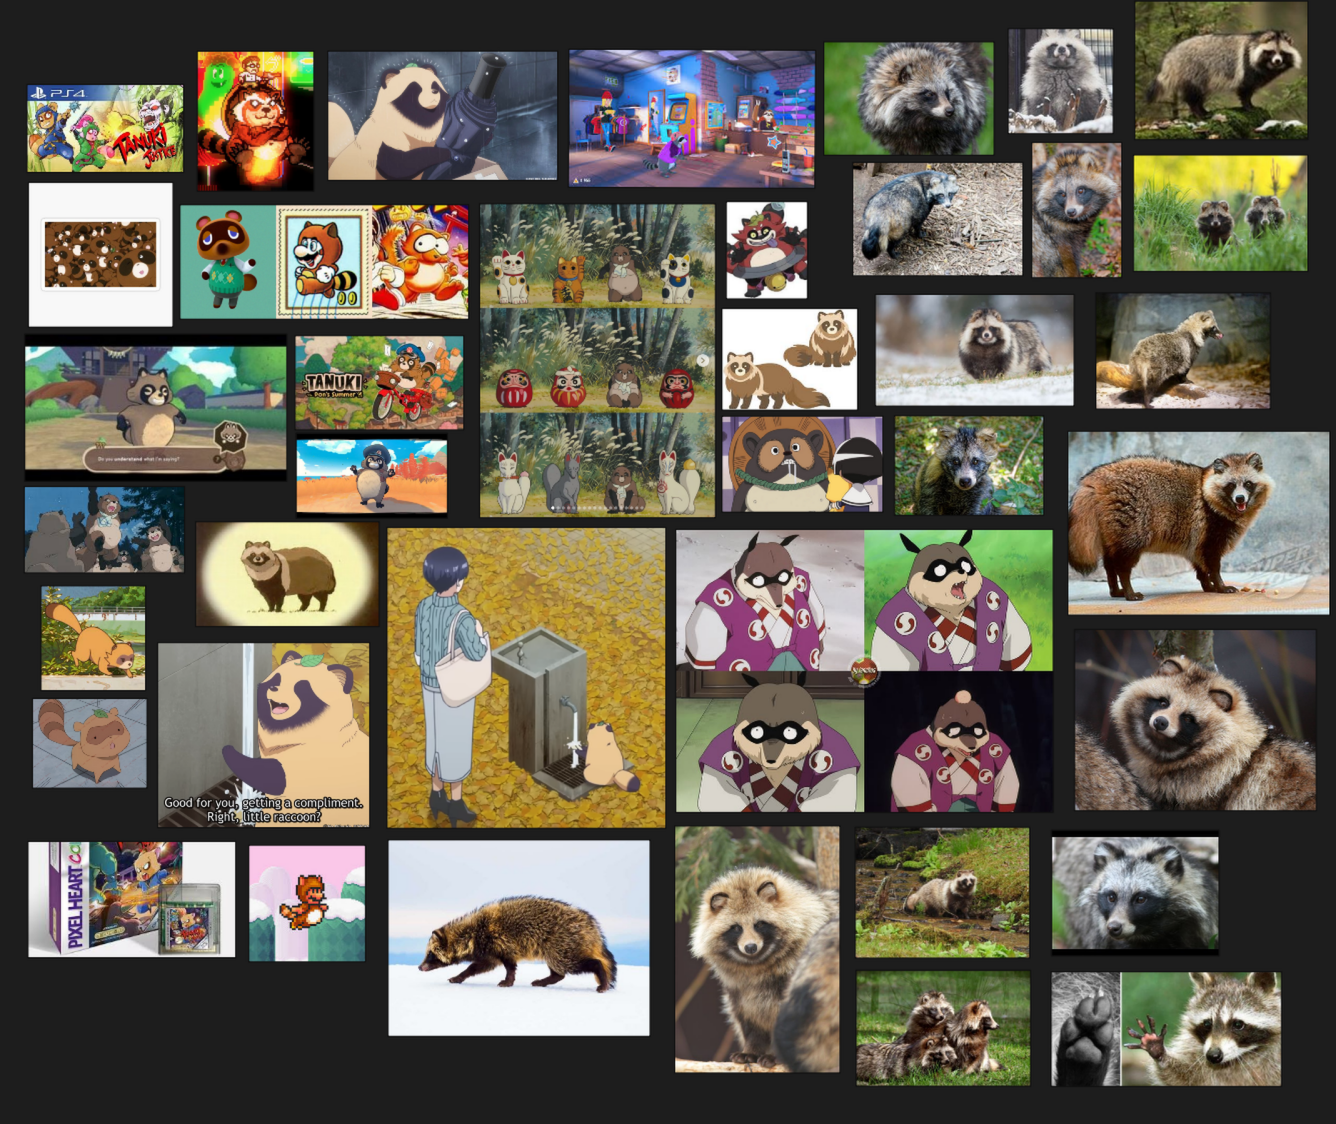
##### TANUKI
[](https://docs.bugjam.dev/uploads/images/gallery/2026-02/ryjimage.png)
[](https://docs.bugjam.dev/uploads/images/gallery/2026-02/VZqimage.png)
[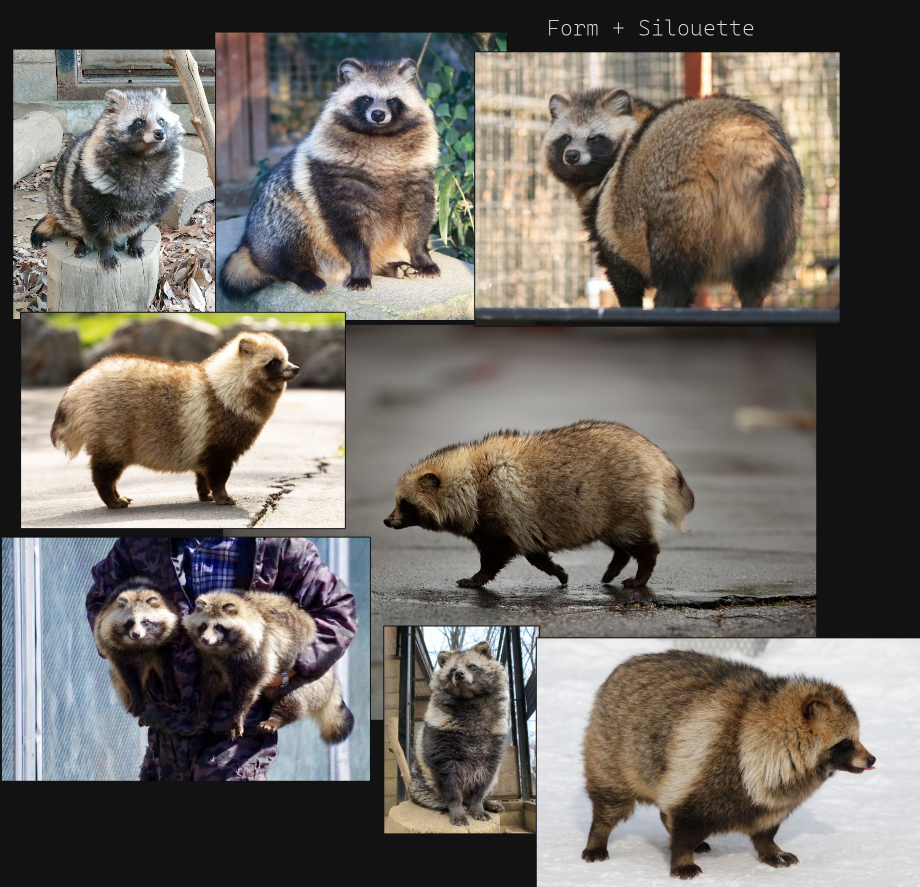](https://docs.bugjam.dev/uploads/images/gallery/2026-02/gbbimage.png)
[](https://docs.bugjam.dev/uploads/images/gallery/2026-02/RWjimage.png)
[](https://docs.bugjam.dev/uploads/images/gallery/2026-02/n3timage.png)
here is a swatch of representations for tanuki in media, gaming and anime.
we must discuss what is in scope, what we have the skill to achieve and choose.
##### **FUTURISM**
[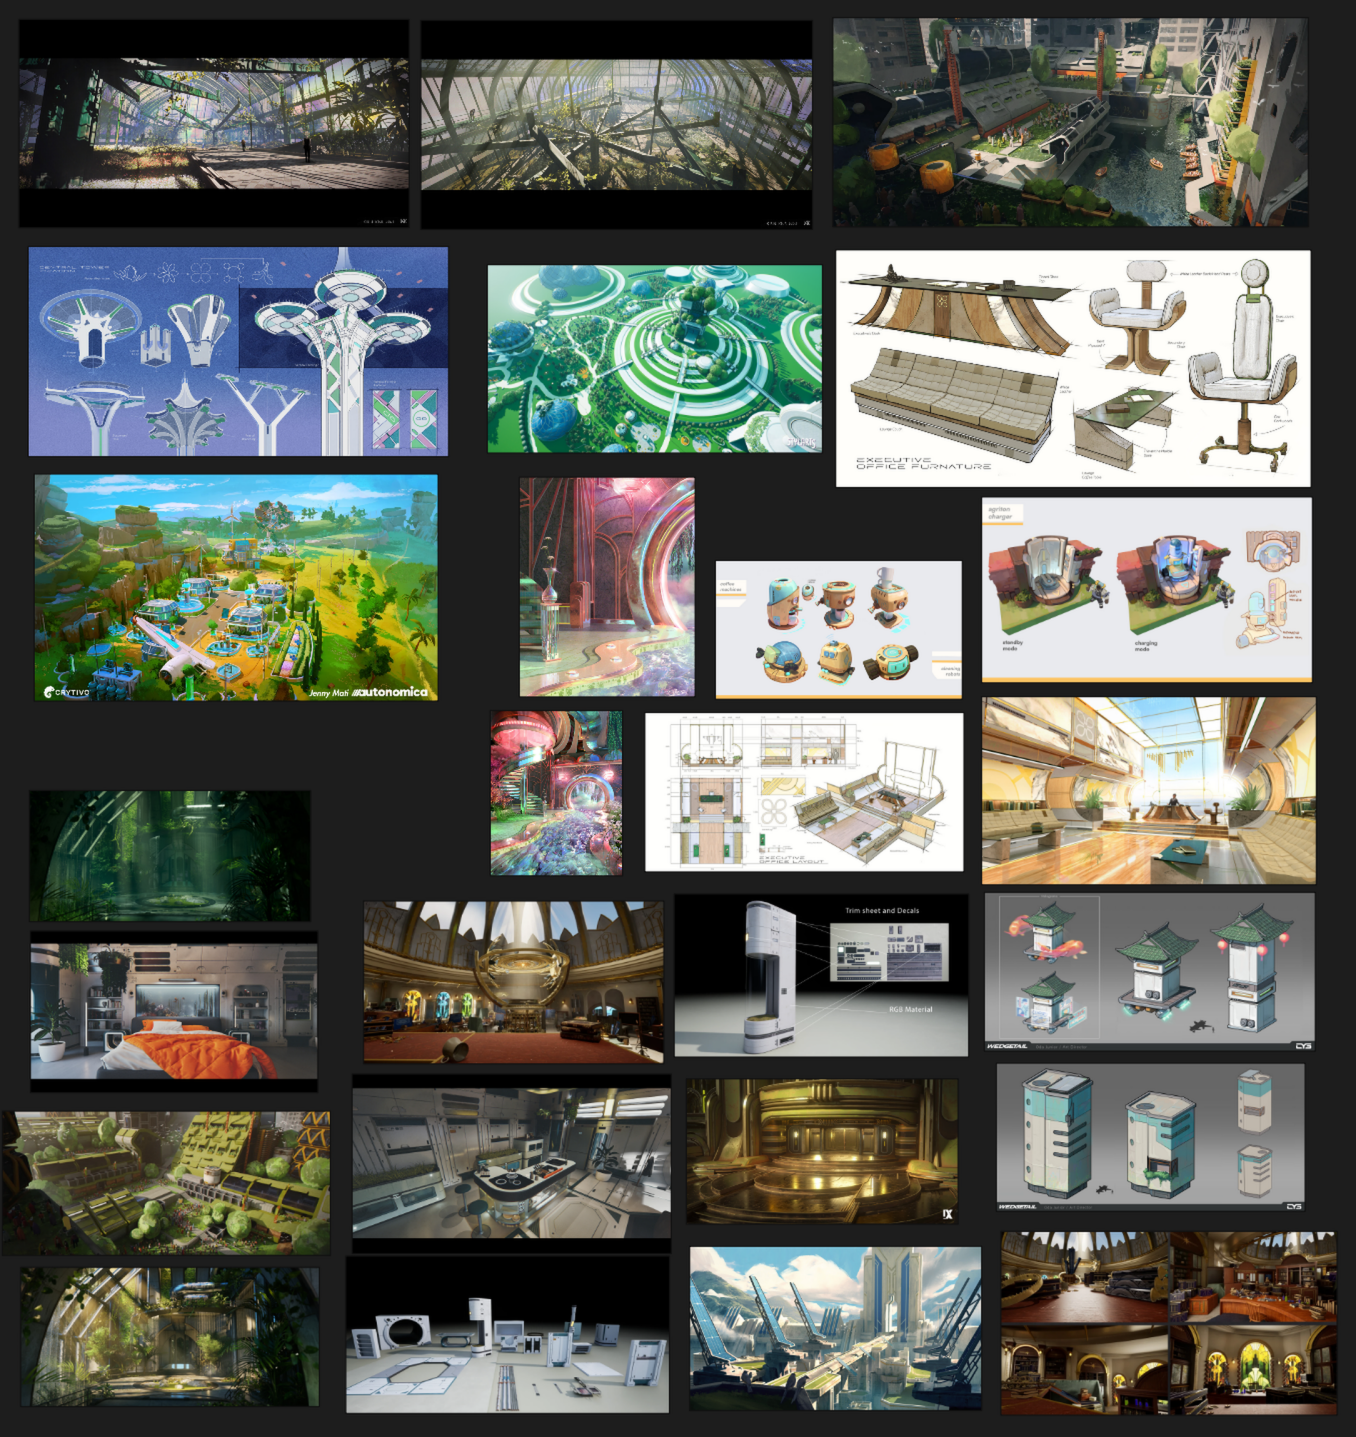](https://docs.bugjam.dev/uploads/images/gallery/2026-02/bSgimage.png)
##### **MODERN MUSEUM INTERIORS**
[](https://docs.bugjam.dev/uploads/images/gallery/2026-02/o5aimage.png)
##### **museum modular kits**
[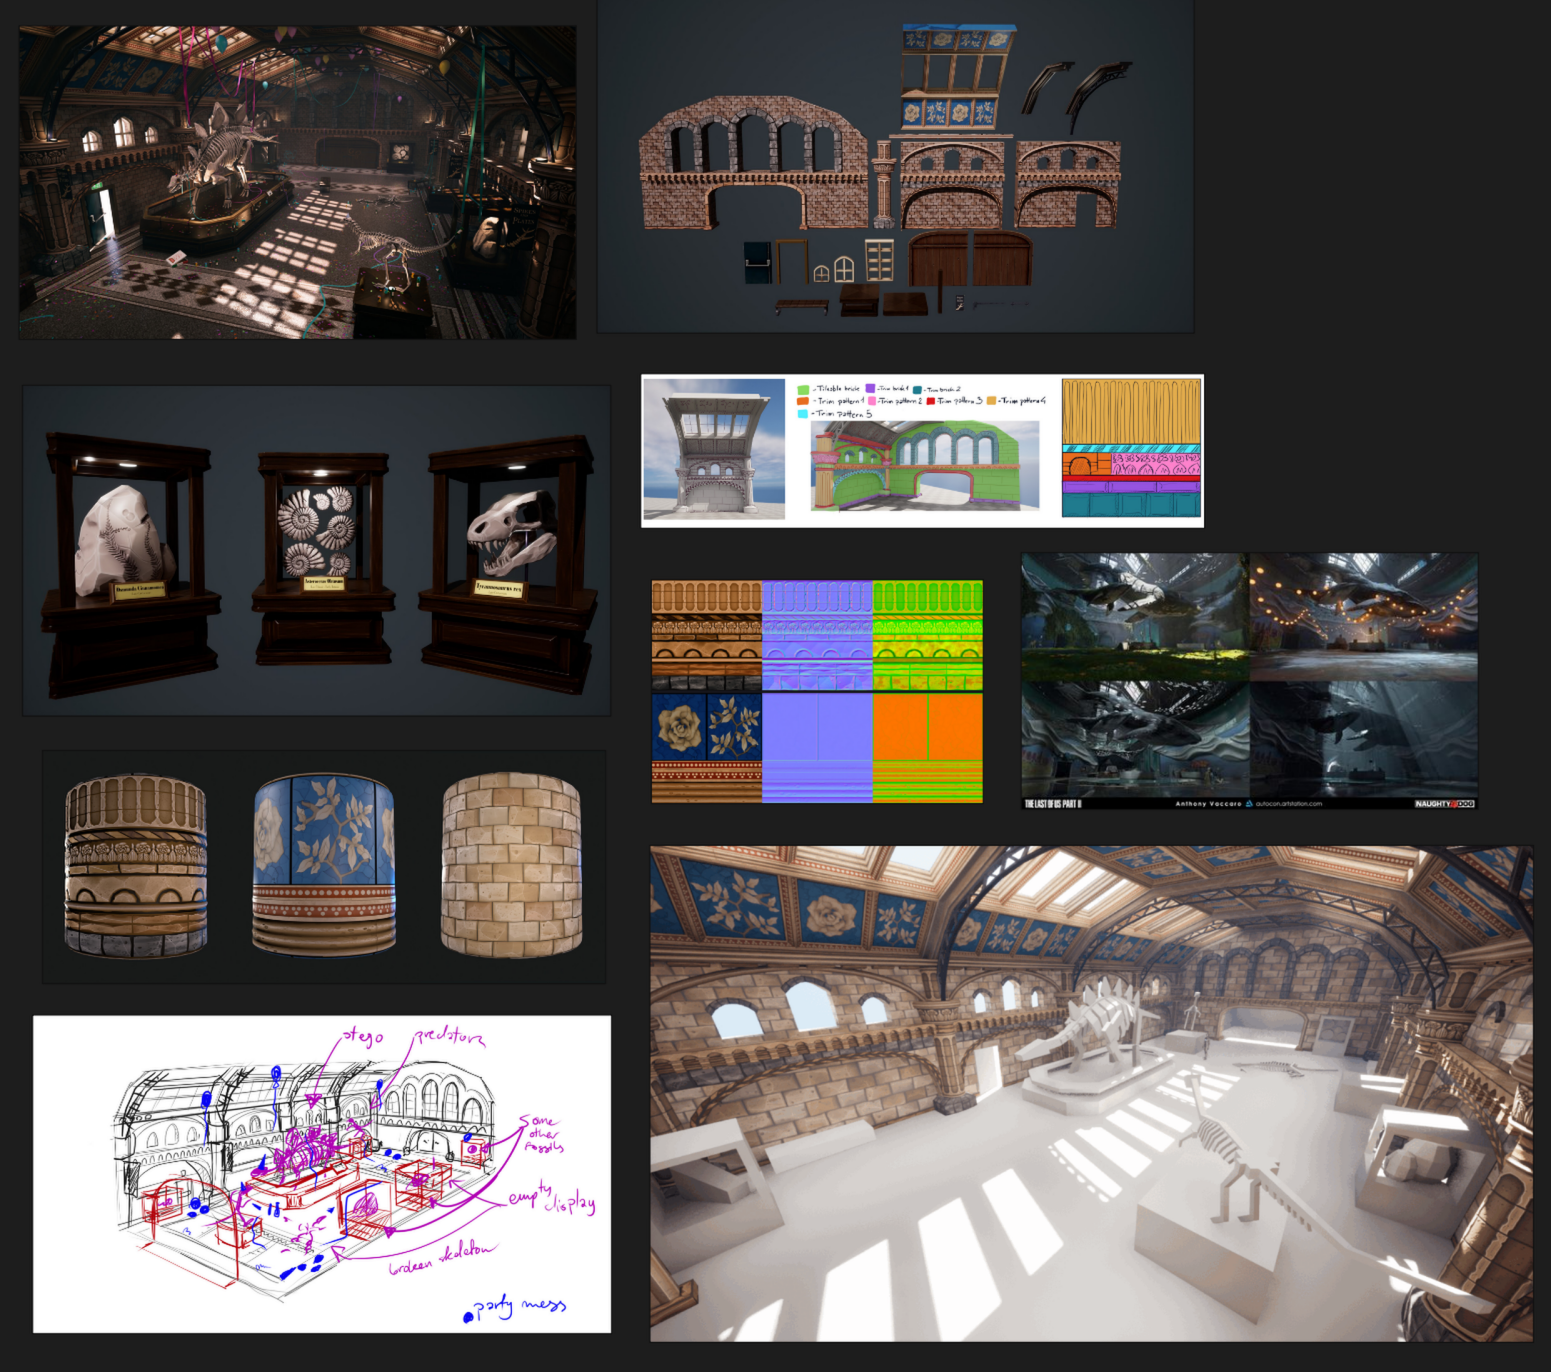](https://docs.bugjam.dev/uploads/images/gallery/2026-02/32eimage.png)
##### **ABANDONED INTERIORS**
[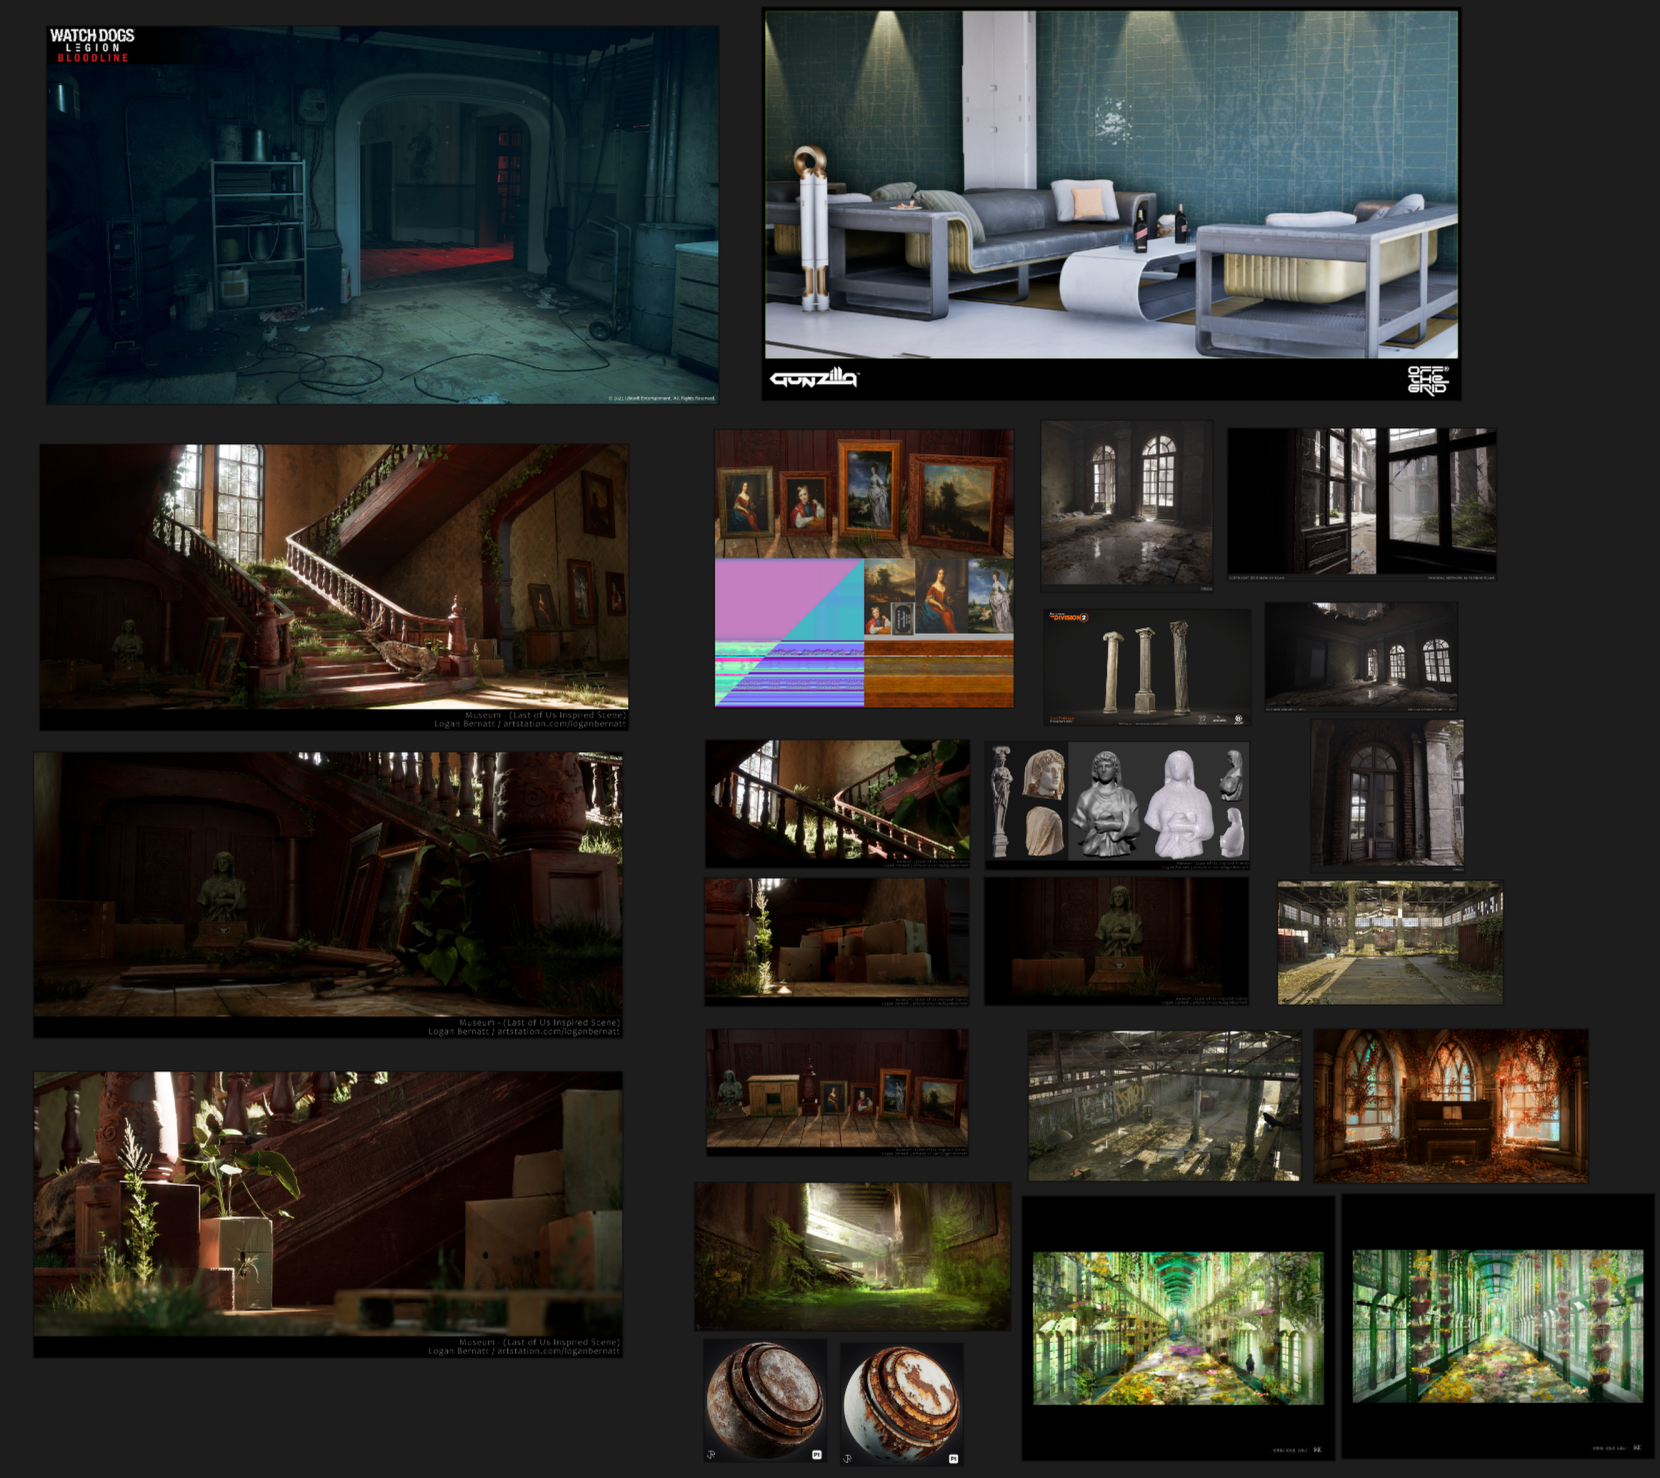](https://docs.bugjam.dev/uploads/images/gallery/2026-02/UAhimage.png)
##### **INTERIOR KIT AND TRIM SHEET EXAMPLE**
[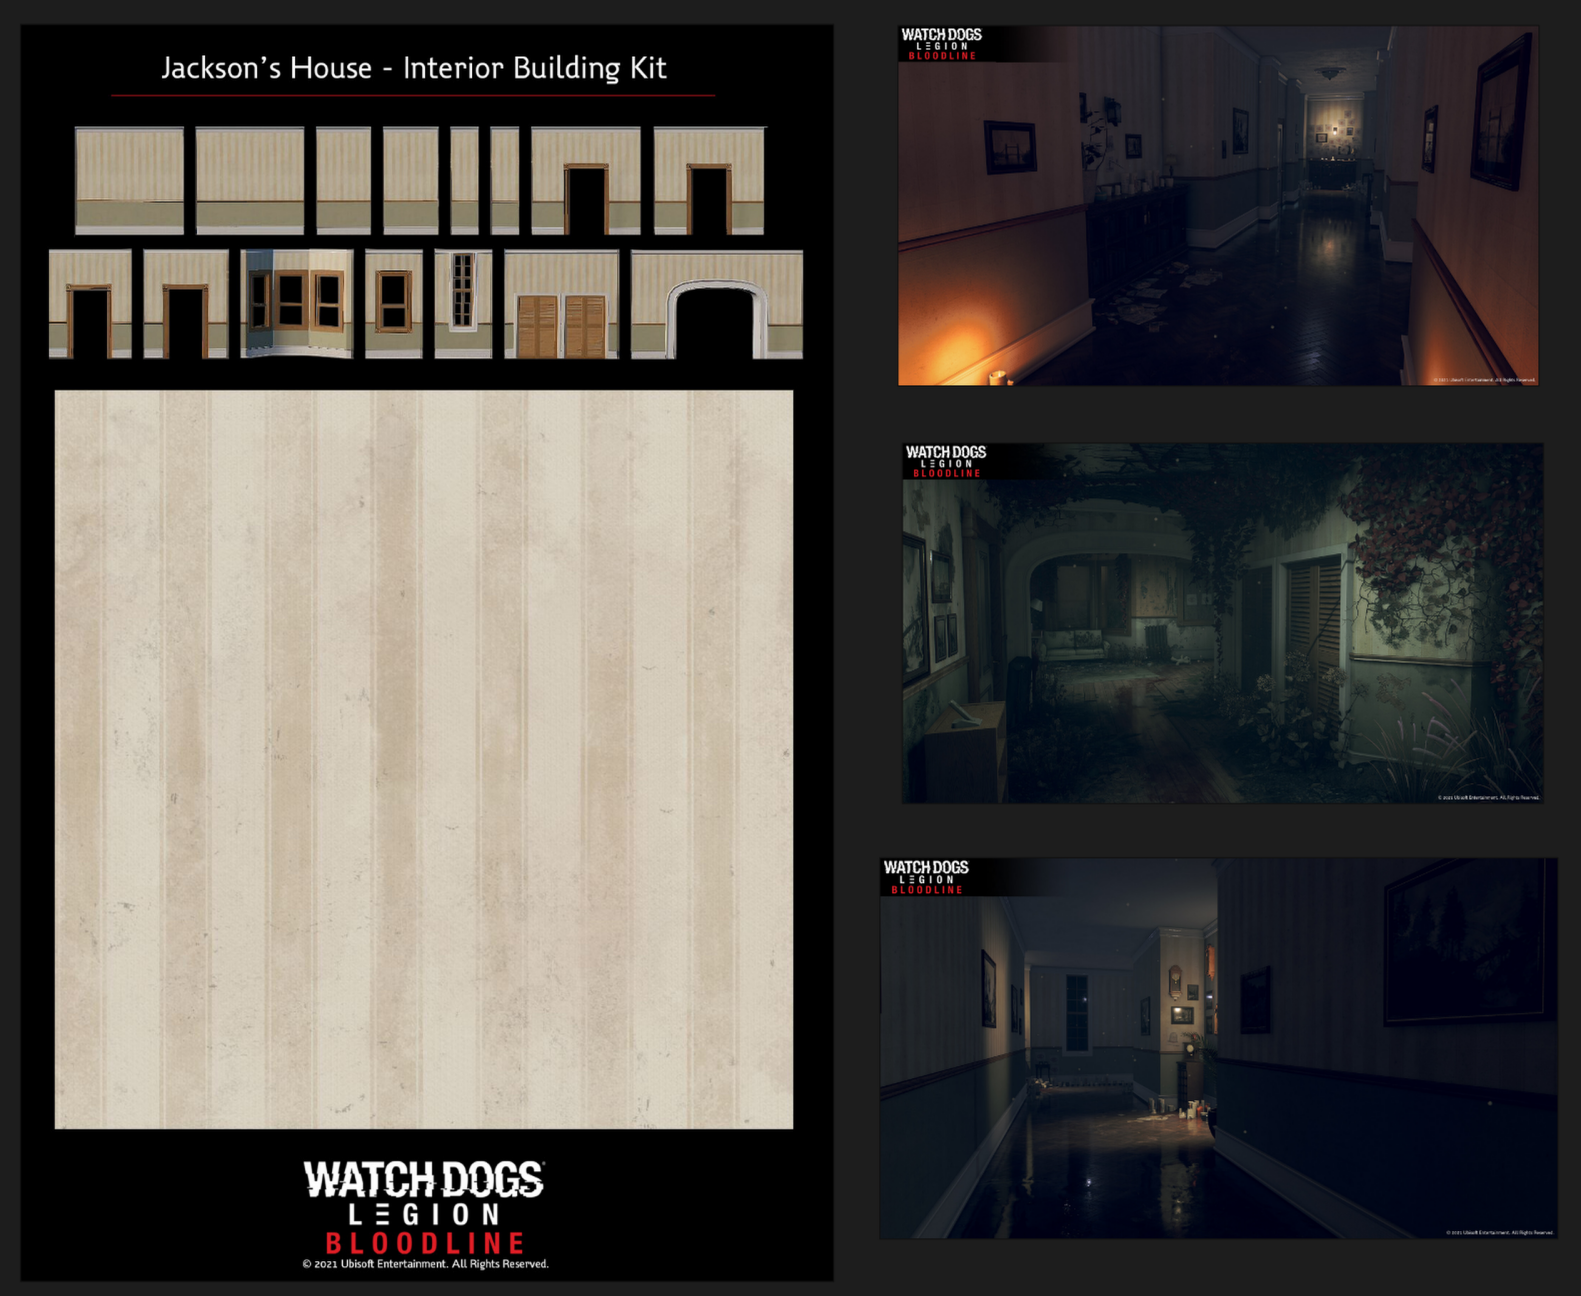](https://docs.bugjam.dev/uploads/images/gallery/2026-02/nwJimage.png)
##### **Liminal Future Spaces**
[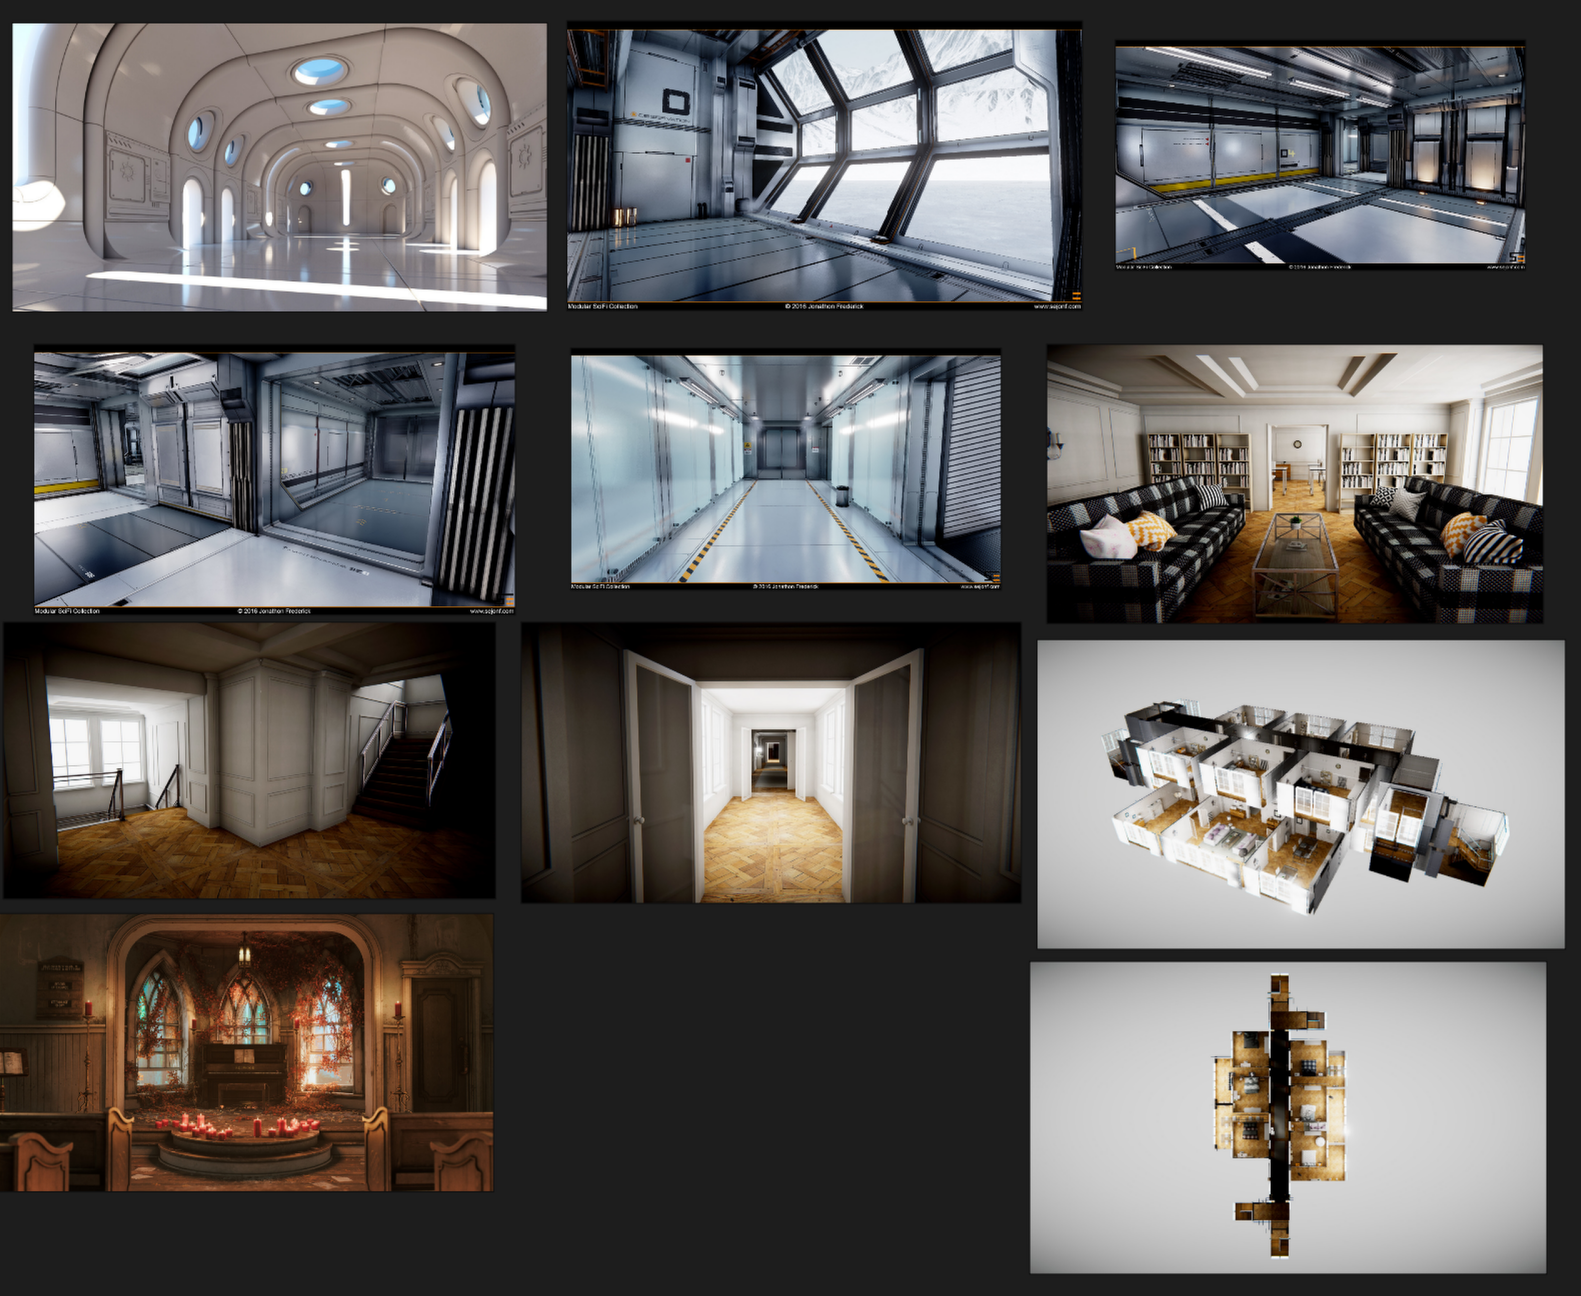](https://docs.bugjam.dev/uploads/images/gallery/2026-02/VPkimage.png)
##### **Solar Punk Future**
[](https://docs.bugjam.dev/uploads/images/gallery/2026-02/qqsimage.png)
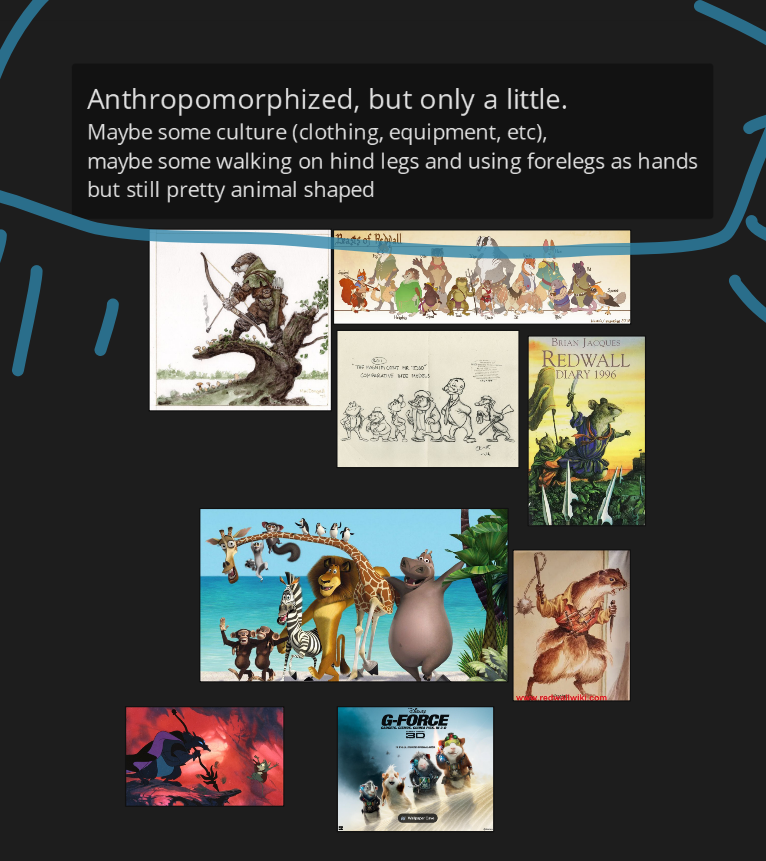
##### Animal to Human Spectrum
[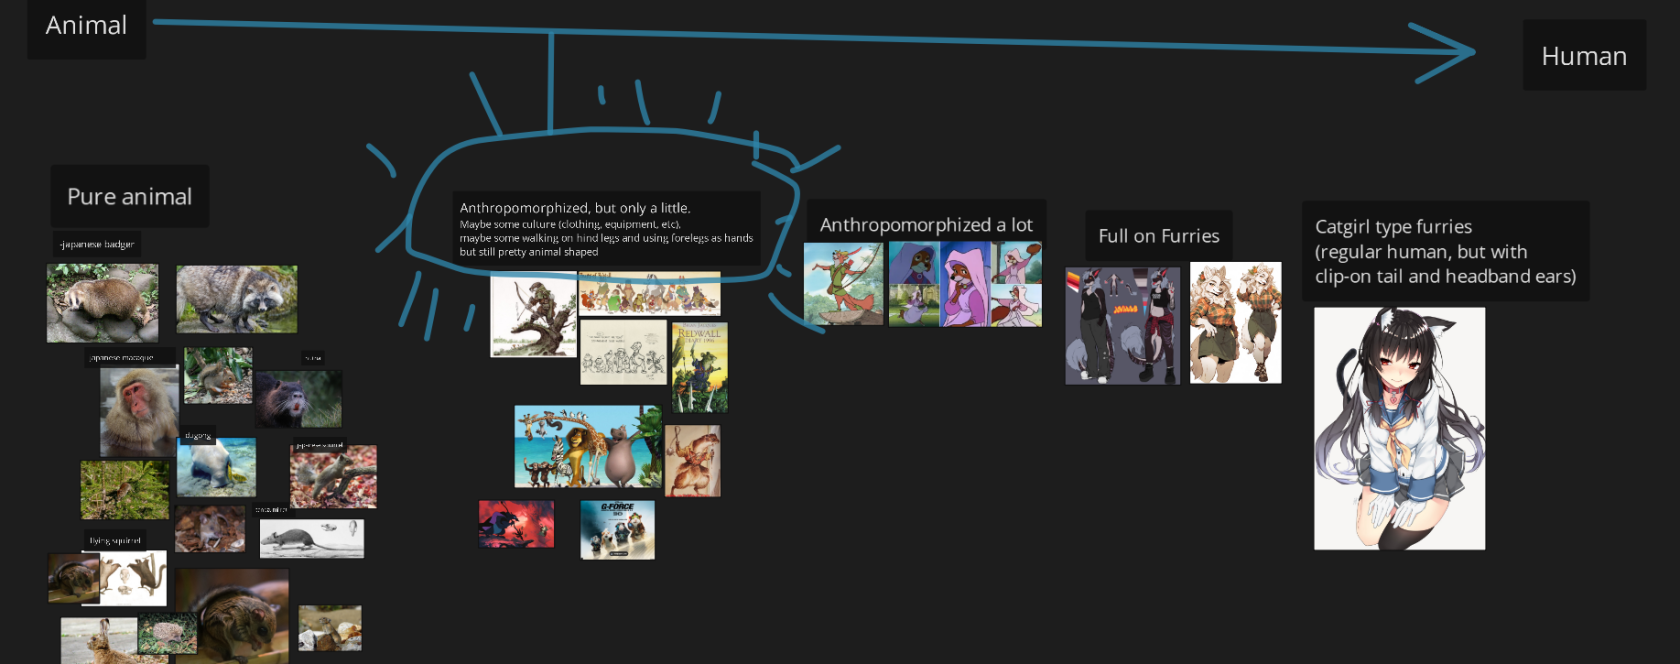](https://docs.bugjam.dev/uploads/images/gallery/2026-02/dKHimage.png)
#####
[](https://docs.bugjam.dev/uploads/images/gallery/2026-02/pRkimage.png)
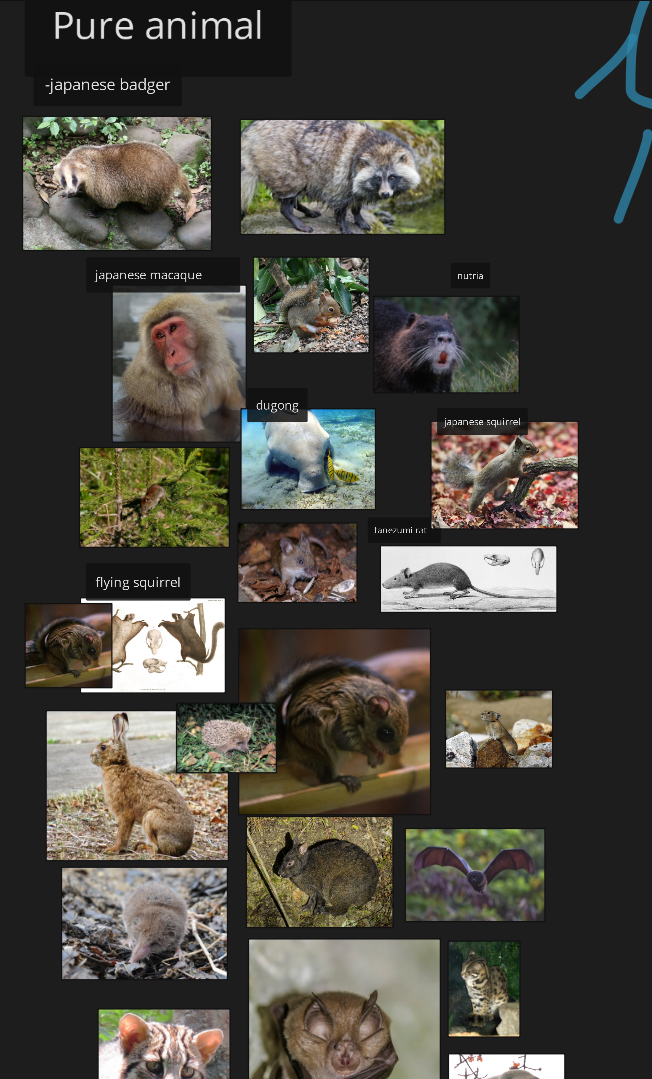
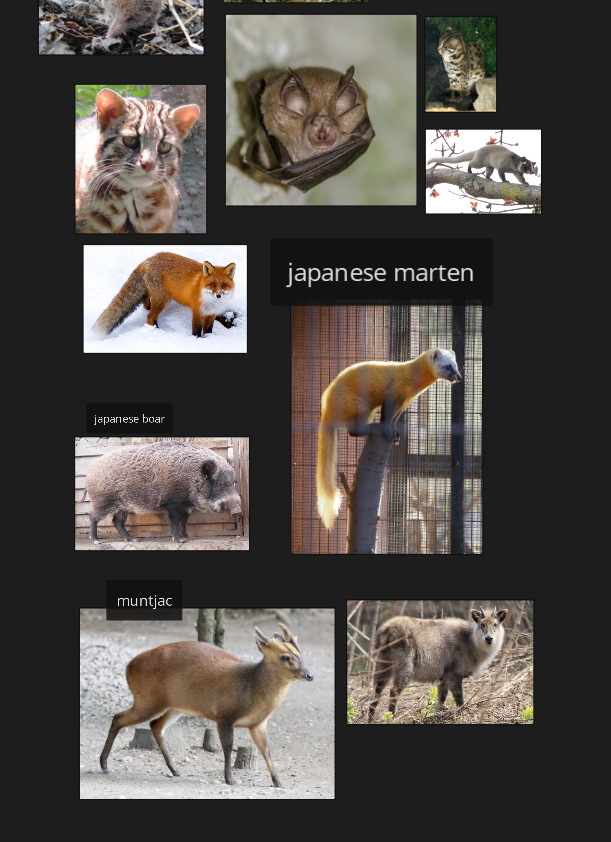
Animals of Japan
Tanuki implies animals from a similar biome range would be about. Is there a post-human culture here? What are the other animals up to? Is there some sorta Redwall-like society of raccoon dogs, stoats, mice, rats, badgers, feral cats and dogs, rabbits, etc?
[](https://docs.bugjam.dev/uploads/images/gallery/2026-02/KNVimage.png)
[](https://docs.bugjam.dev/uploads/images/gallery/2026-02/uetimage.png)
TECH ART NOTES: Within this idea, still a good practice for scope to have a limited number of "template" rigs, AKA a ferret rig that also works on an otter, weasel, etc. Less strain from multiple rigs, less work, rerigging, and most of these guys are in a rough archetype anyway. A rat and a mouse can use the same rig, just make the rat bigger.
#### Robotz
[](https://docs.bugjam.dev/uploads/images/gallery/2026-02/7ykimage.png)
### Mind Map
[Feel free to add to it! ](https://drive.google.com/file/d/1B2wOg1ayBR3sQDH0jU8M45vqwOCyQmpF/view?usp=sharing)
Mind maps are a useful way to get a word salad of helpful ideas to moodboard. No wrong answers--more words = better! "If you know the name of something and you have the internet, there is zero excuse to not have reference," a concept artist said once. --Oscar
# Gray boxing levels with Godot's CSG nodes
## What is CSG?
CSG stands for **Constructive Solid Geometry.** Godot has a built-in CSG system that's *great* for quickly prototyping and grayboxing levels or any other mesh.
If you're used to Blender, think of it like adding a ton of meshes together with the [**Boolean Modifier**](https://docs.blender.org/manual/en/latest/modeling/modifiers/generate/booleans.html) but a lot quicker to iterate on.
There is a page for this in the Godot docs, but it is a little bare-bones and does not go over the export process very well:
[https://docs.godotengine.org/en/stable/tutorials/3d/csg\_tools.html](https://docs.godotengine.org/en/stable/tutorials/3d/csg_tools.html)
It is good to give 👆 a read before continuing on this page!
## Creating CSG levels
### Adding the CSGCombiner3D
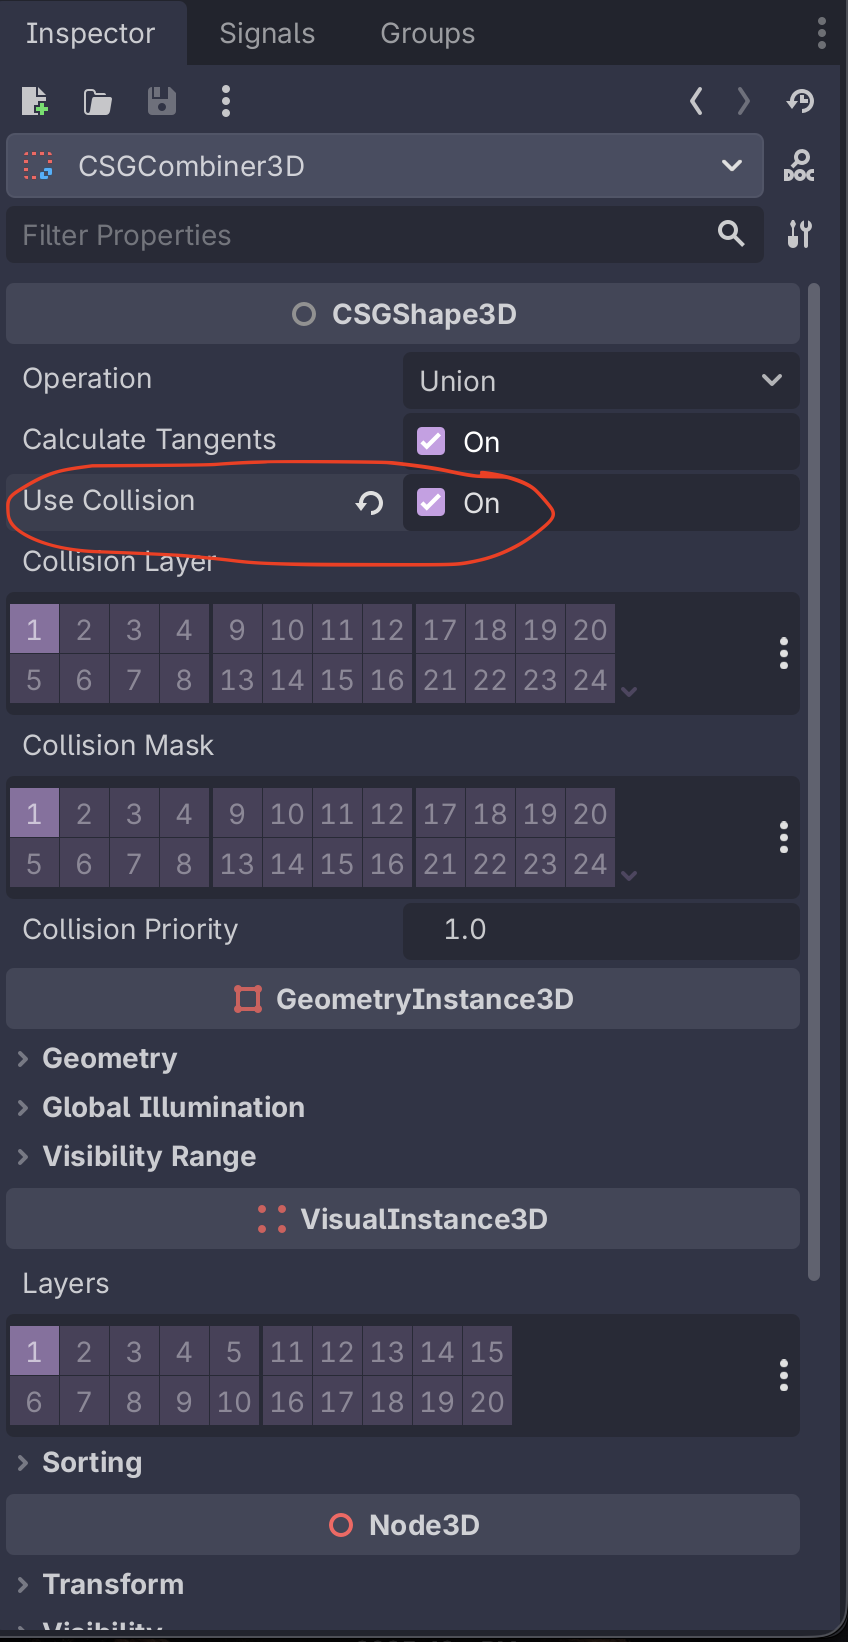
First, you will want to create a root [CSGCombiner3D](https://docs.godotengine.org/en/stable/classes/class_csgcombiner3d.html) node. This node will combine all of the CSG nodes underneath it into one big mesh.
Make sure that you also turn **Use Collision** on. This will also create a **static** collision body as part of the CSG node - important for level geometry!
[](https://docs.bugjam.dev/uploads/images/gallery/2026-02/screenshot-2026-02-15-at-5-04-27-pm.png)
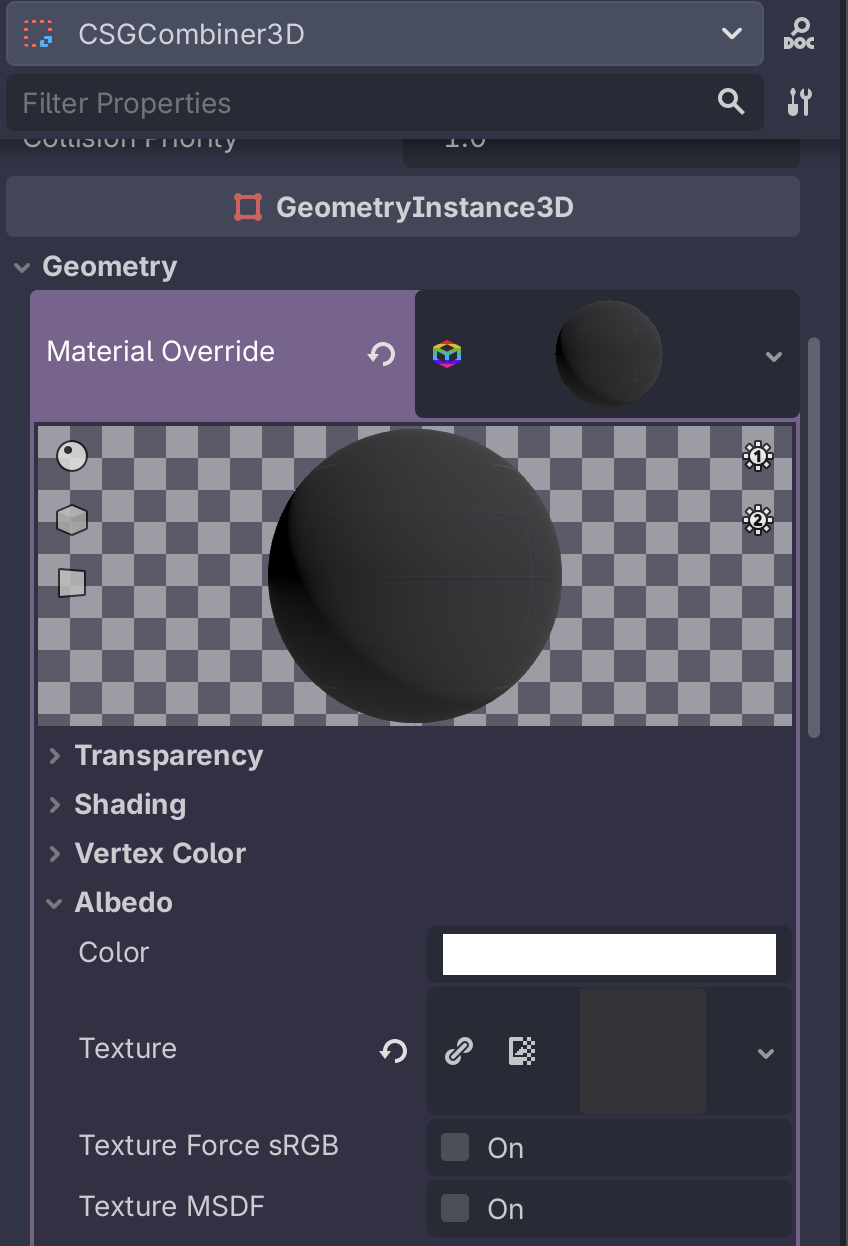
You will also want to add a **Material Override** to the CSG combiner. This material will automatically be used for the generated geometry.
[Kenney's Prototype Textures](https://www.kenney.nl/assets/prototype-textures) pack is very useful here!
[](https://docs.bugjam.dev/uploads/images/gallery/2026-02/screenshot-2026-02-15-at-5-12-31-pm.png)
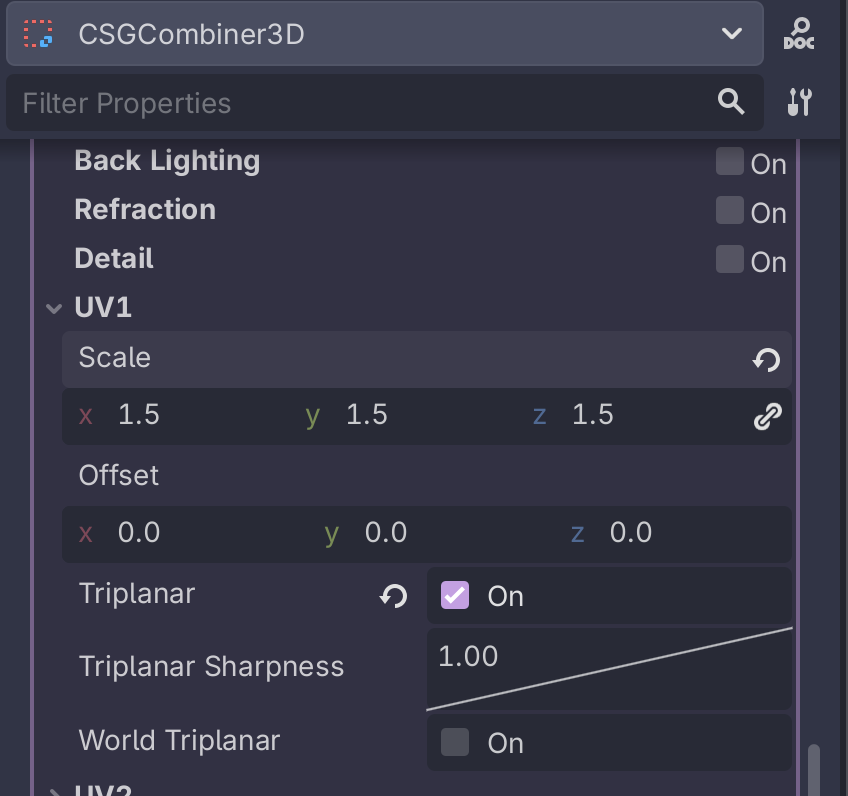
Inside of the material, make sure you turn on **UV1 →** **Triplanar**. This will make the texture repeat over the final geometry. You can also change the **UV1** → **Scale** to change how the texture repeats. Higher numbers means it will repeat more.
[](https://docs.bugjam.dev/uploads/images/gallery/2026-02/screenshot-2026-02-15-at-5-13-50-pm.png)
*Side note: if we're doing this a lot, we should probably just have a material that is saved to a resource to use for this.*
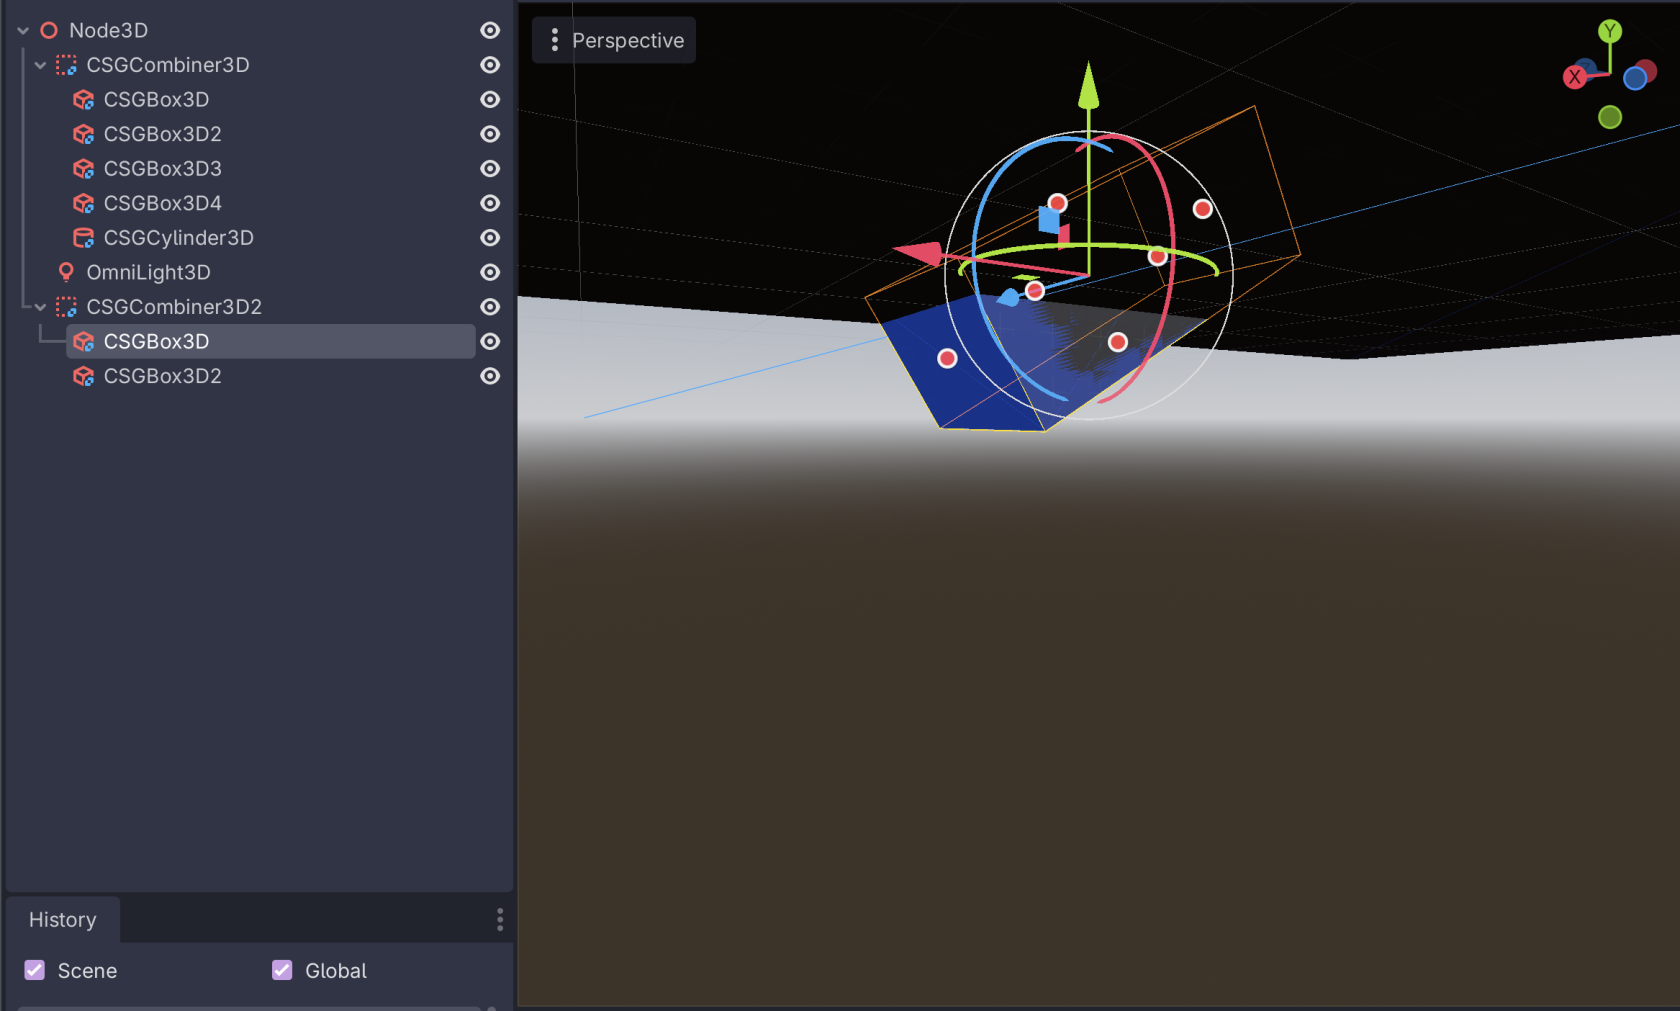
### Adding CSG nodes
As children of the `CSGCombiner3D` , you can add any of the CSG nodes:
- [CSGBox3D](https://docs.godotengine.org/en/stable/classes/class_csgbox3d.html#class-csgbox3d)
- [CSGCylinder3D](https://docs.godotengine.org/en/stable/classes/class_csgcylinder3d.html#class-csgcylinder3d) (also supports cone)
- [CSGSphere3D](https://docs.godotengine.org/en/stable/classes/class_csgsphere3d.html#class-csgsphere3d)
- [CSGTorus3D](https://docs.godotengine.org/en/stable/classes/class_csgtorus3d.html#class-csgtorus3d)
- [CSGPolygon3D](https://docs.godotengine.org/en/stable/classes/class_csgpolygon3d.html#class-csgpolygon3d)
- [CSGMesh3D](https://docs.godotengine.org/en/stable/classes/class_csgmesh3d.html#class-csgmesh3d)
- [CSGCombiner3D](https://docs.godotengine.org/en/stable/classes/class_csgcombiner3d.html#class-csgcombiner3d)
[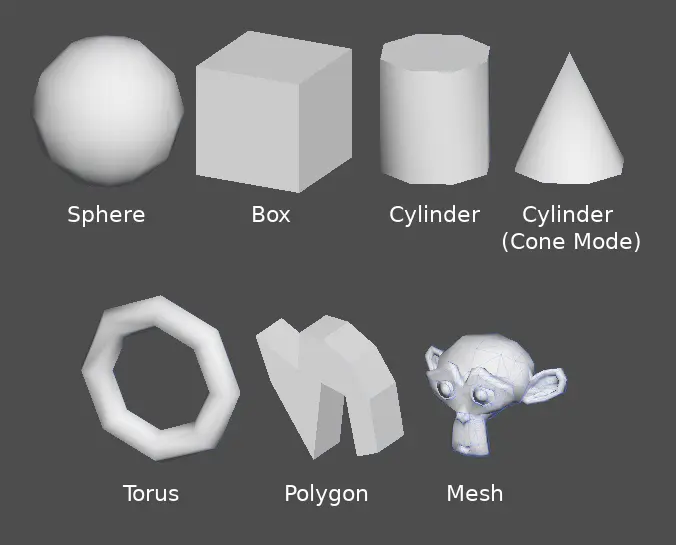](https://docs.bugjam.dev/uploads/images/gallery/2026-02/csg-mesh.webp)
Note that for each node, you can also set its **Operation**, this can be used to i.e. make holes in a mesh:
[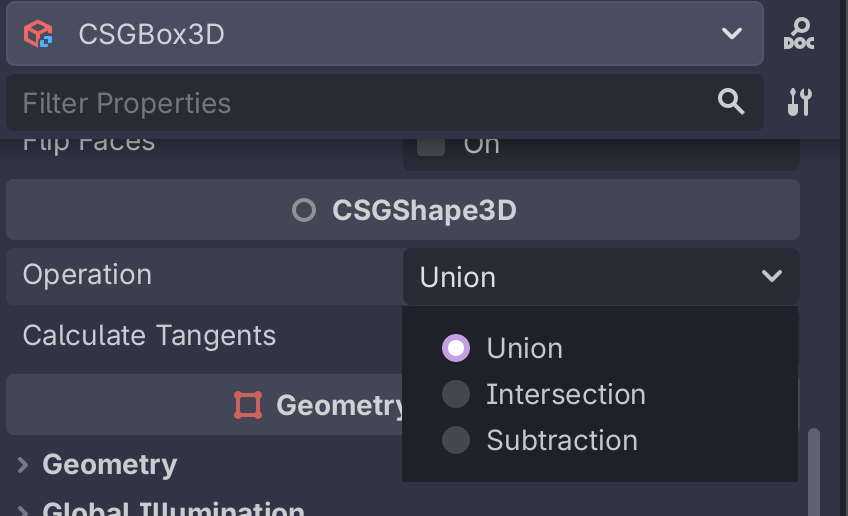](https://docs.bugjam.dev/uploads/images/gallery/2026-02/screenshot-2026-02-15-at-5-10-06-pm.png)
[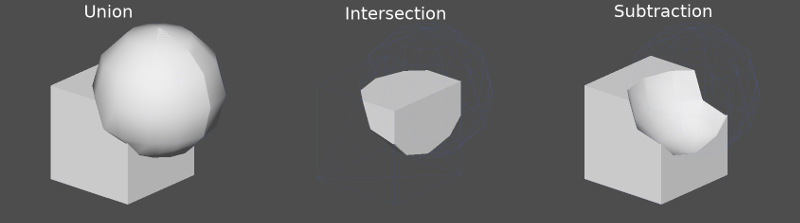](https://docs.bugjam.dev/uploads/images/gallery/2026-02/pS0image.png)
### Making rooms
#### Method 1: Flip faces
As noted in the "[Prototyping levels with CSG](https://docs.godotengine.org/en/stable/tutorials/3d/csg_tools.html)" page in the Godot docs, there is a "**Flip** **Faces**" toggle for CSG primitives. Turning this on will create a sort of "inverted box" that you can go inside of:
[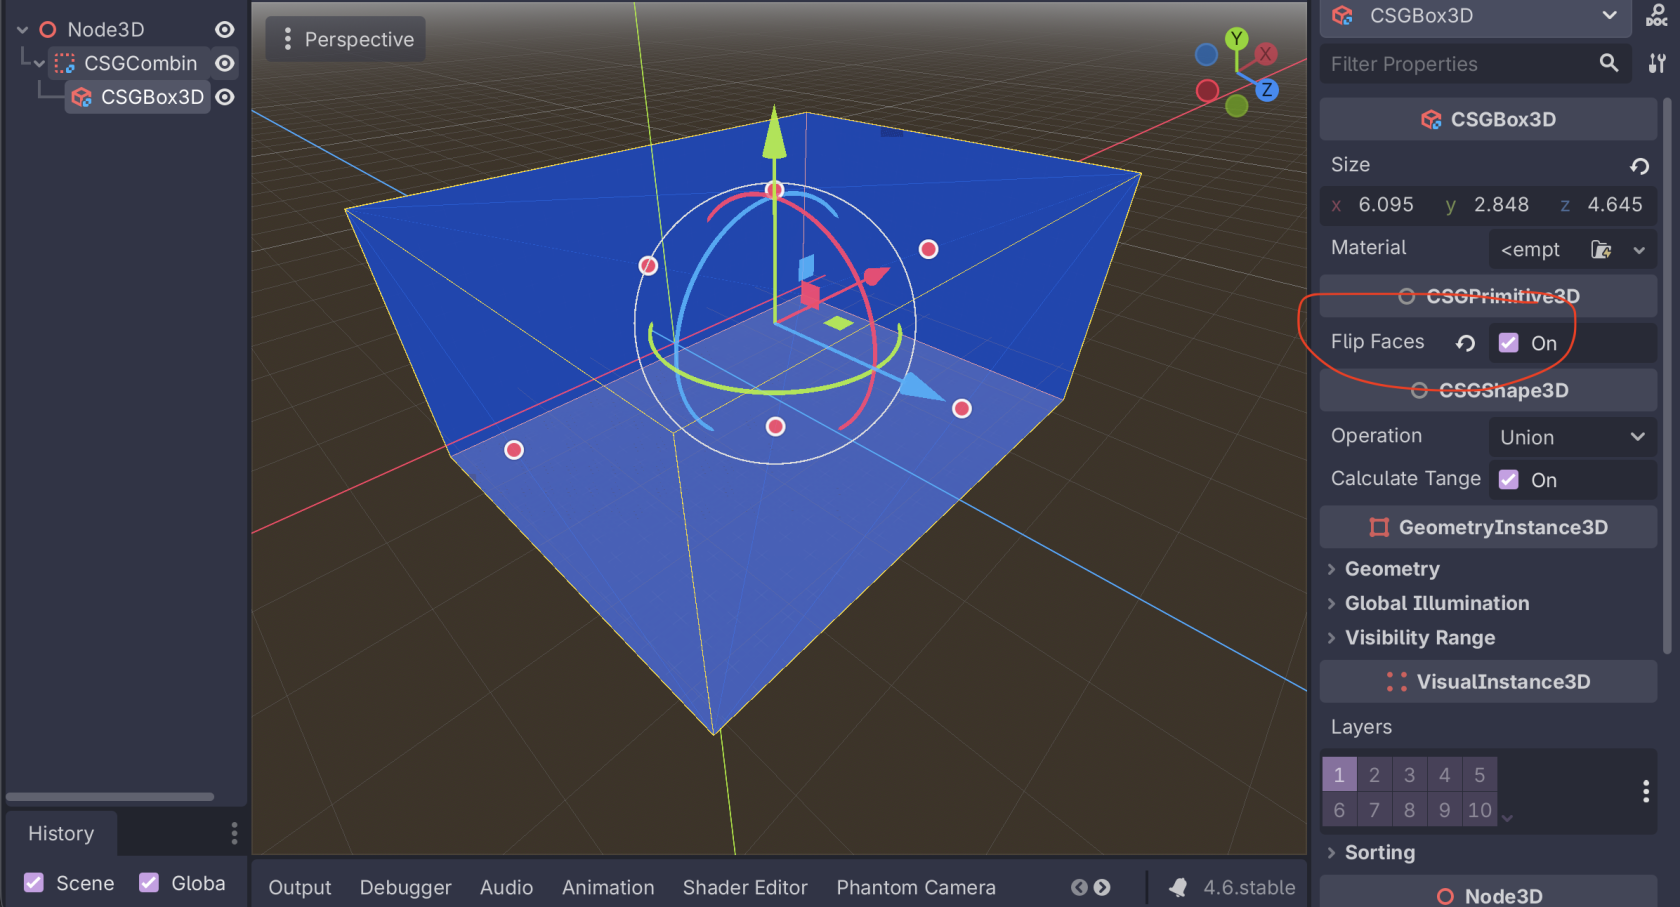](https://docs.bugjam.dev/uploads/images/gallery/2026-02/screenshot-2026-02-15-at-5-20-19-pm.png)
*However*, this has some problems when used for level geometry:
- You cannot easily poke a hole in the box for i.e. a door
- The walls have no width to them, which can lead to physics objects clipping through them easily
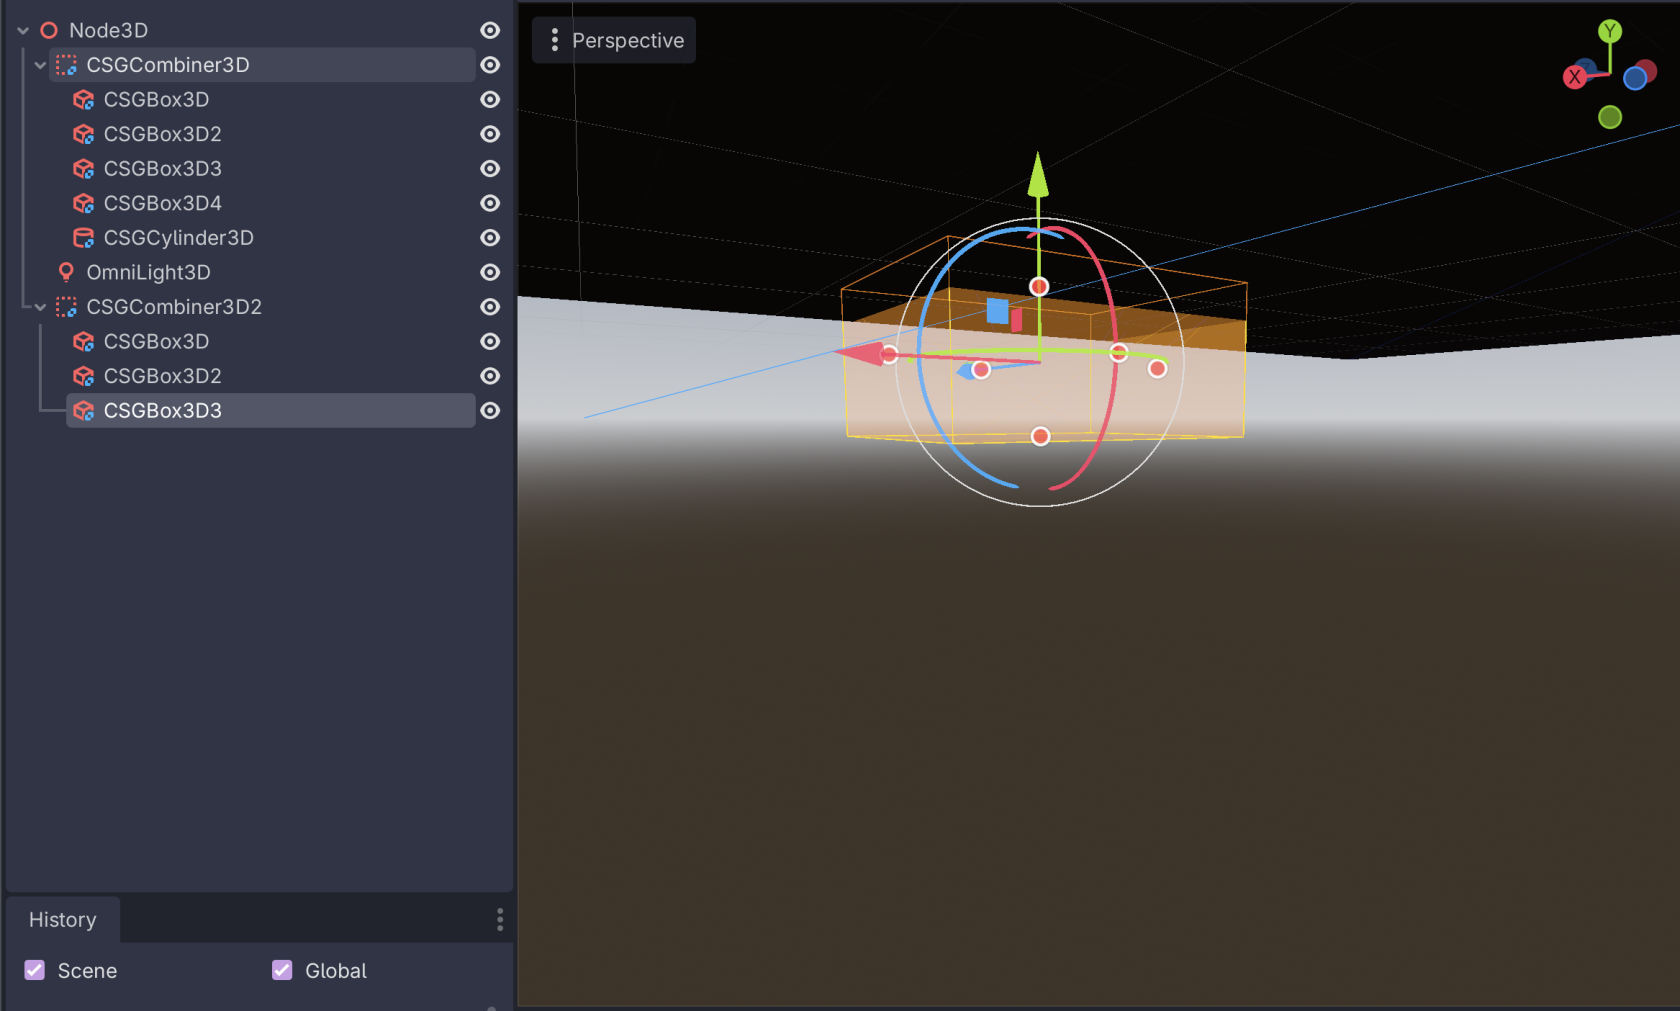
#### Method 2: Double primitives with subtraction
You can also create two of the same CSG primitives, shrink one down by a bit, and then set the "**Operation**" of the smaller one to "**Subtraction**".
Here, I have two boxes. The outer one has a size of `(10, 10, 10)` and the inner one has a size of `(9.5, 9.5, 9.5)`
[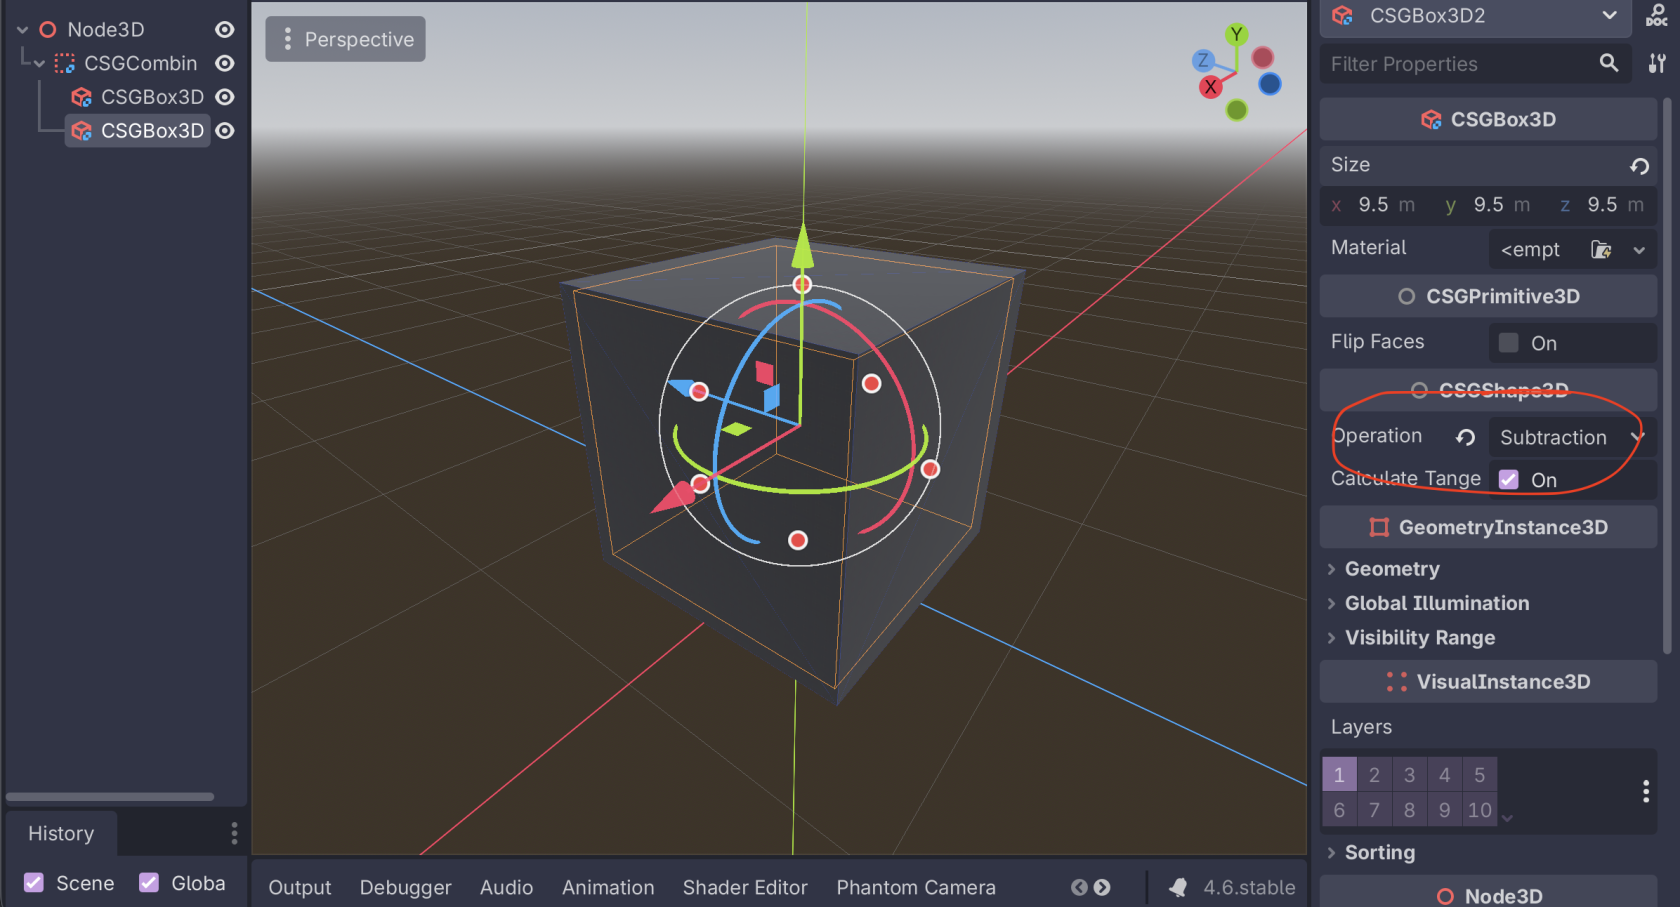](https://docs.bugjam.dev/uploads/images/gallery/2026-02/screenshot-2026-02-15-at-5-26-41-pm.png)
This leaves you with a hollow box with nice, thick walls. Walls that are ~0.5 units thick are nice since they make it easy to hide overlapping geometry if you have anu.
To something like a door, you can add another node with subtraction:
[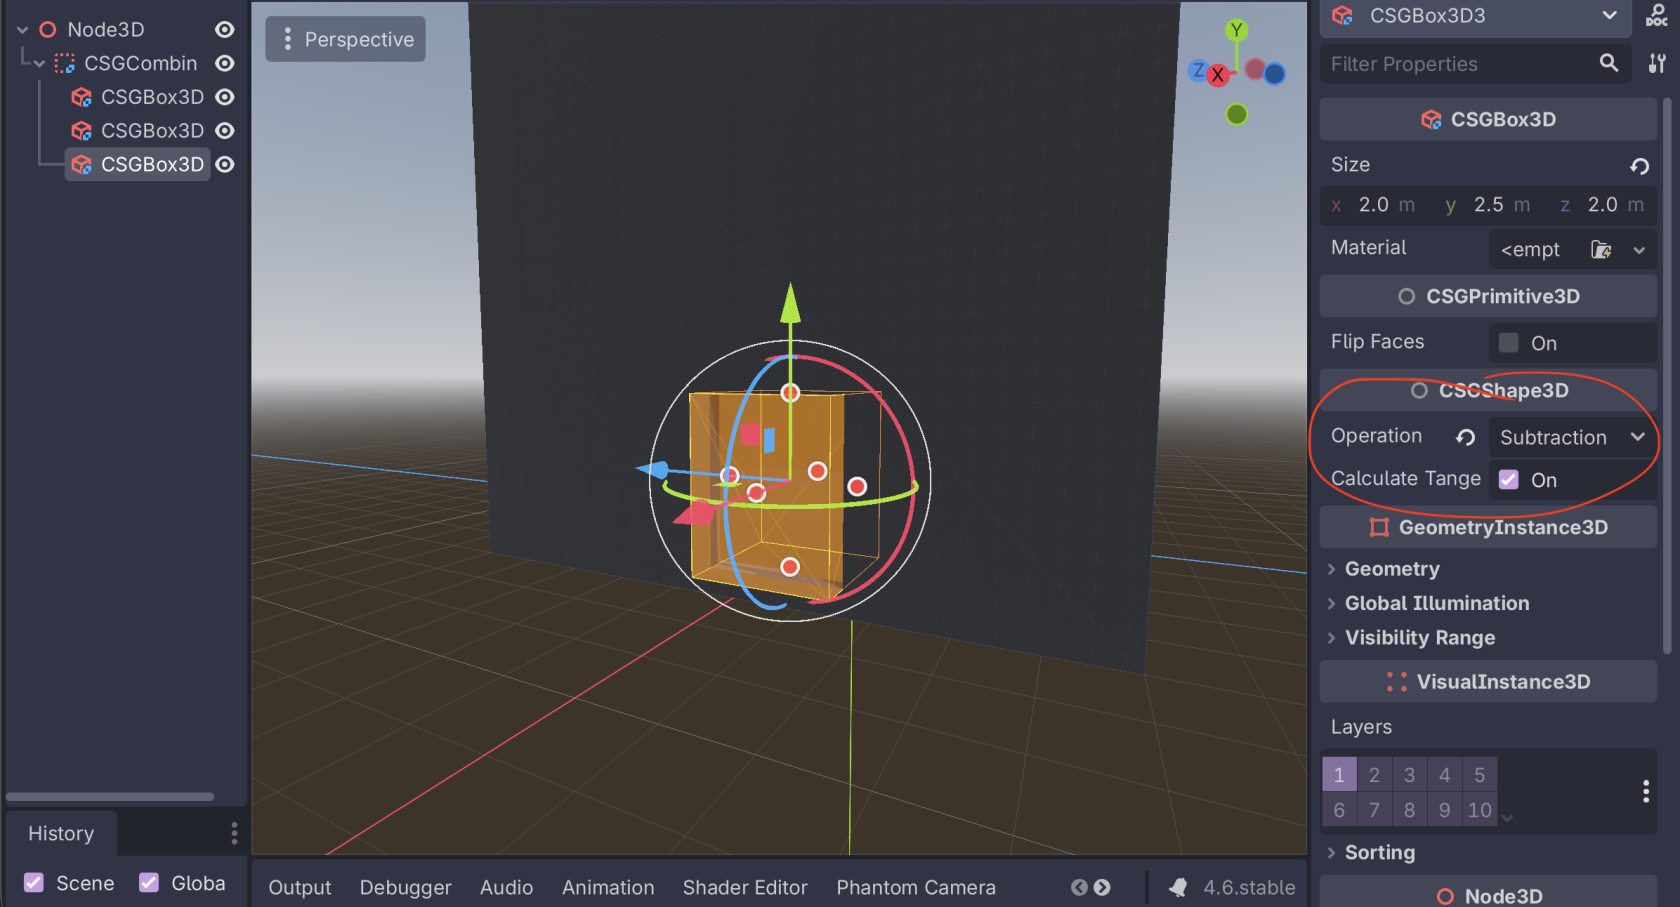](https://docs.bugjam.dev/uploads/images/gallery/2026-02/screenshot-2026-02-15-at-5-28-23-pm.png)
[](https://docs.bugjam.dev/uploads/images/gallery/2026-02/screenshot-2026-02-15-at-5-29-08-pm.png)
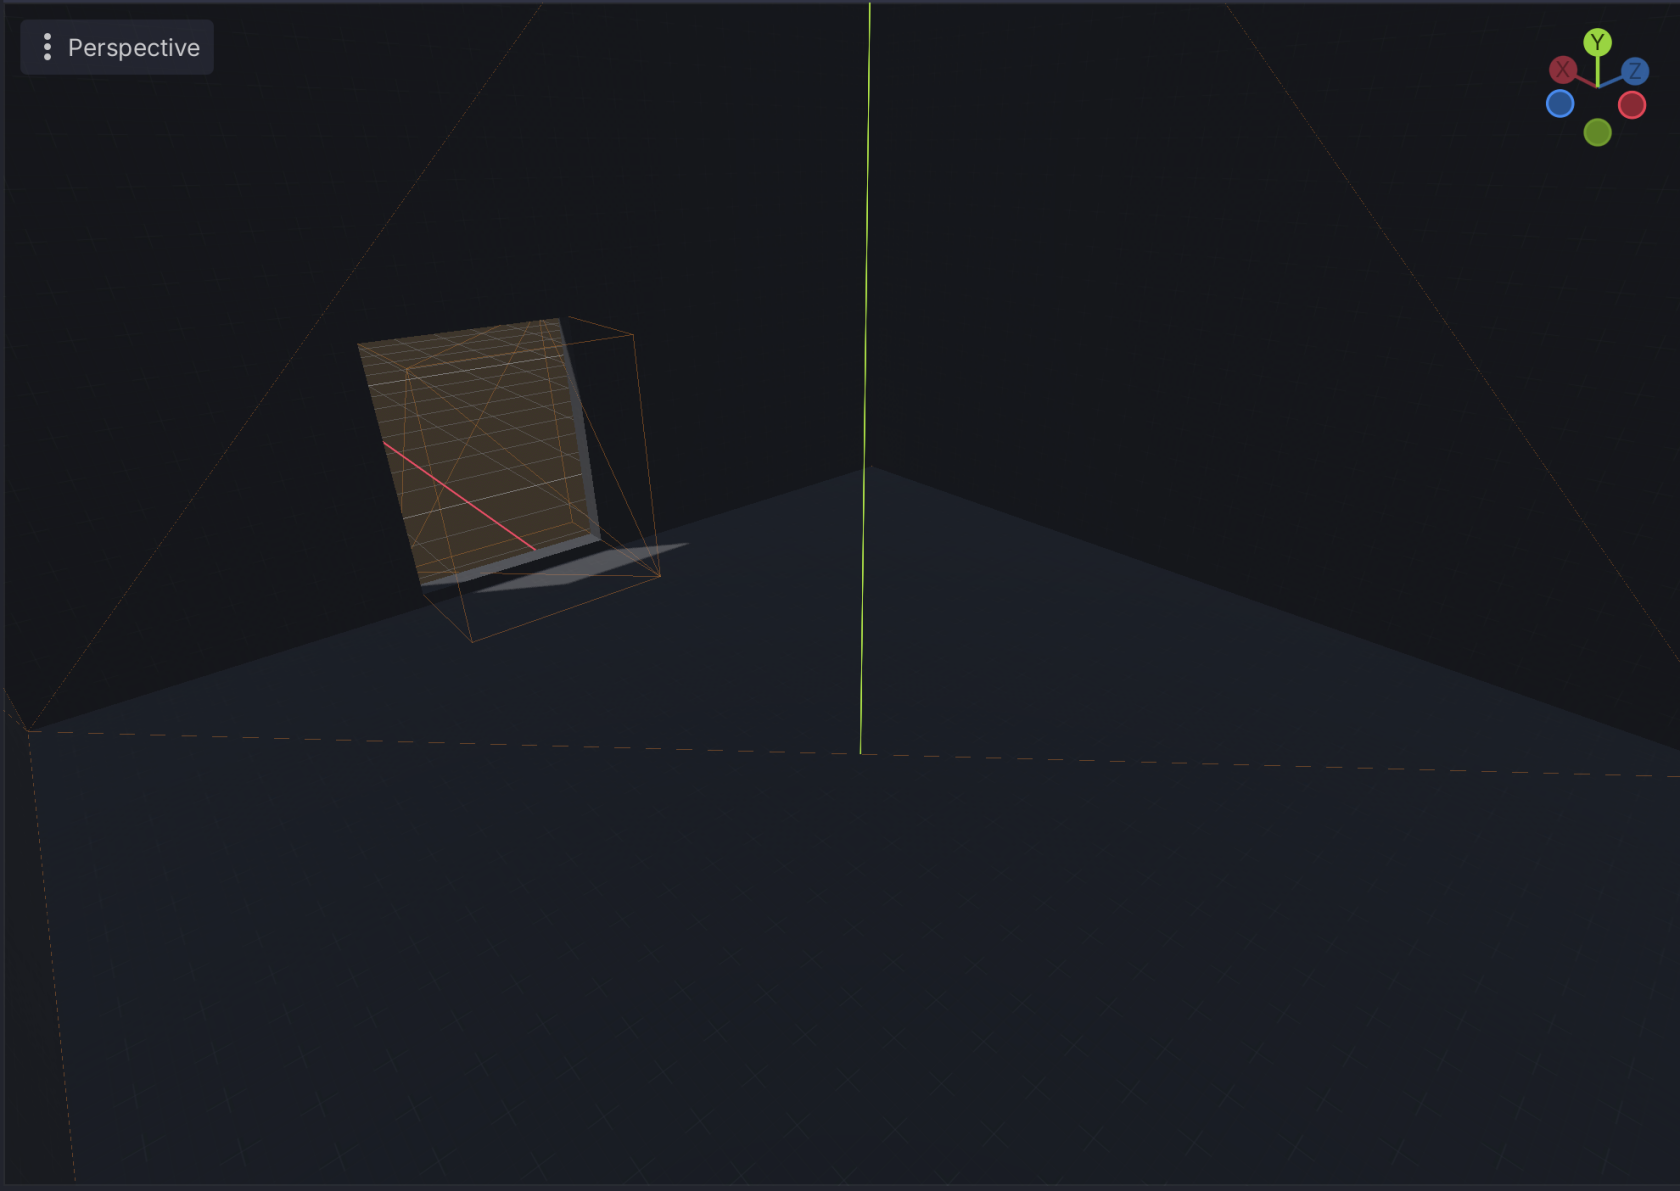
You can also add things like windows:
[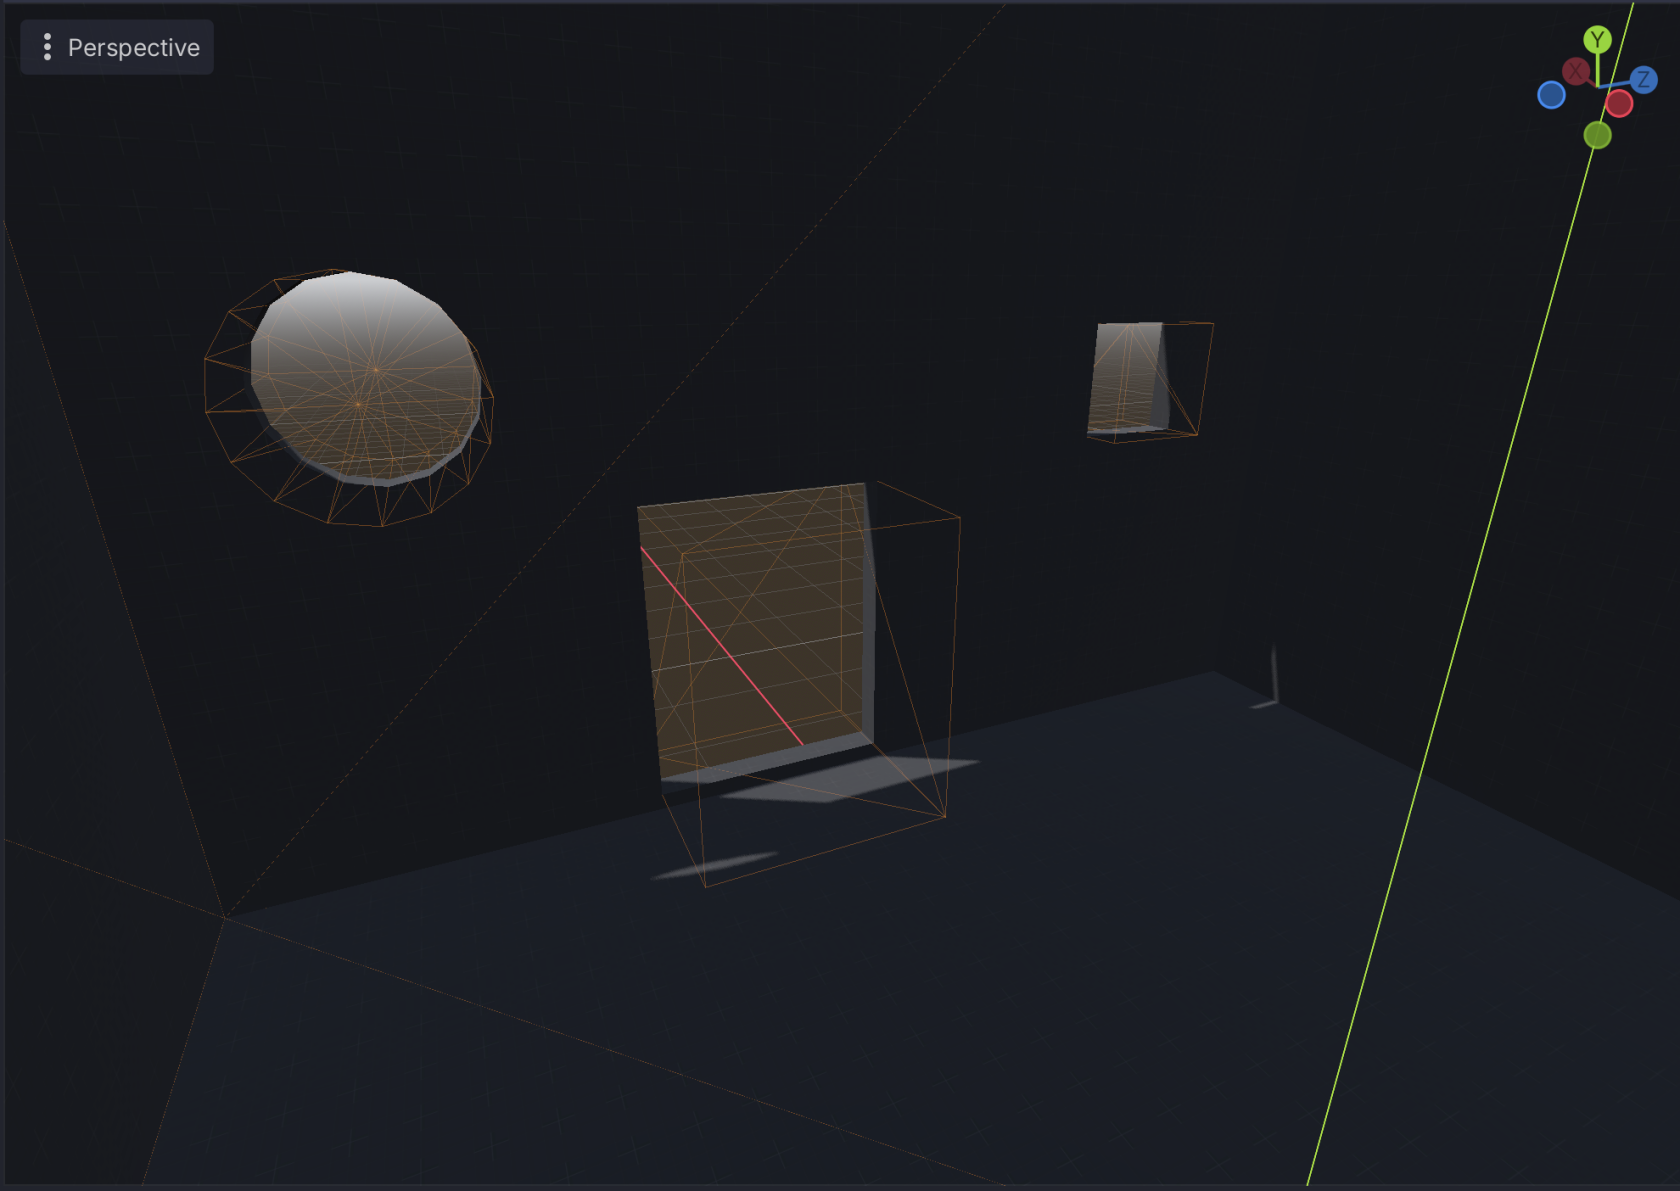](https://docs.bugjam.dev/uploads/images/gallery/2026-02/screenshot-2026-02-15-at-5-32-22-pm.png)
### Making ramps and multiple levels
Ramps can be made by adding a box and, rotating it by 30deg on the Z axis, and then positioning it against another box.
You can make the ramp taller so that there isn't any space underneath it. Getting these lined up exactly can be tricky, but in general character controllers are able to deal with small gaps/hitches and it can be cleaned up in Blender.
[](https://docs.bugjam.dev/uploads/images/gallery/2026-02/screenshot-2026-02-15-at-5-41-41-pm.png)
[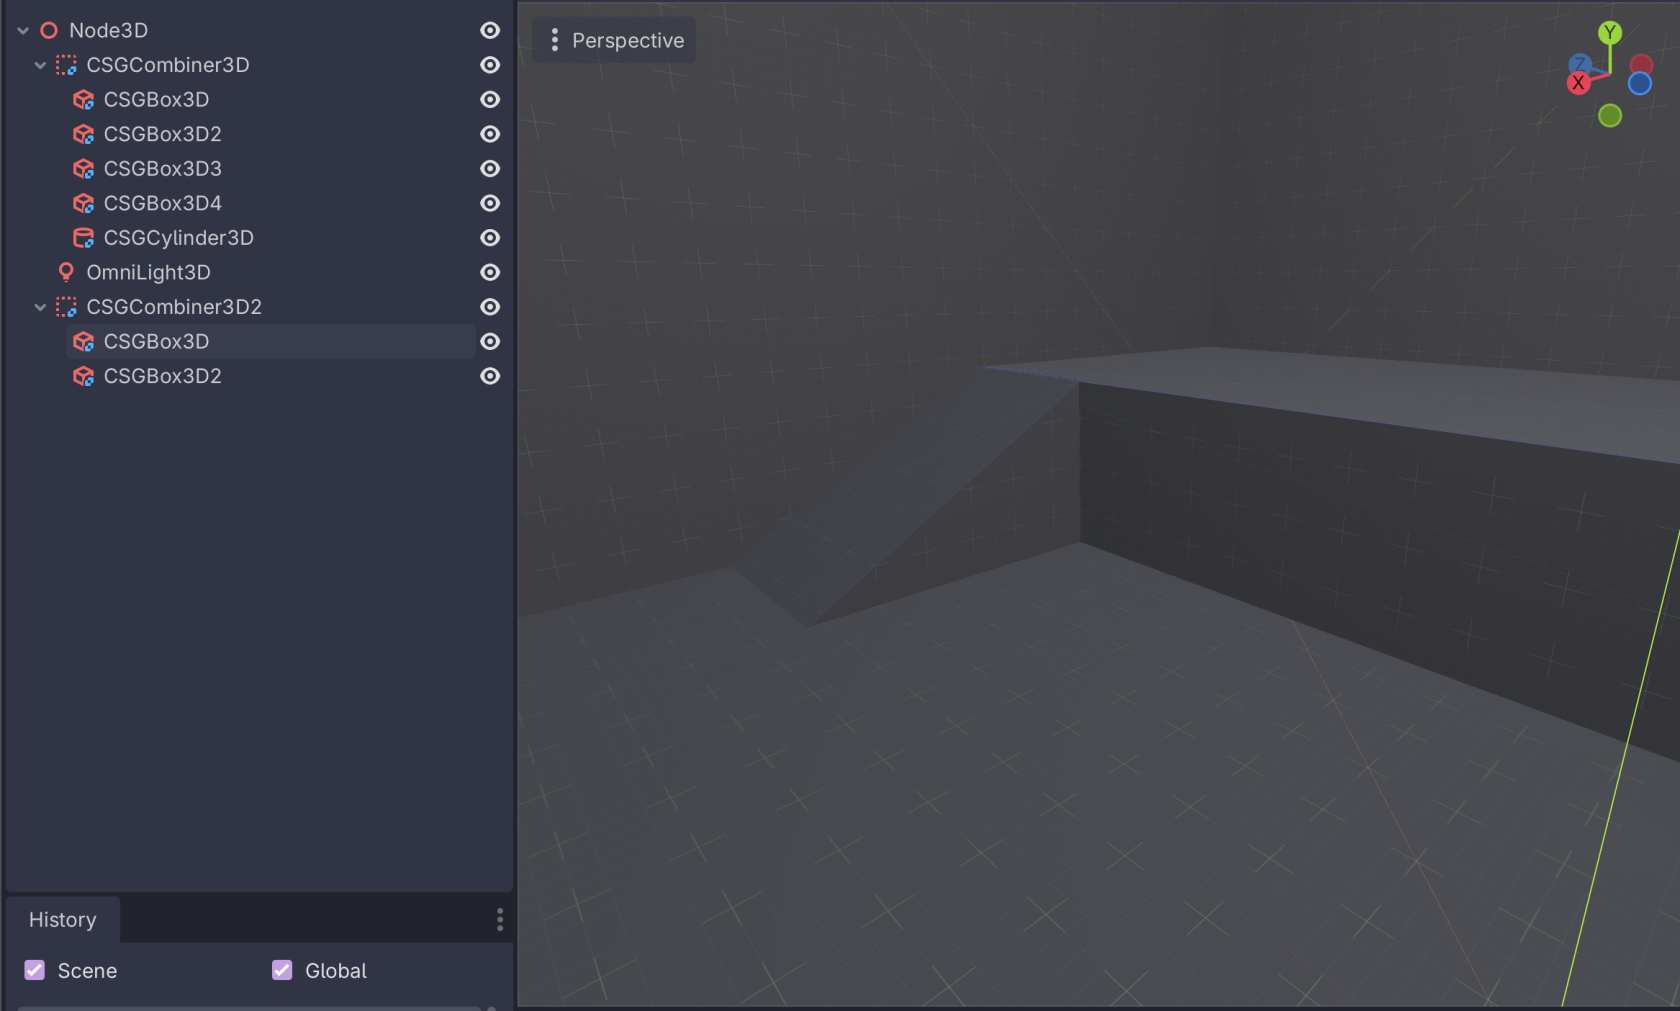](https://docs.bugjam.dev/uploads/images/gallery/2026-02/screenshot-2026-02-15-at-5-42-47-pm.png)
However, making the ramp tall enough to not have space underneath it, it will poke out of the bottom of whatever it's on:
[](https://docs.bugjam.dev/uploads/images/gallery/2026-02/screenshot-2026-02-15-at-5-44-43-pm.png)
This can be remedies with another subtraction node that goes a bit into the floor. Again, this is why thicker walls are nice - you can hide these seams inside of them!
[](https://docs.bugjam.dev/uploads/images/gallery/2026-02/screenshot-2026-02-15-at-5-45-22-pm.png)
### Rapid iteration
At this point, you should be able to drop the player node into the scene, play it, and then move around inside of it.
Super power here is that *you can edit the CSG nodes as the game is running* which means you can change things on the fly to see how they behave!
### Some tips
- In one scene, you can use multiple `CSGCombiner3D` nodes.
- It's a good idea to keep things separated in this way, for example having the "shell" of a room be one combiner and having each "section" of it (floors, inner rooms, etc) be separate combiners
- When using multiple combiners, try to keep the origin of the combiner at or near the actual geometry being created. This makes it easier to move things around later.
- **Order matters** in the combining!
- Sometimes if you try to move things around, it will mess with the operations
- **Name nodes as you go** to keep sanity
- In the moment, having `CSGBox3D33`, `CSGBox3D45`, `CSGBox3D13` is fine but if you ever have to go back and touch them up later you're in for a world of pain
- Add an `OmniLight3D` inside of the scene to see things better as you go
## Exporting CSG to Blender
### Export glTF from Godot
Godot has a native scene glRF exporter built-in that can do this.
**This is a one-way conversion!!!**
That means that you should be *pretty sure* that your CSG layout is how you want it before exporting it from Godot.
Depending on the changes you want to make, it could be easy or difficult to port them back and forth.
It lives under **Scene** **→** **Export As... → glTS 2.0 Scene...**
[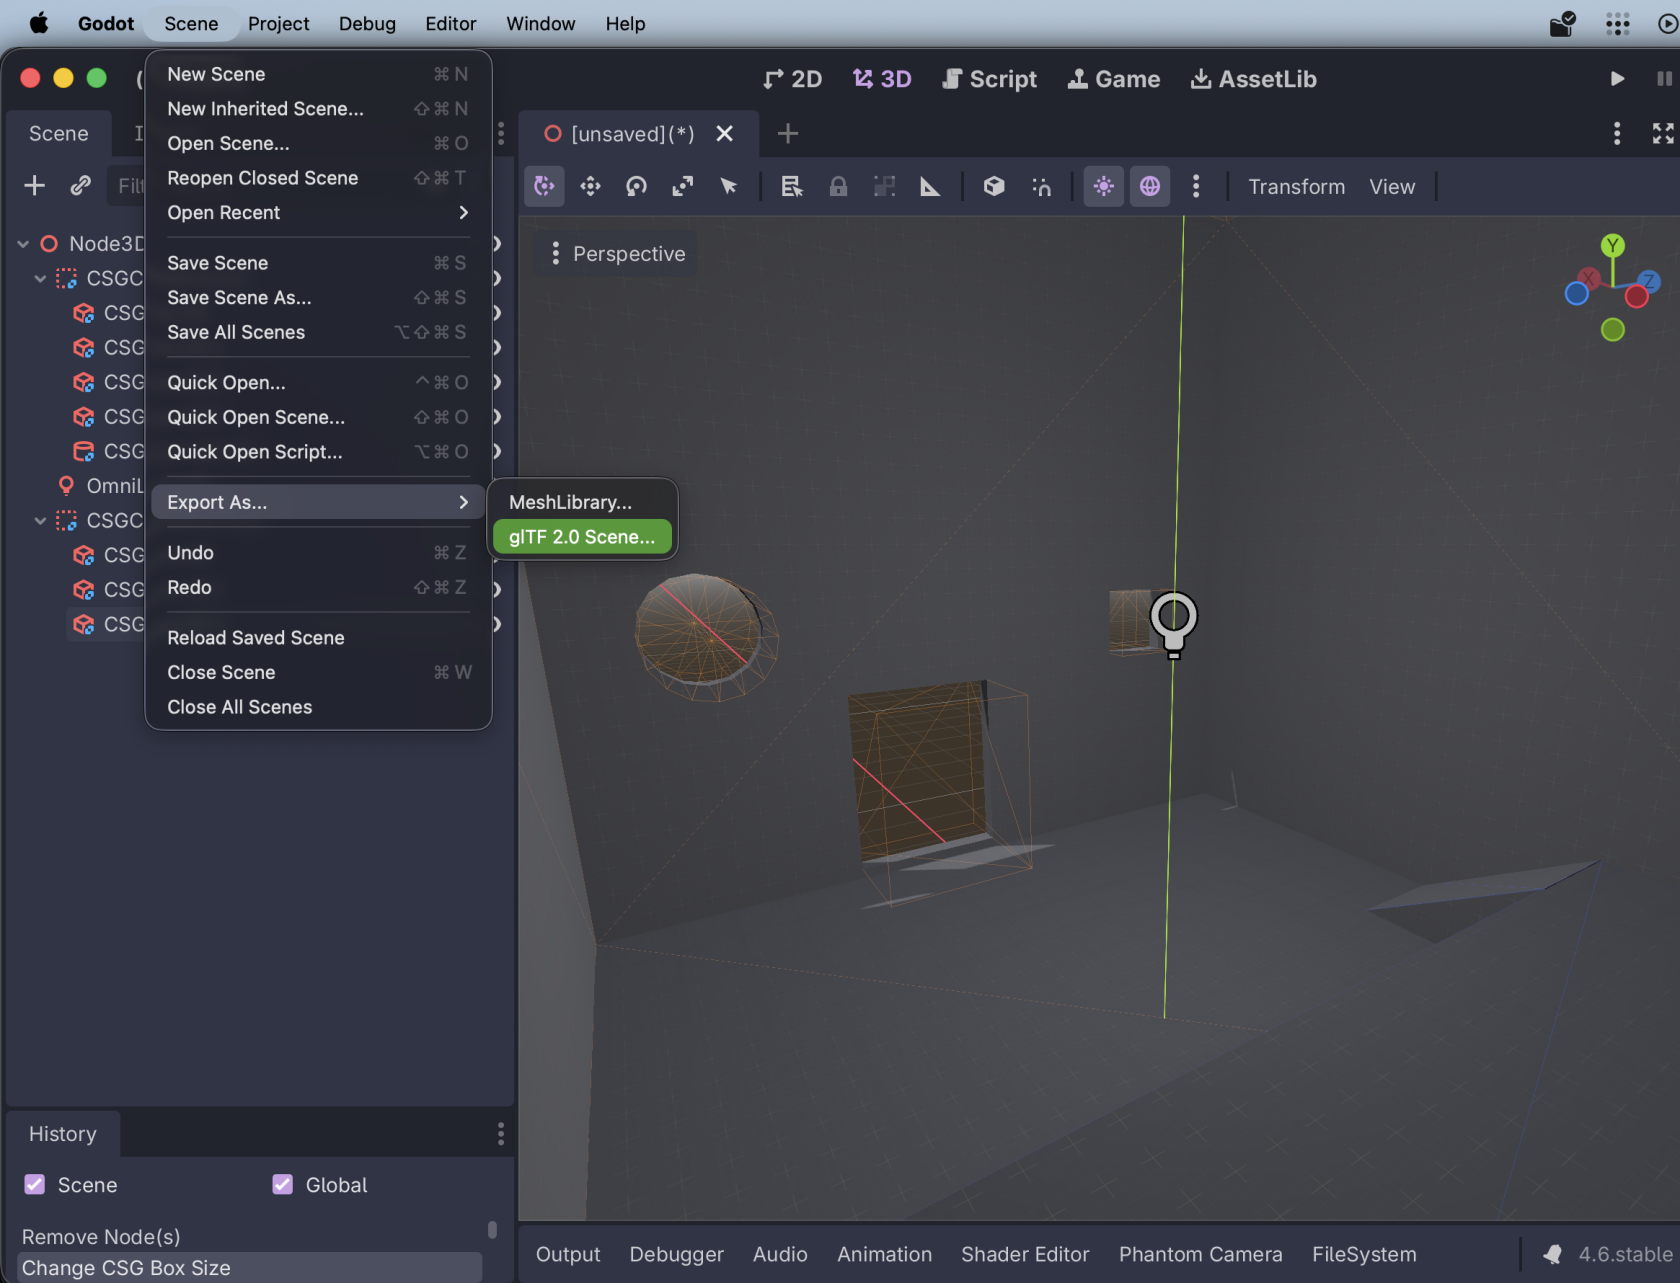](https://docs.bugjam.dev/uploads/images/gallery/2026-02/screenshot-2026-02-15-at-5-51-13-pm.png)
The settings you choose here don't *really* matter:
[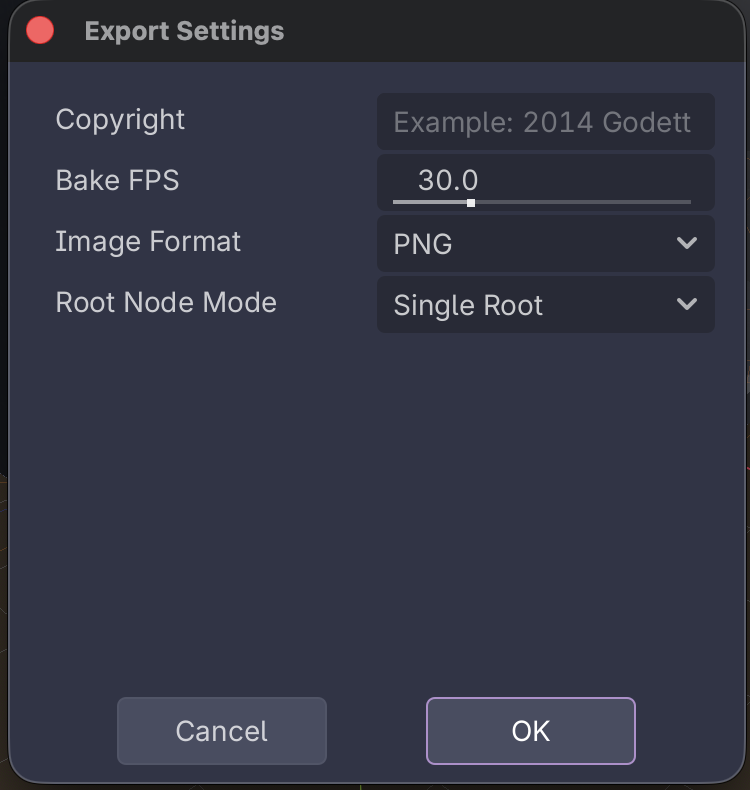](https://docs.bugjam.dev/uploads/images/gallery/2026-02/screenshot-2026-02-15-at-6-01-17-pm.png)
You will then be prompted for where to save the scene.
### Import glTF to Blender
Over in Blender, create a new file and sacrifice the default cube 🔪🧊
Then, go to **File → Import → glTF 2.0 (.glb/.gltf)**
[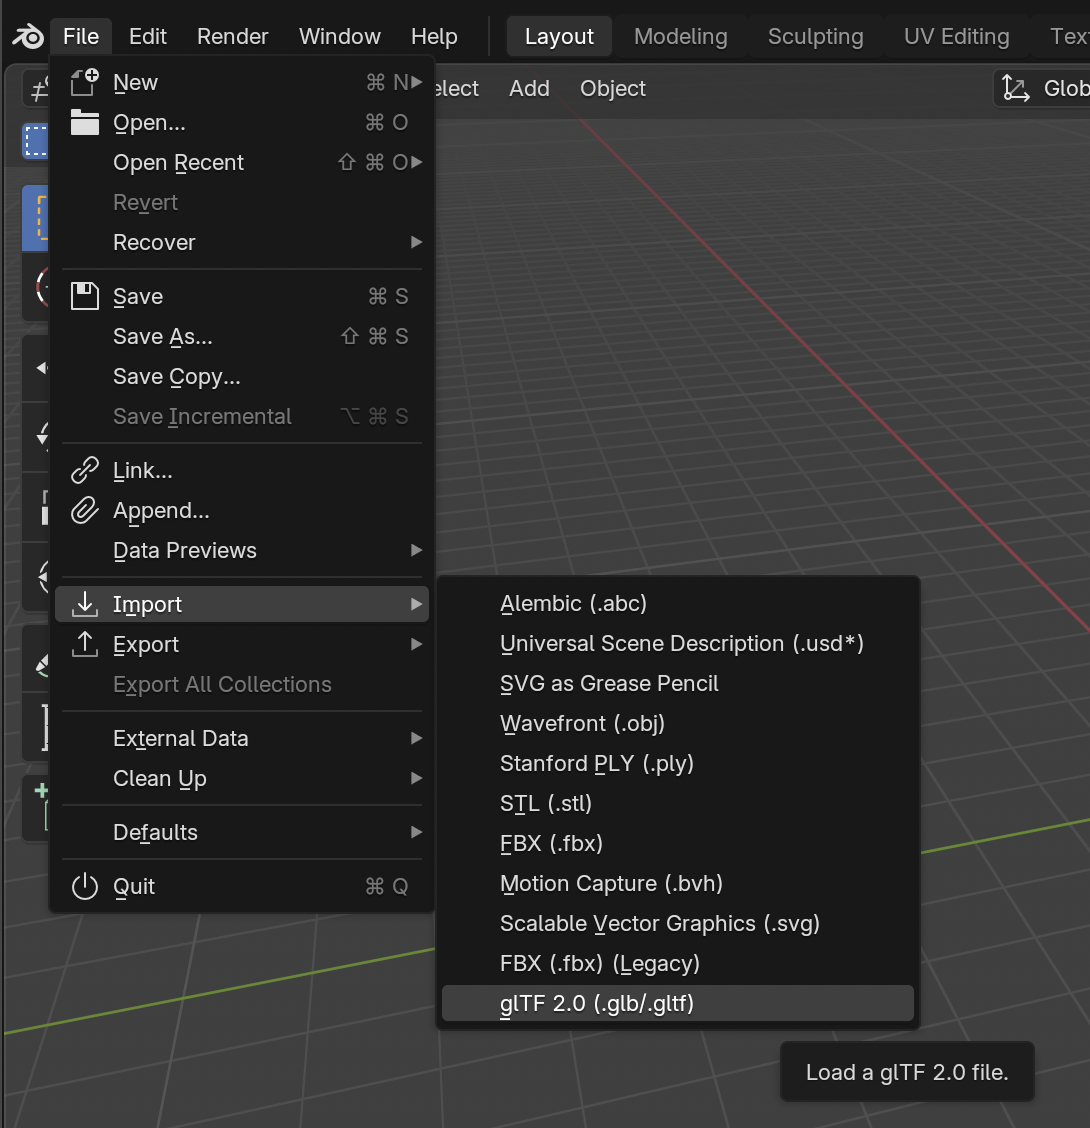](https://docs.bugjam.dev/uploads/images/gallery/2026-02/screenshot-2026-02-15-at-6-05-48-pm.png)
After importing, you'll see your CSG mesh
[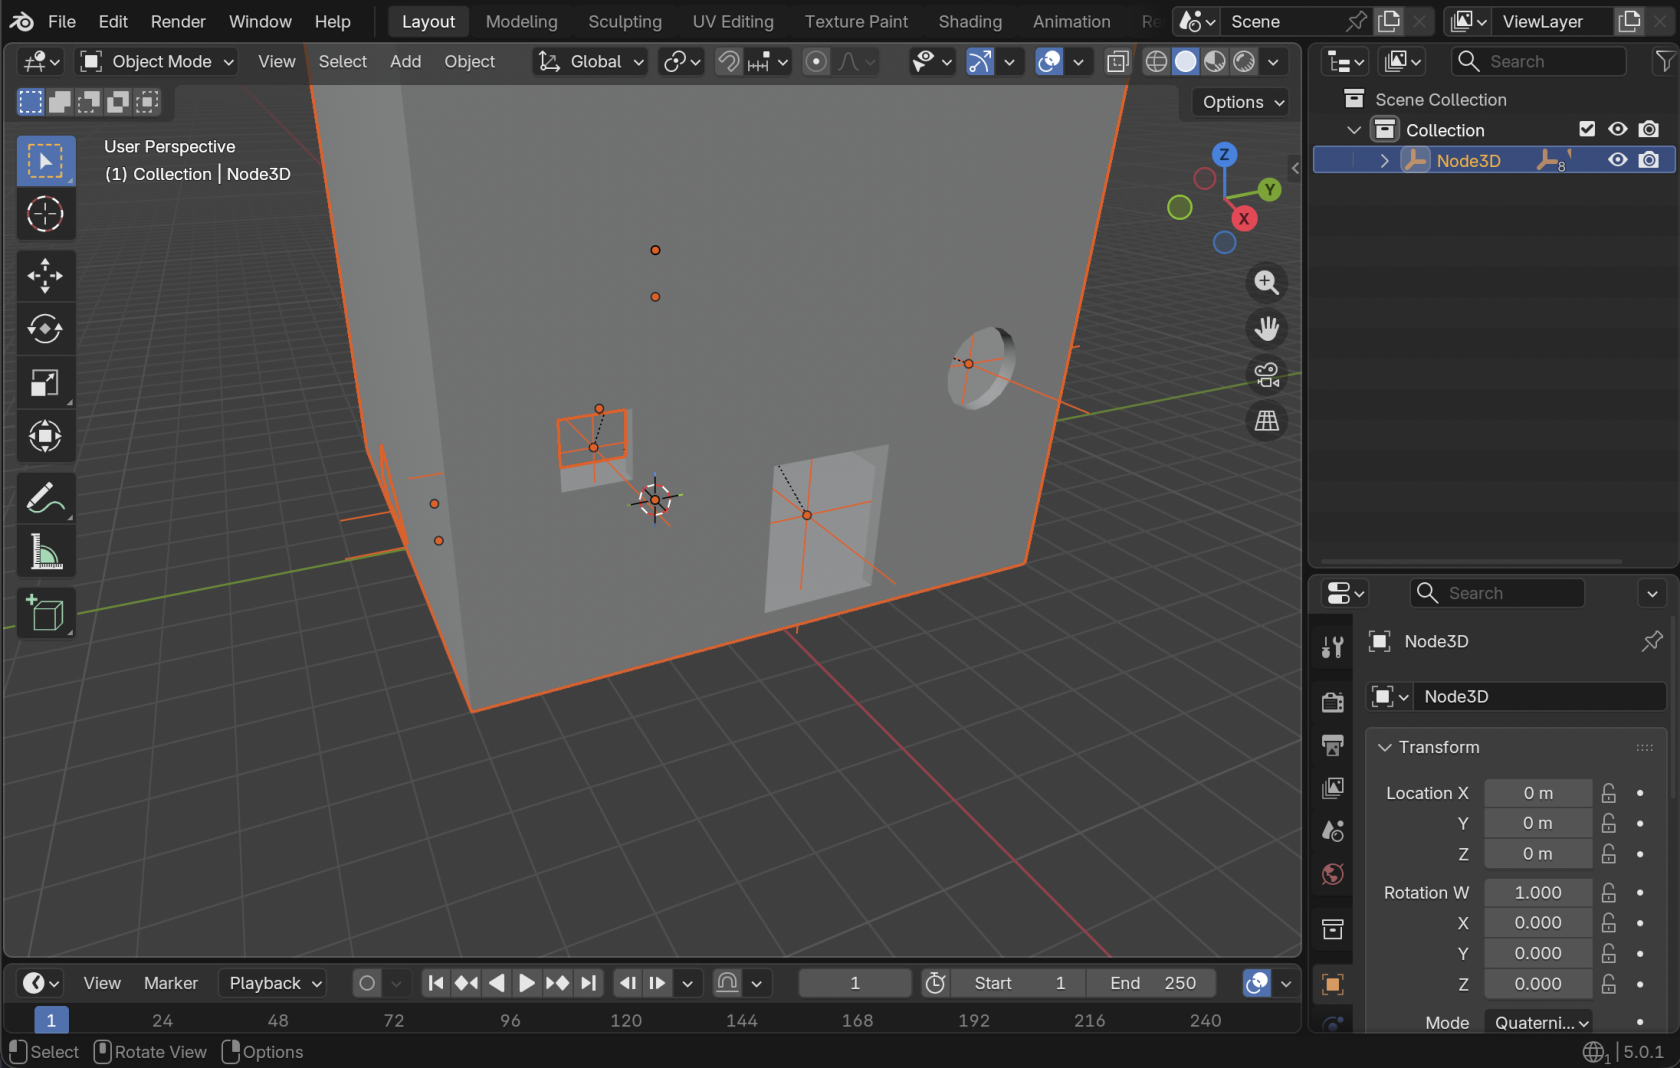](https://docs.bugjam.dev/uploads/images/gallery/2026-02/screenshot-2026-02-15-at-6-52-15-pm.png)
Note that materials, lights, etc. that were in the scene get imported as well! Delete anything you don't want.
[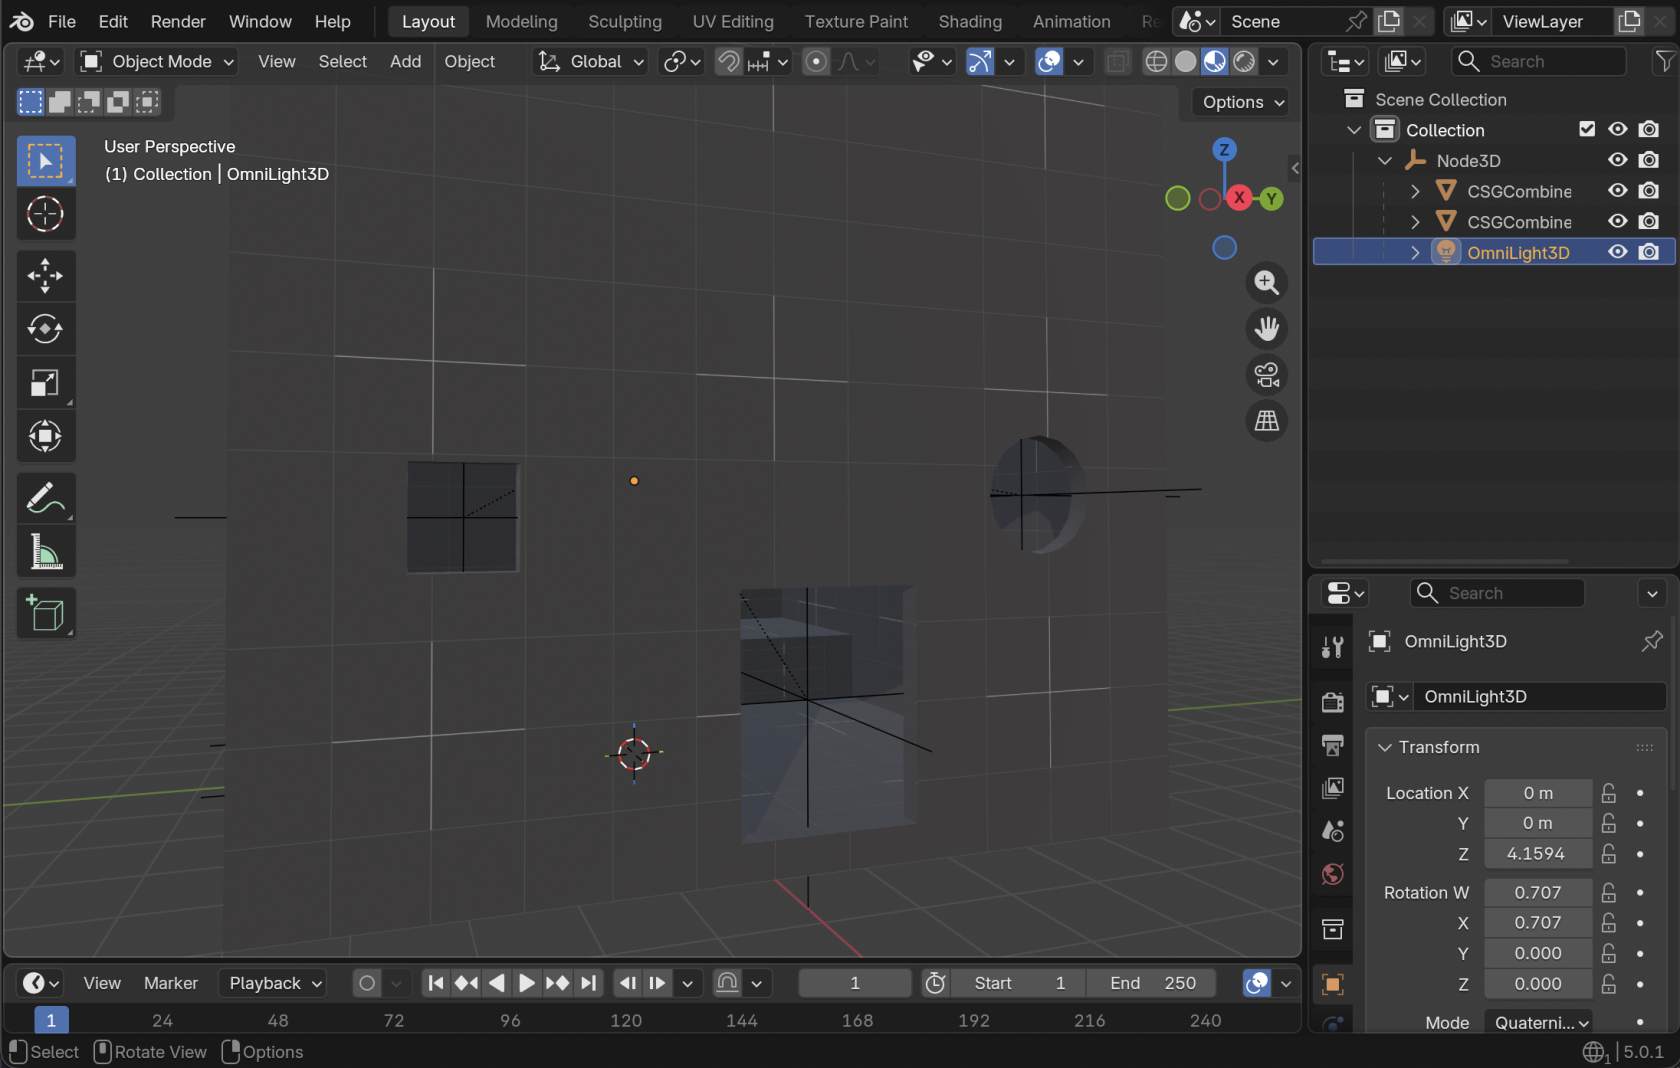](https://docs.bugjam.dev/uploads/images/gallery/2026-02/screenshot-2026-02-15-at-6-54-09-pm.png)
#### Cleaning up the imported glTF
Note that for each CSG node that you added, there will be an "**Empty**" object. You can delete these.
[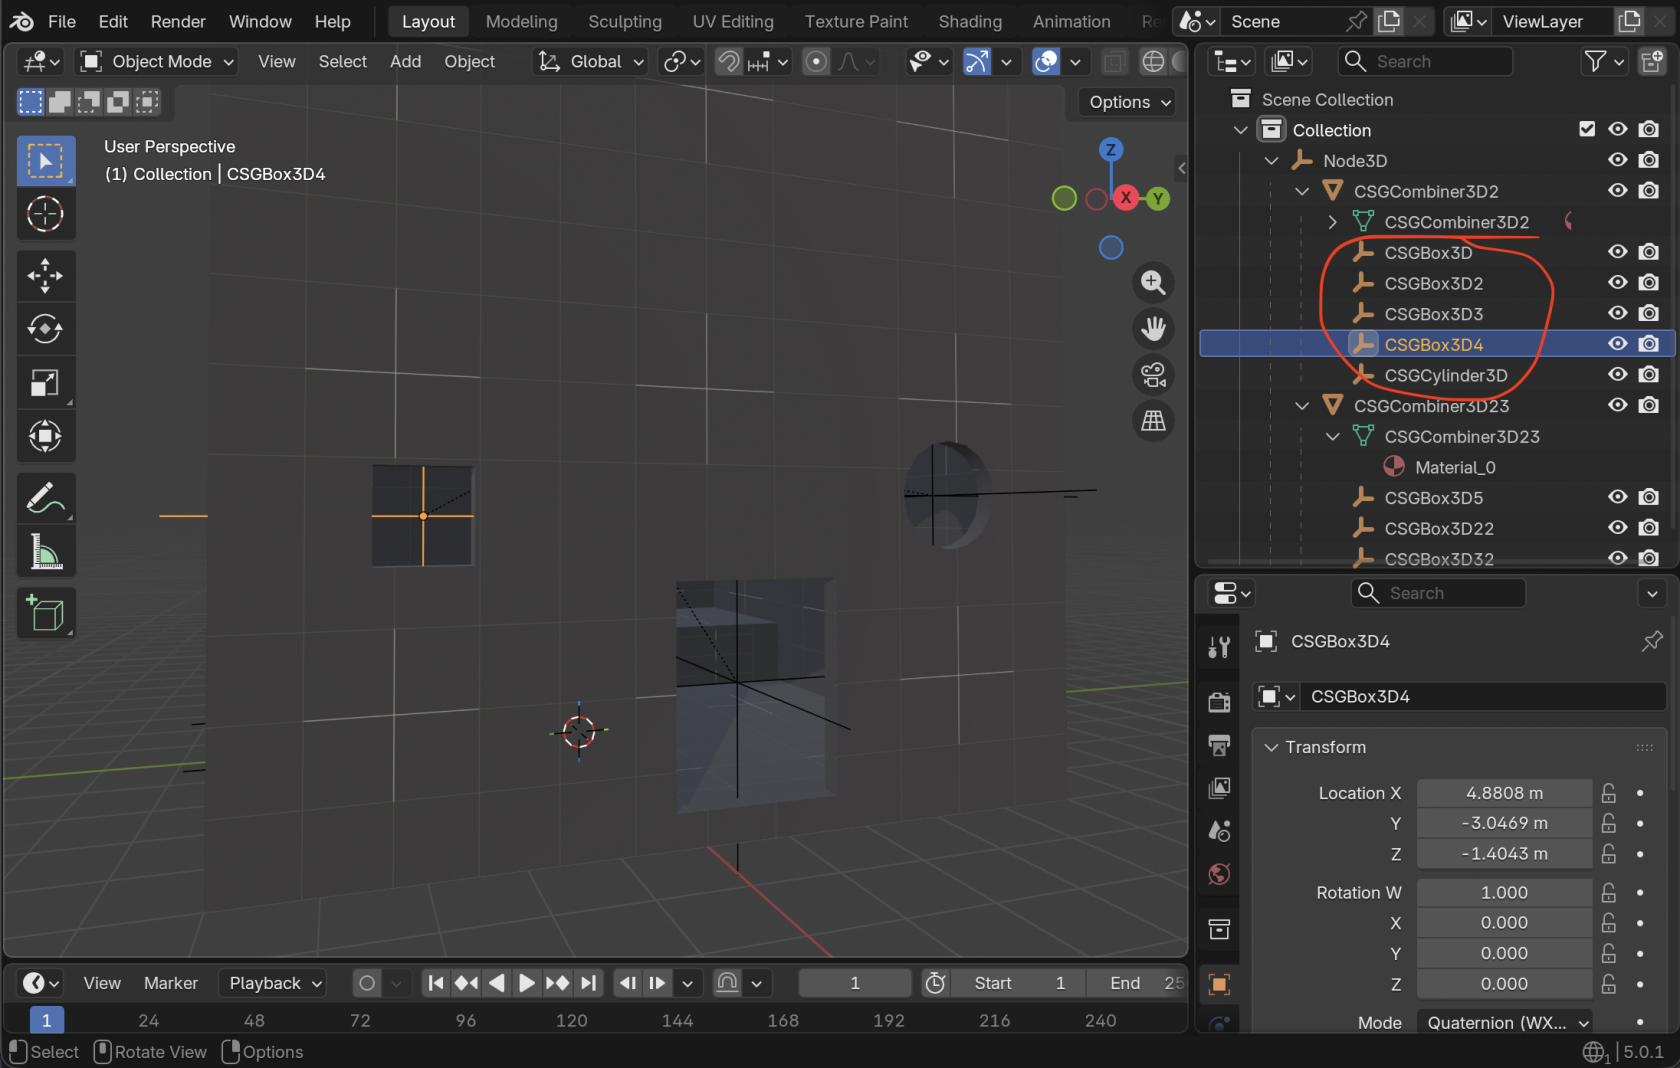](https://docs.bugjam.dev/uploads/images/gallery/2026-02/screenshot-2026-02-15-at-6-55-24-pm.png)
Also **very** important here, *none of the vertices are connected* in the exported mesh! As an example, check out this one vertex that is actually 5 vertices together 😭
[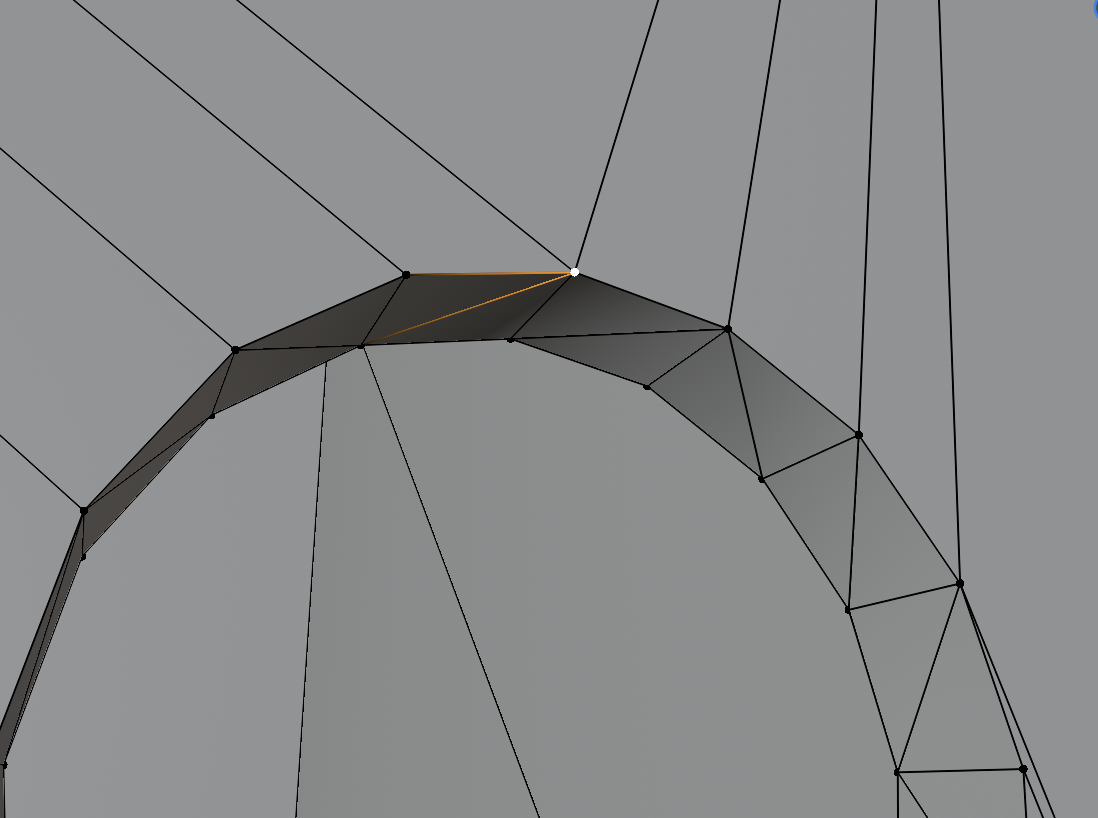](https://docs.bugjam.dev/uploads/images/gallery/2026-02/screenshot-2026-02-15-at-6-59-17-pm.png)
[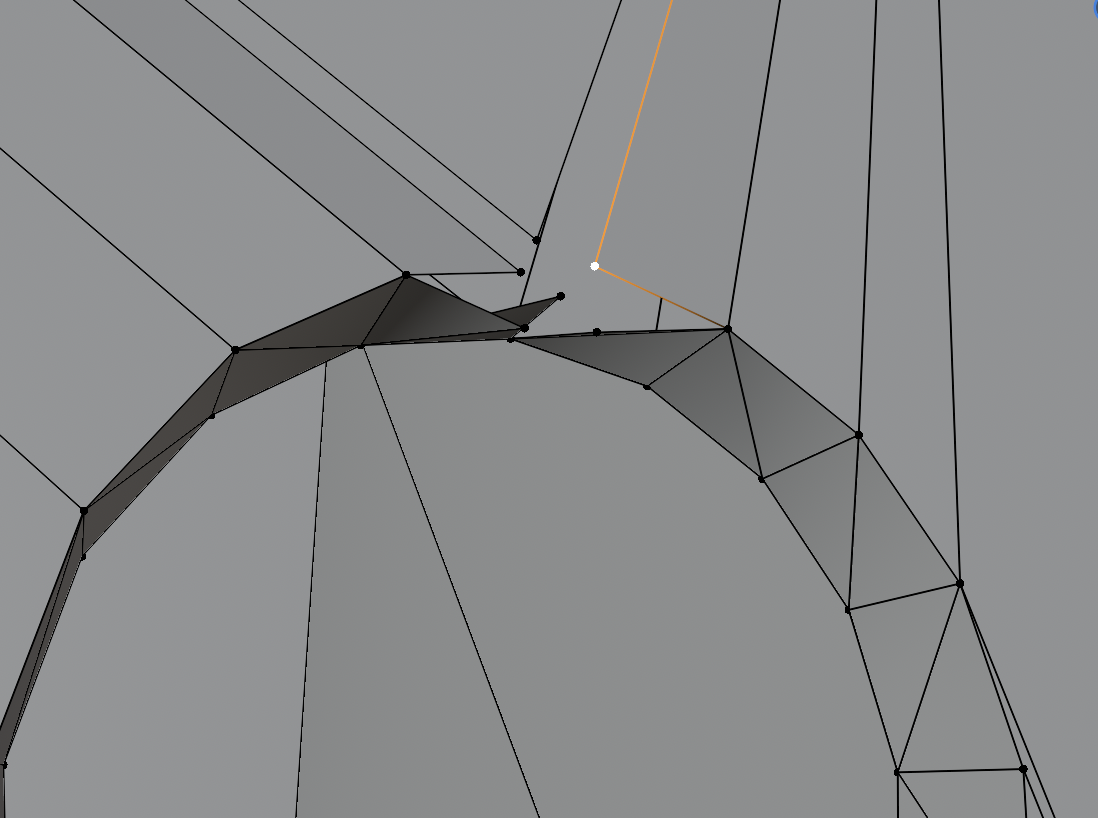](https://docs.bugjam.dev/uploads/images/gallery/2026-02/screenshot-2026-02-15-at-6-59-59-pm.png)
To fix this **hit "A" on your keyboard to select all vertices**, then go to **Mesh → Clean Up → Merge by Distance**
[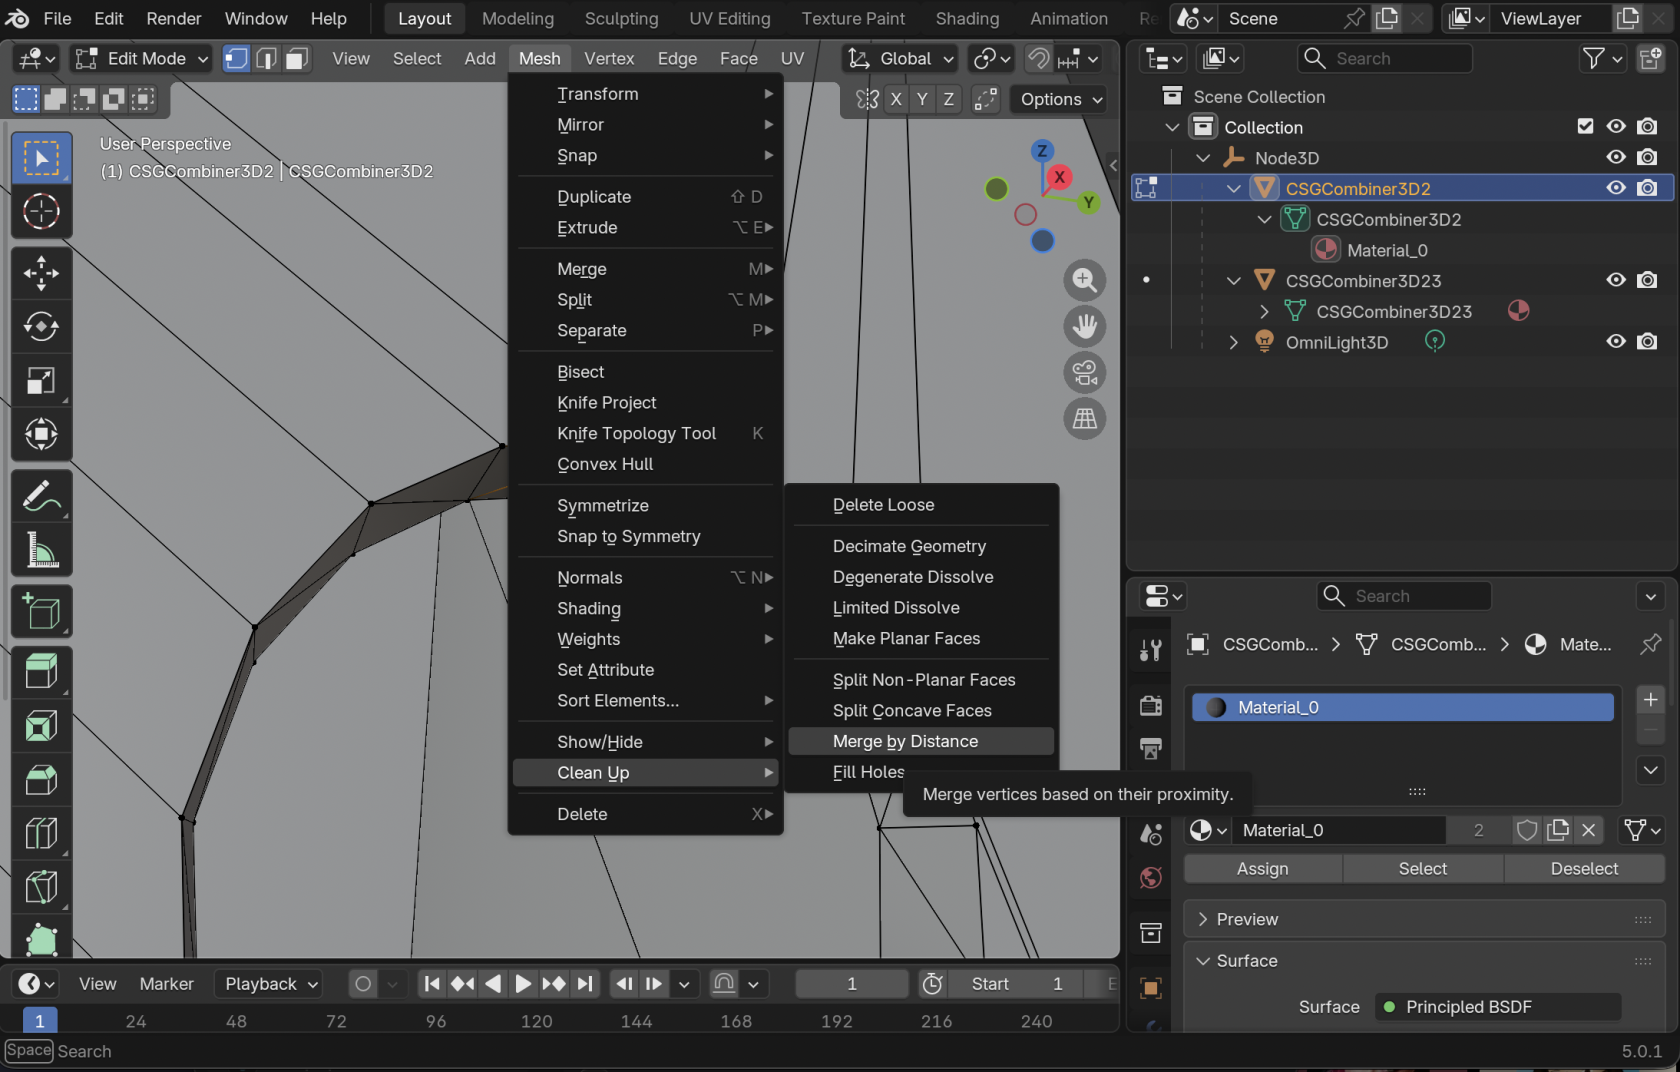](https://docs.bugjam.dev/uploads/images/gallery/2026-02/screenshot-2026-02-15-at-7-01-30-pm.png)
You should see a number of vertices removed at the bottom of the window.
**You will have to do this for each individual CSG mesh that was exported.**
[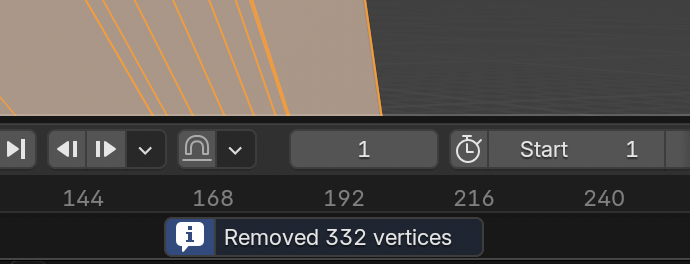](https://docs.bugjam.dev/uploads/images/gallery/2026-02/screenshot-2026-02-15-at-7-02-46-pm.png)
For a little bit of extra clean-up you can also go to **Face → Triangles to Quads**.
[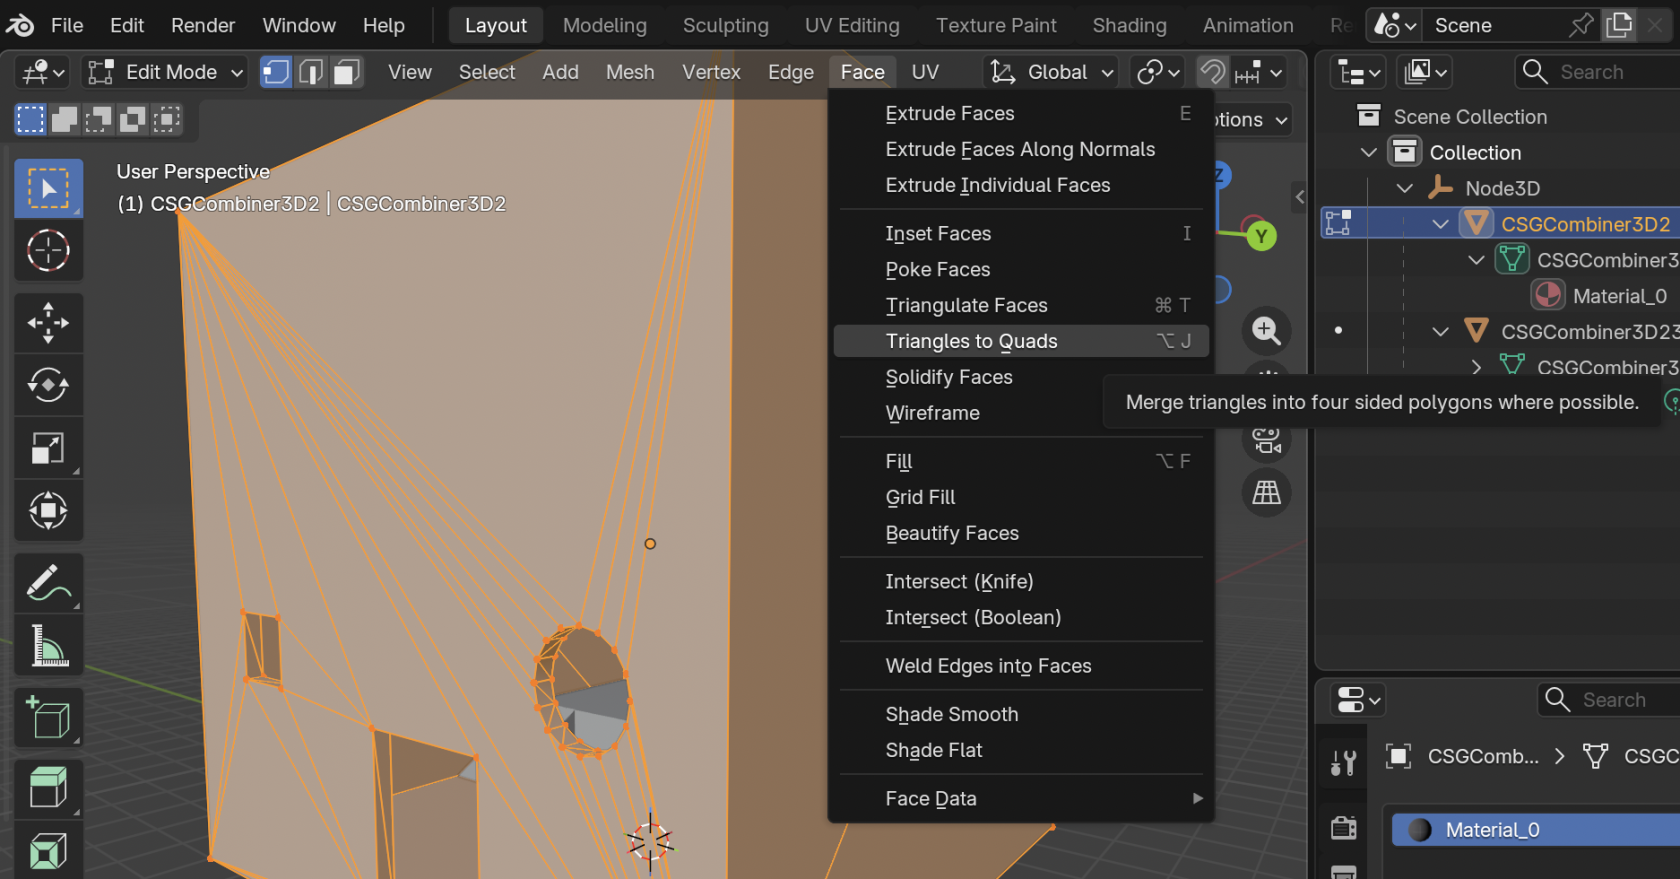](https://docs.bugjam.dev/uploads/images/gallery/2026-02/screenshot-2026-02-15-at-7-04-51-pm.png)
The topology here is not great, but you can at least get the overall shape of what you're working with. You can either edit this mesh directly, or build another mesh on top of it that has better topology.
The UVs here will also be a total mess - you may want to mark seams and unwrap it manually.
[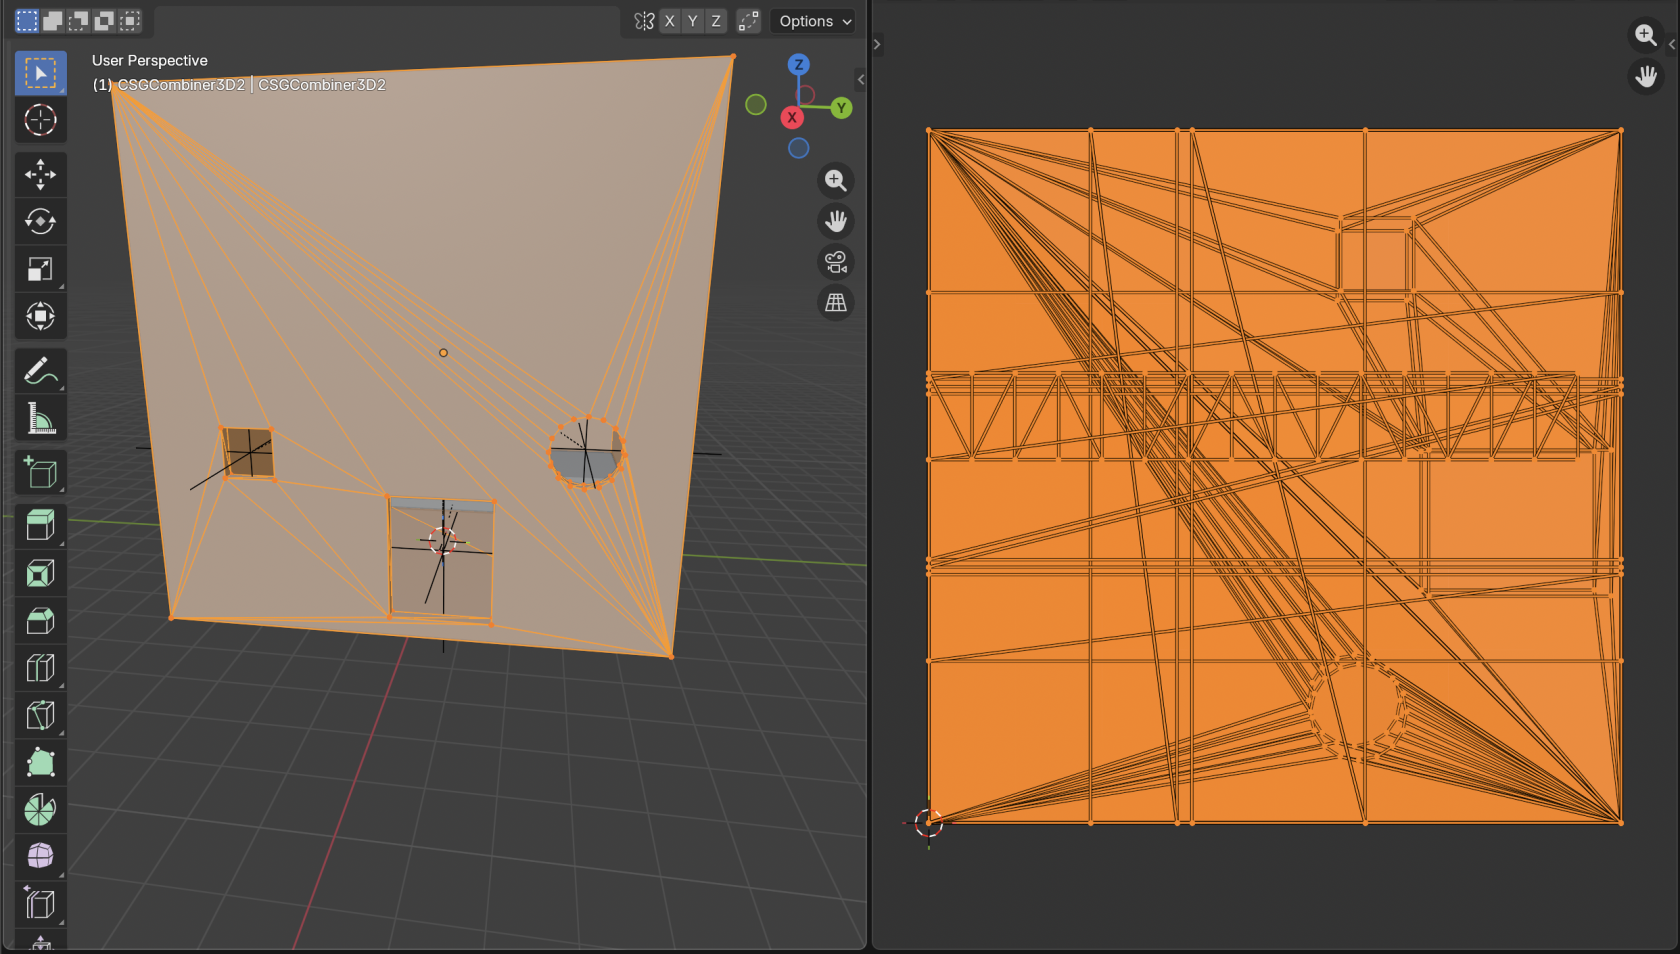](https://docs.bugjam.dev/uploads/images/gallery/2026-02/screenshot-2026-02-15-at-7-12-48-pm.png)
### Back into Godot
After making changes to the mesh, export it back to glTF using our art pipeline and then import that back into Godot.
As an example, I added some super simple bevels around the windows here:
[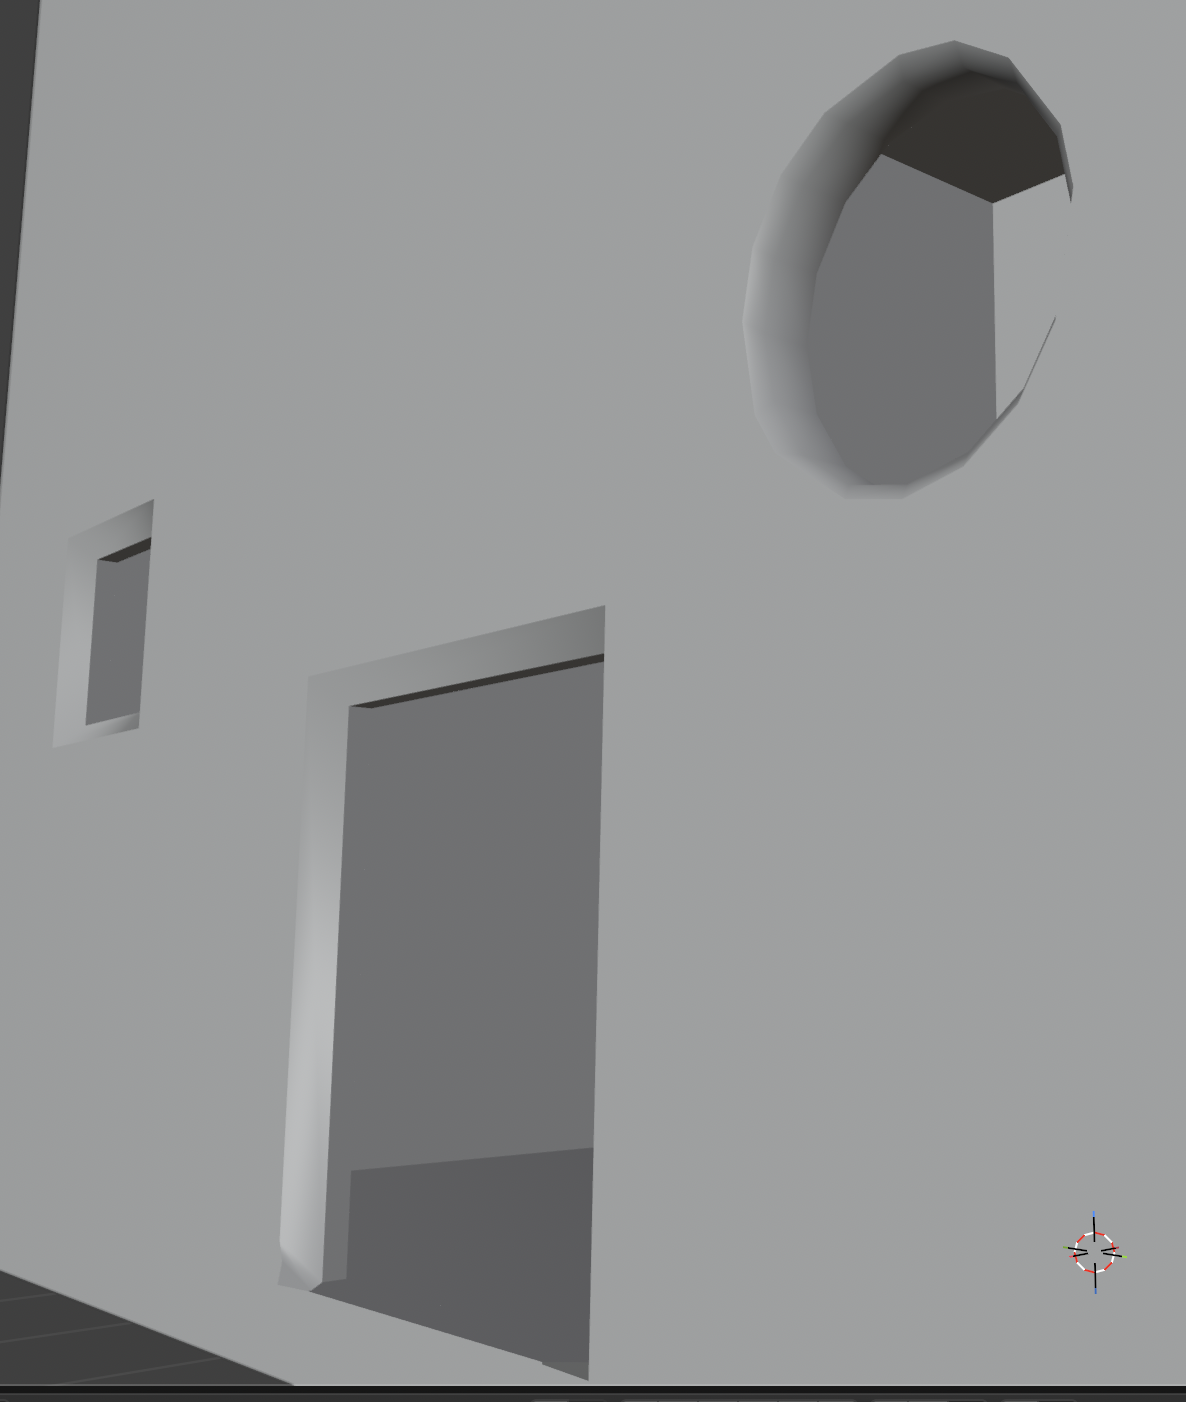](https://docs.bugjam.dev/uploads/images/gallery/2026-02/screenshot-2026-02-15-at-7-16-23-pm.png)
Create a new scene in Godot.
Add a `StaticBody3D` to the scene. Underneath that `StaticBody3D`, add your new mesh that was exported from Blender:
[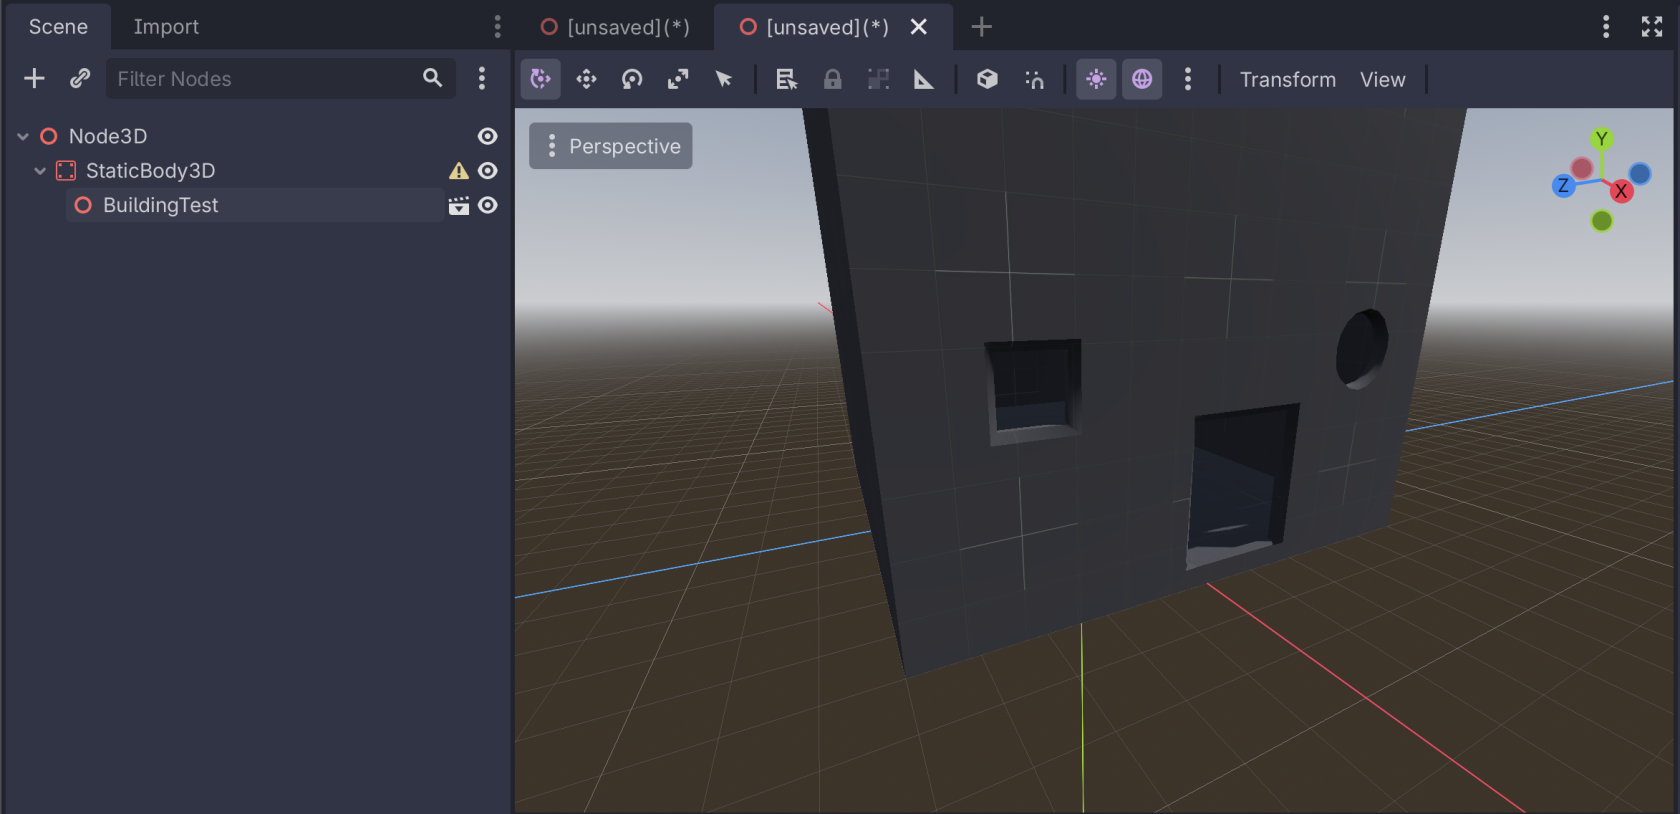](https://docs.bugjam.dev/uploads/images/gallery/2026-02/screenshot-2026-02-15-at-7-18-19-pm.png)
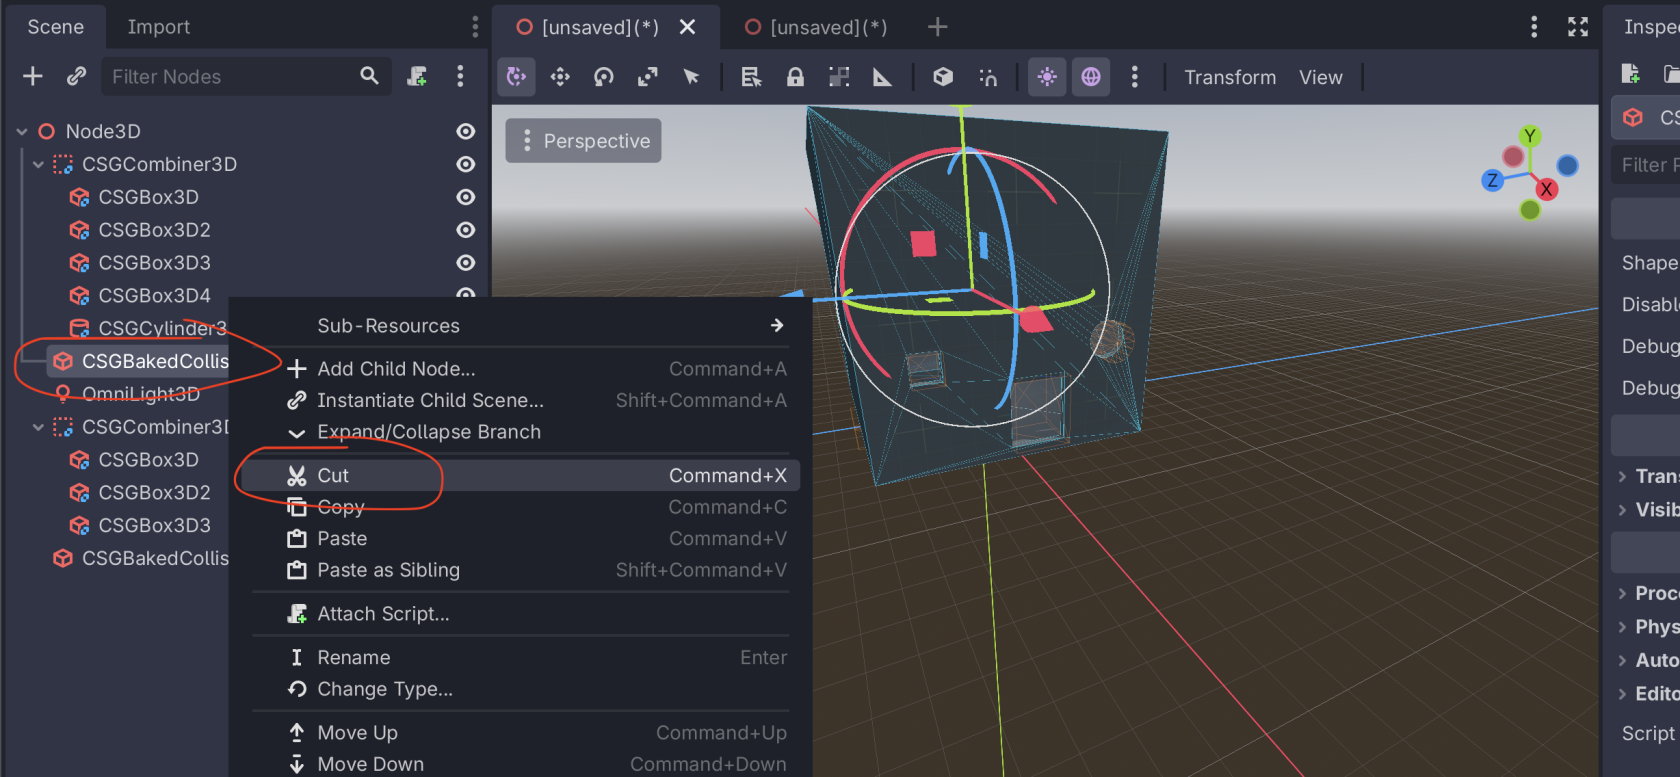
Back in the scene with the CSG nodes, select the root `CSGCombiner3D` and select **CSG → Bake Collision Shape**
[](https://docs.bugjam.dev/uploads/images/gallery/2026-02/screenshot-2026-02-15-at-7-19-52-pm.png)
This will add a node called `CSGBakedCollisionShape3D` to the scene. Cut this node and then paste it in your new scene as a child of the `StaticBody3D`. If you have mulitple `CSGCombiner3D` in your scene, do this for each one.
[](https://docs.bugjam.dev/uploads/images/gallery/2026-02/screenshot-2026-02-15-at-7-23-22-pm.png)
[](https://docs.bugjam.dev/uploads/images/gallery/2026-02/screenshot-2026-02-15-at-7-22-42-pm.png)
Then, your scene is ready to go! You have your mesh imported from the glTF file and the collision generated from the CSG nodes.
[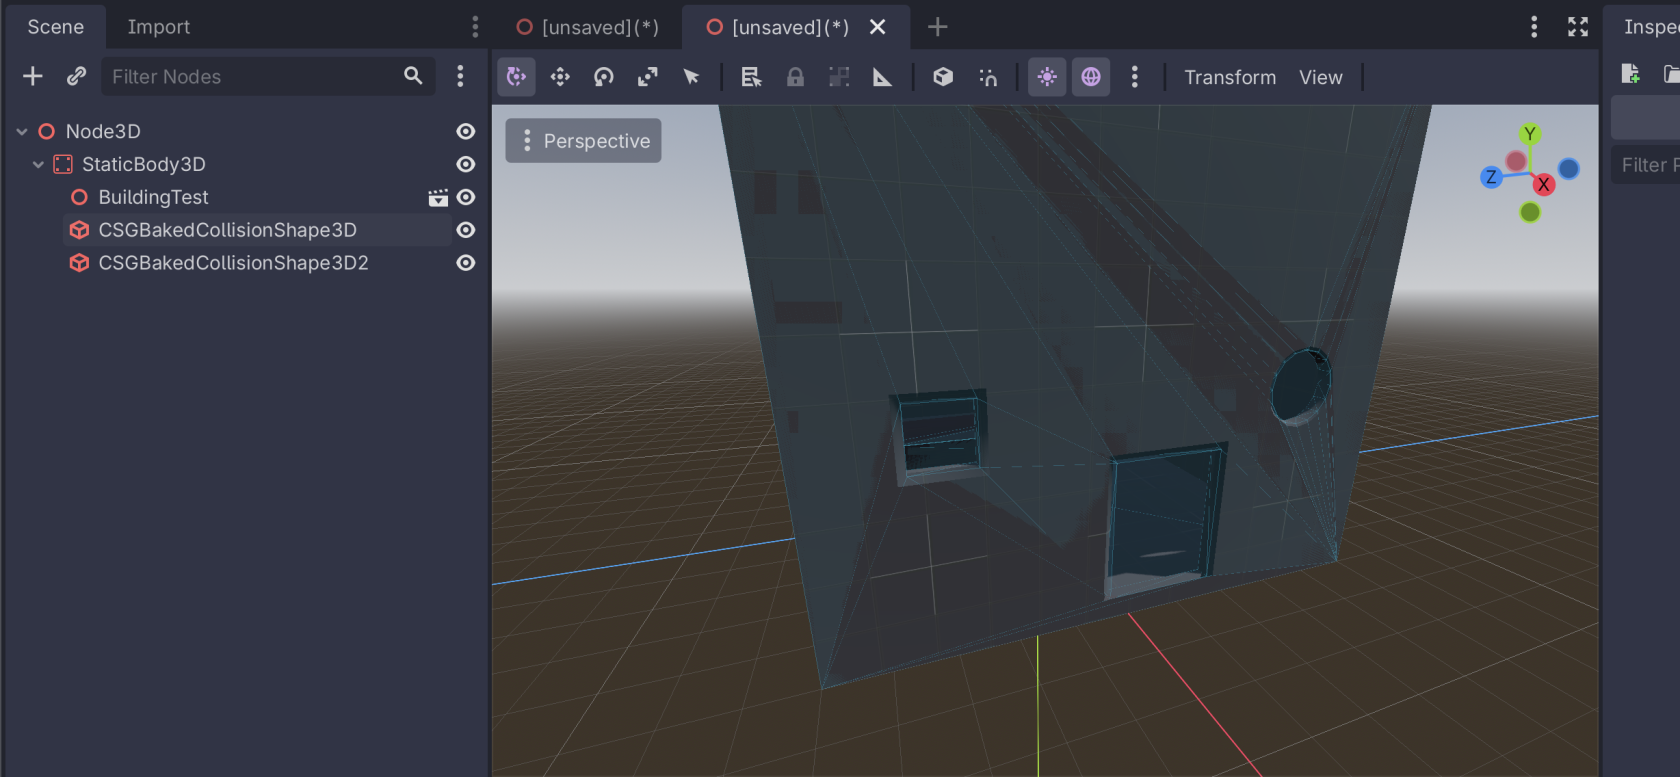](https://docs.bugjam.dev/uploads/images/gallery/2026-02/screenshot-2026-02-15-at-7-24-03-pm.png)
# Pitching Your Game
# Pitch Requirements
BUGJam members who commit to doing at least 40 hours worth of work on the project, will be given the opportunity to pitch an idea for the game. Here are some guidelines how how to make a pitch.
#### Theme / Prompt:
When BUGJam begins, all committed members will be allowed to submit a theme. We will collect those themes and [Spin the Wheel](https://wheelofnames.com/).
#### Constraints:
- The game must be 3D (with art made in Blender) using an intentional and consistent art style.
- The art style will likely be something stylized, but the specifics will be determined after the game pitch is selected.
- The environment must be maneuverable and explore-able (at least a little bit so we can look around and appreciate the art).
- We will be using a "Physically Based Rendering" (PBR) texture workflow.
- NOTE: PBR =/= photo-realistic , it primarily means we will be baking texture sets for albedo, roughness, normal, metallic, etc. 3dEx is a great YouTube channel that shows off what you can do with stylized PBR: [https://www.youtube.com/watch?v=yihYLnokT7o](https://www.youtube.com/watch?v=yihYLnokT7o)
#### General rules to follow:
- Keep the scope small. We're focusing on quality.
- Consider the skill set of the team.
- Focus on the high concept of the game.
- Remember that the design of the game will evolve while making it, over time we'll "find the fun".
- You should pitch something new, not a personal project idea you've always wanted to make. The group is not here to produce your dream project. We don't want to end up with hurt feelings when the project shifts direction, nor do we want intellectual property disputes. Don't go into this thinking the game we make will turn out to be some kind of financial success. We're going to publish the end result for free.
#### Example:
After your a pitch is accepted, we will build out the details into a proper Game Design Document (GDD).
Here's an example of a Game Design Document that I put together for a project I did with my game design cohort:
[https://docs.bugjam.dev/books/chucky-and-dexter](https://docs.bugjam.dev/books/chucky-and-dexter)
Particularly, pay attention to the write up for the [High Concept](https://docs.bugjam.dev/books/chucky-and-dexter/page/high-concept) this part of the GDD is written up first. Your pitch should focus on this aspect.
Here is another example pitch: [https://docs.bugjam.dev/books/cosmic-dentist](https://docs.bugjam.dev/books/cosmic-dentist)
# How To Pitch Your Game Effectively
### **How To Pitch Your Game Effectively**
As somebody who is participating in this jam, you are most likely very, very excited to pitch a million game ideas that have been living in your head rent-free.
**Congratulations! This is a great thing. Now, let's figure out how to compress this into something tangible, and in scope!** At the beginning of BUGJam, you will have the opportunity to pitch your game idea for all members participating. Let's walk through how to effectively communicate your ideas in a concise manner.
tl;dr
1\. Keep your idea short and realistic
2\. Simplicity is better
3\. Scope so tiny you could barely consider it a game
#### **The art of a good elevator pitch**
It is important to come in with the expectation that your game pitch may not be accepted. However, you can increase your chances of people getting on board if you do the following:
##### **Keep the idea short and realistic.**
People often stop listening to an idea you are pitching if it isn't compelling within 5 to 30 seconds. That's not a lot of time! The crux of how you should be pitching a game is how to capture everybody's attention with about 3-4 game mechanics that are simple and scalable.
Consider the following pitches:
1. "Guys, I have an amazing game idea that will blow your pants off. What I have here is a entirely open world RPG, with a skill tree for super dynamic gameplay and each character has like 5 skill trees that they can spec into! Also we'll have 4 main characters where your dialogue choices will affect the game world's story and progression, and also there will be dragons!!! Also you'll have like elemental powers and that fits into the lore I have here that I've pre-written - trust me this is going to be a great game - here's the lore document I've written up which should give you a good sense of how gameplay should be handled..."
2. "You are controlling a luggage bag and hurtling through the airport terminal to ensure you make it to your flight on time. You'll have to swerve your way around a bunch of idiots standing around and try not to hit them, while simultaneously getting to your airplane as fast as possible, because time is money! The slower you go, the less money you'll make in total. Between flights, you'll be able to buy a variety of shop items that increase your stats so you can make it through an increasingly more difficult set of locales."
Option number 1 may sound exciting, but not only is it completely impractical to implement in a short amount of time, the gameplay is not focused, and overall way too vague - none of the mechanics are explained in a clear way. Many people are good at sniffing out something that is unrealistic and you'd likely be faced with a lot of friction.
Looking at option 2, this may overall sound a little less exciting and grand, but for the purposes of BUGJam, it is much more realistic and in scope with two concise game mechanics that can be easily expanded on while not over-explaining everything. This can also open up to other members of your team contributing their own interpretations and suggestions for how these simple mechanics could be expanded, and thus feel more organic, rather than your teammates feeling like they're just making a game that you hold all the ideas for.
##### **Simpler is better.**
It is extremely easy to get excited about your pitch and start to add in a bunch of mechanics that you feel are absolutely necessary to the final product. It happens to everybody and unless you're a seasoned game developer, it will happen quite a lot. The best way to mitigate this is to think about what actually makes a game, a game.
For instance:
From option 1: "each character has like 5 skill trees that they can spec into!"
Think about the gameplay implications of what this would need:
- Multiple characters with distinct character designs, separate animations, individual abilities
- How many movements will need to be animated by the artists
- From a game design perspective, how each skill could potentially throw off the balance of the game
- How much different dialogue, character writing, and story would go into everything
- Much, much more to consider
Versus: "there will be one playable character, and they will use a sword as their weapon of choice"
- One character and character design
- Basic walk cycle, a couple of attack animations
- Game balance centered around one character
- Much less storyboarding
Try to think about how your ideas could impact your team down the line. A month is a very, very short time to build a game, and your mechanics should reflect as such.
##### **Scope tiny, scale up later.**
Obviously, the goal of a game jam is to make a game - so we may assume that there will be a product to play at the end. The biggest complexity lies in *how much of a game* you'll see at the finish line.
When working with a lot of people, a lot can go wrong.
When working by yourself, a lot can go wrong.
Therefore, it is safe to set your expectations to be at the **most minimal product you can bear to think of.** The harshest would be to assume that the output is a barely playable, ugly, no audio game, but you still have a win and end condition nonetheless.
So, how does this relate to the bullet point above? Great question -- **by scoping for a game that is barely playable, you can only go up.** Say you have a 3D shooter. What can you make that could technically be considered a game? The character could be locked into place and can only rotate around while shooting a horde of enemies?
Once you have the most basic of basics down, you can start to add more. Adding feels good. Subtracting does not. Crossing off a to-do, knowing it's all done, feels infinitely better than calling your team and telling them that a leaderboard may not be in the cards.
When you pitch your game, this is what you should have in mind. Remember, this is not a way to ensure that your game will suck. This is so you can set expectations, so that inevitably, down the line, you'll have more mechanics that you can incrementally add throughout the game jam.
Hopefully with this advice you have a much better understanding of how to make an effective game pitch! Good luck jamming!
# Themes
Please comment below what your theme idea is!
# Schedule
Specific tasks and deliverables will be managed at [https://tasks.bugjam.dev/](https://tasks.bugjam.dev/)
Check out the meeting recordings here: [https://docs.bugjam.dev/books/bugjam/page/meeting-recordings](https://docs.bugjam.dev/books/bugjam/page/meeting-recordings)
## Key dates:
### Week 1:
#### Pre-February 12th:
- Event signup - Please try to get signed up before the kickoff so that we can confirm your account is up and running. (Xury has to make everyone's accounts manually).
#### Thursday February 12th - 8:00 pm - 9:00 pm
- BUGJam Kickoff!
- BUGJammers will be on-boarded to the project - We'll practice a little with the 'genesis' example project.
- [Committed BUGJammers](https://docs.bugjam.dev/books/bugjam/page/rules-for-participating-in-bugjam "Rules for participating in BUGJam") will be allowed to pitch a theme.
- Once theme ideas are collected, we'll [spin the wheel](https://wheelofnames.com/) to choose a theme!
- Once a theme has been selected - Committed BUGJammers will be allowed to [make a pitch](https://docs.bugjam.dev/books/bugjam/page/pitch-requirements "Pitch Requirements").
#### Friday February 13th - 8:00 pm - 9:00 pm
- Review the pitches, select our game idea!
- Refine the pitch into the first iteration of a game design doc.
- BUGJammers will be receive tasks on Vikunja.
### Week 2:
#### Thursday February 19th - 8:00 pm - 9:00 pm - Weekly Check-in
- BUGJammers will be receive tasks on Vikunja.
### Week 3:
#### Thursday February 26th - 8:00 pm - 9:00 pm - Weekly Check-in
- BUGJammers will be receive tasks on Vikunja.
### Week 4:
#### Thursday March 5th - 8:00 pm - 9:00 pm - Weekly Check-in
- BUGJammers will be receive tasks on Vikunja.
### Week 5:
#### Thursday March 5th - 8:00 pm - 9:00 pm - End of the jam!
- End of the jam, everyone play the game!
# Genesis Pitches - Theme: "Pounce"
# Python Pounce
A virtual arcade game where you control a claw machine where instead of a claw and cable you control a snake. You have to pounce on as many plushies of mice and rabbits in the bottom of the machine as you can before time runs out.
# P.O.U.N.C.E. - Paranormal Offensive Unit Neon Calico Engine
The city is under attack by ghosts and goblins, the only hope is the P.O.U.N.C.E. project. A robot cat engineered to combat these spectral menaces with feline grace!
Use combo pouncing to stun enemies, parkour to kite enemies then using special neon lines to bind and banish foes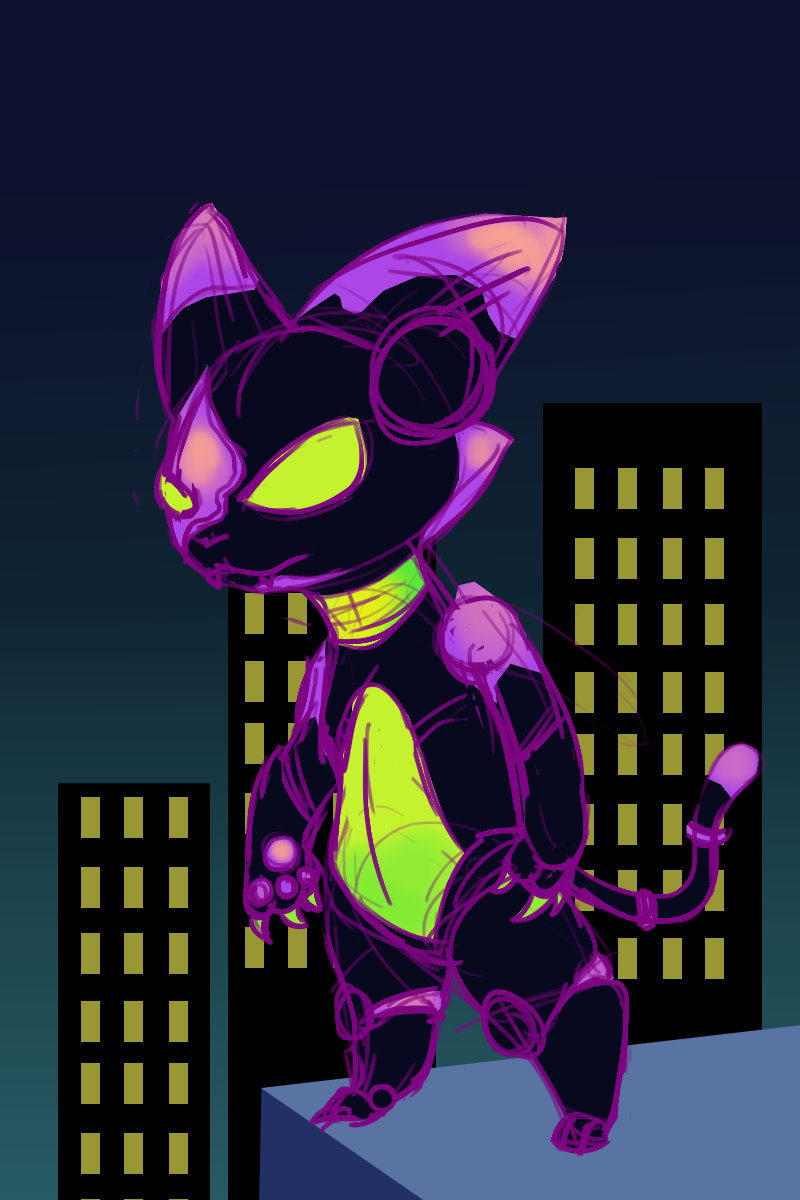](https://docs.bugjam.dev/uploads/images/gallery/2026-02/7iVpounceconceptart.png)
# To the Mewn🌙🚀
You play as a particularly round cat who LOVES jumping. It will be a platformer where you jump from tree branch to tree branch, from cloud to cloud, then from star to star with the goal of reaching the moon (the vibe is more whimsy than scientific accuracy). You can get power-ups along the way that give skills like a slower fall speed, or higher jump. If you fall you have to start from the bottom of the tree again but can keep powerups from before up to 9 lives. (because you're a cat haha)
The game will be very stylized and fall within a mid-poly range, with super exaggerated proportions, very soft round shapes, and bright colors.
[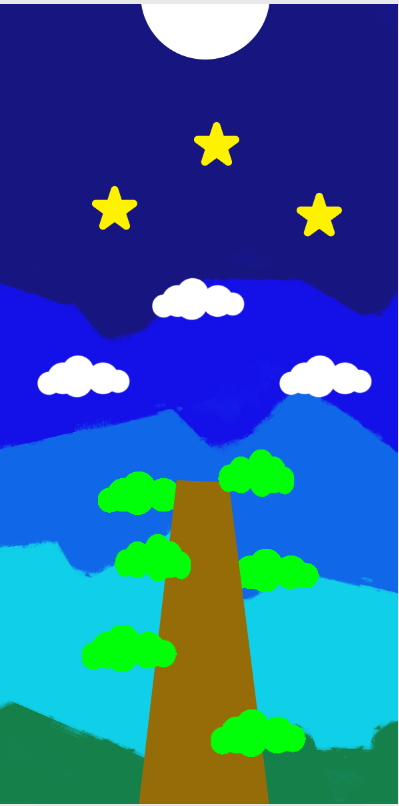](https://docs.bugjam.dev/uploads/images/gallery/2026-02/MtGimage.png)[](https://docs.bugjam.dev/uploads/images/gallery/2026-02/mZjimage.png)
# Snounce A 3d snake momentum platformer.
Play as a stretchy comically long fox that jumps into rodent holes of many shapes and sizes, eating said rodents on your way out, growing longer and gaining speed. keep up the pace and take care not to run into yourself as you stretch longer and occupy previous tunnels. After a certain stage of growth the earth collapses, you shrink down get a little faster and repeat the process to compete for a higher score
# Really Unsafe Fishing!
You control a P.O.U.N.C.E.R -- a fishing vehicle aptly named due to its ability to beat out the competition. In Really Unsafe Fishing!, you will use the P.O.U.N.C.E.R to boost towards fish, catching enough to meet your quota for the day. The deeper you go, the rarer and higher quality of fish you'll be able to catch, but be warned -- you will need to manage your energy and oxygen levels, or you'll sink to the bottom and never come back!
**Really Unsafe Fishing! could include:**
- A robust vehicle that has a Boost drive, causing you to pounce at fish!
- Between-day shop mechanics: select an assortment of wildcard items that can help your next excursion, and/or flatly upgrade your energy, oxygen, and pressure resistance capacities.
- A variety of fish with different handling characteristics and rarities, making some harder to catch than others
- Could include, ink on the screen, being really fast, having small collision hitboxes, etc.
- Handcrafted environment with some Points of Interest (POIs)
- A really smart cat character that operates the P.O.U.N.C.E.R :3
- Diegetic HUD that shows on the window (if first person)
- A constant threat in deeper levels that threaten your P.O.U.N.C.E.R!
**Minimum Level of Completion may include:**
- Vehicle controller
- Rudimentary shop mechanic
- One or more forms of health (energy, oxygen, etc)
- One variety of fish
- One ocean layer
- Very basic environment
- One or two seafloor plants
**Benefits from this idea:**
- Easily expandable
- No need to rig up complex animations
- Plenty of opportunities for VFX
- A lot of plant and fish models can be made
# Sneaky Tag
(Possible multiplayer)
Sneak up on each other and pounce! Whether you're stalking around while your target isn't looking or finding the perfect spot to ambush from your goal is to spook your littermate(s). From under a bed, behind a curtain or slinking through bushes in the great outdoors you are a sneaky hunter.
This could be dogs, cats, or something else.
# T^n//ki:// D ~ Estiny_Intr//pted
[](https://docs.bugjam.dev/uploads/images/gallery/2026-02/6lVimage.png)
Tanuki : Destiny Inturrupted
the sacred Totem has been unearthed by humans and put in a museum.
if it isn't recovered, the magic will fade from your people and you will be little more than racoons.
use your ability to transform to evade detection, surprise enemies, and steal back the ancient treasure.
Take on the role of a Tanuki in this 3rd person top down isometric stealth action heist.
take the form of different things you find throughout the museum, and spring an ambush on unsuspecting guards.
you have a Tanuki animal form, a Statueform copy, and a Humanoid combat Form
aim would be for either action stealth or turn-based strategy.
I envision the game as:
\- turn based
\- top down
\- isometric
\- grid based (Quad or hex)
\- stylized semi minimalist hand painted mid poly art style.
Art it needs :
\- player character Tanuki 3d model (rigged, animated, simple quad rig.) , animal keeps scope down and cuteness up
\- human security guard ( rigged, animated, basic human rig.)
\- museum level architectural kit
\- exhibits and props. low poly statues, paintings, art stuff.
\- UI elements for menu and turn interactions
\- Maybe cards for possible actions with illustration of move.
Code it needs:
\- grid based movement and contextual action selection
\- grid based nav-mesh
\- animation trees
\- behavioral AI for tactical combat
Reasons why i think this is a good idea:
-turn based minimizes the need for dynamic interact-able environment, and instead can have a grid based, cell specific interactions. - view cones are defined on grid, and such.
-detection is a turn by turn calculation done based on what things are in the view, eliminating having bad stealth mechanics because that is hard.
\- might function like a rogue like where you do one action then the world responds with one action.
-like top down turn based super hot.
\- doing turn based makes mouse based and touch interaction easier, for a game jam, maybe making people have to fetch a controller for precise platforming isn't a great way to get plays.
-mouse and keyboard is likely the most common option, if not touch screen on landscape phone/tablet.
\- games like Hitman go, metal gear acid, fights and knights in tight spaces, tactical breach wizards, invisible , inc. all show that this type of turn based tactical top down game has shown viability for entertainment and puzzle solving in many other titles,
\- top down isometric forces a further camera angle, reducing the amount of fidelity needed for each prop, meaning we can have a
-large number of unique props in scene, allowing for many people to have models to make. instead of a handful of higher detail props touched by less people.
\- we have 27 people for a month. This idea i believe is large enough that we could accommodate work for all involved, while the single location, minimal unique character models, allow for more focus on nice animation, environmental variety, and a lower bar for acceptable detail in modeling due to further away camera. certain higher focus exhibits could be spots for our more skilled modelers to show off, while the average prop is viewed from further away. it would also allow us to build a significant amount of props that could see reuse in later SeaBug group ventures.
[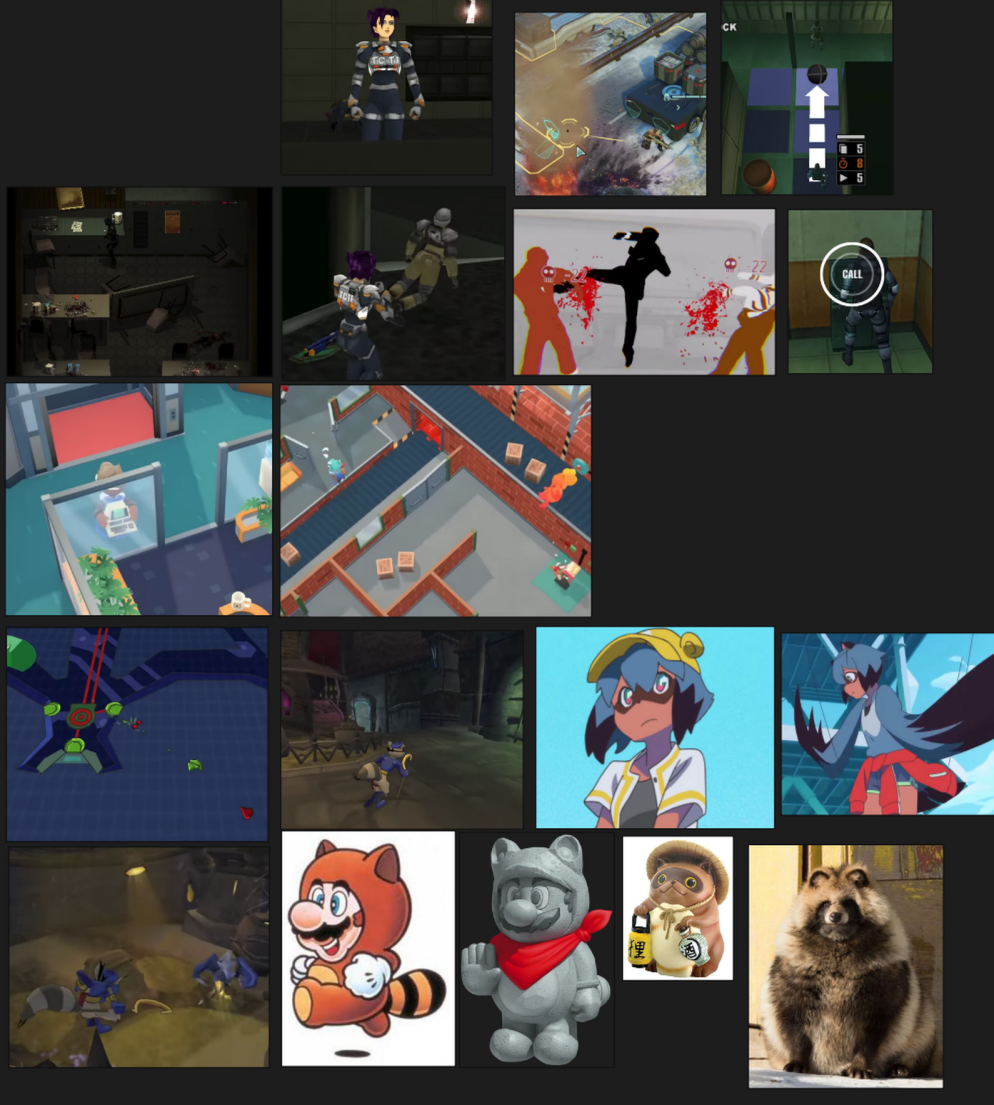](https://docs.bugjam.dev/uploads/images/gallery/2026-02/cigimage.png)
# Stop Feeding the Animals!
[](https://docs.bugjam.dev/uploads/images/gallery/2026-02/INuimage.png)
On the beautiful island of Cozumel, you are the defender, trying to keep your fellow pygmy raccoons safe!
Pounce on the tourists feeding the animals and leaving trash (and chide the young ones for begging?).
Clean up signage on the island to slow down traffic, maybe even sabotage a new hotel or two.
Functionally this about exploration/collectathon:
\* Lots of animals and vegetation
\* Scalable number of people (just one with palette swaps or many with clothing)
\* Optional, scalable destruction (no destruction -> knock stuff over -> destroy a hotel)
This was inspired by https://naturetourism.org/project/cozumel-raccoon/awareness/
In short, Cozumel is the ONLY home of a critically endagered pygmy raccoon. With
less that 200, technology has made things worse because another animal, the coati,
is called the "Mexican raccoon" so few people know that not only does Mexico have
raccoons like we know them, but that this species is on the verge of extinction.
# Night at the Meowseum
You are a kleptomaniac cat on a mission to steal a diamond with mystical power from a museum. The museum is under heavy security by robotic guards programmed to shoot on sight. Luckily, you have your instincts and stealth on your side, with the ability to enter bullet time and take out targets before they can see you. You'll be climbing walls, sneaking behind guards, and dodging lasers and bullets.
# Pounce Master
An arctic fox explores the snow covered steppe, pouncing on hidden prey hoping to survive in the harsh environment
[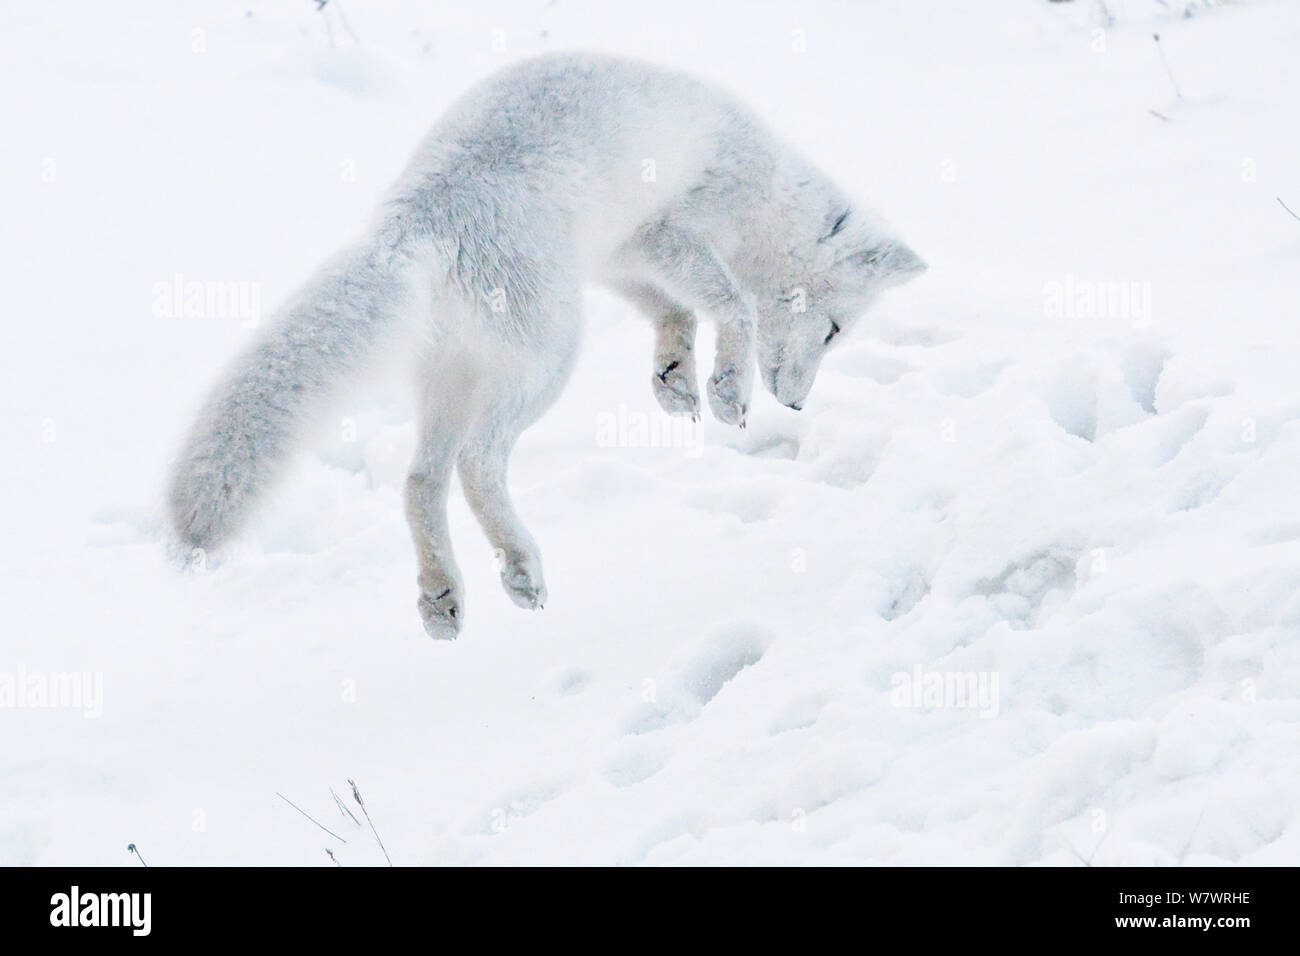](https://docs.bugjam.dev/uploads/images/gallery/2026-02/XyIimage.png)
Largely based on:
[https://www.npr.org/sections/krulwich/2014/01/03/259136596/youre-invisible-but-ill-eat-you-anyway-secrets-of-snow-diving-foxes](https://www.npr.org/sections/krulwich/2014/01/03/259136596/youre-invisible-but-ill-eat-you-anyway-secrets-of-snow-diving-foxes)
Player detects prey with audio and visual clues, then attempts to pounce on it through the snow.
Needs:
rigged fox model
rigged wolf model
rigged prey (ears and tails move)
some kind of snow shader that has interactive volume and shows footsteps
such as [https://godotshaders.com/shader/car-tracks-on-snow-or-sand-using-viewport-textures-and-particles/](https://godotshaders.com/shader/car-tracks-on-snow-or-sand-using-viewport-textures-and-particles/)
a simple hillside with winter foliage
hunger meter, or require X number of kills per day before heading back to the den. how many days can you last? staying out later risks encountering the wolves... but hunger is hard to sleep through.
Really chill vibes (er,) - zen calm game, the sound of snow falling and crunching.
# Sorry I stole you ideas!
Python Pounce (Great Scope)
- A virtual claw machine where you
Tanuki : Destiny Interrupted (Great Theming and Design)
- use your Tanuki transformation powers to
Night at the Meowseum (Great End Goal)
- outsmart and avoid traps to win the grand prize!
# High Level Concept
### [](https://docs.bugjam.dev/uploads/images/gallery/2026-02/pounce-game-banner.png)
### Overview
In this game, the player takes on the role of a mischievous tanuki breaking into a futuristic museum to steal a priceless diamond.
The museum is guarded using various security devices such as robots, lasers, and cameras, forming the foundation of a stealth-puzzle platformer.
The player can transform into objects to hide and use environmental manipulation to navigate the space undetected. By moving objects, redirecting lasers with mirrors, solving puzzles, and causing playful mischief, the player creates pathways deeper into the museum.
After successfully stealing the diamond, the experience shifts: the player must escape without getting caught. If captured at any point, the player is returned to the museum entrance and must attempt the heist again.
---
### Game Loop Structure
**Two-Phase Gameplay Loop**
1. **Infiltration Phase (Stealth-Focused)**
- Goal: Reach the diamond.
- The player can transform into objects to help hide from the various security devices.
- Guards can move around the museum and have vision cones (yellow cone light visualization).
- Cameras function like guards but are stationary.
- Lasers act as tripwires and path blockers.
- The player manipulates the environment to create an escape path.
2. **Escape Phase (Chase-Focused)**
- Triggered after stealing the diamond.
- **The player cannot transform** (key constraint).
- Guards enter high-alert mode and actively chase.
- No grace period when spotted.
- Gameplay becomes more movement/platforming focused.
This creates a strong tonal shift similar to the final escape sequence in [Deep Rock Galactic.](https://www.deeprockgalactic.com/)
---
### Player Abilities & Transforming
#### Transformation Mechanics
- Player (tanuki) can transform into objects found around the museum exhibits.
- Player can jump onto low/medium/high platforms
- Likely cannot move while transformed (baseline for scoping reasons).
- Transformation visually obscured with:
- Smoke poof VFX
- Squash & stretch animation
- Swap the leaf with the diamond
#### Possible Object-Based Properties
- - Heavy object → weigh down switches
- Reflective object → redirect lasers
- Small object → fit through holes
- Round object → limited rolling movement
- Mirror form → redirect lasers but remain stationary
### Environmental Systems
#### Lasers
- Function as tripwires.
- Confine robot guard paths.
- Redirectable using mirrors.
- Grid-based mirror rotation (90° increments) to simplify alignment.
#### Guards/Cameras
- Patrol predetermined paths. (Guard only)
- Vision cones are visualized clearly.
- During stealth:
- Brief search state if the player escapes the cone.
- During alert:
- Immediate chase.
- No cooldown.
### Level Design & Movement
#### Platforming Emphasis
- Pushing columns/pedestals to create vertical access.
- Low/medium/high platform system.
- Shelves and vents as traversal routes.
- Strong emphasis on verticality as a way to discover new paths.
#### Environmental Manipulation
- Push pedestals to block lasers.
- Move objects to create jumping paths.
- Possibly plant “mischief traps” during infiltration that trigger during escape.
---
### Have a suggestion?
- Use **comments** on the High-Level Concept page in BookStack.
- Leave a comment in the Discord thread.
- Create a new task in the Backlog column of the [BugJam: Game Kaban Board](https://tasks.bugjam.dev/projects/33/132)
# Working with Git (Version Control)
# Git Overview
All professionally managed projects require some kind of version control system.
This type of software goes by several names:
- [Version Control System](https://docs.godotengine.org/en/latest/tutorials/best_practices/version_control_systems.html) (VCS) / "Version Control"
- Source Code Management (SCM) / "Source Control"
We'll stick to the name "Version Control" to keep it simple. Professional game development typically uses either **Perforce** or **Git**. - We will be using Git, as it is free and open source. While it's less popular for game development than Perforce is, it is a tool that you can continue to use for free in your personal projects after you learn to use it during BUGJam.
There are four components to Git that you need to know about:
- Git
- Git LFS
- Git GUI
- Software Forge
### Git
[Git](https://git-scm.com/) is a "decentralized" version control system. It is a command-line tool used primarily for software development. It manages source code repositories, and tracks versions of files that you check in. Git by itself is a powerful tool, but it is incomplete for our needs. Since it is decentralized, it doesn't need to connect to a central server in order to function, but without a central server you can't easily collaborate with other people.
### Git LFS (Large File Storage)
By default, large art assets (binary files) aren't well supported by Git. The de facto solution to this is a plugin for Git called "[Git LFS](https://git-lfs.com/)" (Large File Storage). You will not interface with LFS differently than you would with regular Git, it runs in the background and moves your large files into a large files storage container on the server. Once it's installed you can forget that it even exists.
### Git GUI (Graphical User Interface)
Git is a command line tool, this means you interface with it by typing commands into the terminal, so unless you're well versed in typing all of your commands into the console, its usually not a desirable way to work. So third-party tools are available to add a graphical user interface to Git. There are dozens to choose from but we will be focusing on a free and open source tool called "[SourceGit](https://sourcegit-scm.github.io/)".
Git GUI tools are all just wrappers on top of git, and they just issue commands via the Git command line on your behalf, they all do the same thing, but some offer a much better experience than others. SourceGit is very new, and a little rough around the edges as it is in rapid development, but it's one of the best FOSS options.
### Software Forge
Git's decentralized nature means that it doesn't have it's own system for hosting the repository. During collaboration we need a place to push our changes to so that others can pull those changes. Among very many other awesome features, this is something that "[Forgejo](https://git.bugjam.dev/)" provides. This is hosted on the server, you do not download this, instead you access it via a web browser.
# Git Terms
#### Repository / "Repo"
A repository is the what Git uses to manage projects. Every version of every file, every change, every diff, every reference log, every blob, is all stored in the repository. You can think of it as the thing that contains the entire project.
Some projects put all of their project content into a singular repository making one massive "monorepo". This is not really appropriate for game development since it's more ideal to separate out the art source content from the in-game content. For BUGJam we will have two repos: One for art source content, and one for in-game content.
#### Origin
Each of the project repositories are stored in the software forge on the BUGJam server at [https://git.bugjam.dev/](https://git.bugjam.dev/) Origin refers to the version of the repository that is hosted on the server. Since it's not stored on your computer, we call this a "remote" repository. Origin is the "source of truth" for the project.
#### Clone
Nearly identical to "downloading", cloning is a function of Git that can reach out to a remote repository and copy the files down to your computer. With one very important difference: It keeps a connection to that remote repository so that you can track your changes and push them back up to the remote repository.
#### History
A full list of every change that has happened within the repository. Every file that was checked in, every modification, addition and deletion is stored in the project's history.
#### Branch
Git is able to track multiple timelines of history for the project. Whenever you make a split in that history, it's called a branch. The primary branch is called 'main'. The main branch is meant to represent a stable state of the project, you should always be able to view the main branch and play a version of the game that's free from crashes or major issues. We do not develop directly in the main branch. Other branches will contain the actively developed new features, this ensures that each contributor can add content to the game without breaking the content that other people are working on at the same time.
#### Local Changes
Any change you make to the files within the repository will automatically be detected by Git: Creating a file, editing a file, moving a file, deleting a file. These will all show up in your local changes. These changes will not immediately show up for other users. Local changes are volatile, they aren't checked into the version control system yet, so be careful, if you revert your local changes without committing, they are lost forever.
#### Diff (Difference)
Whenever a change is made, Git isn't just tracking the change that happened, it looks through the file to track the difference between the two versions. For text files, it's able to show you line-by-line what changed, this is the "diff".
#### Stage
After you've made changes to files in the repository, Git will be aware of the differences in the files and they will appear in the local changes. But they still need to be added as new versions in the repository. We have to tell Git which files we want to add, picking which files we want is called "staging" those files.
#### Commit
Every time you have a change you want to submit to the repository, you need to commit it into Git's history. This represents an actual check-in which saves your work into the repository. Without a commit, your work is in a volatile state, you must commit to make your changes permanent. First stage your files, then write a message, then commit. Note that this still will not make these changes available for the other users yet, since the commit only happens on your local computer.
#### Commit Message
Sometimes it's unclear what changes took place within a commit, all commits must have a commit message which is usually one or two lines of text describing the changes you're about to check in. Example: "fire extinguisher: Create block mesh". This will make it clear what this commit contains when we view it in the project history.
#### Commit Hash
Every time you commit it is given a unique identifier in history, this is the hash. You won't need to concern yourself with this unless you're doing very advanced Git operations.
#### Fetch
Because Git is decentralized, it's unaware of the remote repository on the server for most operations that you run on your local machine. Changes could be happening upstream from you and your local copy of the repository will become out of date. "Fetch" is an action that reaches out to the remote repository to ask for the latest information.
#### Pull
Where "Fetch" just asks the server for the latest information, "Pull" will take those changes and pull them into your local copy of the branch. This is how you stay up to date. Keep in mind that "Pull" actively makes changes on your machine, if you're not careful it can erase your local data in favor of what's on the server. Don't forget to commit your changes first.
#### Push
"Push" is the opposite of "Pull", it takes the commits in your local repository, and pushes them up to origin. This is how you share your changes with the rest of the team.
#### Merge
If multiple branches were used, you can't see the content of both branches at the same time. Eventually you have the "merge" the content of one branch into the other to unify the timeline.
# Tutorials
Overview of Git:
How to clone the repositories:
# Working with PureRef
PureRef produces `.pur` files. These contain image galleries / mood boards full of reference images and concept art.[](https://docs.bugjam.dev/uploads/images/gallery/2026-02/pureref-screenshot.png)
### Optimization - Use linked images, not embedded
Images are large files, often around 500 KB - 10 MB each. If you add 200 images to your PureRef file, that can easily add up to 100 MB of (data depending on the compression used in each image). Let's keep using 100 MB as an example to keep it simple.
Committing in each of these images by themselves is manageable by Git LFS; These images files aren't likely to be modified, so they only have to be committed to the repo once. This means we will use the storage space and bandwidth of each image once, a total of 100 MB. - Not bad.
However, if you embed the images into the PureRef file directly, it will produce one massive 100 MB `.pur` file instead of saving the individual images. The total size is the same, but now there's a horrible issue: Every time you make a change to the PureRef document such as:
- Adding one new image
- Removing an image
- Moving an image around
- Or even just panning the canvas around
When you save it, the ENTIRE 100 MB has to be updated when it's committed to the repository. So every time you save you're paying the cost of all of the embedded images every time. If you save that file 20 times, that's 1 GB used up on the server's storage space, and 1 GB that every user has to download to their machines for basically no benefit.
Because of this we must instead save the images individually into a "references" folder, and use the "Linked" images option in PureRef, not the "Embedded" option. This will keep the `.pur` file only around 300 KB while the 100 MB of images are individually saved. This way if we make 20 commits with the .pur file it will only equal a total of 6 MB instead of 1 GB in the previous example.
### Setting up linked files in Pureref
1\. Right click and choose Settings (Ctrl + U), and go to Saving and Loading:
[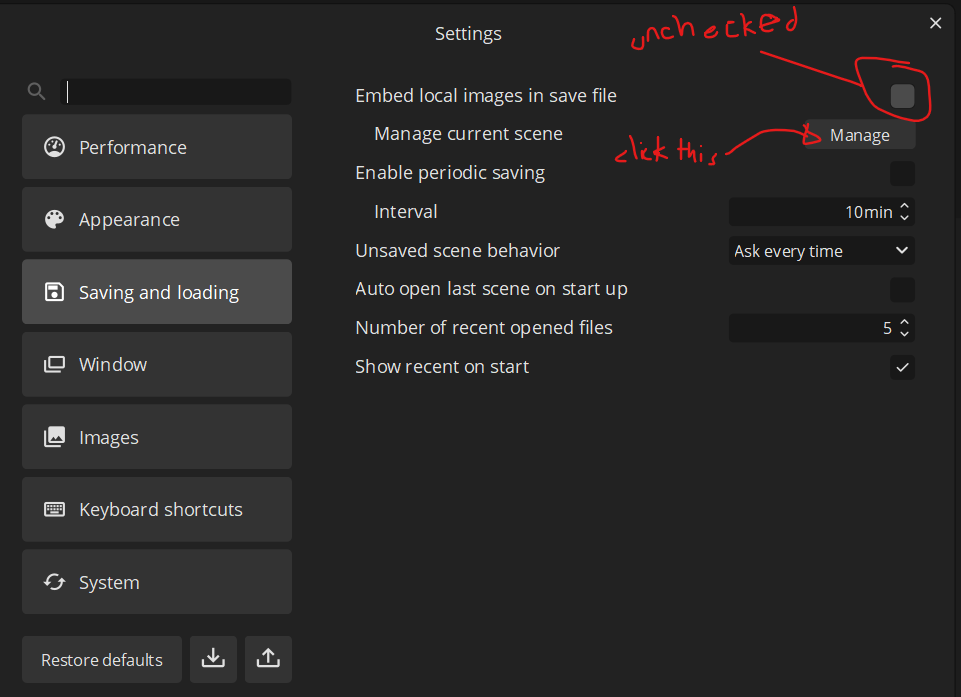](https://docs.bugjam.dev/uploads/images/gallery/2026-02/dKLimage.png)
2\. Click "Manage" and set up linking images with the proper folder output. It'll warn you that this can't be undone.
[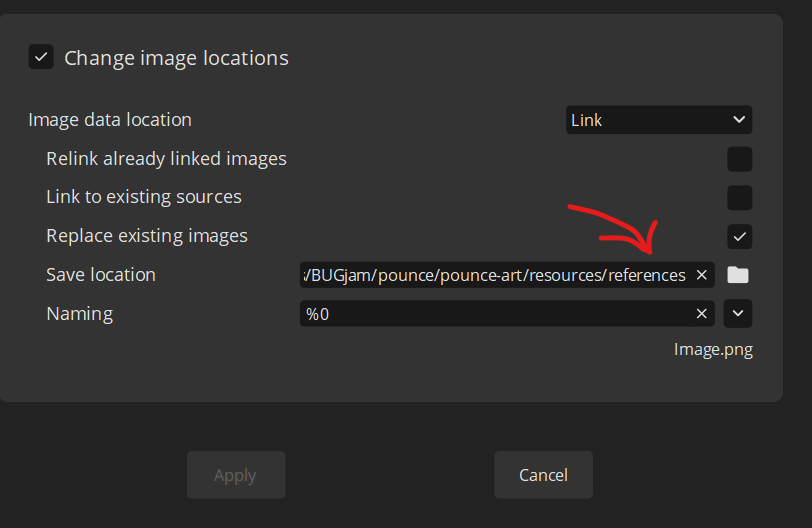](https://docs.bugjam.dev/uploads/images/gallery/2026-02/8Ykimage.png)
And that's it!
# Configuring Git to rebase when pulling upstream changes
We are experimenting with following a Git workflow where everyone is allowed to work from and commit directly to the `dev` branch. This comes with the consequence of having your local version of `dev` frequently falling behind upstream changes made to the `origin/dev` branch (the server's version of your local `dev` branch) as other people push their commits. This can easily lead to a pitfall when pulling changes from the `origin/dev` branch into your local `dev` branch because Git defaults to fast-forward or merge when pulling. This means that by default, if the branches diverge (meaning there are both upstream and local changes) it will create a commit with the subject line `Merge branch 'dev' of https://git.bugjam.dev/BUGJam/pounce-game into dev`. These extra merge commits clutter the repo by creating unnecessary cruft in the commit history and make it difficult to understand the sequence of changes. What needs to happen instead is your local changes need to be rebased on the upstream changes when pulling. The instructions below show how to configure Git on your system to default to rebase when pulling so it will do the right thing for you automatically.
**On Windows**, you can make this change while installing Git when you get to the prompt in the installer asking "What should `git pull` do by default?". It defaults to Fast-forward or merge. You need to set it to Rebase like in the following screenshot. If you did not change the default pull strategy in the installer, you can still change it manually from the command line. See **On all platforms** section below.
[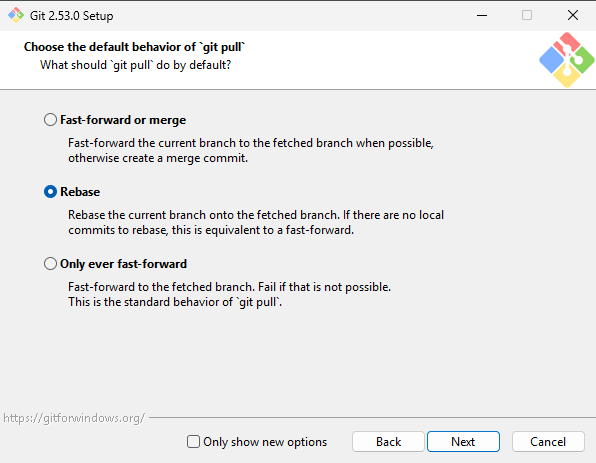](https://docs.bugjam.dev/uploads/images/gallery/2026-02/screenshot-from-2026-02-17-23-54-15.png)
**On MacOS / Linux**, installing git works differently and does not have an installer like on Windows. However, the default pull strategy is still fast-forward or merge, and needs to be changed to rebase.
**On all platforms**, in a command prompt / terminal set the `pull.rebase` option to `true` with the following command:
`git config --global pull.rebase true`
Confirm the change has been made by running the following command:
`git config --get pull.rebase`
the command should just print `true`.
**In SourceGit**, with the above Git configuration change, it should default to use the system Git pull strategy configuration. Still, make sure when you are pulling that the checkbox for "Use rebase instead of merge" is checked before pulling.
It should look like this:
[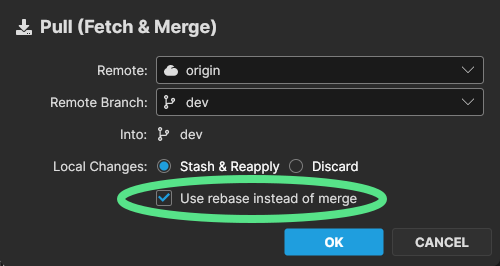](https://docs.bugjam.dev/uploads/images/gallery/2026-02/screenshot-from-2026-02-17-23-15-43.png)
Going forward please do not merge `origin/dev` into your local `dev` branches. You should be rebasing your local `dev` branch changes on `origin/dev` instead. If you ever see the `origin/dev` branch get merged into your local `dev` branch with a merge commit with the subject line `Merge branch 'dev' of https://git.bugjam.dev/BUGJam/pounce-game into dev` (or similar), please do not push that extra merge commit to the repo. Instead, please reach out to one of the many Git experts on our team for help with correcting the mistake before you push your changes.
# Art Asset Workflow
# Art Asset - Overview / Guidelines
### What is an Asset?
In a production pipeline, (both animated films and video games), art assets are finished pieces that are ready to be used in a scene. Creating an asset is more than making a model and submitting a .blend file. A completed asset involves all of the surrounding work to enable the next person in the pipeline to effectively drag-and-drop the asset into the scene, and have everything just work.
### What's expected?
For a 3D game, a finished asset includes:
#### Art Source Content:
- A .blend source file for the high-res model checked into the `art-source` repository:
- file in the right place with the correct 'snake\_case' naming convention.
- A collection inside the file named correctly for the asset.
- A .blend source file for the low-res model checked into the `art-source` repository:
- file in the right place with the correct 'snake\_case' naming convention.
- A collection inside the file named correctly for the asset.
- A "collection exporter" set up for the asset saved with the correct export settings, with the export path pointed at the correct location in the `game` repository.
- UV unwrapped correctly.
- Materials assigned correctly.
- Topology prepared for game:
- No n-gons
- Reasonable polycount
- other validation. - TODO add more about validation.
- A set of input 'mesh maps' saved as .png files in the same folder:
- asset\_name\_mesh\_id.png - ID map
- asset\_name\_mesh\_world\_normal.png - High-res world space normal (16 bit depth).
- asset\_name\_mesh\_tangent\_normal.png - High-res tangent space normal (16 bit depth).
- asset\_name\_mesh\_ao.png - High-res ambient occlusion
- asset\_name\_mesh\_curvature.png - High-res curvature
- A textures set of baked output textures channel packed and saved as .png files in the same folder:
- asset\_name\_abedo.png - (Color map aka "Base Color")
- asset\_name\_normal.png - (16 bit)
- asset\_name\_orm.png (Channel packed Occlusion, Roughness, Metallic).
#### In-Game Content:
- A pair of asset\_name.gltf + asset\_name.bin files exported into the `game` repository via the "export collection" in the source .blend file.
- One or more materials for the model:
- asset\_name\_mat.tres
- OR e.g:
- asset\_name\_head\_mat.tres
- asset\_name\_body\_mat.tres
- asset\_name\_armor\_mat.tres
- All textures from the model's texture set imported with the correct settings:
- asset\_name\_albedo.png
- asset\_name\_normal.png
- asset\_name\_orm.png
- A scene for the asset:
- asset\_name.tscn
- Simple colliders assigned:
- [SphereShape3D](https://docs.godotengine.org/en/stable/classes/class_sphereshape3d.html#class-sphereshape3d)
- [BoxShape3D](https://docs.godotengine.org/en/stable/classes/class_boxshape3d.html#class-boxshape3d)
- [CapsuleShape3D](https://docs.godotengine.org/en/stable/classes/class_capsuleshape3d.html#class-capsuleshape3d)
- [CylinderShape3D](https://docs.godotengine.org/en/stable/classes/class_cylindershape3d.html#class-cylindershape3d) - NOTE: this is reportedly buggy, we need to test it before approval, use Capsule instead.
- If absolutely necessary:
- ConvexPolygonShape3D
- ConcavePolygonShape3D
- LODs created or generated for the model.
# Naming Conventions
All art files should use `snake\_case`: all lower case letters, with underscores to separate words.
Exceptions:
\* It's okay to leave reference images with their default name, just keep them in the `reference` folder next to the asset.
All content within a .blend file should be named correctly.
Please name EVERYTHING in your outliner DO NOT leave things as "cube.001/cube.002" when naming in your outliner, use the conventions **asset\_name\_suffix** with one of the following suffixes. (e.g. fire\_extinguister\_sm)
\# In .Blend Files:
"\_sm" - static mesh
"\_sk" - skeletal mesh
"\_mat" - material
"\_basecolor" - base color texture
"\_normal" - normal map texture
"\_ao" - ambient occlusion texture (mesh map)
"\_curvature" - curvature texture (mesh map)
"\_orm" - channel-packed texture containing Ambient Occlusion, Roughness, and Metallic maps
All artwork for the game (characters/ materials/ props/ etc) will be submitted as .blend files to the GIT repo
\[BAD EXAMPLES\]: cube.001 / New Material Ball / 111.blend
### Name file and place in the appropriate directory
##### Name
All art files should use `snake\_case` all lower case letters, with underscores to separate words. absolutely no spaces in file names, this can break tools and pipelines.
Multi-part assets should be named with the primary part appearing in the name first e.g. dog\_main, dog\_collar, dog\_shoes 'dog' is the descriptive part here so it comes first so that all parts are sorted together in the file system.
##### Directory
All art production files will be created inside of the `pounce-art` repository. The output of these files will be exported into the `pounce-game` repository. The file paths for these files will match 1:1 between the two repositories. See the [game folder structure](https://docs.bugjam.dev/books/bugjam/page/game-folder-structure "Game folder structure") page for more info.
All art assets should go inside of the `art_assets` folder within each repository.
Your prop should be categorized into the appropriate sub-folder based on its type:
- props
- environments
- characters
Within this sub folder, you should create a folder named after the specific asset. All files for creating that asset should be saved in that folder. If you have reference images, make a `reference` folder inside of that asset's folder. In most cases, it should be one asset per .blend file. It's okay to create multiple assets within the same .blend file if they are logically grouped and it makes sense to make them together all at the same time e.g. a bunch of rocks, or a fence post + fence scaffolding.
```
BUGJam
└── pounce
└── pounce-art
└── art_assets
├── characters
│ └── example_character
│ ├── example_character.blend
│ └── reference
│ ├── reference.pur
│ └── reference_image.png
├── environments
│ └── example_environment
│ └── example_environment.blend
└── props
└── example_prop
└── example_prop.blend
```
##### Examples
A reflective mirror object that's used as a puzzle element in the game would go here:
`BUGJam/pounce/pounce-art/art_assets/props/mirror/mirror.blend`
The Tanuki character that the player will play as would go here:
`BUGJam/pounce/pounce-art/art_assets/characters/tanuki/tanuki.blend`
In Blender Mesh
tanuki\_sk
In Blender Material
tanuki\_mat
Blender Textures
tanuki\_basecolor.png
tanuki\_normal.png
tanuki\_ao.png
tanuki\_curvature.png
tanuki\_orm.png
Blender Output Textures
tanuki\_albedo.png
tanuki\_normal.png
tanuki\_orm.png
# Asset Creation - Part 1: Block Mesh
**The purpose of the block mesh is to spend less than 15 minutes to create an extremely rough block out version of the model that can be used as a stand-in version of the asset. This allows us to get an early version in the game asap so that the level designers and programmers aren't blocked in their ability to do their work.**
#### Goals
1. **Save a file into the correct location with the correct naming convention.**
2. **Block out an extremely rough version of the model that vaguely looks like it could be the asset.**
3. **Ensure scales and proportions are correct.**
4. **Name all of content inside of the file appropriately.**
5. **Set up an export collection, and point the file path to the in-game location for the asset.**
6. **Export it into the appropriate game folder and establish it as an asset in the game.**
7. **Create collision for the asset in-game.**
## Step-by-Step
### **1.) Prepare / start the task:**
- Check the [Vikunja Art project page](https://tasks.bugjam.dev/projects/32/127) to see if you were given a task / find a task that you can do from the to-do list.
- Refresh the page and make sure nobody else is already working on the given task before you assign it to yourself.
- Assign the task to yourself:
- Assign to user -> Type your name, accept.
- Move the task to the 'in progress' column, to let the team know you're actively working on it.
### **2.) Check your Git working directory (pounce-art):**
- Have the [Working with Git](https://docs.bugjam.dev/books/bugjam/chapter/working-with-git-version-control) page at the ready.
- Open the `pounce-art` repo in SourceGit.
- Make sure you have no uncommitted files in the 'Local Changes' section.
- Go to the 'History' section and sure you have the `dev` branch checked out. If you don't already have a local `dev` branch, right click on `origin/dev` and choose "Checkout origin/dev..."
- Use the default settings and click 'OK' to create local copy of the `dev` branch.
- Pull the latest changes from origin.
-
Check that you have `dev` as your working branch- not `main`!
### **3.) Make the Blender file:**
[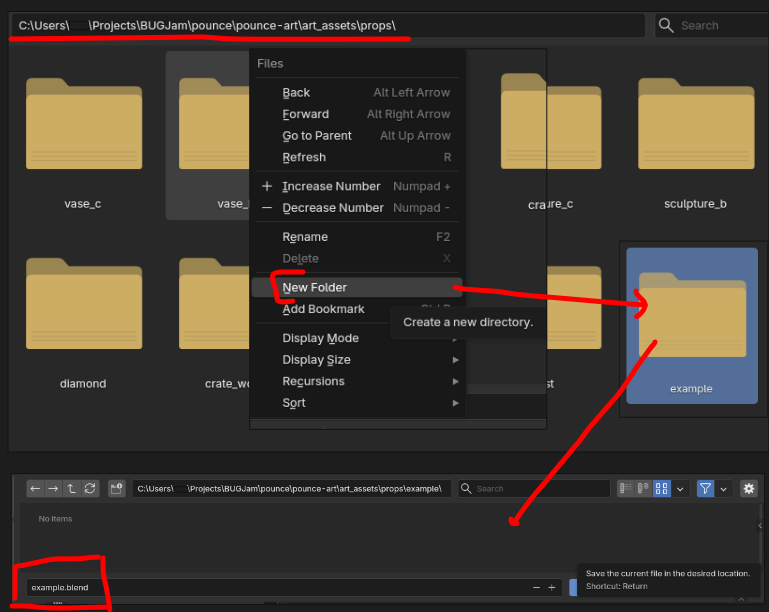](https://docs.bugjam.dev/uploads/images/gallery/2026-03/image.png)
Have the [Game folder structure](https://docs.bugjam.dev/books/bugjam/page/game-folder-structure) at the ready. Start in the `pounce-art` repository.
- Determine the asset type:
- characters - A rigged an animated character (robot, security camera, tanuki)
- environments - Static assets to build the environment (walls, floors, trim, windowsills)
- props - Items that can potentially be moved around in the game (vase, crate, sign, coins, statues, diamonds)
If you are making a prop, you'd navigate to" `pounce/pounce-art/art_assets/props`
- Create the folders for your asset.
- e.g. `pounce-art/art_assets/props/crate_wood`
- Read more about [naming conventions and files paths](https://docs.bugjam.dev/books/bugjam/page/naming-conventions)
- Immediately save the file into asset folder that you created a moment ago.
- e.g. `pounce-art/art_assets/props/crate_wood/crate_wood.blend`
- Follow the [Naming Conventions](https://docs.bugjam.dev/books/bugjam/page/naming-conventions).
- Do NOT include things like "WIP" or "Blockmesh" in the name, always use the final name for the asset
1.
choose asset type
2.
create new folder in correct location named after the asset
3.
save the .blend in that new folder named after the asset ( example.blend / wood\_crate.blend)
### **4.) Make the Block Mesh:**
[](https://docs.bugjam.dev/uploads/images/gallery/2026-03/TEAimage.png)
**A block mesh functions as a bounding box + rough shape for your asset, this allows us to apply physics to the object, and start using it to develop scenes + game mechanics right away. You should be able to tell what it is by glancing at it- but its far from detailed- like this chair**
[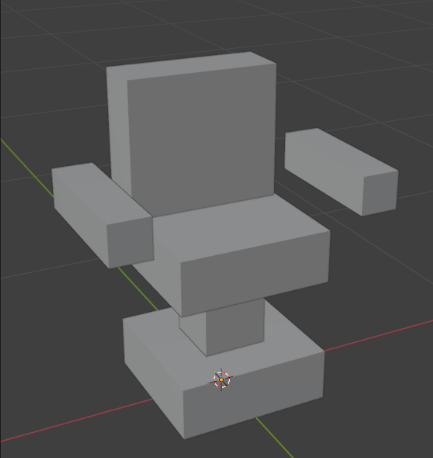](https://docs.bugjam.dev/uploads/images/gallery/2026-03/gmgimage.png)
- Use modeling tools to create an extremely rough block out of the mesh **(don't spend more than 10 minutes)**:
- Keep it extremely simple, focus on scale and proportions.
- Keep in mind the point is to establish the bounds /size / dimensions / proportions of the model.
- Match the dimensions that were given in the task assignment.
- You can use the sidebar's item tab to type in exact dimensions.
- Use primitive shapes.
- For a crate, use a cube.
- For a fire extinguisher, use a cylinder with a sphere on top.
- Keep the poly count low so we don't bog down performance in the game.
- Make sure all content inside of the .blend file is organized and named correctly.
- Ensure that the object is located at the world center with the bottom of the mesh sitting on the floor (z 0) and that the origin point of the object is at it's lowest center point- blender's default where the origin point is in the exact center of the mesh will cause the object to clip through the floor in the game engine
- Ensure asset is centered and sitting on the floor (not below the grid).
- Make sure that you're oriented correctly forward.
- Negative Y axis is forward, Positive Z is up (Note: these axes will be different inside of Godot).
- Tip: Add a Suzanne monkey to the scene, check which was she if facing; Your mesh should face the same direction.
- Apply all transforms.
1.
Create something very simple that is the size + approximate shape of your asset (no more than 15 minutes)
2.
Set the objects origin to the lowest center point of the object
3.
Check that the object is sitting on the floor and not clipping below
4.
Apply all transforms
### **5.) Create a collection for the asset + clean up outliner:**
1.
Create a new collection + name it after your asset
2.
move the block mesh into this collection
[](https://docs.bugjam.dev/uploads/images/gallery/2026-03/jRdimage.png)
- - Name all objects and mesh data with \_sm **(see example above)**
- Remove lights, camera, annotations, and other unneeded junk.
- Tip: Use the "Blender file" view in the Outliner to help find and remove junk.
- You can also use File -> clean up -> purge unused data
- Do not pack textures or other large assets into the .blend file
### **6.) Set up the collection exporter**
**You only have to set this up once during the block mesh phase. Subsequent phases will re-use the same settings.**
- - Select the asset's collection, go to the 'Collection' tab in the 'Properties' editor.
- Find the 'Exporters' sub-section, click the '+' button on the right, and choose 'glTF 2.0'
- Set the 'File Path':
- Point the path to the equivalent folder in the pounce-game repo
- TIP: start with the current .blend file's location by typing two forward slashes "//" for the File Path, then click the browse button (// is short hand for the current .blend file location.)
- Once the file browser opens to the location of the current .blend file, swap the "-art" for "-game" in the file path to send it over to the other repo.
- Use the default 'Relative Path' option, it will look like this:
- `//../../../../pounce-game/art_assets/props/crate_wood/crate_wood.gltf`
- Do NOT use absolute file paths, which look like this:
- `/home/xgreer/Projects/BUGJam/pounce/pounce-game/art_assets/props/crate_wood/crate_wood.gltf`
- Make sure you add the ".gltf" file extension
- Set the 'Format': to 'glTF Separate (.gltf + .bin + textures)'
- Enable 'Collection' -> 'Export at Collection Center'
- Enable 'Data' -> 'Mesh' -> 'Apply Modifiers'
- Set 'Data' -> 'Material' -> 'Materials' to 'Placeholder'
- Note: We will handle proper material assignments in Godot during later asset creation phases.
- For static meshes (things without animated bones):
- Uncheck 'Data' -> 'Shape Keys'
- Uncheck 'Data' -> 'Skinning'
- Uncheck 'Data' -> 'Animation'
- For skeletal meshes (things with animated bones):
- Check 'Data' -> 'Armature' -> 'Use Rest Position Armature'
- Check 'Data' -> 'Armature' -> 'Export Deformation Bones Only'
- Check 'Data' -> 'Armature' -> 'Remove Armature Object'
- Save the .blend file.
- Don't commit to the repo yet, follow the next steps and make sure the export works first.
[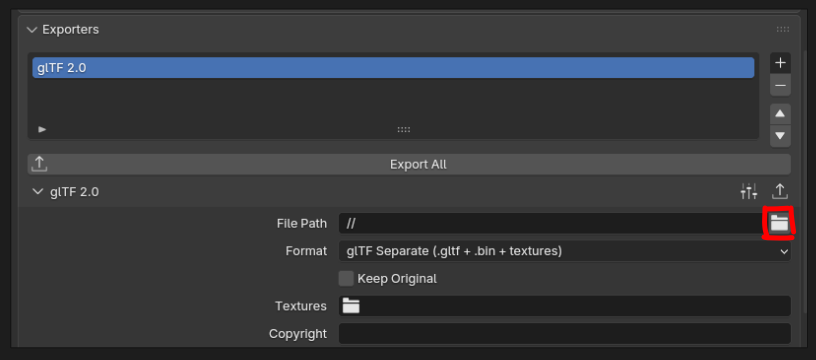](https://docs.bugjam.dev/uploads/images/gallery/2026-03/8vTimage.png)
[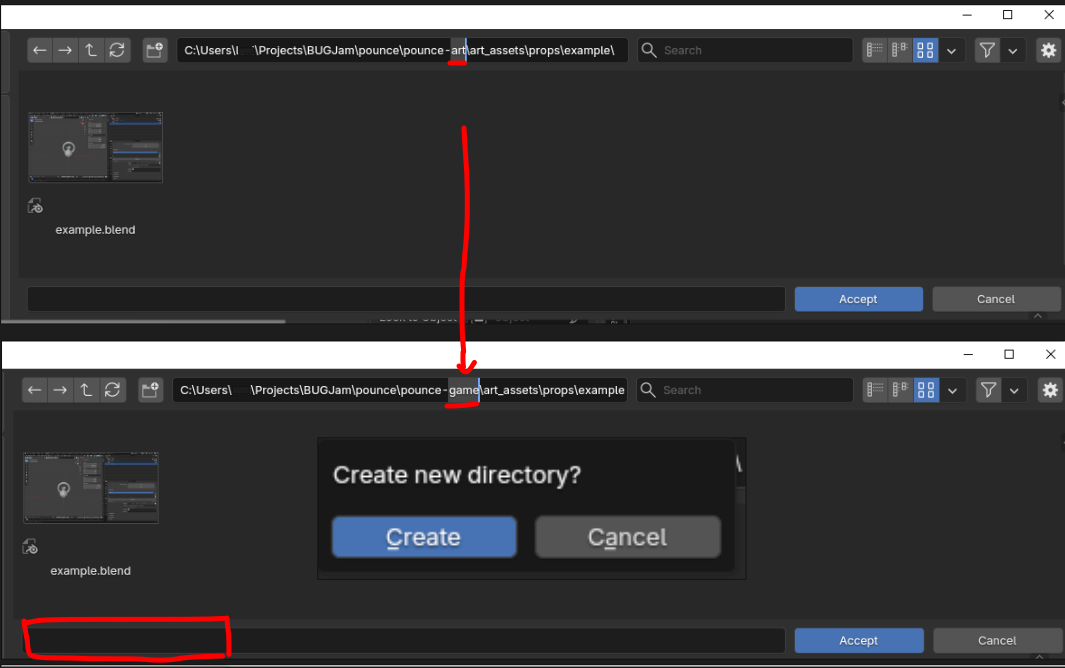](https://docs.bugjam.dev/uploads/images/gallery/2026-03/LL4image.png)
1.
select collection and add a new exporter in the properties panel under 'collection properties'
2.
in file path option type "//" to direct the file to the relative path
3.
select the little file icon to specify the file path, replace "pounce-art" with "pounce-game" and create new directory
4.
in this new directory name the file the same as the asset + but with '.gltf' ( example.gltf | wood\_crate.gltf)
5.
double check settings and ensure that the format is set to glTF Separate NOT glb
6.
Click the 'Export All' button in the collection exporters section + save your blend file
If there are multiple **assets** in this .blend file, make a collection for each **asset** *(a handle that is a separate object on a mug is not a new asset, a new asset would be a mug + a plate, the mug would need a collection and the plate would need a collection, the mug collection would hold both the mug object and the handle object) . + **each new collection will need its own exporter***
### **7.) Add block mesh to game**
##### **IF YOU HAVEN'T OPENED THE GAME YET->**
[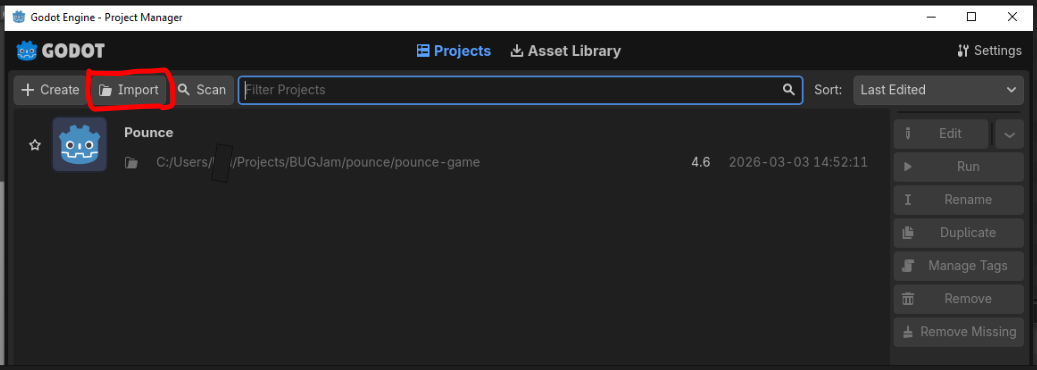](https://docs.bugjam.dev/uploads/images/gallery/2026-03/nsLimage.png)
- Open the `pounce-game` repo in SourceGit.
- Make sure you have the `dev` branch checked out.
- Pull the latest changes from Origin/ Dev
- Open Godot 4.6.1
- Click "import" and navigate to the pounce game under pounce/pounce-game
- Open the 'Pounce' project in Godot
##### **IF YOU ALREADY HAVE THE GAME ->**
[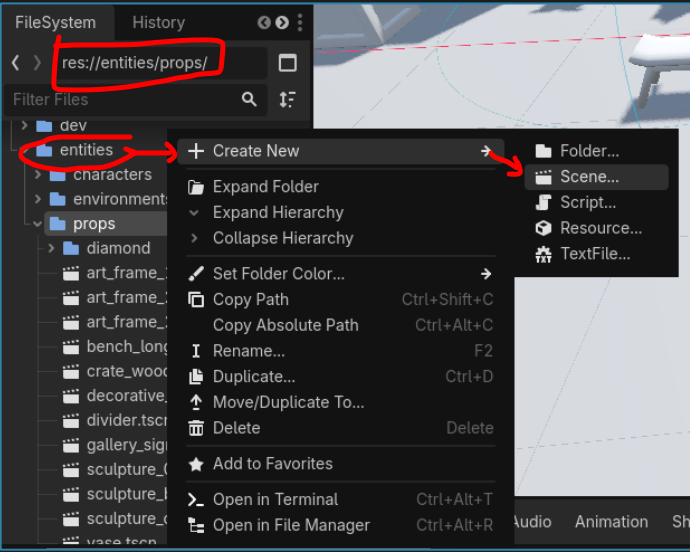](https://docs.bugjam.dev/uploads/images/gallery/2026-03/yWPimage.png)
[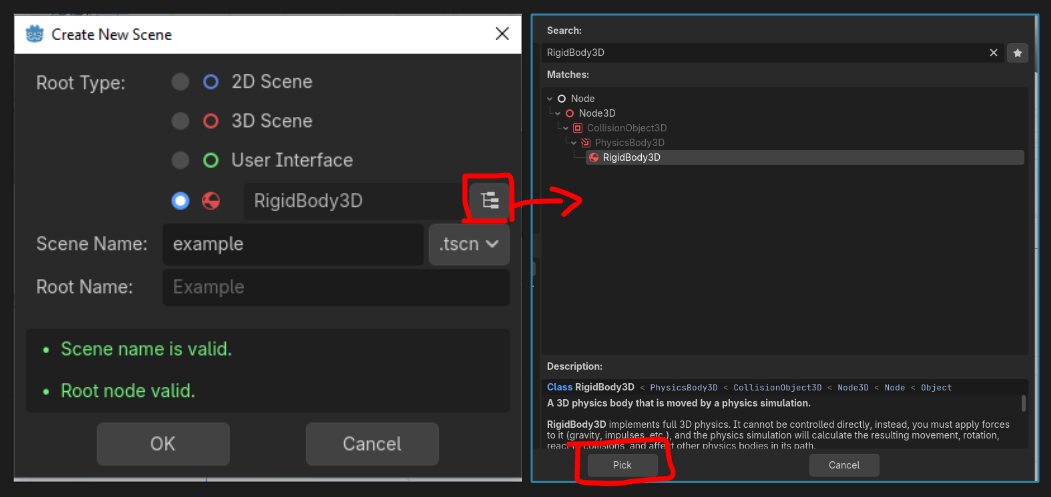](https://docs.bugjam.dev/uploads/images/gallery/2026-03/ljKimage.png)
- Open the 'Pounce' project in Godot
- In Godot's file system (lower left) navigate to a folder called entities
- Select the subfolder corresponding to your prop (environment / prop/ character) and right click + select "create new scene"
- In the Make an entity for your newly imported asset:
- In Godot's FileSystem, navigate to the `entities` folder
- Open the folder for your asset type:
- characters
- environments
- props
- Right click, and choose 'Create New' -> 'Scene...'
- In the 'Create New Scene' dialogue:
- Select the fourth circle option to select a custom root node.
- Set the 'Scene Name' to match your asset:
- e.g. "crate\_wood"
- Click the "Pick Root Node Type" button to the right of the fourth circle option (Its icon looks like a file hierarchy)
- Choose the appropriate node type:
- CharacterBody3D - For characters.
- StaticBody3D - For environment art that doesn't move.
- RigidBody3D - For props that can be pushed around.
- Click the 'Pick' button.
- Click the 'OK' button.
- Double click to open the newly created entity scene.
- Drag the .gltf file into the scene tree
- Right click on the node that you just dragged in, and choose 'Editable Children'
[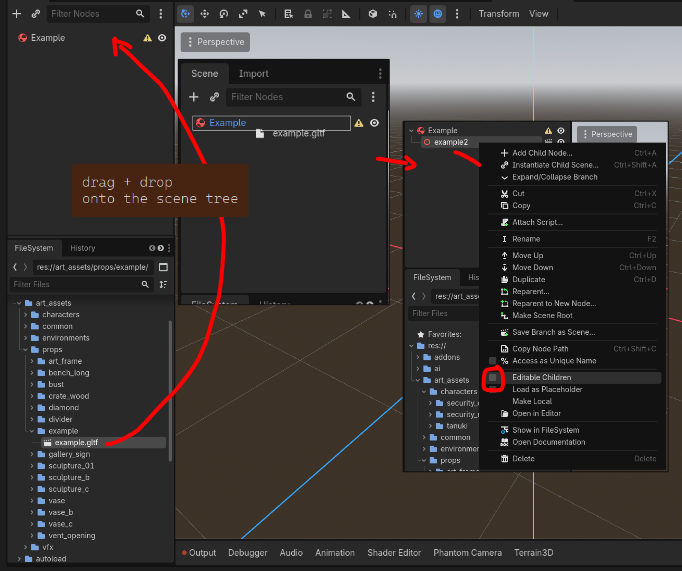](https://docs.bugjam.dev/uploads/images/gallery/2026-03/aB7image.png)
#### Set up Collision for the entity:
[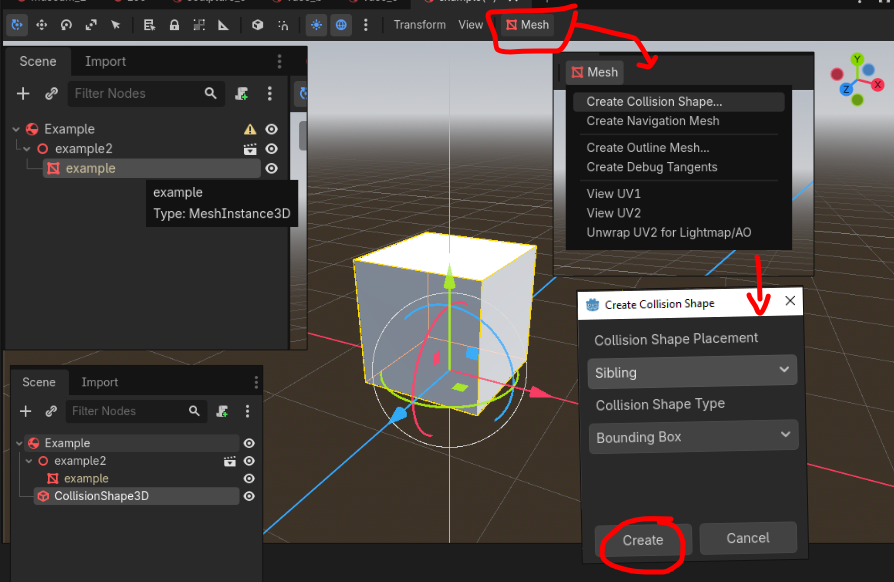](https://docs.bugjam.dev/uploads/images/gallery/2026-03/0Urimage.png)
- Once you've selected editable children you will be able to edit the mesh data on the object (a red symbol that looks like a box with a slanted line)
- With the mesh data (red box) selected in the scene tree, a new mesh button will appear over the viewport
- Click that mesh button and select "create collision shape"
- In the pop-up, select 'sibling' and 'bounding box' + hit create
- Sometimes there will be little yellow warning signs in the scene tree, if that happens just click + drag the new collision shape onto the top object in the collection so that it clips in to the correct hierarchy (it will look like the example above)
- Save the .tscn file with ctrl + s
### **Add to Zoo Scene**
[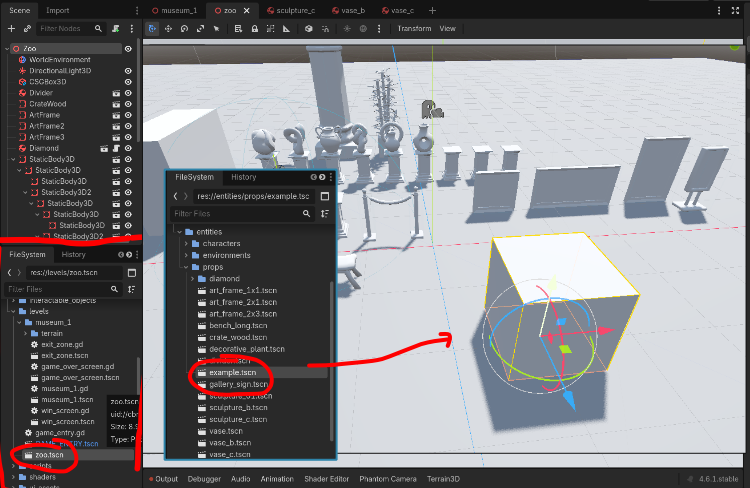](https://docs.bugjam.dev/uploads/images/gallery/2026-03/uG3image.png)
**Under levels in the file system, navigate to 'zoo.tscn' and open it to view the scene with all of the game assets, then go to entities in the file system, locate your new asset tscn and click and drag it into the zoo scene to see it next to everything in the game! (yay!)**
### **8.) Commit changes / complete the task:**
- ##### Go to the `pounce-art` repo:
- Make sure you're in the right branch: `dev`
- Go to the 'Local Changes' section and and stage the .blend file for the newly created asset.
- Make sure you haven't staged irrelevant files.
- Write a commit message:
- Prefix the message with the name of the asset and a colon.
- e.g. "crate wood: Create block mesh"
- Push the change to origin.
- If it prompts you for credentials, enter your username and password for git.bugjam.dev
[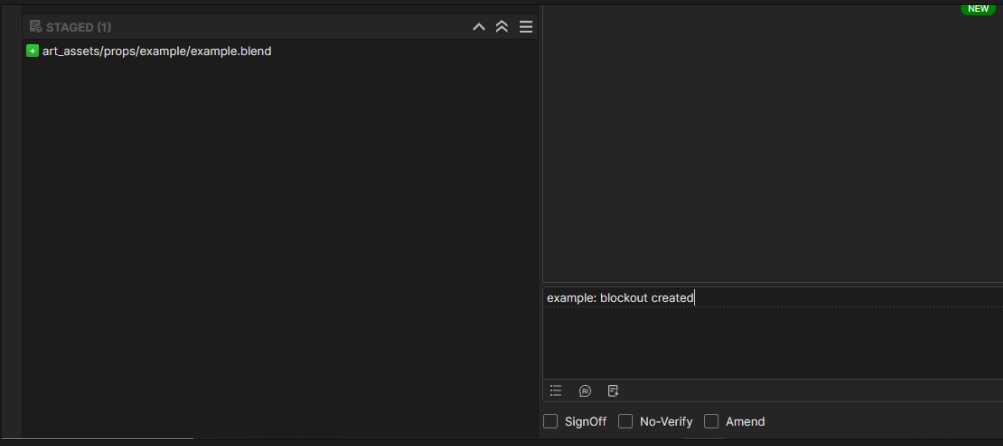](https://docs.bugjam.dev/uploads/images/gallery/2026-03/68yimage.png)
- #### Commit to the `pounce-game` repo:
- Make sure you're in the right branch: `dev`
- Stage the files for the newly imported asset e.g.: **THERE SHOULD BE 5 if you followed above steps**
- `art_assets/props/crate_wood/crate_wood.bin` - The binary mesh data for the exported gltf file.
- `levels/zoo.tscn` - This shows when you added the new entity to the zoo scene
- `art_assets/props/crate_wood/crate_wood.gltf` - The text header file for the exported gltf file.
- `art_assets/props/crate_wood/crate_wood.gltf.import` - Godot import settings and UID for the asset.
- `entities/props/crate_wood.tscn` - The text-based scene file that contains the entity and it's collision.
- Make sure you haven't staged other irrelevant files.
- Write a commit message:
- Prefix the message with the name of the asset and a colon.
- e.g. "crate wood: Import block mesh, set up crate\_wood.tscn entity"
- Push the change to origin.
- If it prompts you for credentials, enter your username and password for git.bugjam.dev
- Move a the Vikunja task to 'blockout+ in progress'
- Check the box for "Block Mesh" in the task description.
- Tell Lexi you're finished with that asset, and get approval to move on to Block Mesh Plus (please DM her or just ping her in the chat)
- congratulate yourself! that was a ton of steps!
# Asset Creation - Part 2: Block Mesh Plus
**The purpose of the block mesh plus is to take the block mesh to the next level. Since the asset boundaries + general shape were already established during the block mesh phase, the rest of the team may have already started using the block mesh in their gray box level designs.**
**Now we can take the asset closer to the final shape and silhouette. Still using placeholder pieces and block-out techniques, the finished block mesh plus model should look reminiscent of the final model and be ready for approval by the art director before refining it. If the art director asks for major design changes after this, it shouldn't be difficult to iterate on since no detail work has been done yet.**
**It is also best to work non-destructively, using modifiers whenever possible to make style passes / changes easy and painless. [Review the style guidelines before starting](https://docs.bugjam.dev/books/bugjam/page/style-guidelines)**
[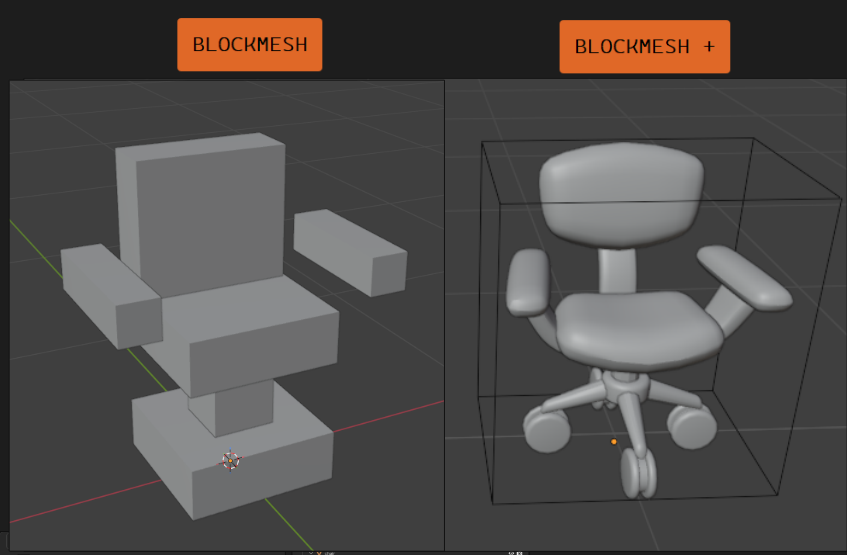](https://docs.bugjam.dev/uploads/images/gallery/2026-03/miNimage.png)
#### Goals
1. Update the block mesh model to get to the desired shape, silhouette and style of the model.
2. Name all of content inside of the file appropriately.
3. Re-run the 'export all' operator on the export collection, to update the mesh in the game asset.
4. Update collision for the asset in-game if needed.
5. Check in all of the changes to the respective repositories.
6. Get feedback from the art director (Lexi aka Pixel)
[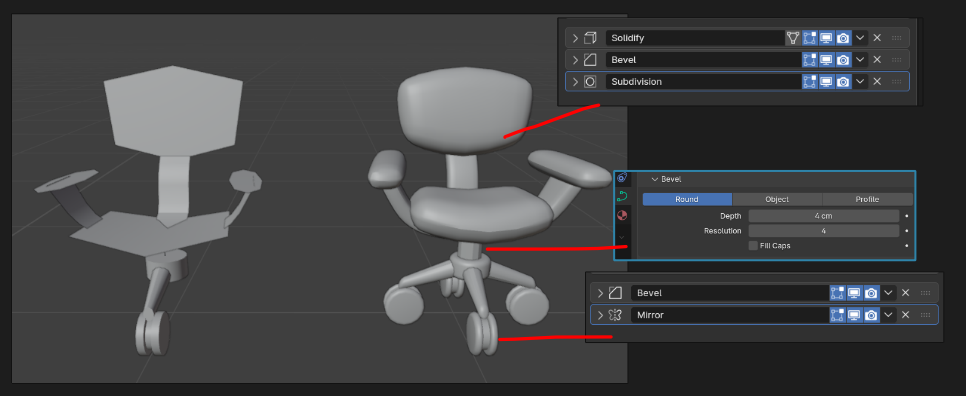](https://docs.bugjam.dev/uploads/images/gallery/2026-03/sYUimage.png)
## Step-by-Step
#### Prepare / start the task:
- Check the [Vikunja Art project page](https://tasks.bugjam.dev/projects/32/127) make sure the task is assigned to you.
- Move the task to the 'blockmesh + in progress' column, to let the team know you're actively working on it.
#### Check your Git working directory (pounce-art):
- Have the [Working with Git](https://docs.bugjam.dev/books/bugjam/chapter/working-with-git-version-control) page at the ready.
- Open the `pounce-art` repo in SourceGit.
- Make sure you have no uncommitted files in the 'Local Changes' section.
- Make sure you have the `dev` branch checked out.
- Pull the latest changes from Origin.
### **Update the block mesh model:**
##### You should...
- Use techniques that are easy to iterate on:
- Make the model out of multiple objects that are easy to move around
- Mirror modifier for symmetrical parts
- Make pipes, tubes, hoses, etc out of curves with modifiers for thickness so they can be adjusted
- Repeated parts made from mesh instances
- Simple custom geometry nodes for mesh generation (if it's faster than doing it by hand)
- Focus on silhouette, proportions, and matching the style guide.
- Try to match the concept art (if concept art is provided).
- Save the .blend file when you're done
- For complex assets it's okay to do multiple commits to the pounce-art repo as long as each one represents tangible progress. Please don't check in every time you move a vertex or two, these files sizes add up fast with each commit.
##### You should not...
- Add small details / wear and tear
- Spend time on final topology / edge flow
- UV unwrap (automatic smart UV project is fine since it doesn't take any time).
- Make materials / textures
#### Clean up the scene:
[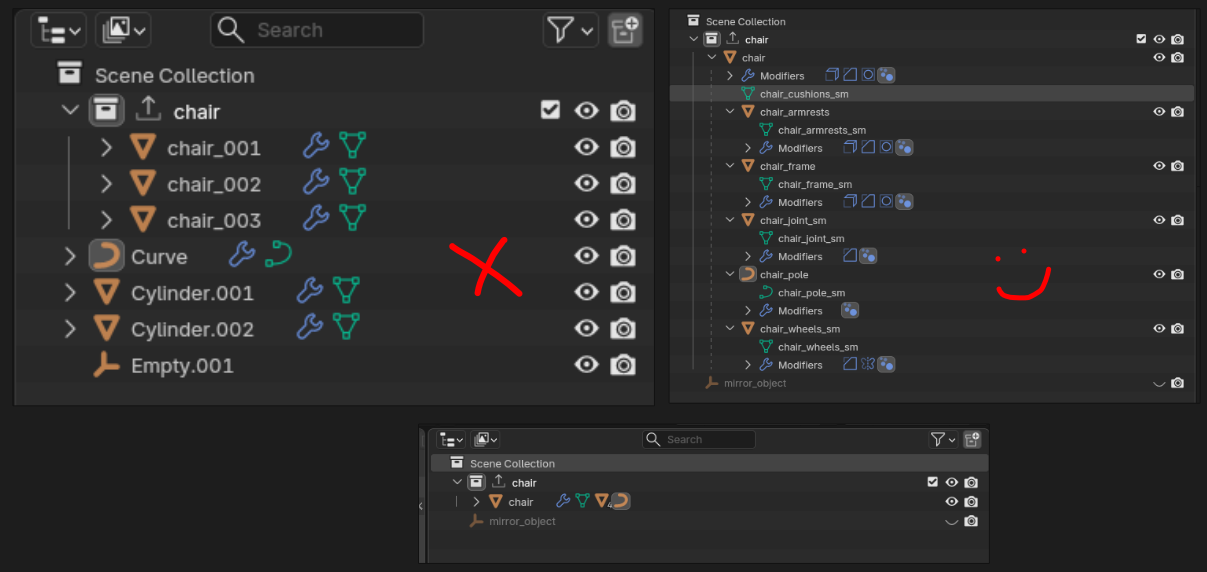](https://docs.bugjam.dev/uploads/images/gallery/2026-03/I28image.png)
1.
Same as we did in the Block Mesh phase, but there might be new mesh pieces now, so double check everything.
2.
Ensure asset is centered and sitting on the floor (not below the grid).
3.
Make sure that you're oriented correctly forward.
-
Negative Y axis is forward, Positive Z is up (Note: these axes will be different inside of Godot).
-
Tip: Add a Suzanne monkey to the scene, check which was she if facing; Your mesh should face the same direction.
4.
Apply all transforms.
5.
Name all objects and mesh data.
6.
Remove lights, camera, annotations, and other unneeded junk.
-
Tip: Use the "Blender file" view in the Outliner to help find and remove junk.
-
You can also use File -> clean up -> purge unused data
-
Do not pack textures or other large assets into the .blend file
### **Export the model:**
- The great thing about the export collection that was set up in the block mesh phase, is that it's already ready to go, including the correct file path. Just re-run the exporter and overwrite the in-game asset.
#### Update collision:
- If there were substantial changes to the model the collision from the first version might not line up correctly anymore. Take a moment to update that in-game
#### Commit changes / complete the task:
All changes to the .blend file need to be checked into the pounce-art repository. And the newly exported mesh / collision update need to be checked into the pounce-game repository.
Now that the asset has been pushed to the server, the art director will have access to it. Contact Lexi to let her know it's ready for review. If she has feedback for you, make the appropriate adjustments and repeat steps 1-5 as needed.
- #### Commit to the `pounce-art` repo:
- Make sure you're in the right branch: `dev`
- Stage only the .blend file for the newly created asset.
- Make sure you haven't staged irrelevant files.
- Write a commit message:
- Prefix the message with the name of the asset and a colon.
- e.g. "crate wood: Create block mesh"
- Push the change to origin.
- If it prompts you for credentials, enter your username and password for git.bugjam.dev
- #### Commit to the `pounce-game` repo:
- Make sure you're in the right branch: `dev`
- Stage the files for the newly imported asset e.g.:
- `art_assets/props/crate_wood/crate_wood.bin` - The binary mesh data for the exported gltf file.
- `art_assets/props/crate_wood/crate_wood.gltf` - The text header file for the exported gltf file.
- `entities/props/crate_wood.tscn` - The text-based scene file that contains the entity and it's collision- wont appear in local changes if you haven't made any updates to the bounding box
- Make sure you haven't staged other irrelevant files.
`art_assets/props/crate_wood/crate_wood.gltf.import` - if you see a new import file in your local changes STOP and ask for tech help in the bugjam chat, this means that a file path is incorrect somewhere and your new export isn't directed to the entity we made in godot last step
- - Write a commit message:
- Prefix the message with the name of the asset and a colon.
- e.g. "crate wood: block mesh +"
- Push the change to origin.
- If it prompts you for credentials, enter your username and password for git.bugjam.dev
- Tell Lexi you're finished with that asset, and get approval to move on to the high resolution mesh
- this is the stage where you will most likely get a drawover+ notes for changes to make before moving to high res, repeat the steps to export + push after making those changes if needed until it's approved and then check off "blockmesh +" on vikunja task and move to "high-res in progress"
# Asset Creation - Part 3: High Resolution Mesh
**Once the block mesh plus has been approved, it's time to refine it into a high quality high resolution mesh. There are multiple ways to do this depending on the asset you're trying to make: hard surface models tend to rely on subdivision surface workflows and geometry nodes, while organic forms tend to rely on sculpting. We should use whatever combination of techniques are appropriate.**
#### Goals
1. Create a high resolution mesh that will eventually be used to bake normals and other mesh maps.
2. Save the file as a new file with the "\_high" suffix: asset\_high.blend
### 1: Create a new file for the high resolution mesh
[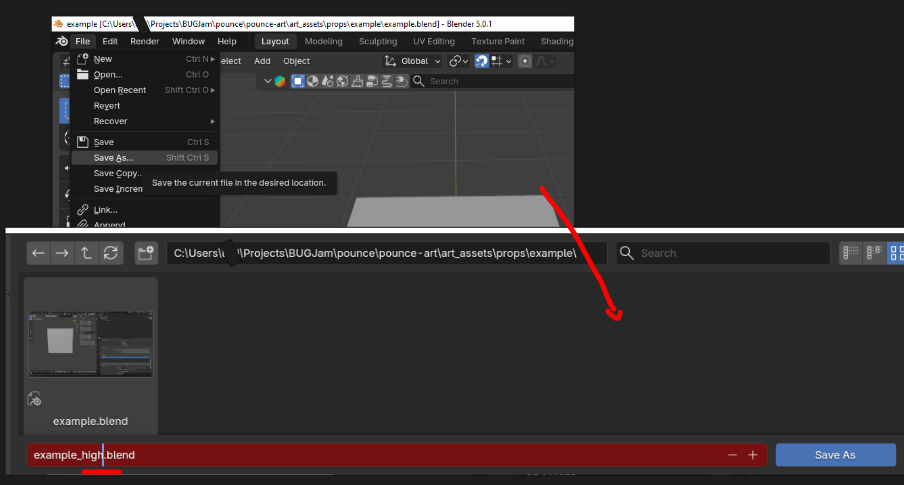](https://docs.bugjam.dev/uploads/images/gallery/2026-03/xR4image.png)
**Starting from your blockout+ blend file** - go to file > save as> and add '\_high" to the file name, this creates a dupicate working file
This high poly mesh will NEVER be put into the game, so you can delete the collection exporter inside of this file, as well as updating the mesh data in your outliner with the suffix '\_high'
[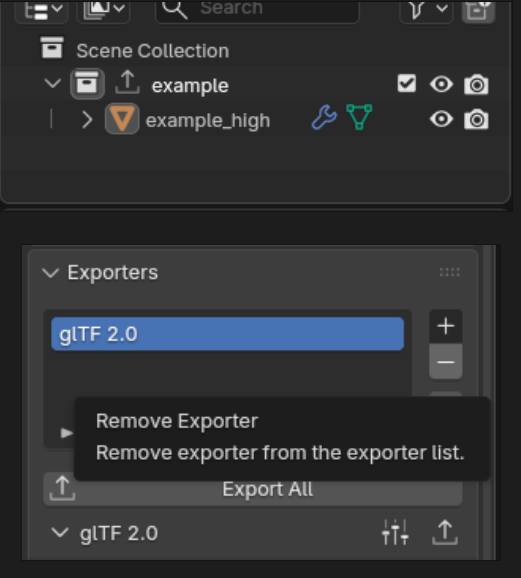](https://docs.bugjam.dev/uploads/images/gallery/2026-03/JwNimage.png)
### 2: Create High Resolution Mesh
[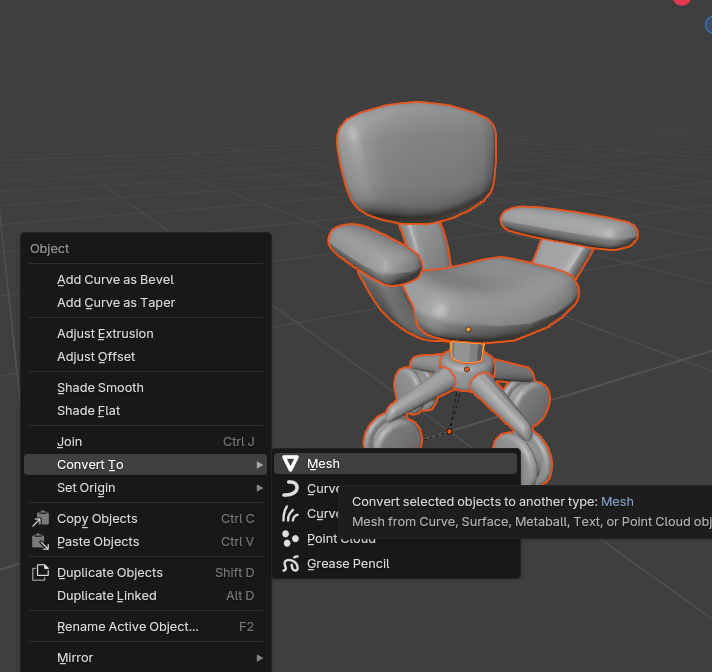](https://docs.bugjam.dev/uploads/images/gallery/2026-03/1Plimage.png)
[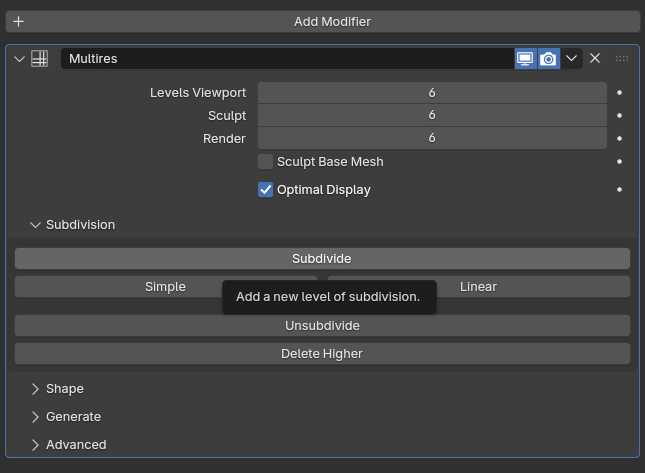](https://docs.bugjam.dev/uploads/images/gallery/2026-03/P5wimage.png)
1.
start by applying all current modifiers to your mesh (excluding instances) If you are working on a symmetrical mesh, use the mirroring effect in the sculpt workspace, and go ahead and apply any mirror modifiers
2.
apply a multires modifier with 3-6 iterations, this increases the polygon count to a level that is appropriate for sculpting (if you find you need more when you are sculpting, just hit 'subdivide' again)
3.
switch to the sculpting workspace
4.
sculpt + detail your model adhereing to the style guide + following notes
Hit ctrl + S frequently while working on the high poly mesh + sculpting! it is a very likely time for blender to crash and you don't want to lose work! when you are done, only the most recent save will get pushed to the repo so dont worry!
### Polygon Notes:
We are going to be using a high - low polygon workflow, which means you can go pretty high when working on the details of your model! Poly counts + budgets arent a thing in this step, but please be considerate of the server's capacity and dont add 20 subdivs just because you can, add as many as you **need** to capture the details you want, but start low and go up instead of just throwing on 1 million faces
**Just make sure there is enough to create a smooth surface- see below: when you see shading artifacts and little jagged edges, thats a sign to increase your subdivision level**
[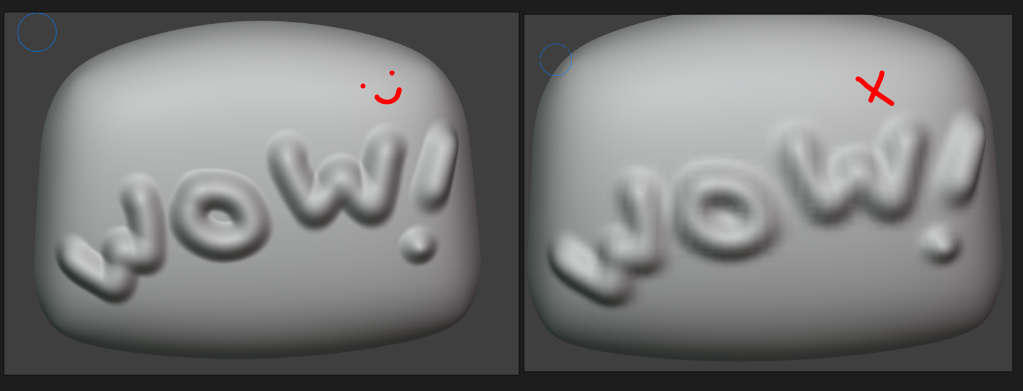](https://docs.bugjam.dev/uploads/images/gallery/2026-03/0Vdimage.png)
**A good high res sculpt adds detail (like dents, wrinkles, seams, fur, etc.) without making noticeable changed to the silhouette or size of the object**
[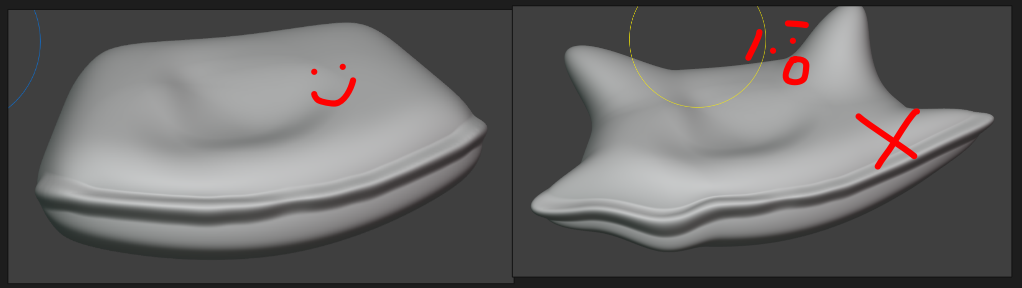](https://docs.bugjam.dev/uploads/images/gallery/2026-03/PN7image.png)
### **3.) Push to the repository**
#### Commit changes / complete the task:
All changes to the .blend file need to be checked into the pounce-art repository. And the newly exported mesh / collision update need to be checked into the pounce-game repository.
Now that the asset has been pushed to the server, the art director will have access to it. Contact Lexi to let her know it's ready for review. If she has feedback for you, make the appropriate adjustments and repeat steps 1-5 as needed.
- #### Commit to the `pounce-art` repo:
- Make sure you're in the right branch: `dev`
- Stage only the .blend file for the newly created asset.
- Make sure you haven't staged irrelevant files.
- Write a commit message:
- Prefix the message with the name of the asset and a colon.
- e.g. "crate\_wood: Create high res pass"
- e.g. "crate\_wood: Create high res pass"
- Push the change to origin / DEV.
- If it prompts you for credentials, enter your username and password for git.bugjam.dev
# Asset Creation - Part 4: Low Resolution / Game-Ready Mesh
**Since the high resolution mesh often has hundreds of thousands, if not millions of polygons, it can't be used in-game. We need to create a low-resolution version of the mesh. Usually the involves re-topology, but we can usually get a good start by copying the high resolution mesh and removing and subdivision / multi-resolution modifiers - or working from our blockout + file**
#### Goals
1. Replace the old block mesh plus file with a mesh that has the final topology that will be used in the game.
2. Name all of content inside of the file appropriately.
3. UV Unwrap
4. Set up materials
5. re-export to game.
### 1: Create a new file for the low resolution mesh
[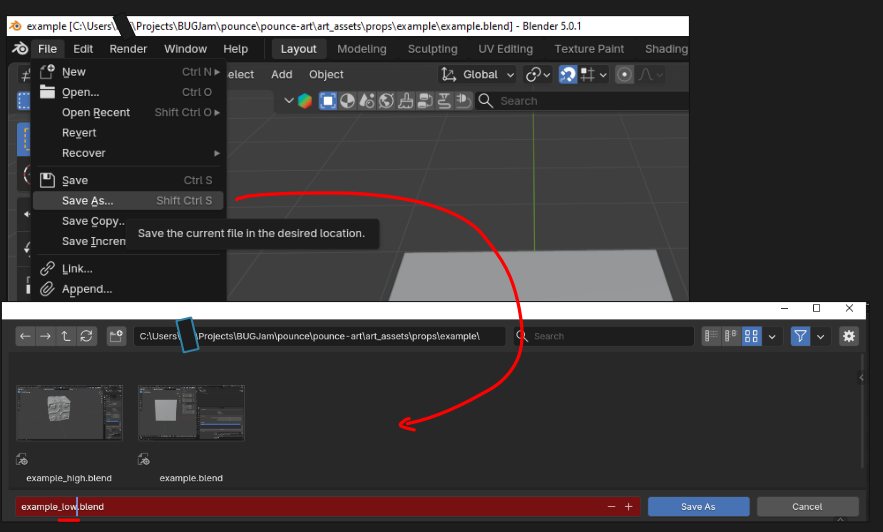](https://docs.bugjam.dev/uploads/images/gallery/2026-03/p2Gimage.png)
**Starting from your blockout+ blend file** - go to file > save as> and add '\_low" to the file name, this creates a duplicate working file
This will not be put into the game, so you can delete the collection exporter inside of this file
[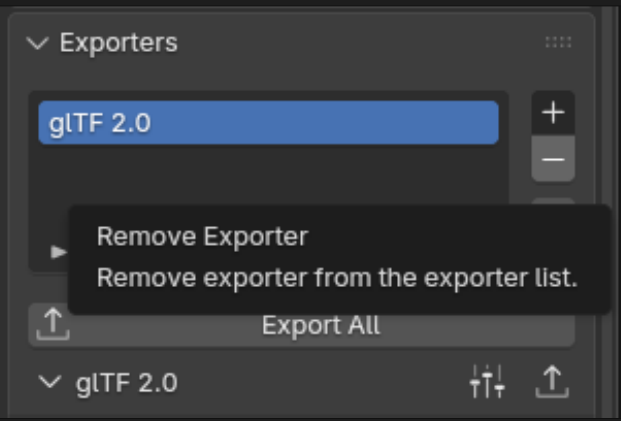](https://docs.bugjam.dev/uploads/images/gallery/2026-03/RiNimage.png)
### **2.) Link the High- Res Mesh to this file**
In blender, go to file > Link and and a popup showing your asset's folder should appear. Double click the folder to show data inside the \_high blend file
go to objects > and select the object for your high resolution mesh
Link the OBJECT data from the high resolution file
your high res mesh should appear in the same location as your blockout with some z-fighting (this is a great sign). Because it is linked in, you wont be able to edit the high resolution mesh in this file, only your new low resolution mesh.
[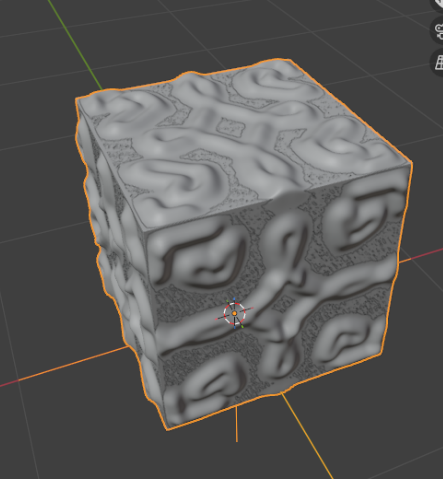](https://docs.bugjam.dev/uploads/images/gallery/2026-03/e8Vimage.png)
### **3.) Apply Modifiers + Optimize Topology**
[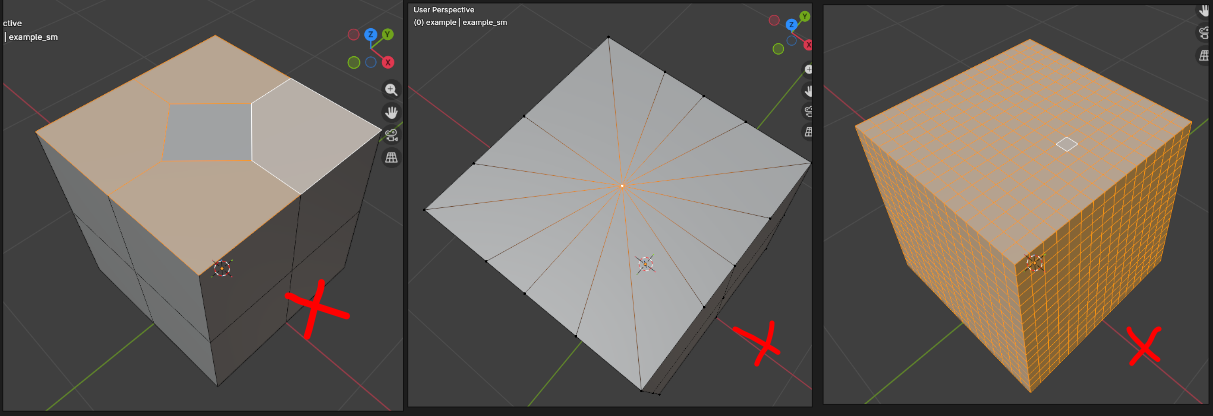](https://docs.bugjam.dev/uploads/images/gallery/2026-03/uGdimage.png)
Identify where your topology needs to be repaired! Signs of bad topo are N-gons (left), poles (middle), and unnecessary loops (right)
#### NGONS
[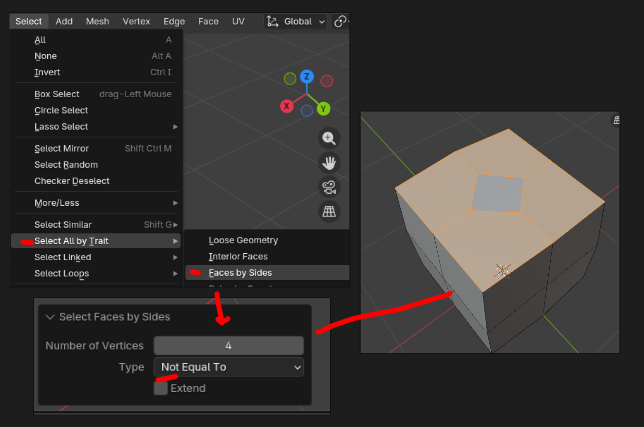](https://docs.bugjam.dev/uploads/images/gallery/2026-03/127image.png)
An N-gon is a face with more than 4 vertices. The easiest way to spot them is to use select > all by trait > faces by sides > not equal to and set to 4. (triangles are okay sometimes, but should be minimized or avoided when possible.
N-Gons are often caused by beveling and boolean modifiers, if those were part of your workflow always check using the above selection
[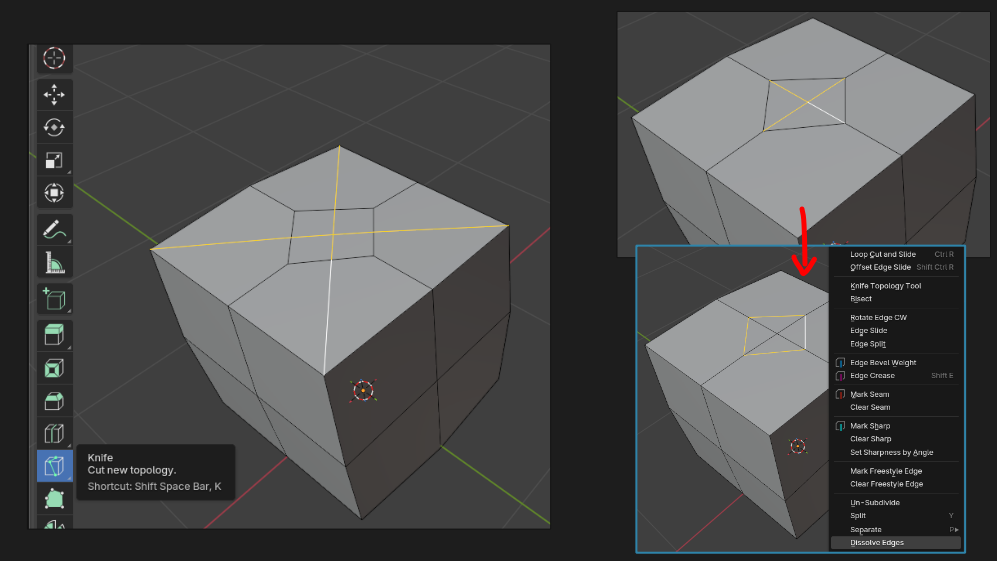](https://docs.bugjam.dev/uploads/images/gallery/2026-03/EgTimage.png)
**Solutions include cutting strategically with the knife tool to turn n-gons into quads (left), or re-directing edges + dissolving unnecessary cuts (right)**
**every time you use the knife tool make sure you are in vertex mode (1) so that the knife can snap to vertices, this is an imperfect system so always cleanup afterward by hitting m > merge by distance**
#### POLES
[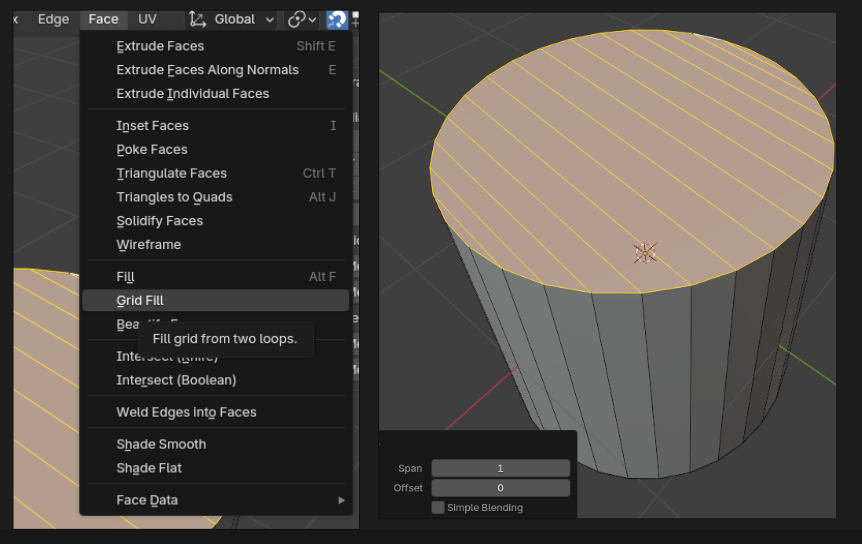](https://docs.bugjam.dev/uploads/images/gallery/2026-03/pPcimage.png)
poles are points where many triangle meet, that are often made by poking faces, insetting circles, and merging many vertices. They are fixed by selcting the entire series of triangles and selecting face > grid fill
keep the span low unless the extra faces are necessary for a rounded part
#### UNNECESSARY LOOPS
The goal is to have as few faces as possible without changing the silhouette, a cylinder that has 32 segments could be reduced to 16 for example, without significantly affecting the shape of the object. Similarly, a shape with lots of supporting loops can be reduced carefully, to leave only what is necessary for the silhouette of the object- this is also referred to as optimizing the mesh
[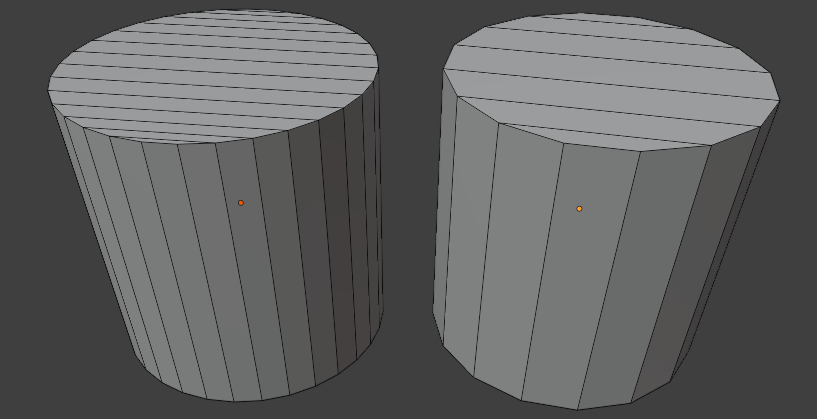](https://docs.bugjam.dev/uploads/images/gallery/2026-03/x4Vimage.png)
[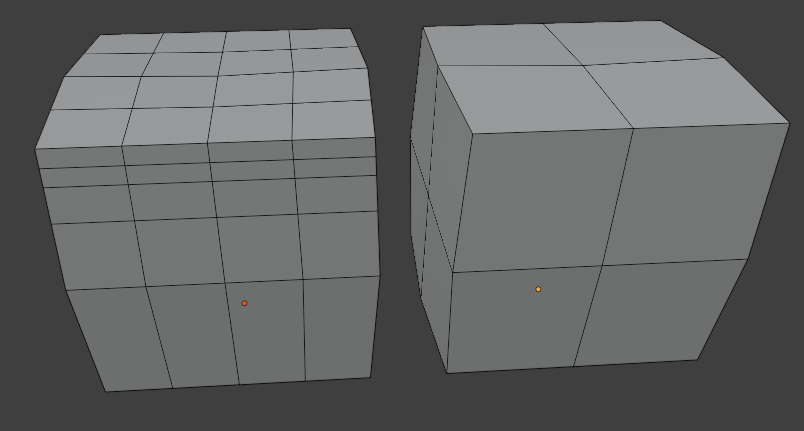](https://docs.bugjam.dev/uploads/images/gallery/2026-03/mUUimage.png)
keep high poly toggled on with "retopo" enables in viewport to see where the geometry is necessary or unneeded. Also consider using a second viewport set to flat shading, with a black object + white background to easily check the silouette
### **3.) UV- Unwrapping**
[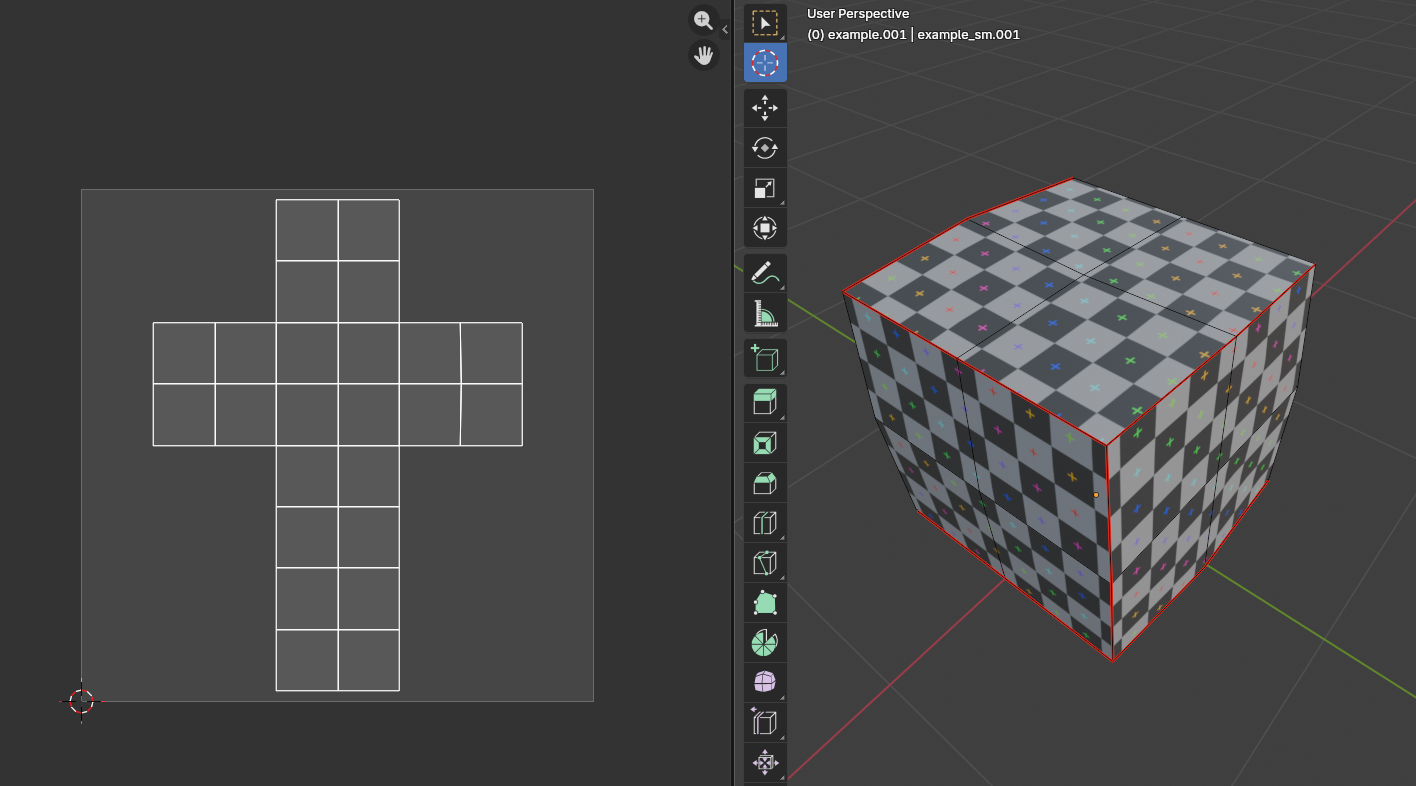](https://docs.bugjam.dev/uploads/images/gallery/2026-03/nm6image.png)
**Now that your low poly mesh is done, its time to unwrap and prepare it for baking, to unwrap, cut seams on the low poly mesh strategically so that it can unwrap with minimal stretching.**
**Apply a checkerboard pattern to preview scale of the UV map and trouble areas, but make sure you delete the checker material after use to clean up the blend file.**
**A good UV map has all islands within the image space, with no faces or islands hanging outside, or overlapping**
**It should also be optimized, meaning you use "average islands scale" and arrange elements so there isnt excessive crowding in corners of the texture space. Also ensure that there are enough seams so that the unwrapped face isnt crammed to a small area, this allows the resolution of the texture maps to remain consistent**
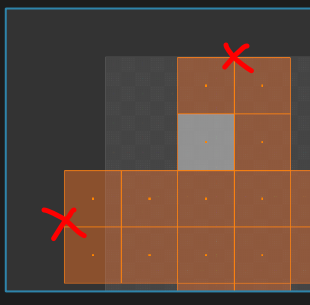
too close to the edge + overhanging the texture space. Fix by moving or scaling island
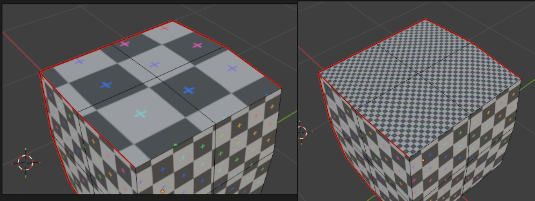
inconsistent island / face scale: fix with average islands scale
[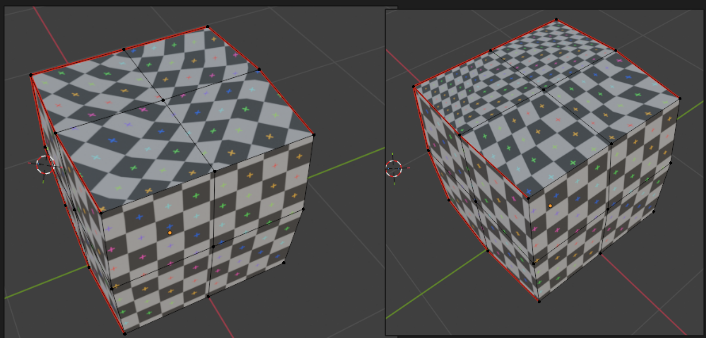](https://docs.bugjam.dev/uploads/images/gallery/2026-03/SImimage.png)
stretching / warping: fix by adjusting seam placement + re-unwrapping
### **4.) Push to the repository**
#### Commit changes / complete the task:
All changes to the .blend file need to be checked into the pounce-art repository. And the newly exported mesh / collision update need to be checked into the pounce-game repository.
Now that the asset has been pushed to the server, the art director will have access to it. Contact Lexi to let her know it's ready for review. If she has feedback for you, make the appropriate adjustments and repeat steps 1-4 as needed.
- #### Commit to the `pounce-art` repo:
- Make sure you're in the right branch: `dev`
- Stage only the .blend file for the newly created asset.
- Make sure you haven't staged irrelevant files.
- Write a commit message:
- Prefix the message with the name of the asset and a colon.
- e.g. "crate\_wood: Create low poly"
- e.g. "crate\_wood: Create low poly"
- Push the change to origin / DEV.
- If it prompts you for credentials, enter your username and password for git.bugjam.dev
# Asset Creation - Part 5: Baking Mesh Maps
**For the materials we will extract information from the high resolution model and apply it to the low resolution model. This information can be used to mix materials and make the assets look professional.**
#### Goals
1. Bake mesh maps from the high poly to the low poly mesh
2. Use mesh maps to mix PBR materials / create smart materials
3. Export final texture set
4. Create in-game materials
### 1) Start in your asset\_low file with the high resolution mesh linked
If you followed last steps, this is very easy to do! If not, revist the last page andmake sure your assset\_low file is completely ready to bake. that means it has
- Optimized + Clean Topology
- It is already UV unwrapped
- The High res mesh is linked in and overlapping the low res mesh
### 2) Make sure you have a current working version of the bakery
[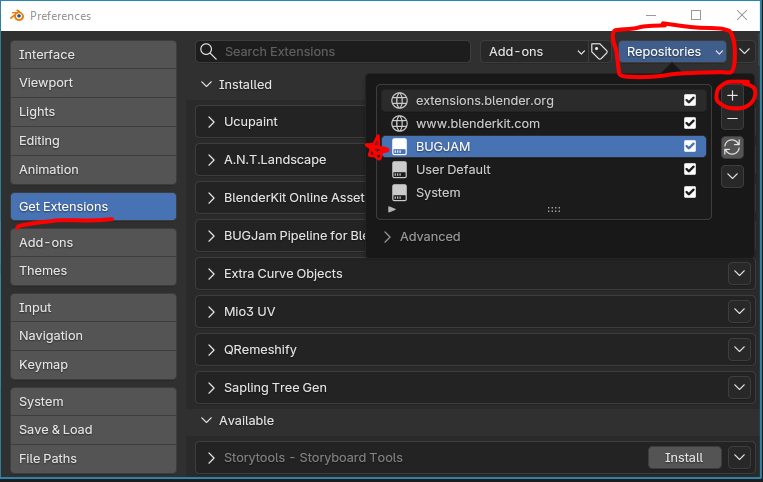](https://docs.bugjam.dev/uploads/images/gallery/2026-03/dPcimage.png)
[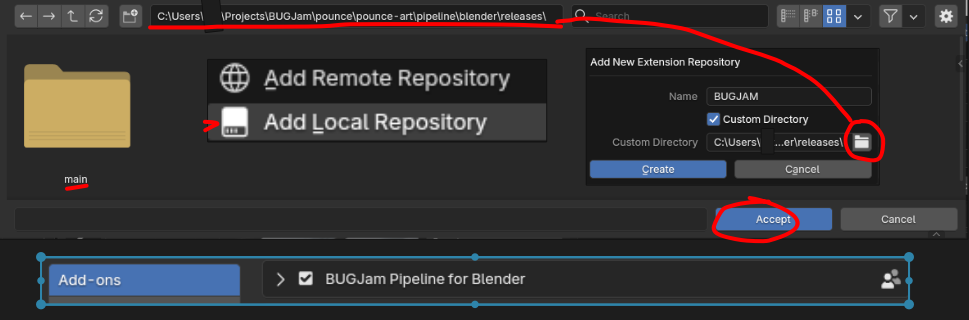](https://docs.bugjam.dev/uploads/images/gallery/2026-03/SCgimage.png)
**To make sure you have the most up to date version of the bakery**
Edit > Preferences > Get Extensions , then in the repositories menu, hit the little plus icon
Select "**Add Local Repository**", name it **"BUGJAM"**, check **"custom directory"** and then, after clicking the file icon, you can select the directory with the blender pipeline that should look as follows
**Users............\\BUGJam\\pounce\\pounce-art\\pipeline\\blender\\releases\\**
**Hit Create, done! You should see 'BUGJam Pipeline for Blender Users" now listed as installed**
**IF it is greyed out, navigate to your add-ons (still within preferences) and check the box next to the pipeline to enable it**
**Hit "save preferences" and then restart blender**
**if you have manually downloaded the bakery as a zip file, delete it or disable it in blender add-ons and follow this installation path instead, this way bug fixes come through automatically**
### **3) Set up the Bakery + Bake**
**Make sure both objects are set to 'shade smooth'**
[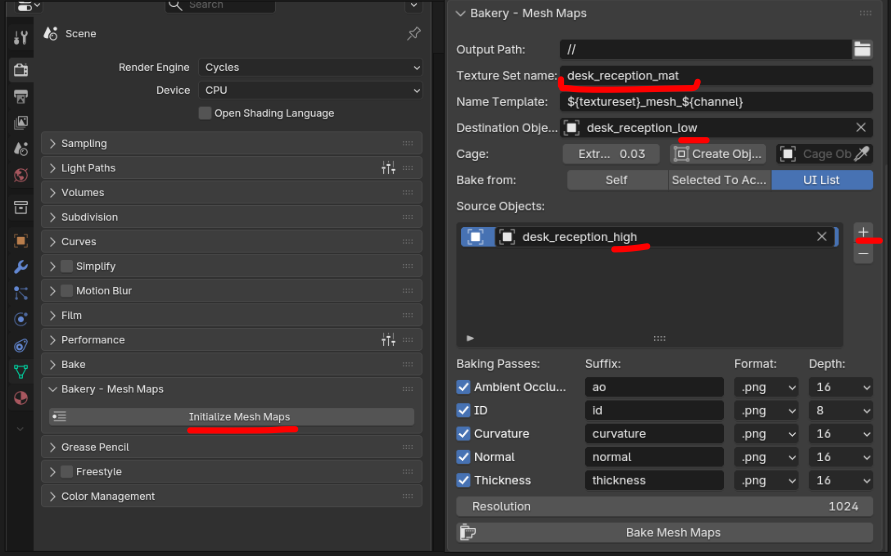](https://docs.bugjam.dev/uploads/images/gallery/2026-03/iEsimage.png)
**At this step, the bakery will be located in your render properties panel, scroll down to bakery - mesh maps and hit "initialize"**
**Then, setup is fairly simple, check that output path is going to the same folder as your blend file**
**then name the texture set the same as your object but with '\_mat'**
**DO NOT change the name template**
**Under destination object, select your \_low mesh | Under source object, select your \_high mesh**
**SAVE YOUR BLENDER FILE FIRST then hit 'bake mesh maps, this can take up to 5 minutes but if it is taking longer reach out for support**
### **4) Check your maps**
[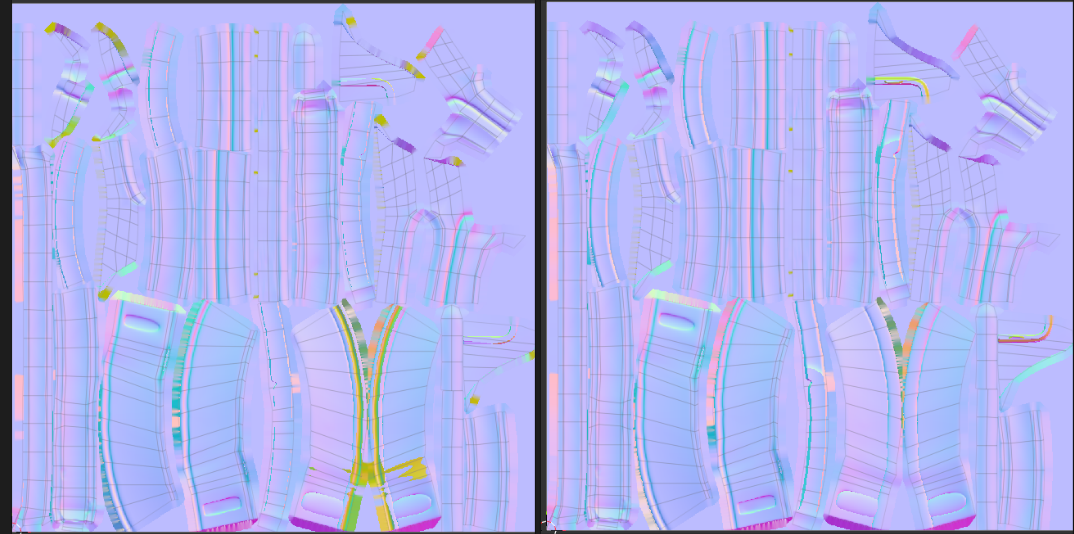](https://docs.bugjam.dev/uploads/images/gallery/2026-03/WjDimage.png)
**The easiest way to spot changes is with your normal map, if you see lots of yellow, that means the bake missed those areas, this is easy to fix by increasing the extrusion amount a little bit, or by double checking your UV maps.**
**A tiny but of 'mustard' is expected in areas that overlap or fold over themselves in the mesh, but minimize it as much as possible.**
**If all has gone well, you should have 5 maps baked into your asset folder. Save your .blend file again**
**Go ahead and make a push to the repo with these to make sure nothing gets lost. The commit message can be "Mesh Maps Baked"**
[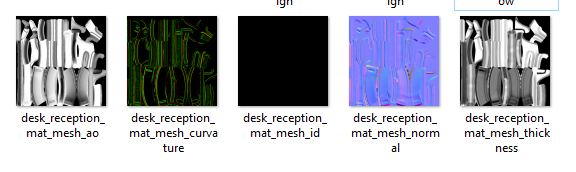](https://docs.bugjam.dev/uploads/images/gallery/2026-03/9LSimage.png)
# Asset Creation Part 6: Applying Textures
### 1) open your original .blend file
Go ahead and delete the original blockmesh
Import your low poly mesh by going to file > **append**
select the \_low.blend version of the asset, then navigate to objects and select the object
### 2) Set up the asset library
In edit > preferences > file paths
hit '+' to add a new asset library path, and navigate to the texture library for this project
[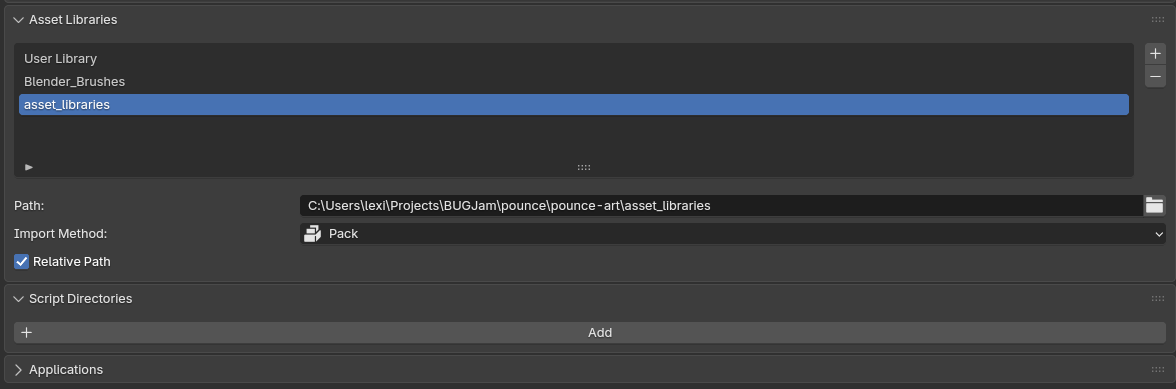](https://docs.bugjam.dev/uploads/images/gallery/2026-03/QM6image.png)
**users...\\BUGJam\\pounce\\pounce-art\\asset\_libraries**
then save your preferences
### 3) Set up shading workspace
delete everything except for the material output in the existing texture that should have been created with the bakery
rename the texture to asset\_mat
then in the upper left viewport, toggle to asset browser, and select the "asset libraries" library- you should see a bunch of cool textured jackets!
[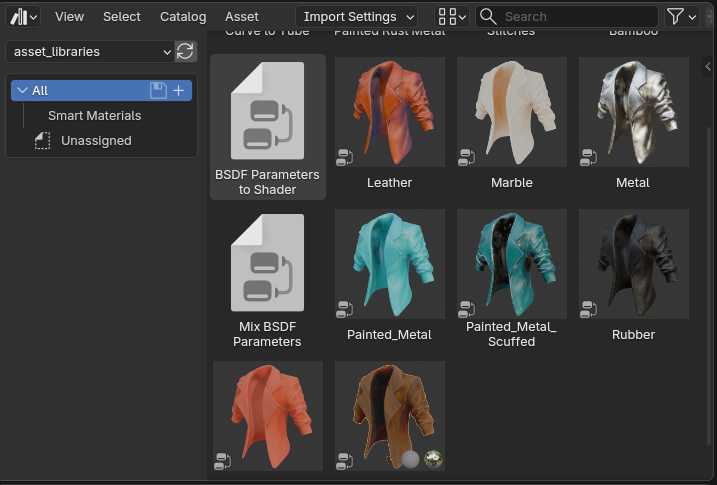](https://docs.bugjam.dev/uploads/images/gallery/2026-03/9c7image.png)
in your mostly empty material, right click and select 'setup mesh map nodes'
shift+click to select all 5 baked texture maps and import them (make sure to uncheck relative path)
[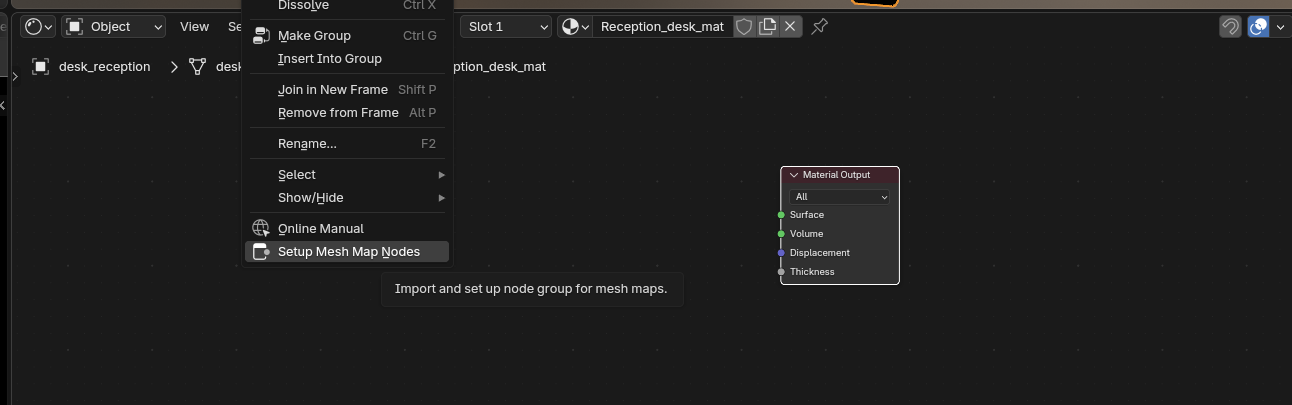](https://docs.bugjam.dev/uploads/images/gallery/2026-03/pAmimage.png)
[](https://docs.bugjam.dev/uploads/images/gallery/2026-03/2MGimage.png)
You should have two nodes now, the texture bundle, and the output
[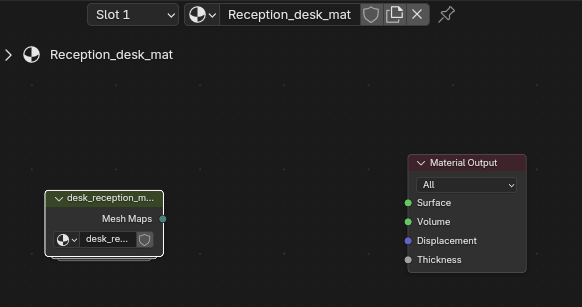](https://docs.bugjam.dev/uploads/images/gallery/2026-03/sOlimage.png)
Now, back in your asset browser- drag and drop the BSDF parameter to shader node group into the shader graph and conenct it to the material output
[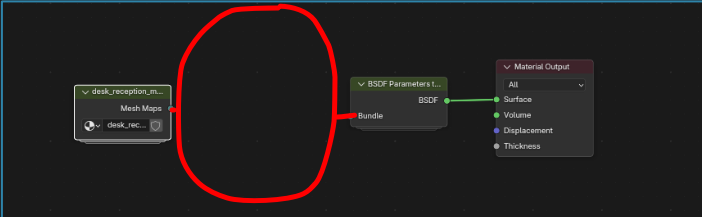](https://docs.bugjam.dev/uploads/images/gallery/2026-03/oOGimage.png)
### 4) Set Up Material
with that added, the area in between is where you can drag + drop desired materials from the asset library! just connect the mesh maps to material node to BSDF parameters node- then you can edit the color of the material you'd like to use from the library
[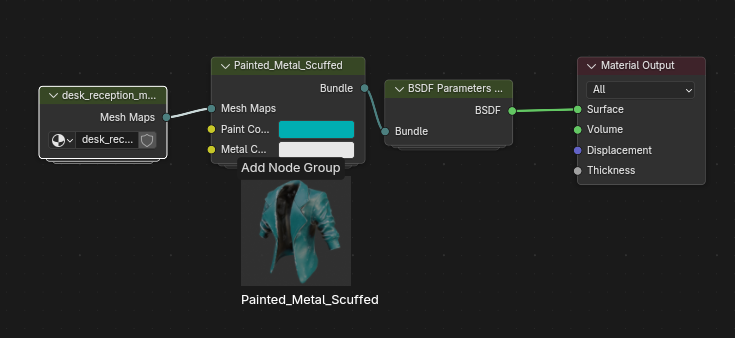](https://docs.bugjam.dev/uploads/images/gallery/2026-03/APUimage.png)
### 5) Bake Texture Set
in the material properties panel, there is another bakery option called "texture set" go ahead and click initialize when you are happy with the texture + color of your object
[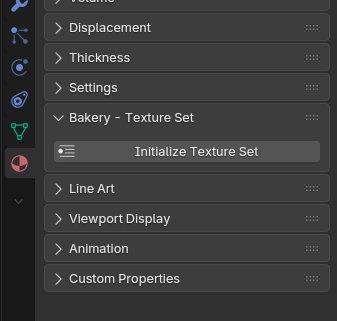](https://docs.bugjam.dev/uploads/images/gallery/2026-03/NYFimage.png)
make sure to set up the file path like the original exporter, with it set to pounce 'game' instead of pounce 'art' and name it asset\_mat
DO NOT edit the name template
[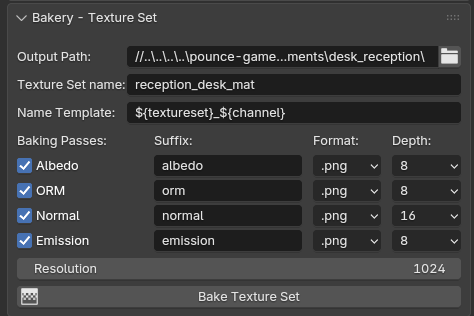](https://docs.bugjam.dev/uploads/images/gallery/2026-03/CEoimage.png)
[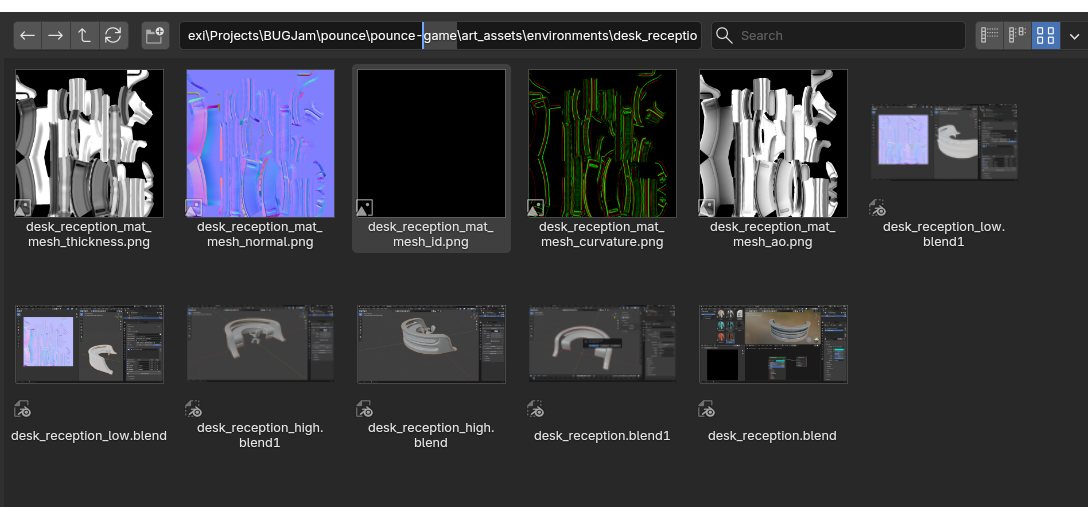](https://docs.bugjam.dev/uploads/images/gallery/2026-03/8bOimage.png)
and hit bake!
### 6) Export to Game
# Asset List
# INDEX
#### Characters
[Tanuki (main character)](https://docs.bugjam.dev/books/bugjam/page/tanuki-main-character)
[Security Robot ](https://docs.bugjam.dev/books/bugjam/page/security-robot)
[Security Cameras](https://docs.bugjam.dev/books/bugjam/page/security-camera)
#### Puzzle Elements
Lasers
reflective (mirror) = an interactive gallery sign
Moving objects to climb + hide
1. wooden crate
2. bamboo plant
3. decorative vase
4. decorative sculpture
Timing
#### Environment
Main Diamond
Entry Room / reception desk + globe
Puzzle room 1
Puzzle Room 2
Puzzle Room 3
[Modular Elements](https://docs.bugjam.dev/books/bugjam/page/modular-environmental-elements)
#### UI + Music
# Tanuki Main Character
[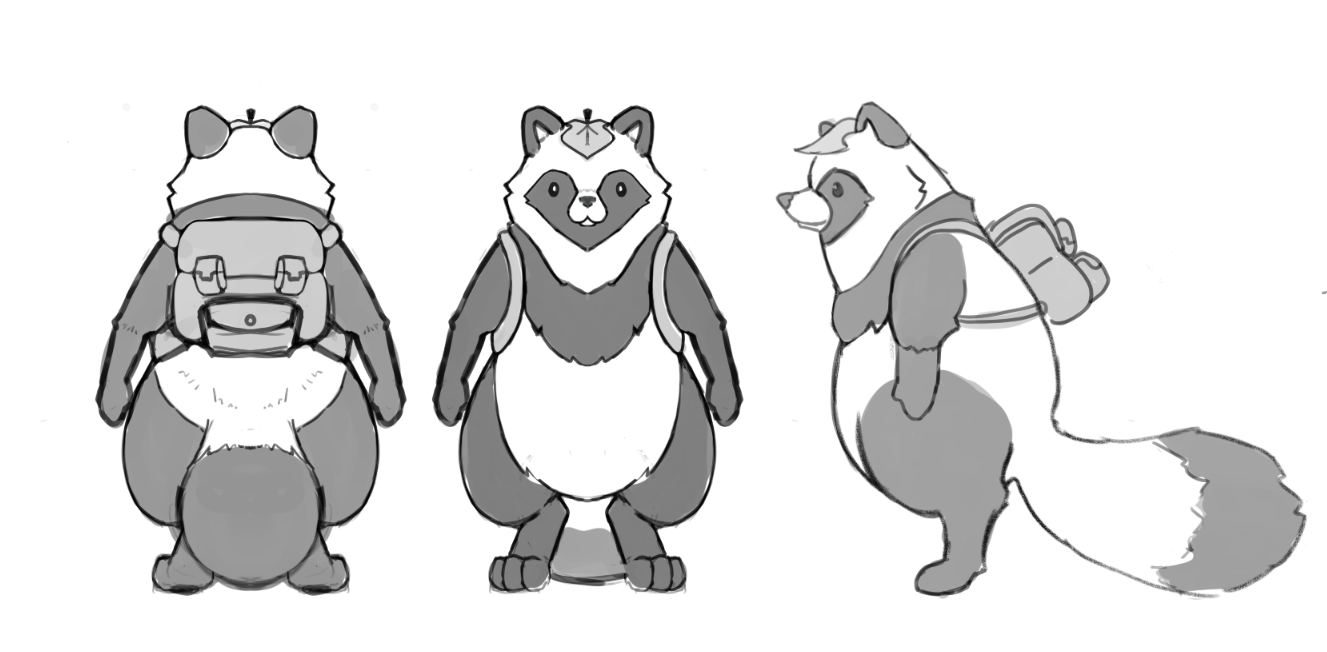](https://docs.bugjam.dev/uploads/images/gallery/2026-02/tanuki-concept.png)
both:
leaf on head
sculpted fur shapes at extremities. cheeks,scruff,ankles,tail.
racoon mask face
Bestial form
Animal Main character like Stray and Untitled Goose Game.
leaf on the head.
tan and brown stripes, with a colorful green leaf
sits on hind legs like a dog when you idle.
cute ears
can use front legs to push objects.
we can pretend they have raccoon hands and not dog paws like real life it it helps
# Modular environmental elements
### Props
long bench
pedestal small
pedestal medium
rope and pole / divider
wall mounted light fixture
ceiling mounted light fixture
painting frame large
painting frame medium
painting frame small
display case large standing (glass)
display case wall (glass)
display case small + wide (glass)
wooden crates
3x large statues
3x medium statues
3x medium sculptures
3x small sculptures
3x busts
decorative plant (bamboo)
### architectural
tile floor
plain wall
paneled wall
wall with doorway
wall with window
arched doorway
3m pillar
### Environment
large globe
reception desk area
# Security Robot
wheels
shaped like a matroshka doll
[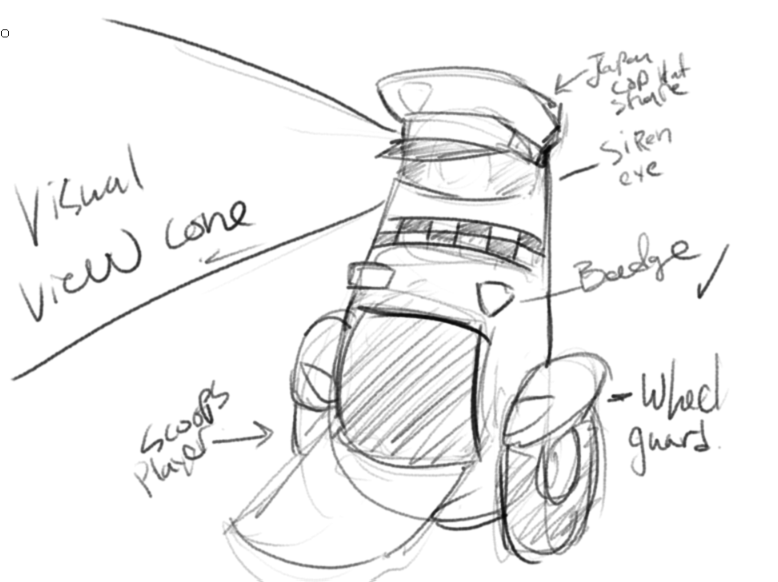](https://docs.bugjam.dev/uploads/images/gallery/2026-02/kY8image.png)
wobbly bobble movement, uncoordinated, has to rotate then move.
view cone can go in any direction
is basically a trashcan cop.
[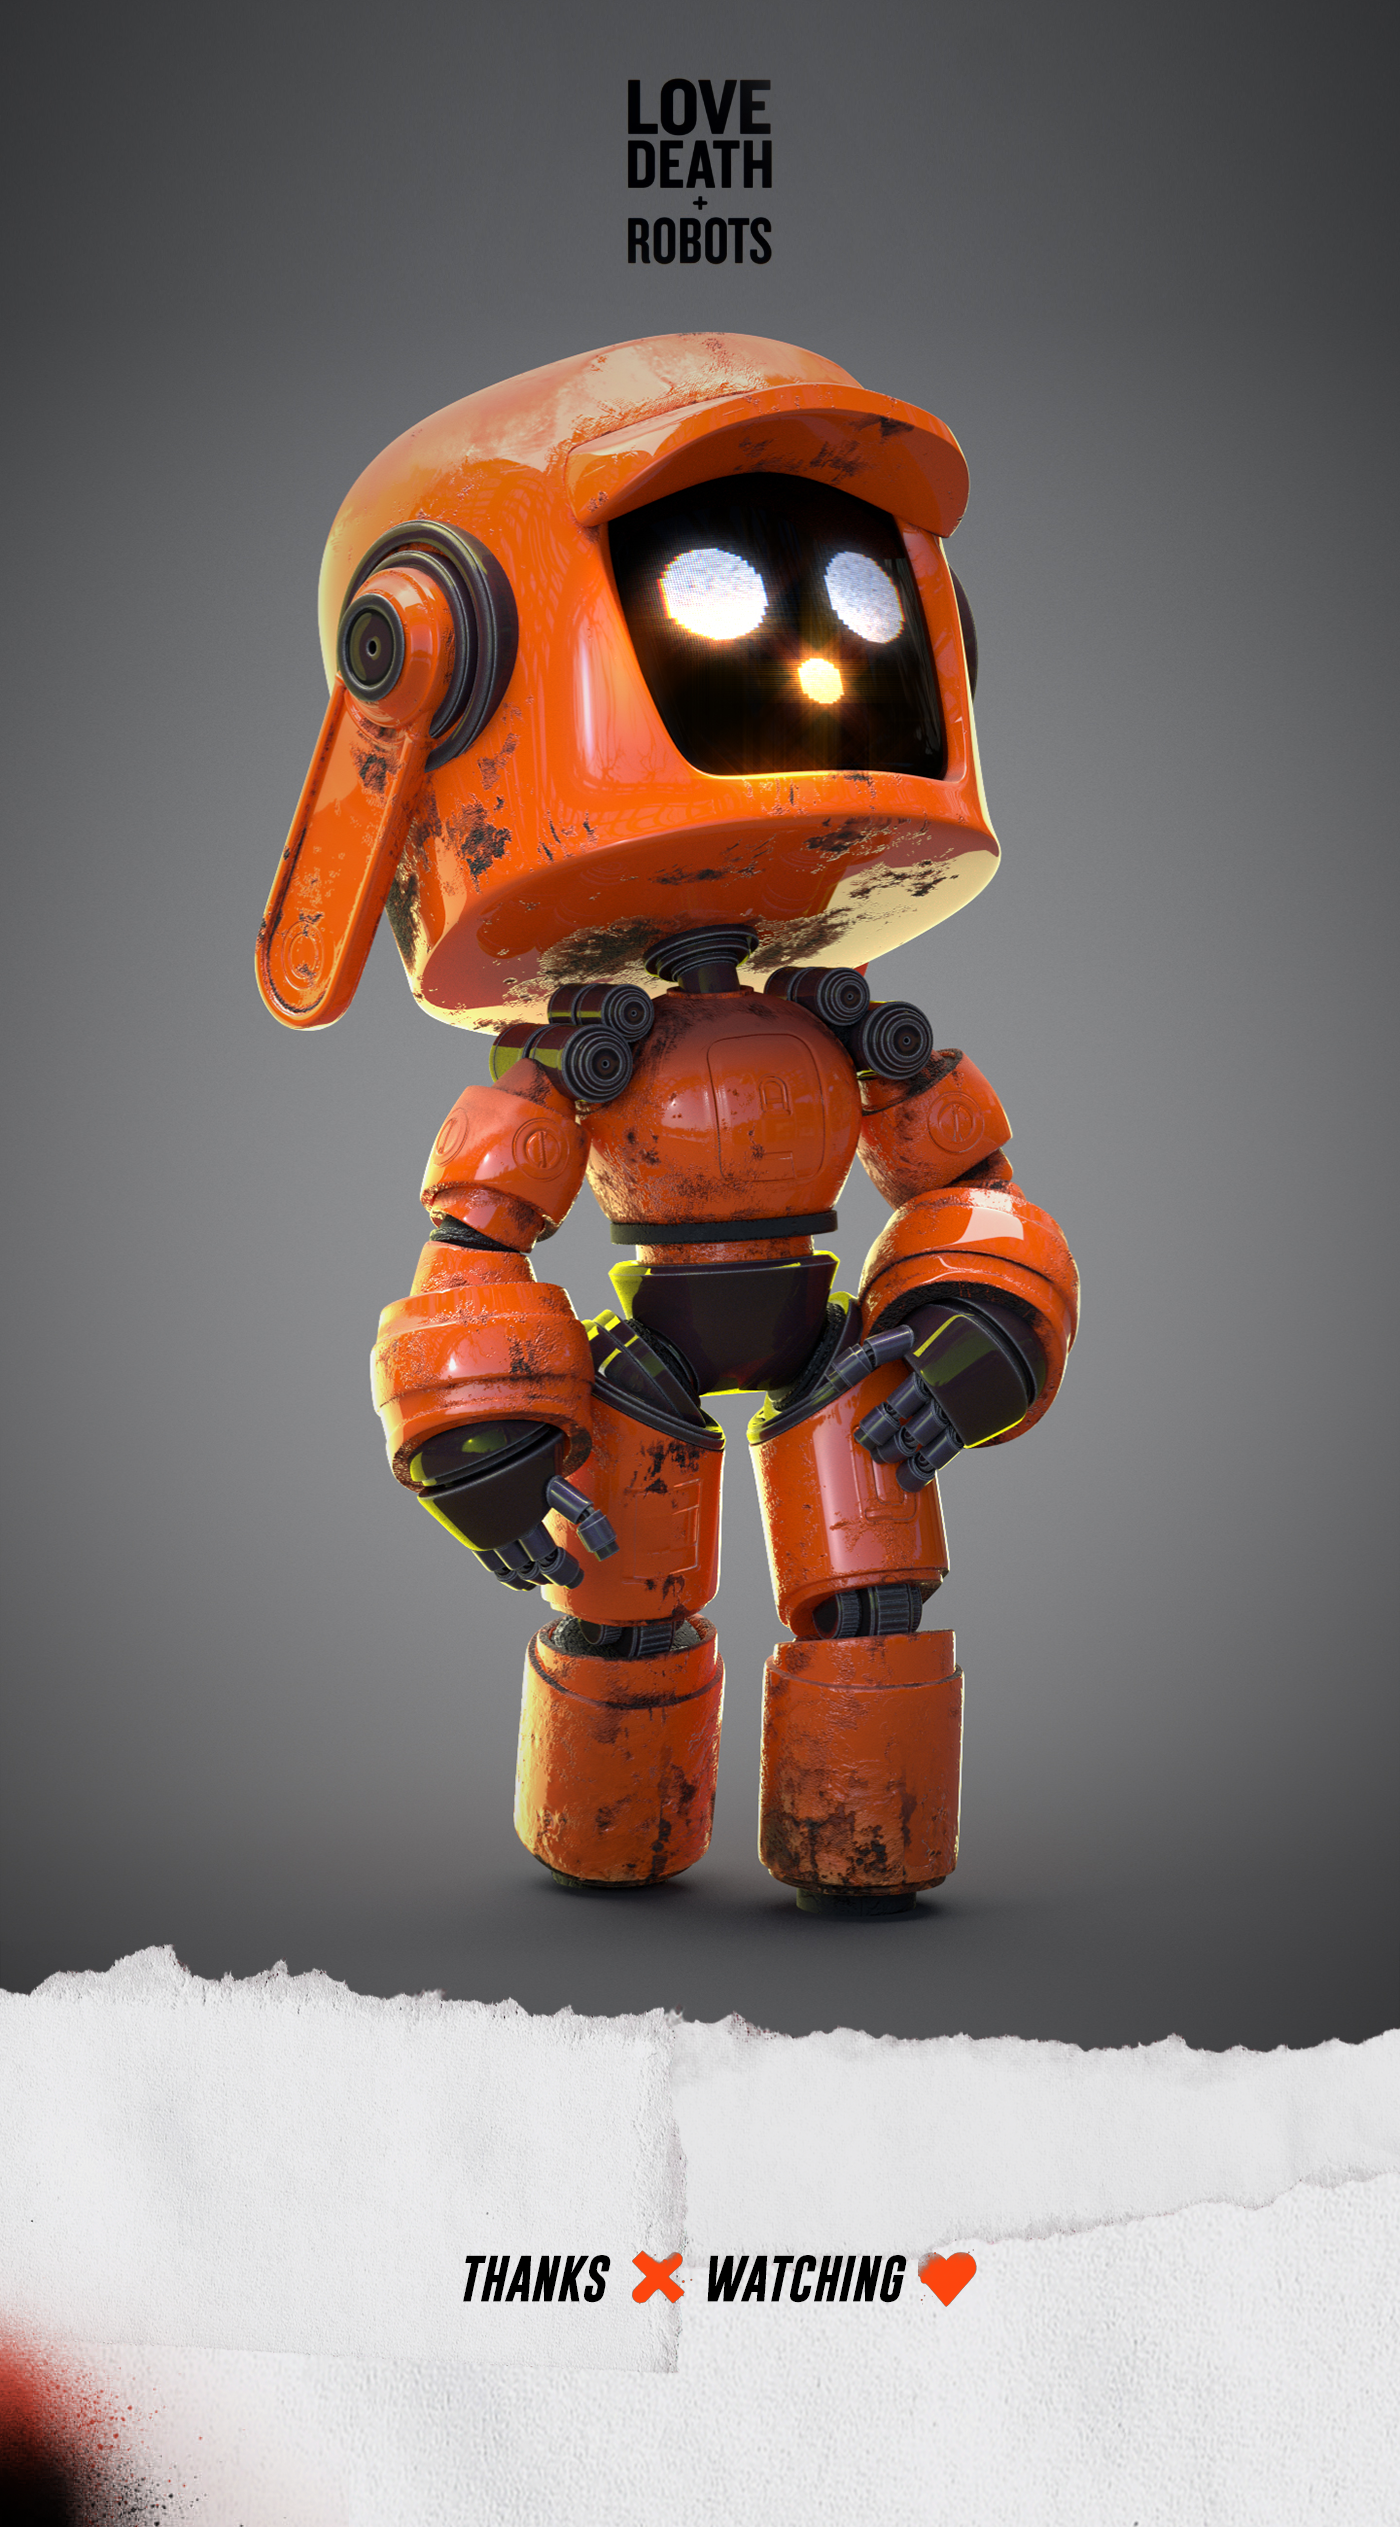](https://docs.bugjam.dev/uploads/images/gallery/2026-02/0vFimage.png)
example of an old and disused robot. not damaged, just not cared for.
# Security camera
Smart cameras, expressive.
when they see you they look like they take notice, and perk up, and look at you and track you, shining light on you and causing nearby security bot to come check out the alert.
has a little alert light that spins up when its sending alert to the guard.
think about how the pixar lamp works with its head is the lamp and its face is the light.
[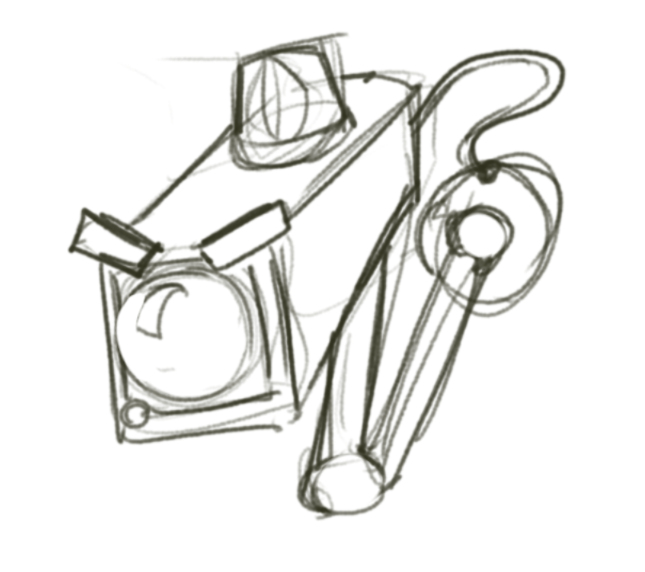](https://docs.bugjam.dev/uploads/images/gallery/2026-02/nvfimage.png)
think about the design of the robots from Wall-e on the ship.
[](https://docs.bugjam.dev/uploads/images/gallery/2026-02/jzJimage.png)
simple, started clean, isnt now.
uses facial minimal expression for maximum performance.
# Puzzle Rooms
Room 1
Lazers
Mirrors
Room 2
Room 3
# Contributions
ASSET NAME
TYPE
CONTRIBUTOR (CC-BY)
Tanuki
character
Alice / Alethium
Security Bot
character
Taybor
Security Camera
character
Taybor
Pillar
environment
Jodi / Rue
Pedestal
environment
Jodi / Rue
Window Frames + Doorways
environment
Jacob S
Glass Display Cases
environment
Lexi | P\_ixeL + Jacob S
Gallery Sign
props
Scott M
Globe
environment
Vinny
Art Frames + Gallery
environment
Lexi | P\_ixeL
Decorative Plant (bamboo)
props
Hellpug
Reception Desk + Chair
environment
Lexi | P\_ixeL
Long Bench
environment
Hellpug
Diamond
props
Taybor
Sculptures 1-3
props
Lexi | P\_ixeL
Backsplash / BugJam Poster
2D art
Embers
Vases 1-3
props
Lexi | P\_ixeL
Old Computer
props
Taybor
Dividers
props
Lexi | P\_ixeL
Wooden Crate
Props
Lexi | P\_ixeL
Lighting Fixtures
props
Lexi | P\_ixeL
Tanuki Den
environment
Joseph M
Materials Library
materials
Lexi | P\_ixeL
Diamond Shader
materials
David
Art in gallery frames
2D art
BUGjam team
Busts 1-2
props
Lexi | P\_ixeL + Xury Greer
Shaman Head
props
Alice | Alethium
Cool Knife
props
Andy
Bush
environment
Neemo | Mo
Tree
environment
Lexi | P\_ixeL
computer monitor
keycard + pad
clipboard
# Meeting recordings
### 02/12/2026
##### Kickoff
##### Setting up SourceGit and cloning the repositories
### 02/13/2026
##### Game pitches
### 02/15/2026
##### Pipeline meeting
##### Art assets meeting
##### Block Mesh Demo
##### Impromptu Design Meeting
### 02/17/2026
##### Code and In-game Content Kickoff
### 02/19/2026
##### Weekly Check-in Pick License
##### Sculpting Demo
### 02/25/2026
##### Tanuki retopology and bake demo
### 02/26/2026
##### Weekly Check-in / Re-scoping / Pipeline Demo
##### Fixing asset imports in dev
##### Art asset workflow recap / apple demo
### 03/03/2026
##### Low res / retopology and UV workflow
##### Mesh Map baking workflow
### 03/05/2026
##### Weekly Check-in / Show and Tell
# Onboarding
## Applications
- Blender 5.0.x [https://download.blender.org/release/Blender5.0/](https://download.blender.org/release/Blender5.0/)
- Godot 4.6.x [https://godotengine.org/download/archive/4.6.1-stable/](https://godotengine.org/download/archive/4.6.1-stable/)
- Git (latest) [https://git-scm.com/install/](https://git-scm.com/install/)
- (Optional) SourceGit (latest) [https://github.com/sourcegit-scm/sourcegit/releases/latest](https://github.com/sourcegit-scm/sourcegit/releases/latest)
- PureRef (latest) [https://www.pureref.com/download.php](https://www.pureref.com/download.php)
## Setup
### Project
1. Clone the art and game repository. See [https://docs.bugjam.dev/books/bugjam/page/tutorials](https://docs.bugjam.dev/books/bugjam/page/tutorials) for more information.
2. Checkout the `dev` branch in the art repository.
### Blender
1. Pull down the latest updates from the `main` or `dev` branch in the art repository.
2. Update the extension repository to point to the `pounce-art/pipeline/blender/releases/main` folder.
1. Go to preferences
2. Go to **Get Extensions**
3. Go to Repositories, press the + button, and **Add Local Repository**[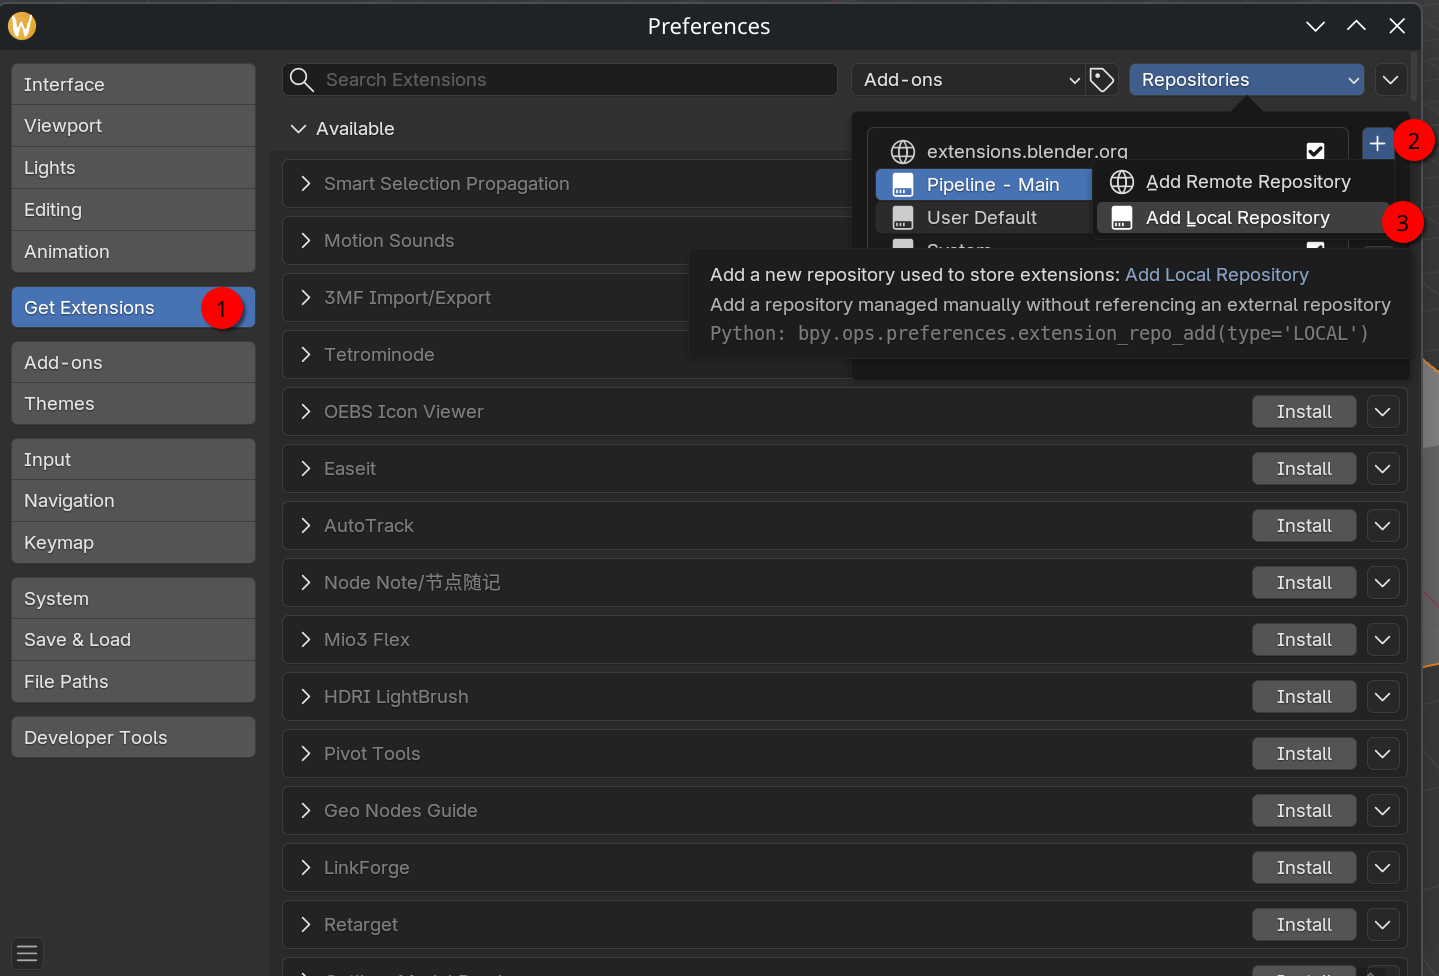](https://docs.bugjam.dev/uploads/images/gallery/2026-02/Hxeimage.png)
4. Set the name to something such as **Pipeline - Main**, check **Custom Directory**, and set the path to `pounce-art/pipeline/blender/releases/main`. Then press **Create**. [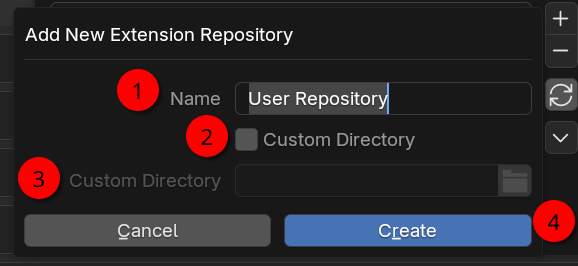](https://docs.bugjam.dev/uploads/images/gallery/2026-02/klZimage.png)
5. The BUGJam Pipeline for Blender should be listed under installed, but greyed out. Press the down arrow on the right, and select **View Details**.[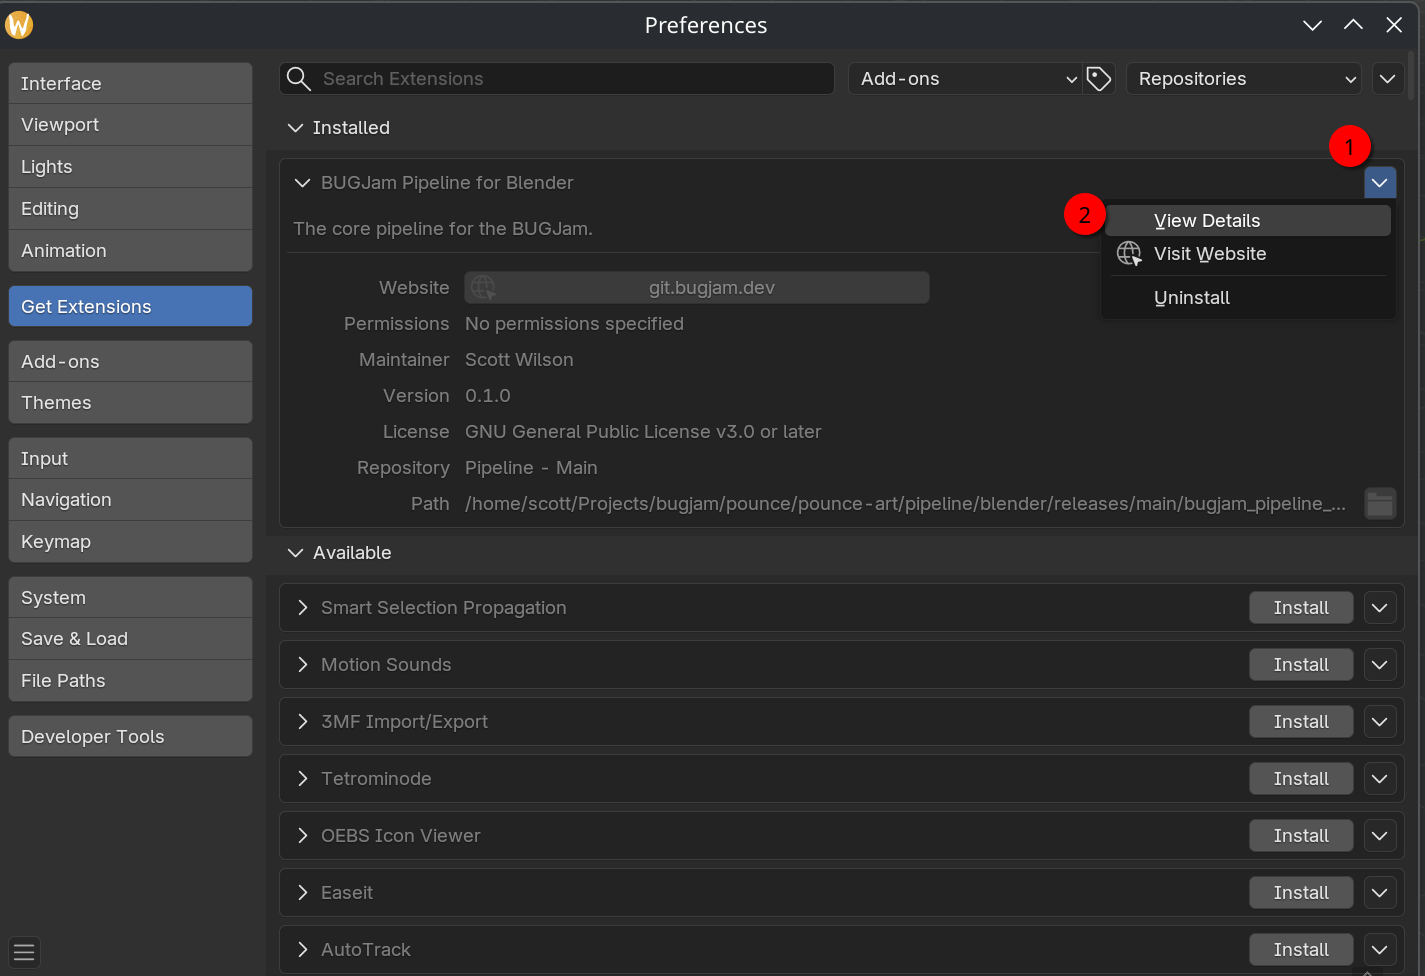](https://docs.bugjam.dev/uploads/images/gallery/2026-02/PD5image.png)
6. This will open the Add-ons view of the extension. Click on the box to the left to enable the pipeline.[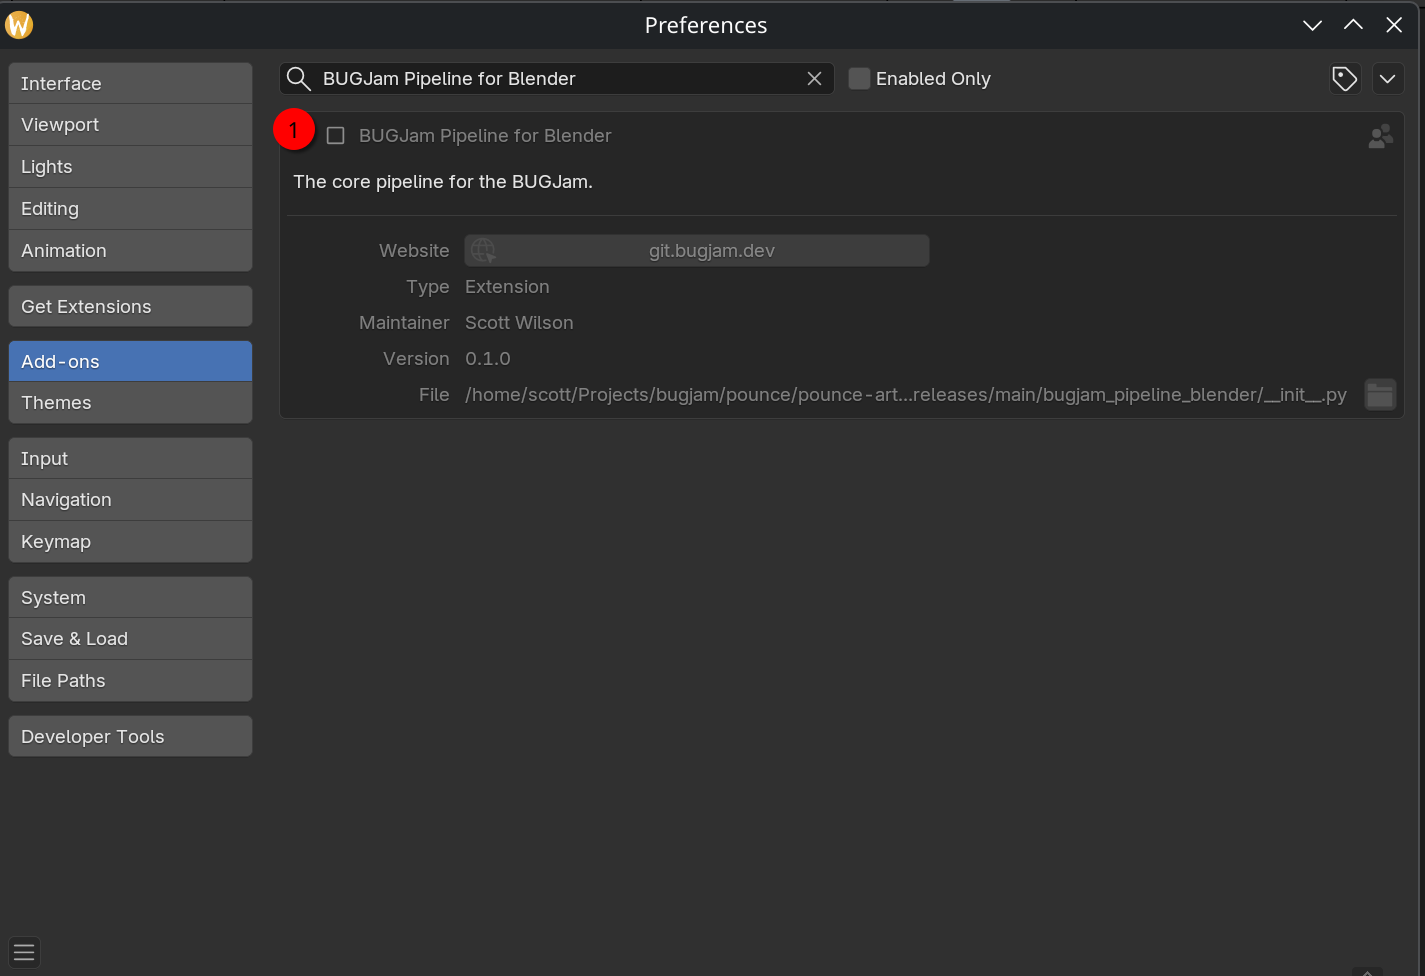](https://docs.bugjam.dev/uploads/images/gallery/2026-02/QPeimage.png)
### Godot
TODO
# Programming
# Behavior trees and state machines with LimboAI
## LimboAI addon overview
We'll be using LimboAI for behavior trees and state machines
#### [LimboAI docs](https://limboai.readthedocs.io/en/stable/index.html) | [LimboAI on GitHub](https://github.com/limbonaut/limboai)
LimboAI includes a demo project. It is **highly recommended** that you download it and check it out. When you run it, it has a nice little tutorial that walks you through the basics: [https://github.com/limbonaut/limboai/tree/master/demo](https://github.com/limbonaut/limboai/tree/master/demo)
In its classes and nodes, LimboAI uses the following prefixes:
- `BT`: Behavior Tree
- Nodes/classes that start with this have to do with parts of behavior trees
- As an example, the `BTPlayer` node "plays" a behavior tree every frame and inside of that tree you have `BTSequence`, `BTSelector`, etc
- `BB`: BlackBoard
- The blackboard is a shared place for agents to write values to.
- These values can be read and written by any task in the tree.
- `LimboHSM`: Hierarchical State Machine
- HSMs have `LimboState`s inside of them.
- `LimboHSM` is itself a `LimboState`, and `BTState` can put states inside of behavior trees
### Behavior trees
#### [Read the intro to behavior trees here](https://limboai.readthedocs.io/en/stable/behavior-trees/introduction.html)
#### Accessing LimboAI behavior tree editor
When installed, LimboAI adds a button to the top of the Godot editor, alongside the 2D/3D/Script buttons
[](https://docs.bugjam.dev/uploads/images/gallery/2026-02/screenshot-2026-02-19-at-9-55-44-pm.png)
When you click on a `BTPlayer` node, it has a `BehaviorTree` attached to it. When clicking that, it will automatically switch over to the LimboAI tab.
[](https://docs.bugjam.dev/uploads/images/gallery/2026-02/screenshot-2026-02-19-at-10-10-46-pm.png)
#### Building blocks: sequences and selectors
The main building blocks of a behavior tree are:
- [`BTSequence`](https://limboai.readthedocs.io/en/stable/classes/class_btsequence.html): Think of these like an AND operator on the child tasks.
- As long as a task return `SUCCESS`, the next one will be executed.
- [`BTSelector`](https://limboai.readthedocs.io/en/stable/classes/class_btselector.html): Think of these like an OR operator on the child tasks.
- On the first task that returns `SUCCESS`, it will stop executing.
#### Writing custom tasks
[Read the documentation on writing custom tasks.](https://limboai.readthedocs.io/en/stable/behavior-trees/custom-tasks.html)
Custom tasks go inside of `ai/tasks` in the project.
At the time of writing, we have:
- `follow_path`: Follows a `Path3D` node (i.e. for preset patrol paths)
- `generate_navigation_path` / `follow_navigation_path`: Using a `NavigationAgent3D`, generate and follow a path to a `target` in the blackboard
- `follow_navigation_path` will follow the path until it gets close enough to the `target`, it will return `RUNNING` until it gets there
- `distance_based_cooldown`: Takes in a `Curve2D` and uses that to do a cooldown based on how close the agent is to the `target`
- Useful for generating navigation paths more frequently the closer you are to the `target`, and less frequently the further you are
- `in_shape_and_visible`: Returns `SUCCESS` if there's a target in a `ShapeCast3D` that is visible (hit by a raycast, in "front" of the agent)
- This also sets the `target` when it is visible
### State machines
[https://limboai.readthedocs.io/en/stable/hierarchical-state-machines/create-hsm.html](https://limboai.readthedocs.io/en/stable/hierarchical-state-machines/create-hsm.html)
# Using Scene Builder
### Scene Builder overview
The [Scene Builder addon](https://github.com/sci-comp/scene-builder) has been installed an initialized in the project. This is an open source addon written in GDScript.
Scene Builder can be used to easily place assets inside of a scene.
[AssetPlacer](https://cookiebadger.itch.io/assetplacer) is a popular addon for this functionality but it: a) Costs money, b) Is not open source, c) Requires the .NET (C#) build of Godot.
### Using Scene Builder
On the right panel of the Godot editor, there is a Scene Builder tab:
[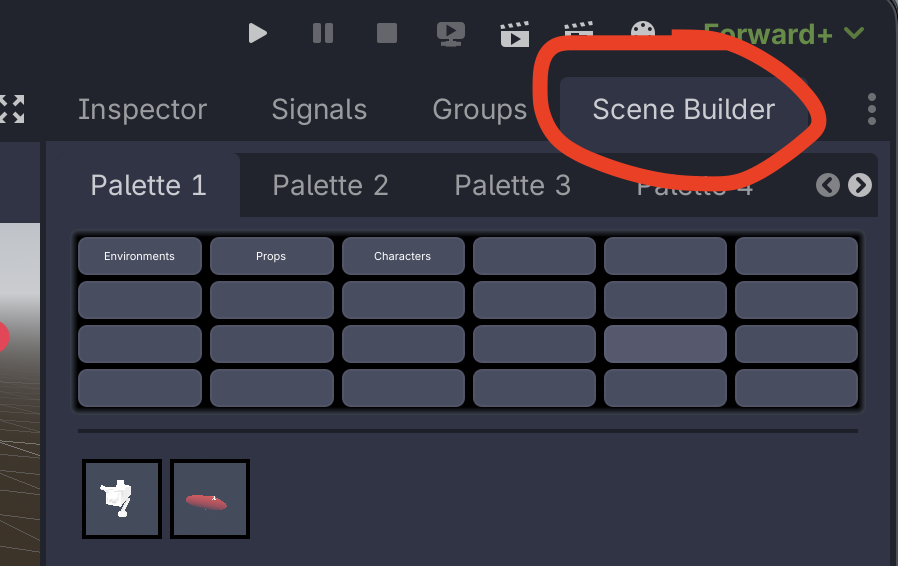](https://docs.bugjam.dev/uploads/images/gallery/2026-02/screenshot-2026-02-22-at-6-28-38-pm.png)
Selecting that, you can see a series of "Palettes" and below that categories.
When selecting an item from the icon list, that item can then be placed into the scene.
To rotate an item along the Y axis when placing it, click and drag left/right.
#### Parent node
At the bottom of the scene builder tab, there's a "Parent" option that can be used to set which node items that are added as children to.
To set this, drag a node from the scene tree over to the "Parent" option.
If this doesn't work, click "Find world 3d" first.
[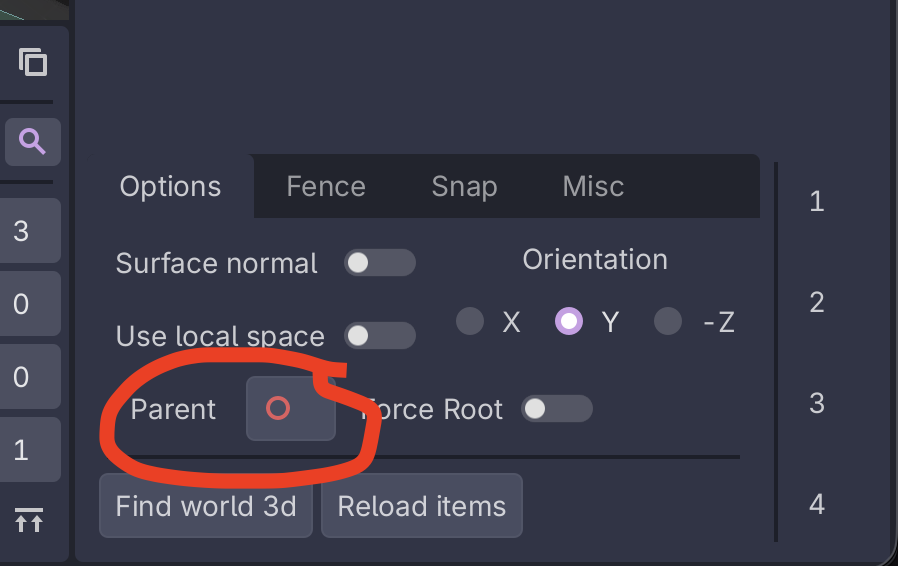](https://docs.bugjam.dev/uploads/images/gallery/2026-02/screenshot-2026-02-22-at-6-41-49-pm.png)
### Adding scenes to Scene Builder
To add scene(s) to the Scene Builder list,
1. Select the scene(s) you want to add from within the "FileSystem" tab
2. Open the command pallette
- On all operating systems: ` (backtick, to the left of the "1" key)
- On macOS: Command+Shift+P
3. Search for / select "Create scene builder items"
- [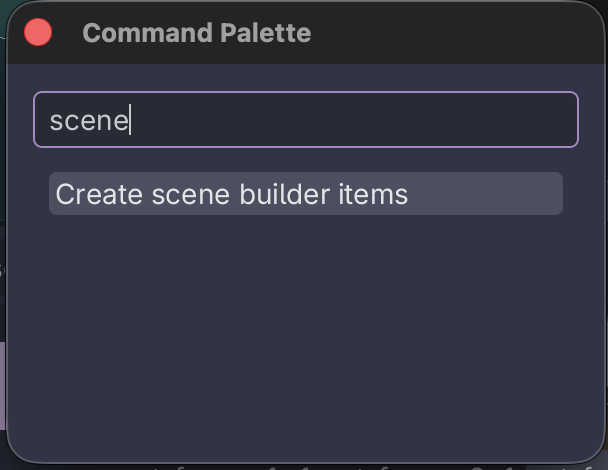](https://docs.bugjam.dev/uploads/images/gallery/2026-02/screenshot-2026-02-22-at-6-57-53-pm.png)
4. A window will pop up asking for info
- [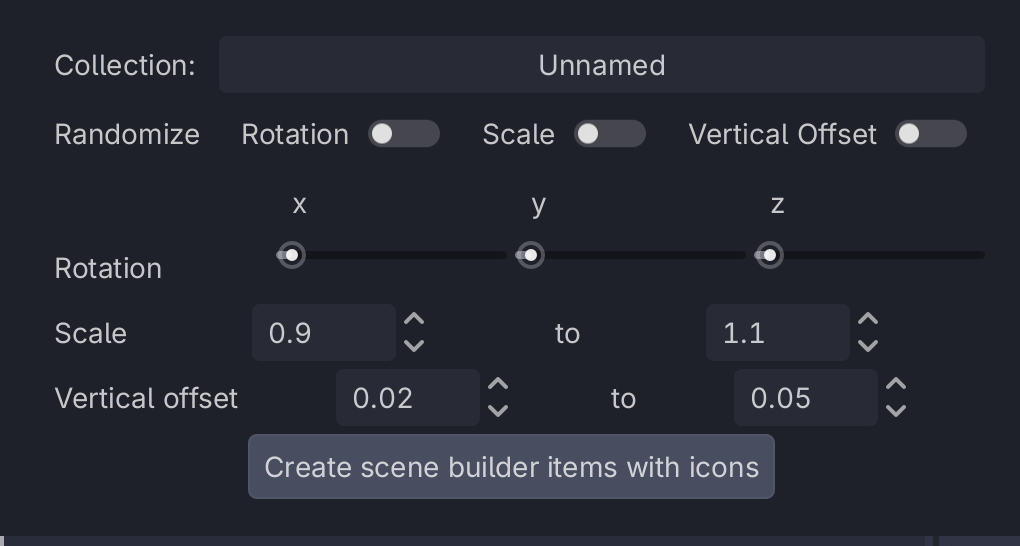](https://docs.bugjam.dev/uploads/images/gallery/2026-02/screenshot-2026-02-22-at-6-58-28-pm.png)
- Leave the "Randomize" toggles un-checked (unless you do want some randomness)
- In "Collection", **type in the name of the collection you want the scenes to show up under**
- [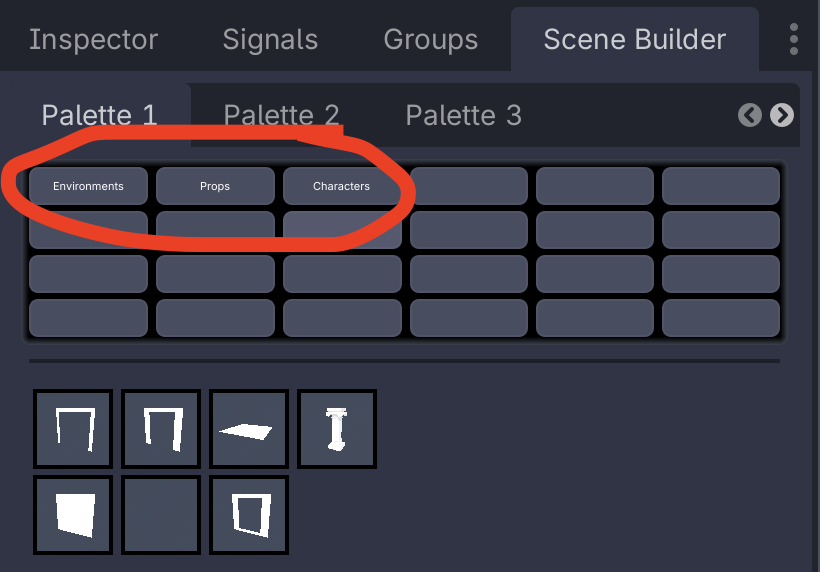](https://docs.bugjam.dev/uploads/images/gallery/2026-02/screenshot-2026-02-22-at-6-59-46-pm.png)
- At the time of writing these are `Environments`, `Props`, and `Characters`
5. Click "Create scene builder items with icons"
6. Click "Reload items" in the Scene Builder tab's options to show the new item
- [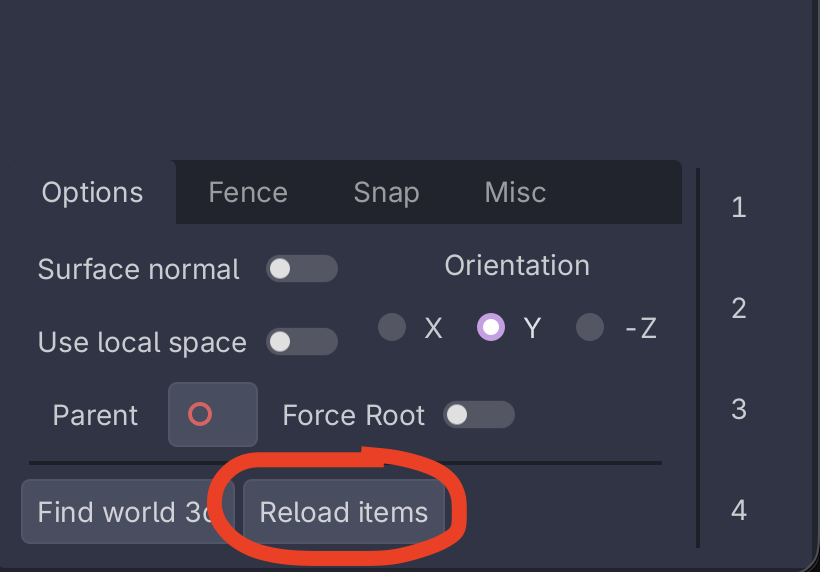](https://docs.bugjam.dev/uploads/images/gallery/2026-02/jwjscreenshot-2026-02-22-at-7-01-53-pm.png)
If the item doesn't show up, it could mean that there is a UID issue.
Open the `.tscn` file itself and then save it and try again - in source control you may notice that its UID gets updated.
Commit this change in source control and everybody should see your object show up in their scene builder list.
#### Managing Scene Builder
Scene builder has two resources inside the project that it uses to store data.
`Data/scene_builder/collection_names.tres` contains all of the names of the collections that are used. Double click on this in the FileSystem to view it in the Inspector.
[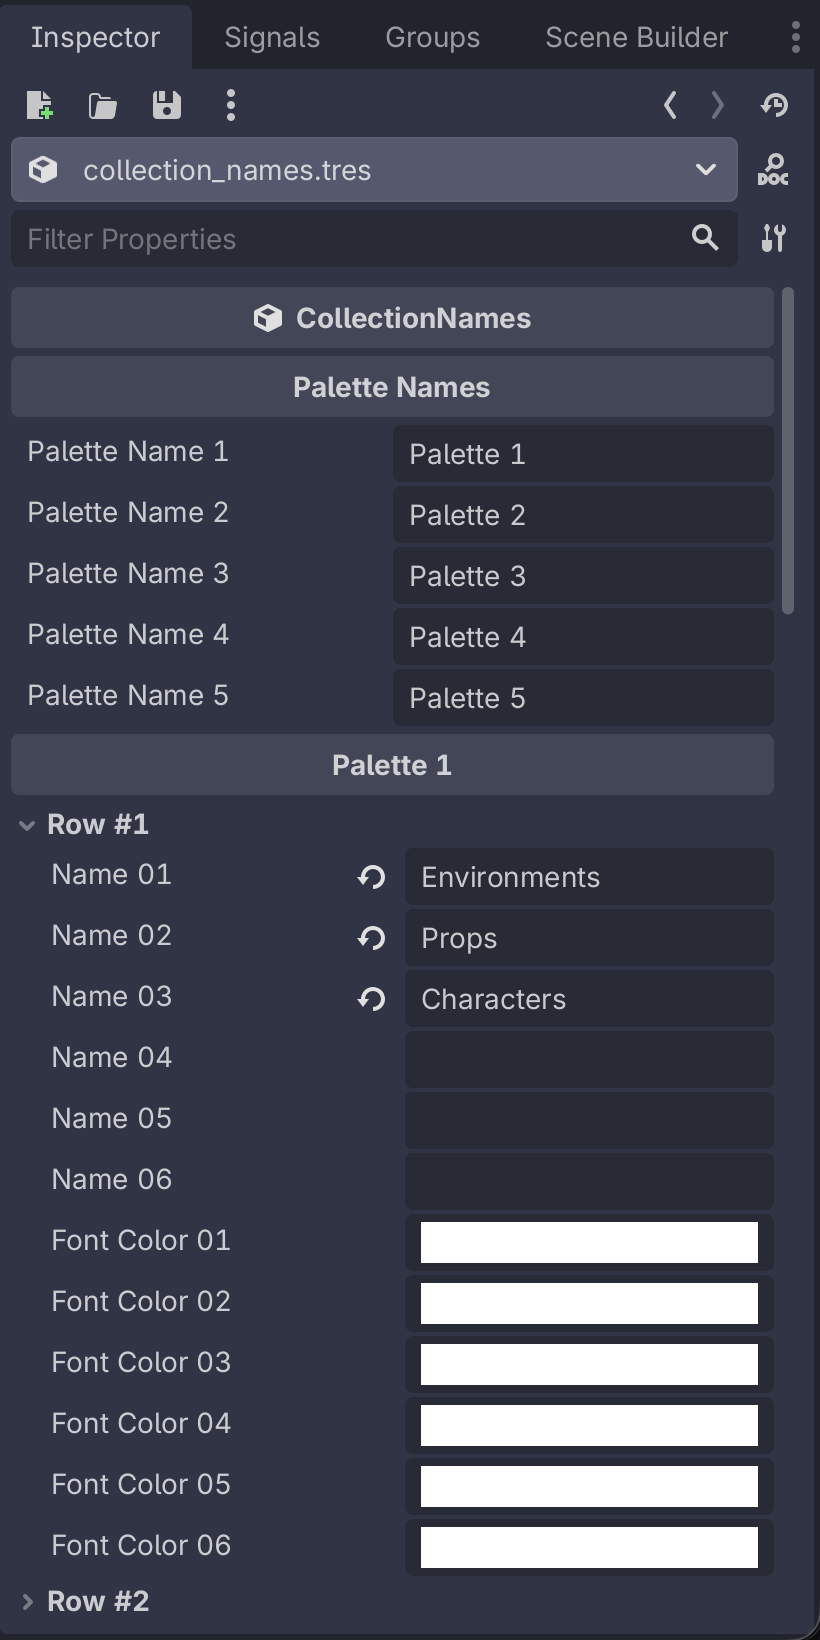](https://docs.bugjam.dev/uploads/images/gallery/2026-02/screenshot-2026-02-22-at-7-06-36-pm.png)
\---
`Data/scene_builder/scene_builder_database.tres` contains the database of scenes, stored in a few nested dictionaries. Double click on this and open it in the inspector to edit/remove items from the different collections.
[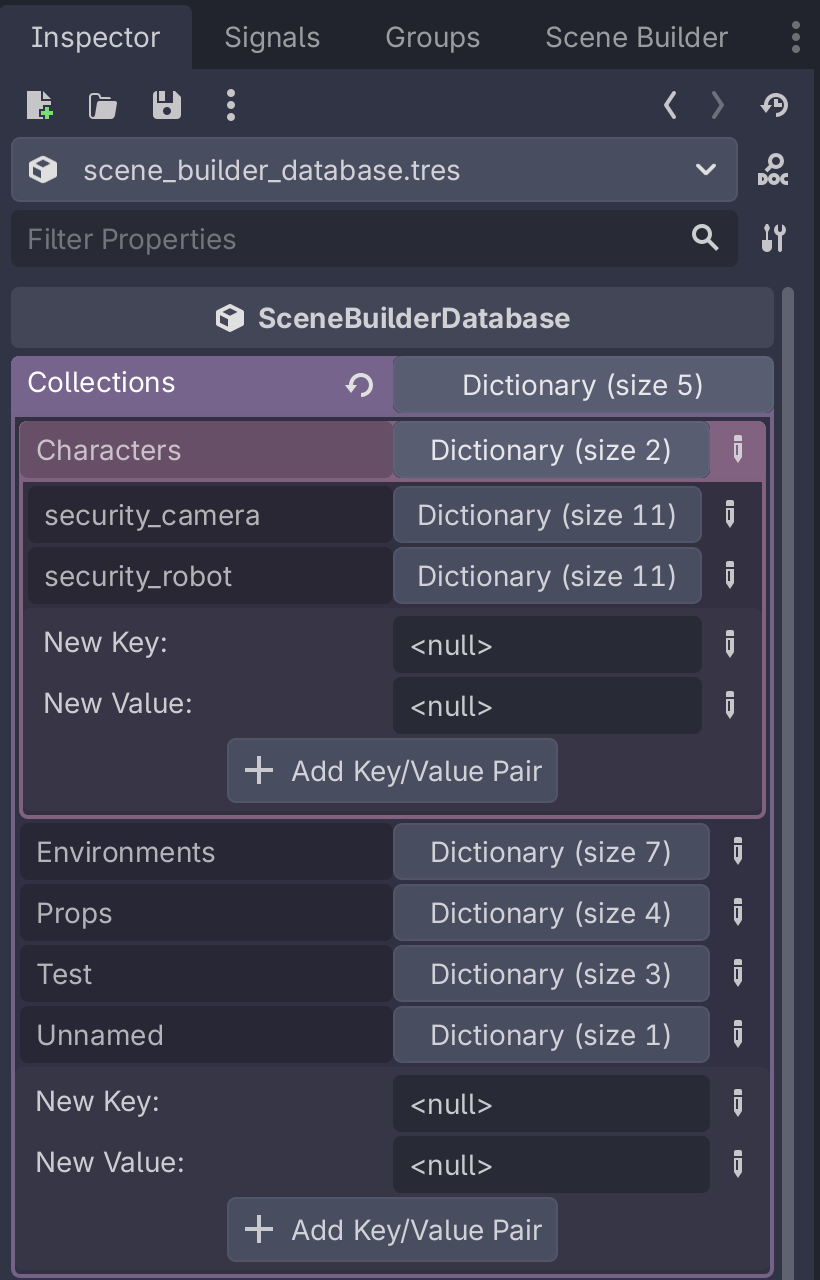](https://docs.bugjam.dev/uploads/images/gallery/2026-02/screenshot-2026-02-22-at-7-09-10-pm.png)
# Physics layers and navigation regions
### Physics layers
Current physics layers are:
1. **Environment**: Anything in the environment that the player should collide with and get stopped by
1. The player and the over-the-shoulder camera will collide with these
2. **Player**: The player is on their own layer
3. **Walls**: Anything that the *overhead camera* should interact with
1. In general, all **Walls** should *also* be in the **Environment** group
2. Props that the player might hide behind (i.e. pillars) should be in **Envrionment** but *not* **Walls**
1. This way, when the player has the overhead camera active and they move behind something, the camera doesn't "snap" in front of the object
4. **Pickups**: Things that the player can pick up
1. The player has a shapecast on them that checks for this
### Navigation regions
Meshes that should be part of the navigation mesh must be added to the `navigation_mesh_source_group` group. This is a *global* group that should
Navigation regions should be set to have their "Source Geometry Mode" set to "Group Explicit". This makes it so that only nodes in the `navigation_mesh_source_group` group get parsed as part of navigation mesh baking:
[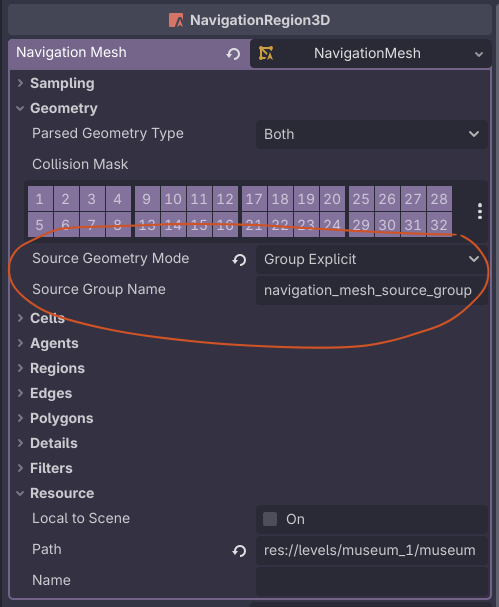](https://docs.bugjam.dev/uploads/images/gallery/2026-02/screenshot-2026-02-25-at-10-32-02-pm.png)

