# Art
# Resources
| Main Character for scale reference | >COMING SOON< |
| BlenderKit texture library Addon | [https://www.blenderkit.com/](https://www.blenderkit.com/) |
| Xury's Punk character sculpting workflow | [Punk sculpting playlist](https://www.youtube.com/watch?v=2_XLOEN8Z5Y&list=PLFei7Xknm2X7-5JCeVtXSynuz1xOifAbw) |
| PureRef Reference Boards | [https://www.pureref.com/](https://www.pureref.com/) |
| Qremeshify to auto re-mesh with quads (free) addon | [https://ksami.gumroad.com/l/QRemeshify](https://ksami.gumroad.com/l/QRemeshify) |
# Style Guidelines
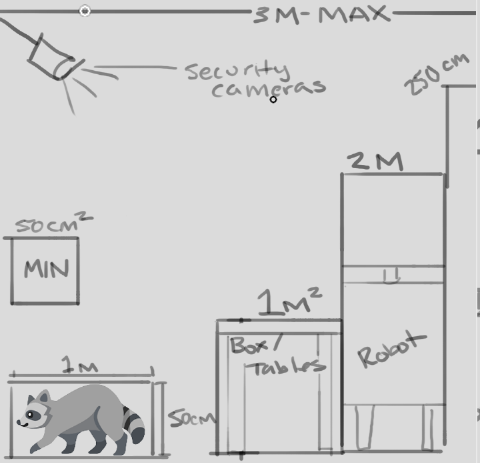
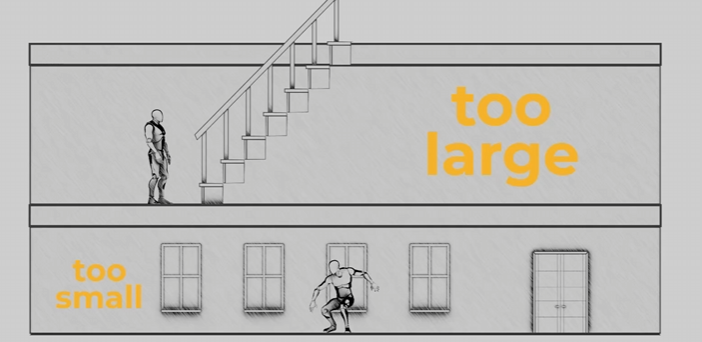
### Scale + Proportions
[](https://docs.bugjam.dev/uploads/images/gallery/2026-02/9QFimage.png)[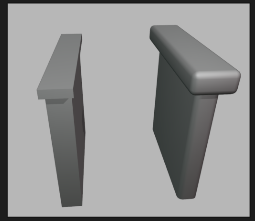](https://docs.bugjam.dev/uploads/images/gallery/2026-02/ZOHimage.png)
All proportions will be very exaggerated in order for the tiny tanuki to navigate the environment. interactive elements will be placed within 3m of the floor. The main playable character has a size of 100cm x 50cm- all reachable surfaces will be 100cm tall (table tops / switches / crates/ etc )
Larger characters and elements, like the security robots, should be a max of 2m tall. Security cameras should be placed at 3m above the ground to be visible to the tanuki but out of reach. Non-interactive elements will be a max of 250cm tall to fit within frame
Props that the tanuki can transform into should fit within 50cm-100cm
No props should be smaller than 25cm or larger than 3m
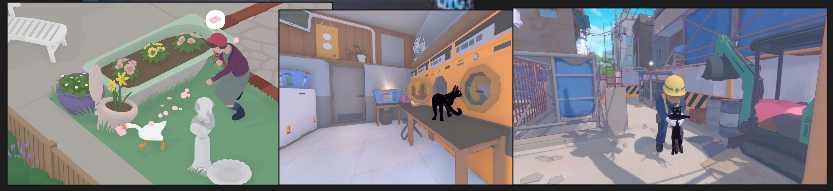
When translating elements to the game style, proportions will be exaggerated for a playful effect. See the example above^ whenever there are areas that can be exaggerated without losing their silhouette, they should be exaggerated. Below are examples of how similar games have pulled off this scale exaggeration- the goose and the cat would be much smaller, but the worlds don't feel "looming" or overly giant around them.
[](https://docs.bugjam.dev/uploads/images/gallery/2026-02/Ld3image.png)
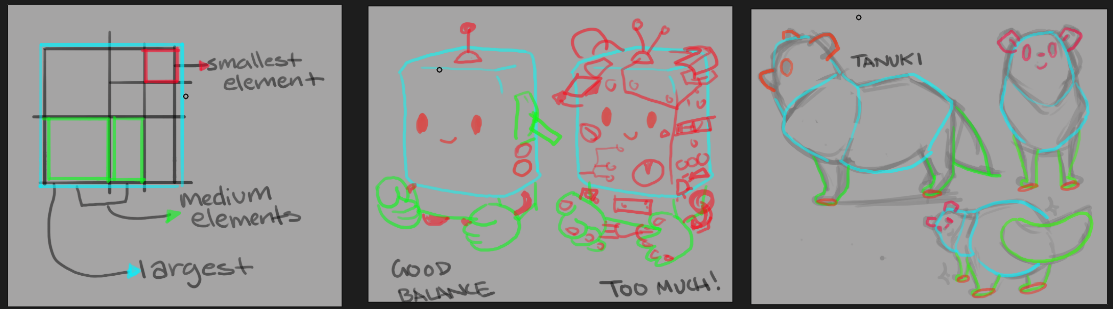
### Granularity + Detail
[](https://docs.bugjam.dev/uploads/images/gallery/2026-02/mmqimage.png)
Designs should be sorted into large, medium, and small elements- finding a balance between them. There should be a main form that is the largest element and make up 75% of the object or character's silhouette. Medium elements should be 25%-33% of the size of the largest shape, and take up about 20% of the silhouette. Small elements should only have a very minimal impact on the characters main silhouette, 5%. See the example above, the robot on the left is easy to read at a glance, and still includes cute details - like a few buttons and levers. However the robot on the right is too busy to understand, with too much visual information and the main shape gets lost. For our game, we want to keep a good balance and use small elements that are no smaller than what is pictured above, and used sparingly to tell a story- not to overwhelm the viewer.
This is a very simplified style, so start by seeing what the **least** possible amount of information is necessary in order to communicate the object or character, and build up from there
### Edges + Beveling
[](https://docs.bugjam.dev/uploads/images/gallery/2026-02/u6gimage.png)
1m = 0.1m bevel distance
2m = 0.2m bevel distance
3m = 0.3m bevel distance
This game will be a very soft, inviting , and playful environment. Because of this, edges will be rounded off but there is a level of standardization necessary to keep the game cohesive. On the left you can see 3 cubes, one that is super round, one that is a little beveled but still sharp, and one that has completely sharp edges. You can see these each have a different feel to them. On the right is the level of softness we will be using for our game- 10%. so, if you love numbers you can take that literally, and apply a 0.1 bevel to a 1m cube, or using the reference on the right, try to match that amount- using an orthographic view is very helpful when setting this up, or ideally a bevel modifier, where you can easily and non destructively adjust the bevel proportionately to the shape.
This applies mostly to prop building, like shelves and architecture- but if you are doing organic modeling please still keep this in mind and don't include any hard edges or sharp corners
### High Poly Sculpt Pass
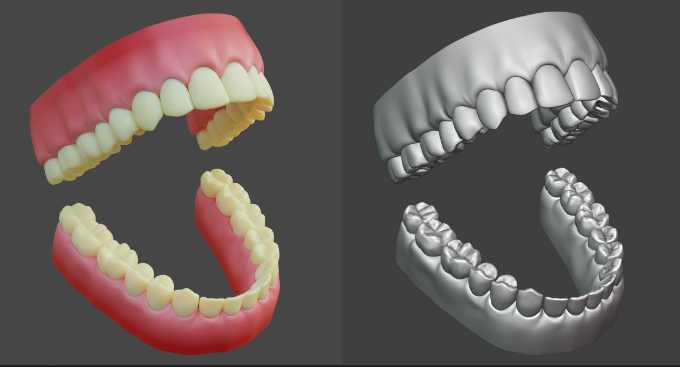
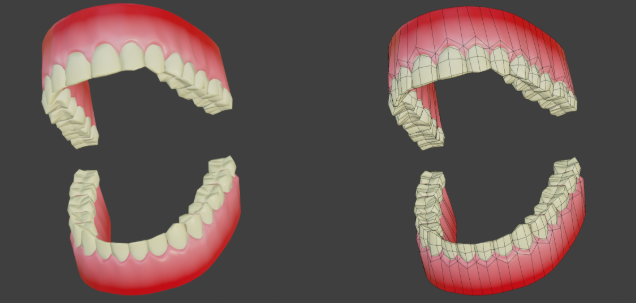
All assets will include a high poly sculpt pass! DONT BE OVERWHELMED this is still a very stylized game, NO ONE should be doing hyperrealism but we are going to learn a high to low poly baking workflow, what this means is that when we make each element- we will be adding some smaller details in a sculpt pass that add more interest + history to the item / character. For example, when making the tanuki, the sculpt pass will include adding some areas of chunky fur, or if you are making a crate, finding areas to add a chipped piece of wood, a dent in the side of a can, or a chipped corner on a table. These details will be baked onto the mesh later
We are going to be using a high - low polygon workflow, which means you can go pretty high when working on the details of your model! If your computer can handle it- go for it! Please see Xury's punk character series to understand this workflow in depth. Included example is this pair of teeth by Xury- see the difference in the original sculpt vs final game model
[](https://docs.bugjam.dev/uploads/images/gallery/2026-02/X5Uimage.png)
[](https://docs.bugjam.dev/uploads/images/gallery/2026-02/NzHimage.png)
[](https://docs.bugjam.dev/uploads/images/gallery/2026-03/n9uimage.png)
[](https://docs.bugjam.dev/uploads/images/gallery/2026-02/JW8image.png)
### Materials
WIP
# Scale and Proportions
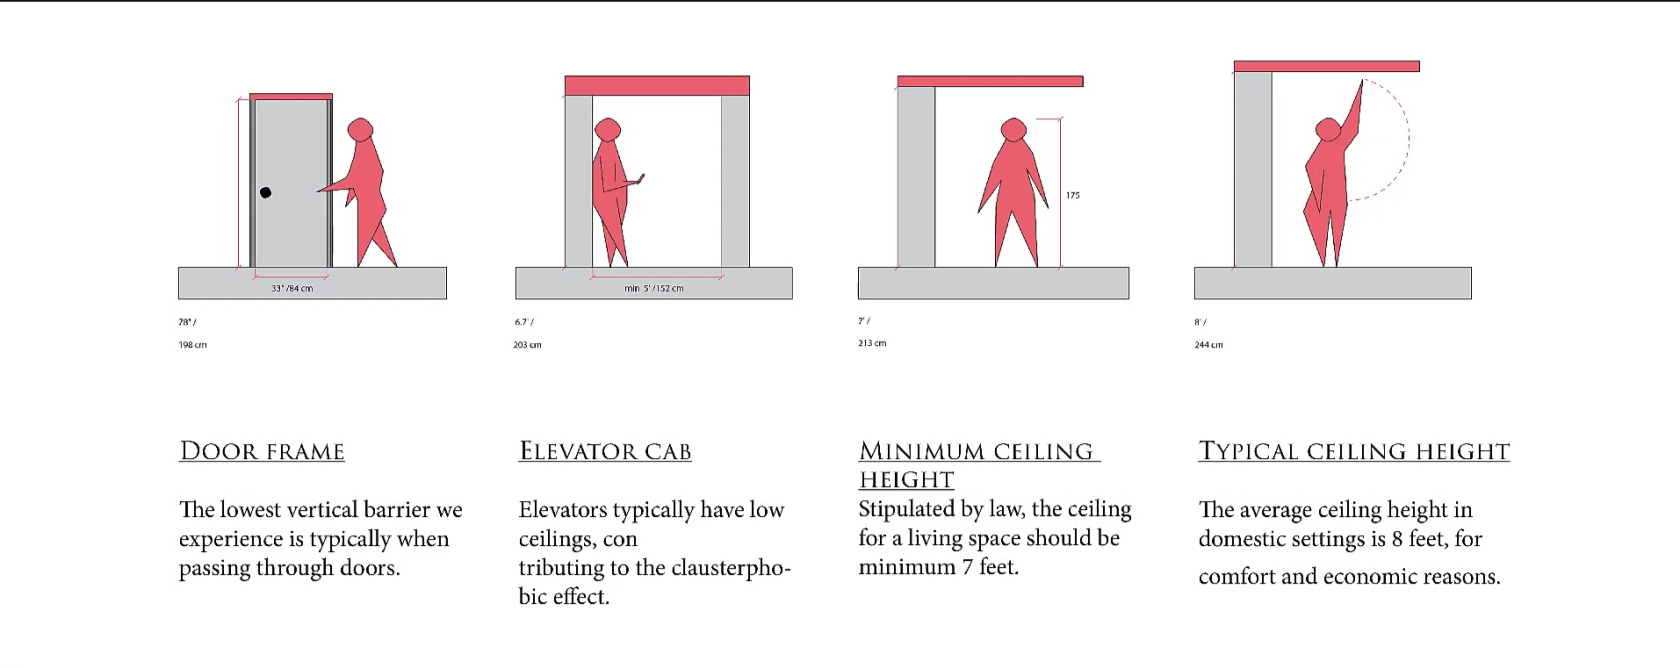
We will be working with standard Blender units aka meters. One meter is one Blender unit. One meter is also 100cm, so working from measurements like the ones attached is easier than it seems if you're used to imperial!
[](https://docs.bugjam.dev/uploads/images/gallery/2026-02/H2Oimage.png)[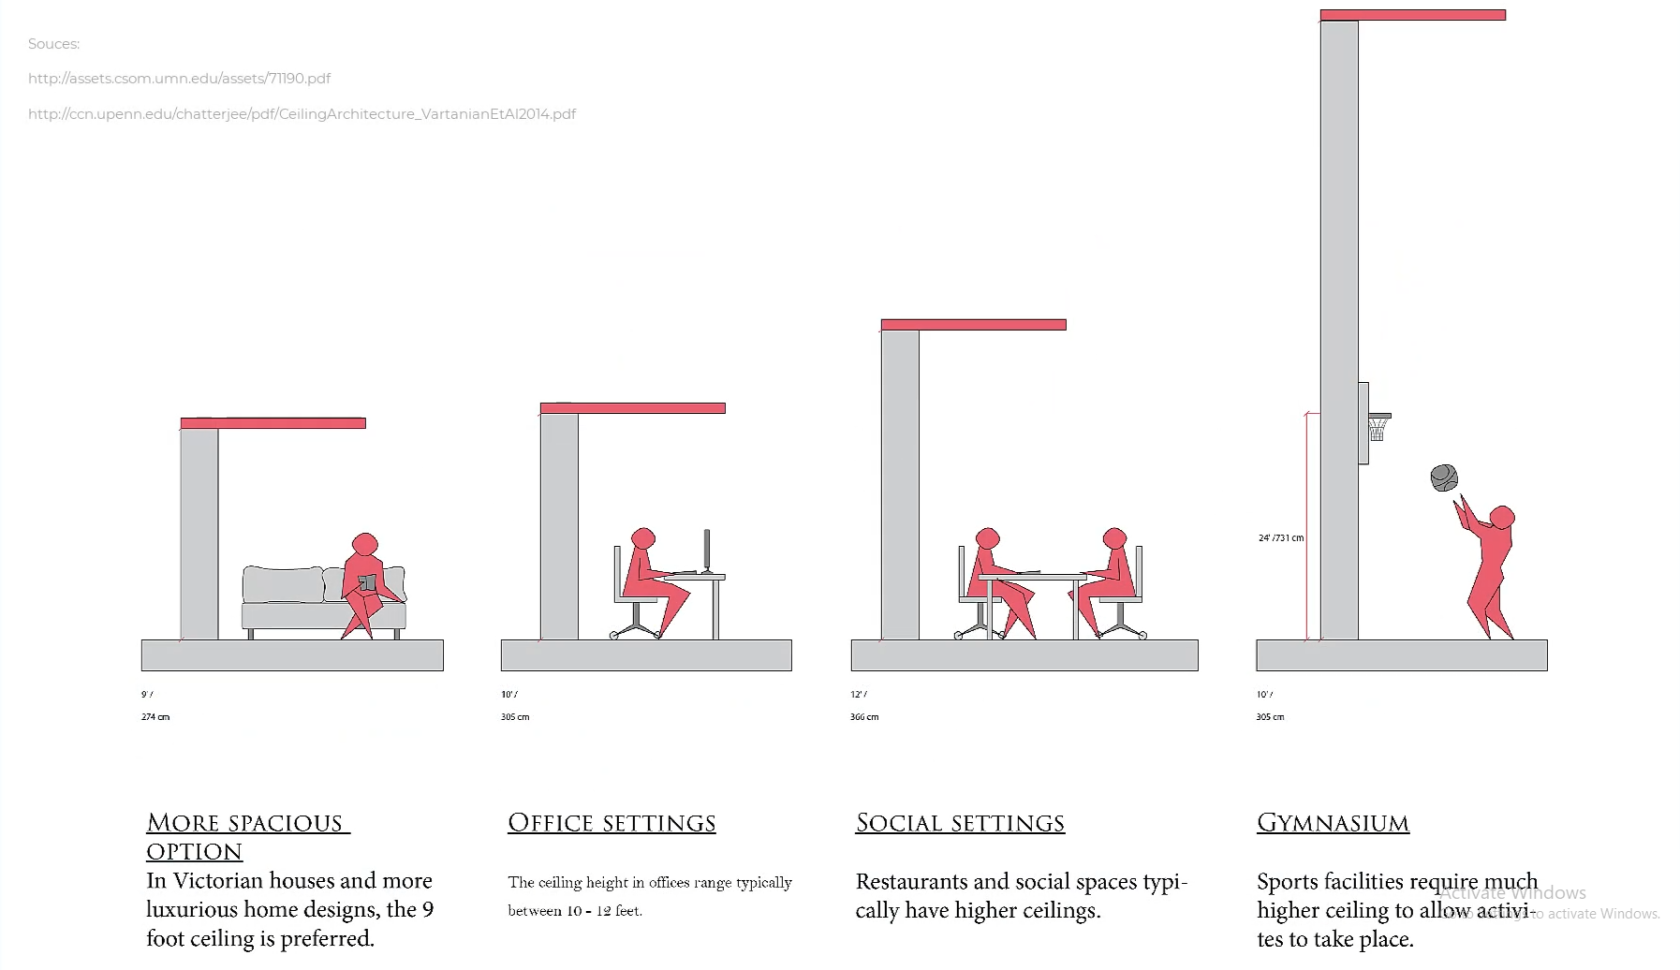](https://docs.bugjam.dev/uploads/images/gallery/2026-02/oauimage.png)
[](https://docs.bugjam.dev/uploads/images/gallery/2026-02/LNtimage.png)[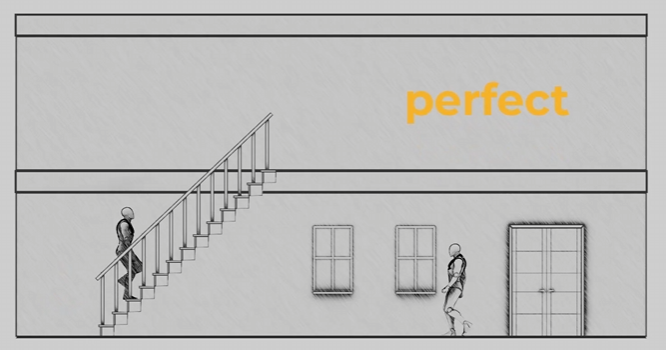](https://docs.bugjam.dev/uploads/images/gallery/2026-02/fBUimage.png)
[](https://docs.bugjam.dev/uploads/images/gallery/2026-02/KLvimage.png)
For scale, please also utilize a "main\_character" mesh (attached) to compare to your mesh whenever possible! When working, we will start with a blockout for your objects/ character that will be tested in the game engine.
*reference photos sourced Schoolism. Life – Lesson 71. Schoolism. Accessed 2/11/26. [https://schoolism.com/s/life/course/lessons/71](https://schoolism.com/s/life/course/lessons/71)*
# Materials List
Pre approved textures and materials through blenderkit! Please make sure you use materials from this list!
\*\*\*list coming soon!\*\*\*\*
# WIP: Basic Requirements For The Projects Goals
**tanuki night at the meowseum requirements as described by Alice , with Embers goals in mind**
we should select a few real world museums to blend styles from to make our unique museum
the style of post fall modernism,
a place once for public use, now faded into disuse with the fall of mankind.
but the security robots remain roaming the halls.
renewable power means they might guard this place forever.
Concept art , style agreement, modeling scope decided
blender needs
1 tanuki model
concept
model
rig
animation
1 guard bot
concept
model
rig
animation
1 basic level modular pack begun.
floor tiles,
wall tiles,
window frames,
props
concept ,style, reference needed for all
vase
statue
pole that you hang
the velvet rope on
the velvet rope
painting frames
diamond
pedestal
ceiling lights
display cases
anything that would go in a case
take your pick
go wild
security camera
laser emitter
mirror deflector.
the outside of the museum where you get put before selecting an entrance
needs foliage, trees, grass, pavement and such.
to begin imagine our museum is nothing but, vases paintings and a diamond.
variety of objects increase as people claim a desire to add something.
personally i think making parody of real pieces of art is fun.
like a simpler or funny version of the original.
or when you turn into something, you are like the original.
but with like little cute ears and theres a racoon face on the object.
godot needs:
player capsule controller,
idle,walk,run state machine
guard,
idle walk run state machine
navmesh
grey box level layout basics.
security camera set up.
Tooling pipeline requests:
a way to turn out modular architectural kit , into a level, faster.
aka snapping scripts based on object selected, not sure what blender is capable of.
might already exist.
week one should end with a grey box level of no specific design
explored by one capsule collider 3rd person action character controller.
we should have a clear concept of the museums look,
we should have v1 of our guard bot and camera drawn,
and maybe modeled but not animated and textured,
that we can place into the scene
and start building things like vision cones, follow systems,
work out the code for navigating the nav mesh,
before we start loading the scene with production models we should focus on basic function and form
in preparation for week 2 we could aim to have modeled, rigged ,and animations roughed out for our two animated characters.
and some agreed form for the the layout of our museum formed through greyboxing the space out. and doing flat floorplan drawings.
# Mood boards add your own!
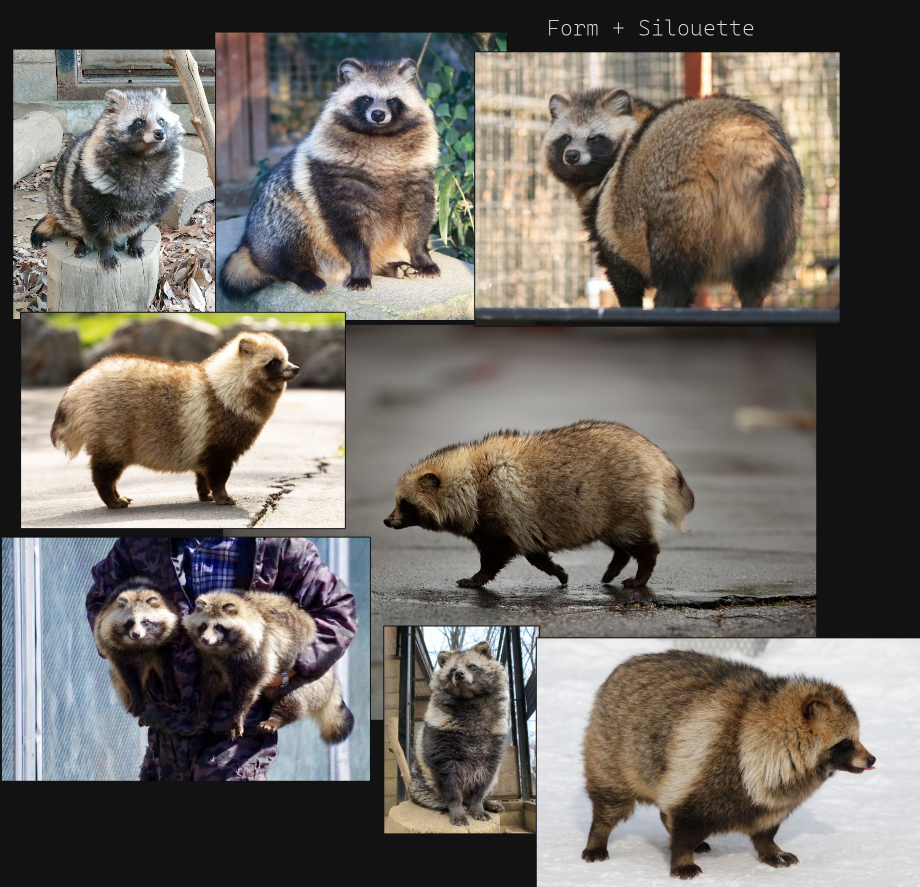
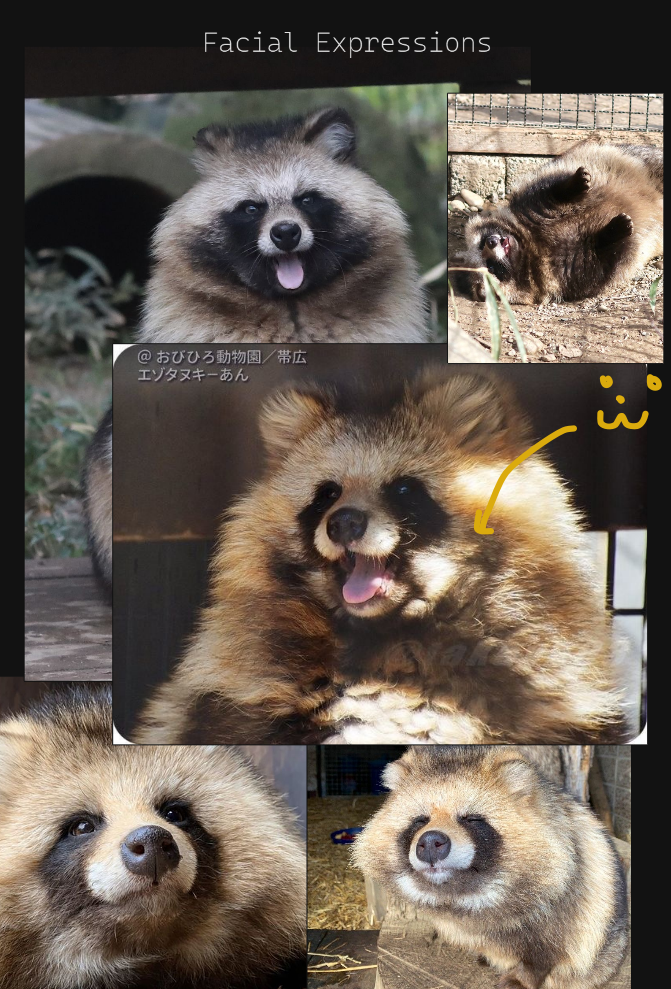
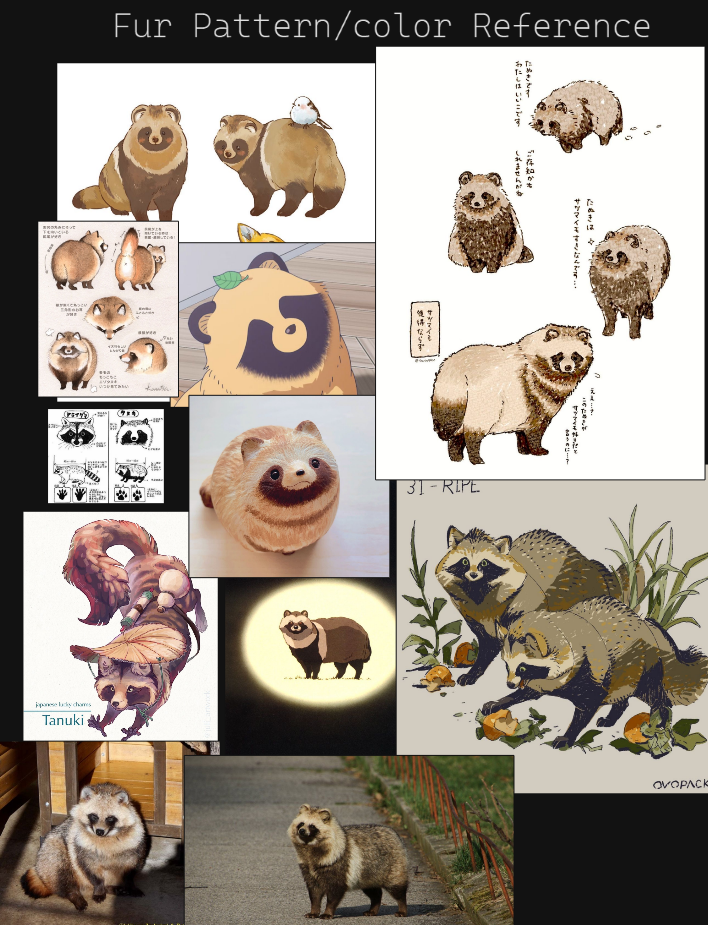
We have to decide what our tanuki would look like!
##### TANUKI
[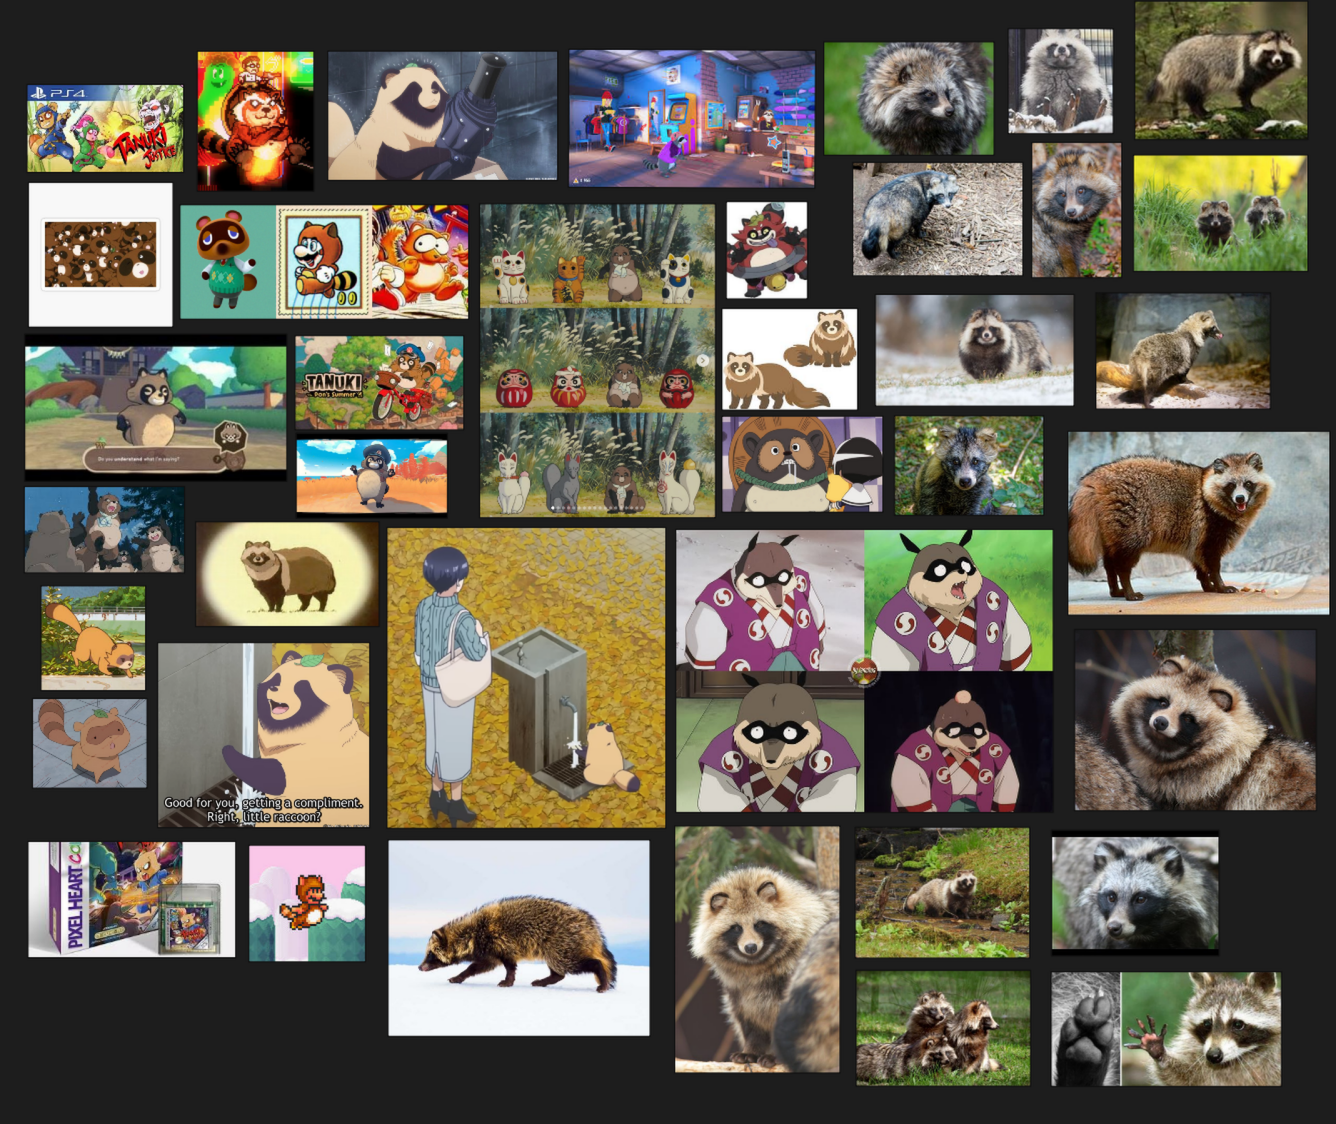](https://docs.bugjam.dev/uploads/images/gallery/2026-02/ryjimage.png)
[](https://docs.bugjam.dev/uploads/images/gallery/2026-02/VZqimage.png)
[](https://docs.bugjam.dev/uploads/images/gallery/2026-02/gbbimage.png)
[](https://docs.bugjam.dev/uploads/images/gallery/2026-02/RWjimage.png)
[](https://docs.bugjam.dev/uploads/images/gallery/2026-02/n3timage.png)
here is a swatch of representations for tanuki in media, gaming and anime.
we must discuss what is in scope, what we have the skill to achieve and choose.
##### **FUTURISM**
[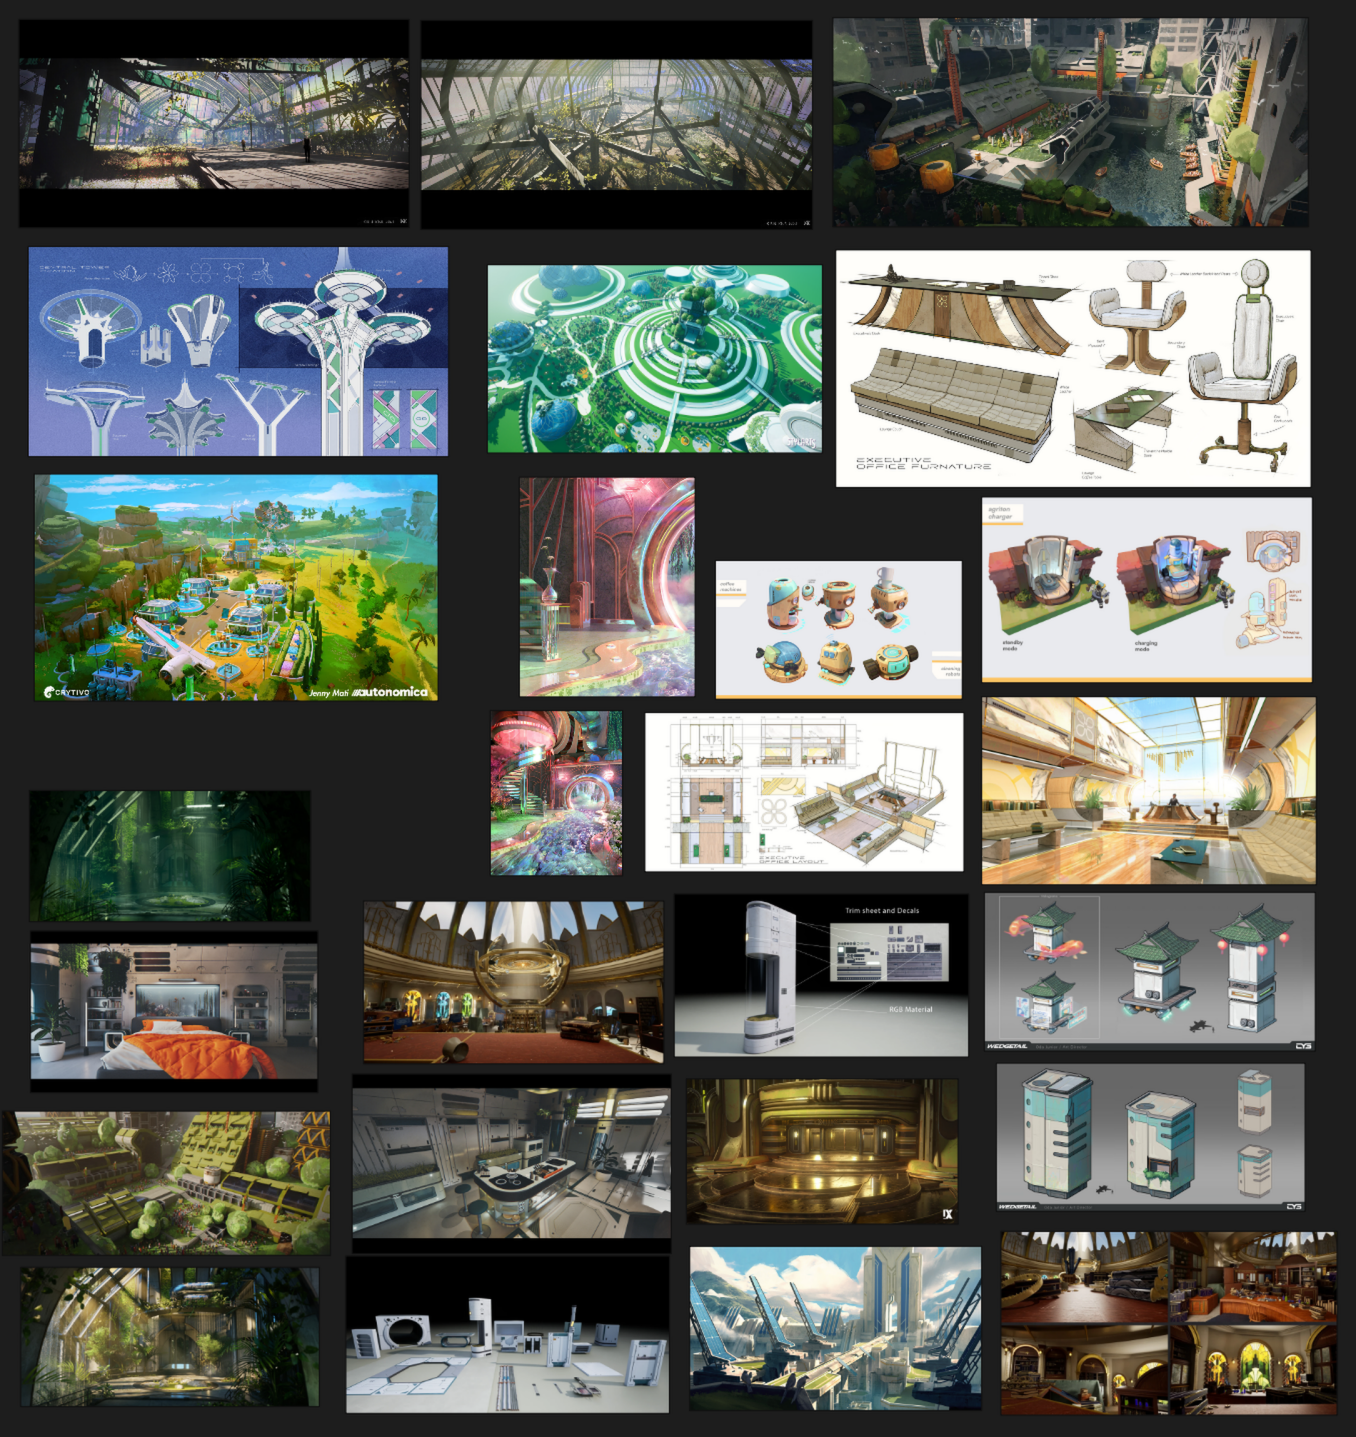](https://docs.bugjam.dev/uploads/images/gallery/2026-02/bSgimage.png)
##### **MODERN MUSEUM INTERIORS**
[](https://docs.bugjam.dev/uploads/images/gallery/2026-02/o5aimage.png)
##### **museum modular kits**
[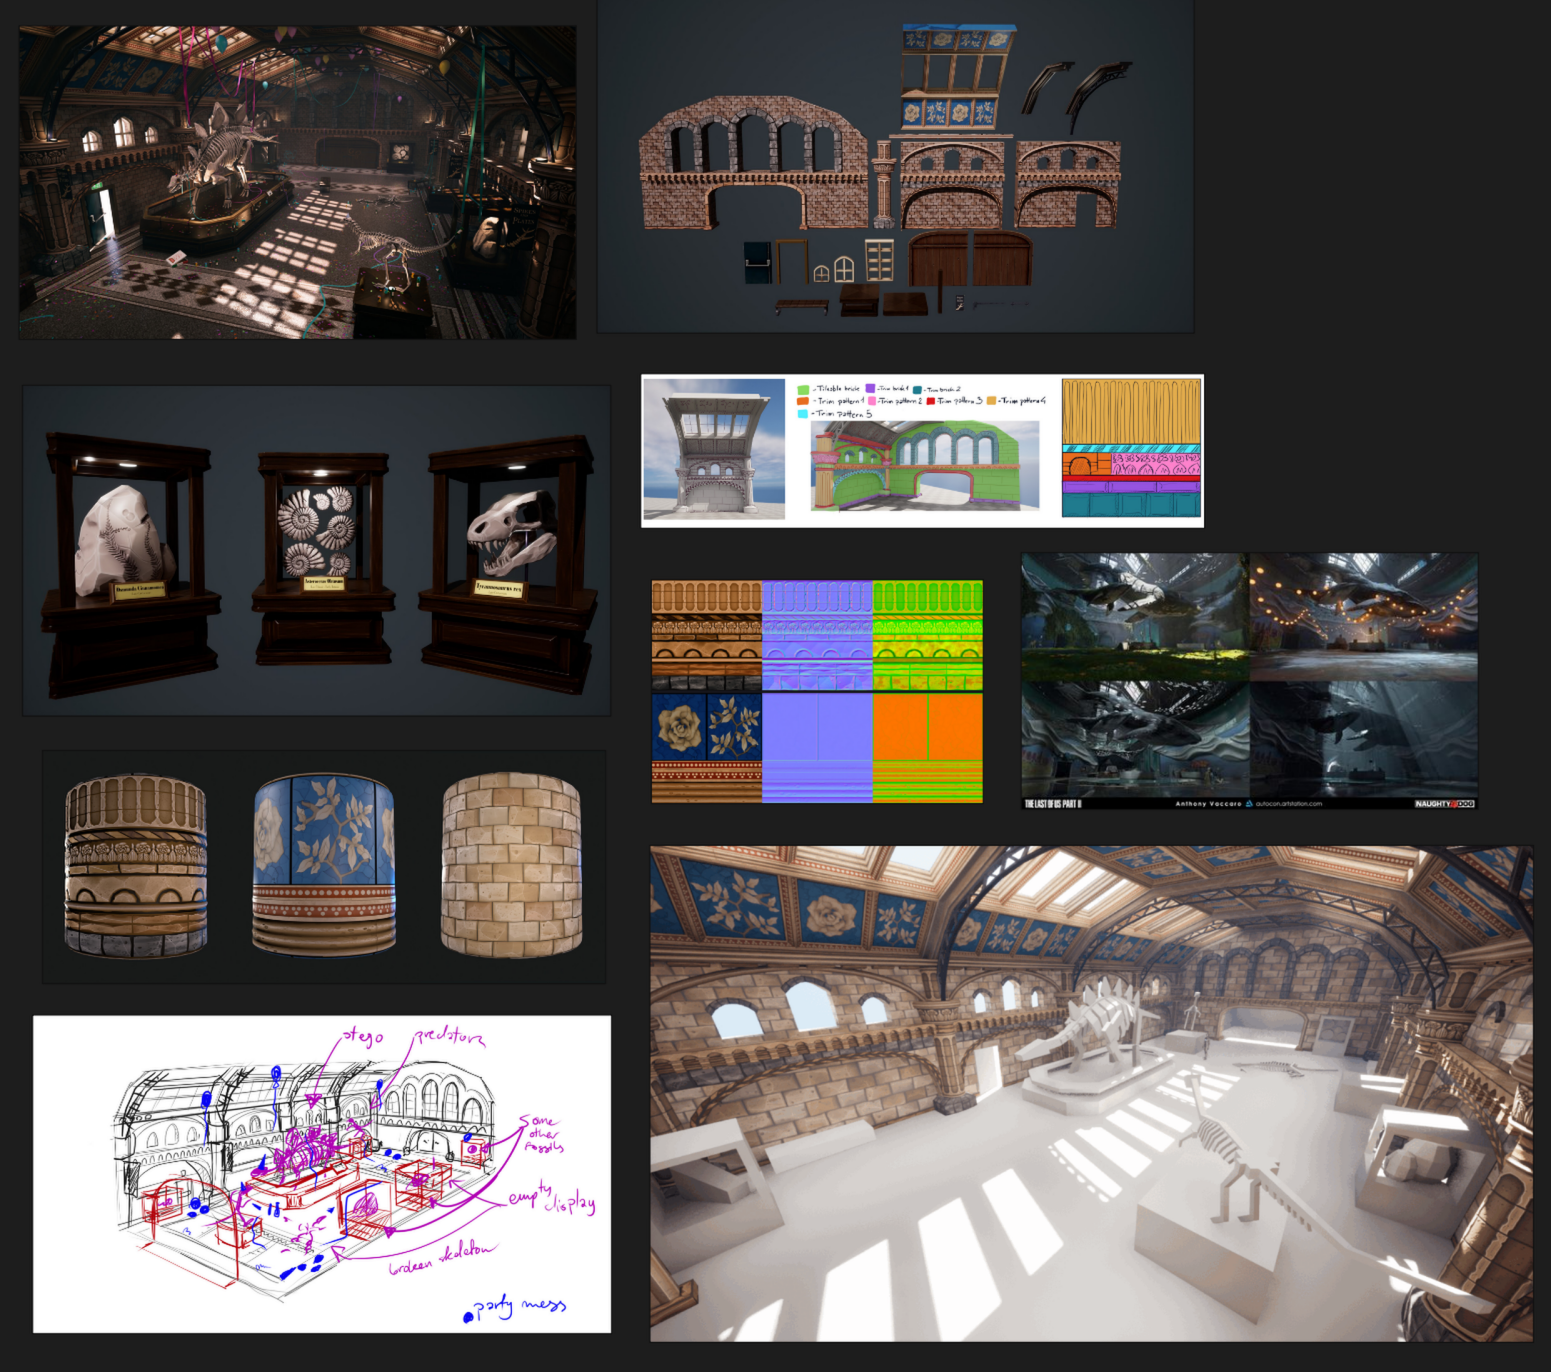](https://docs.bugjam.dev/uploads/images/gallery/2026-02/32eimage.png)
##### **ABANDONED INTERIORS**
[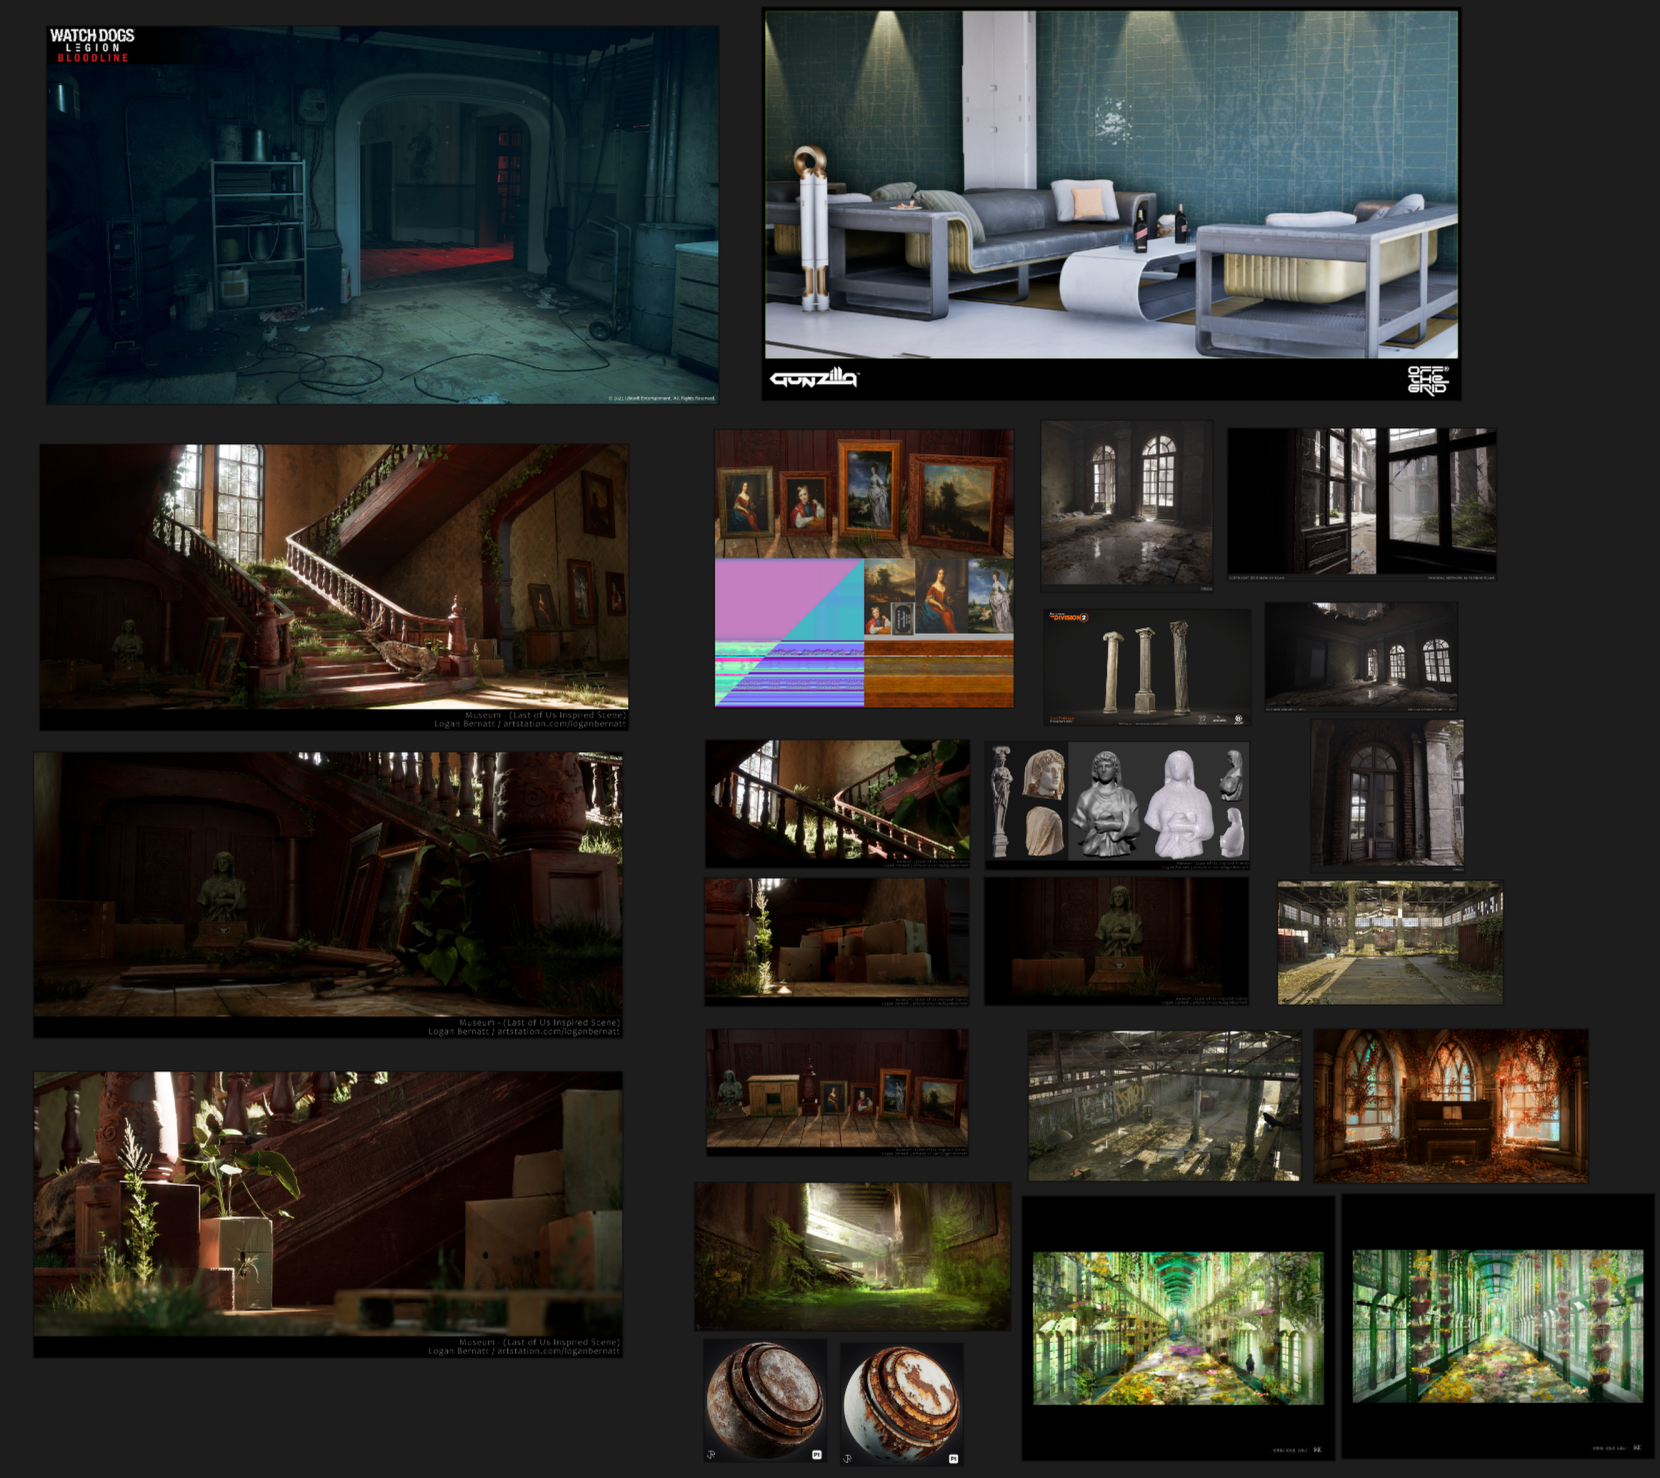](https://docs.bugjam.dev/uploads/images/gallery/2026-02/UAhimage.png)
##### **INTERIOR KIT AND TRIM SHEET EXAMPLE**
[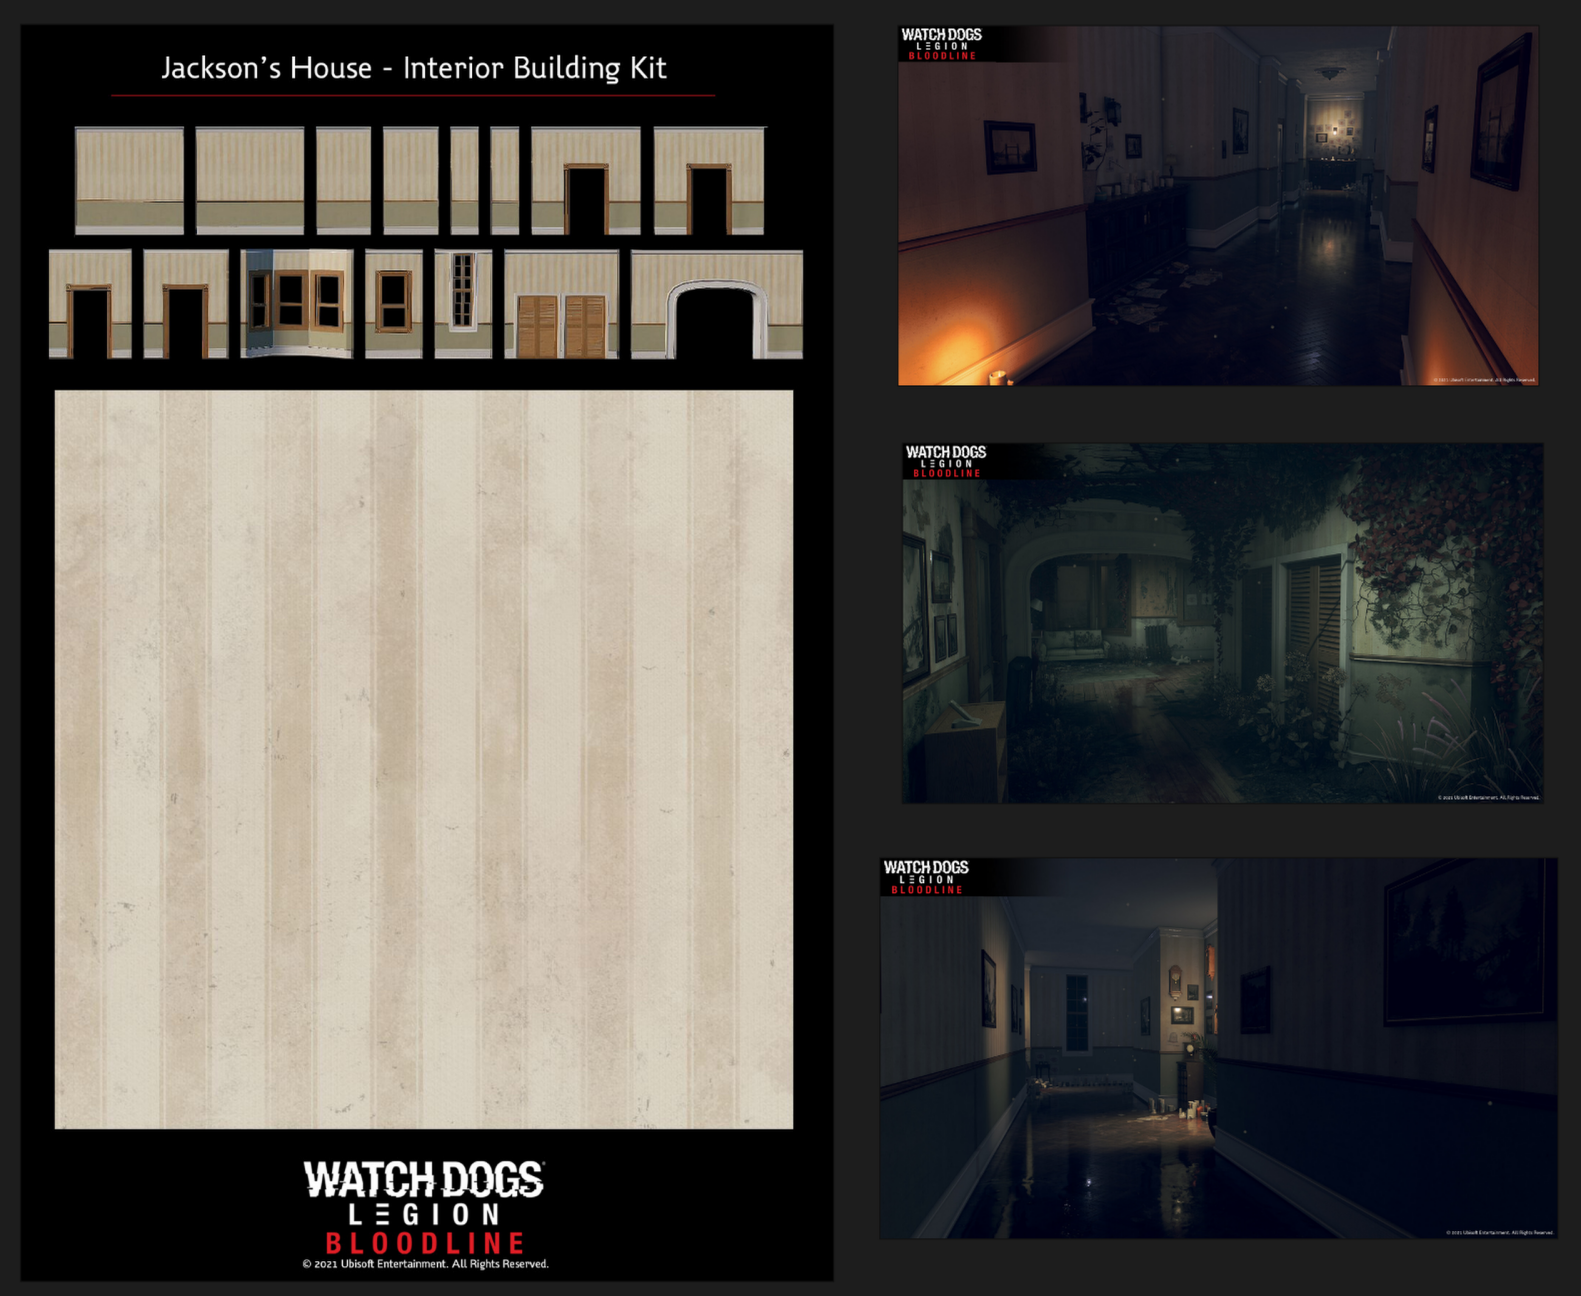](https://docs.bugjam.dev/uploads/images/gallery/2026-02/nwJimage.png)
##### **Liminal Future Spaces**
[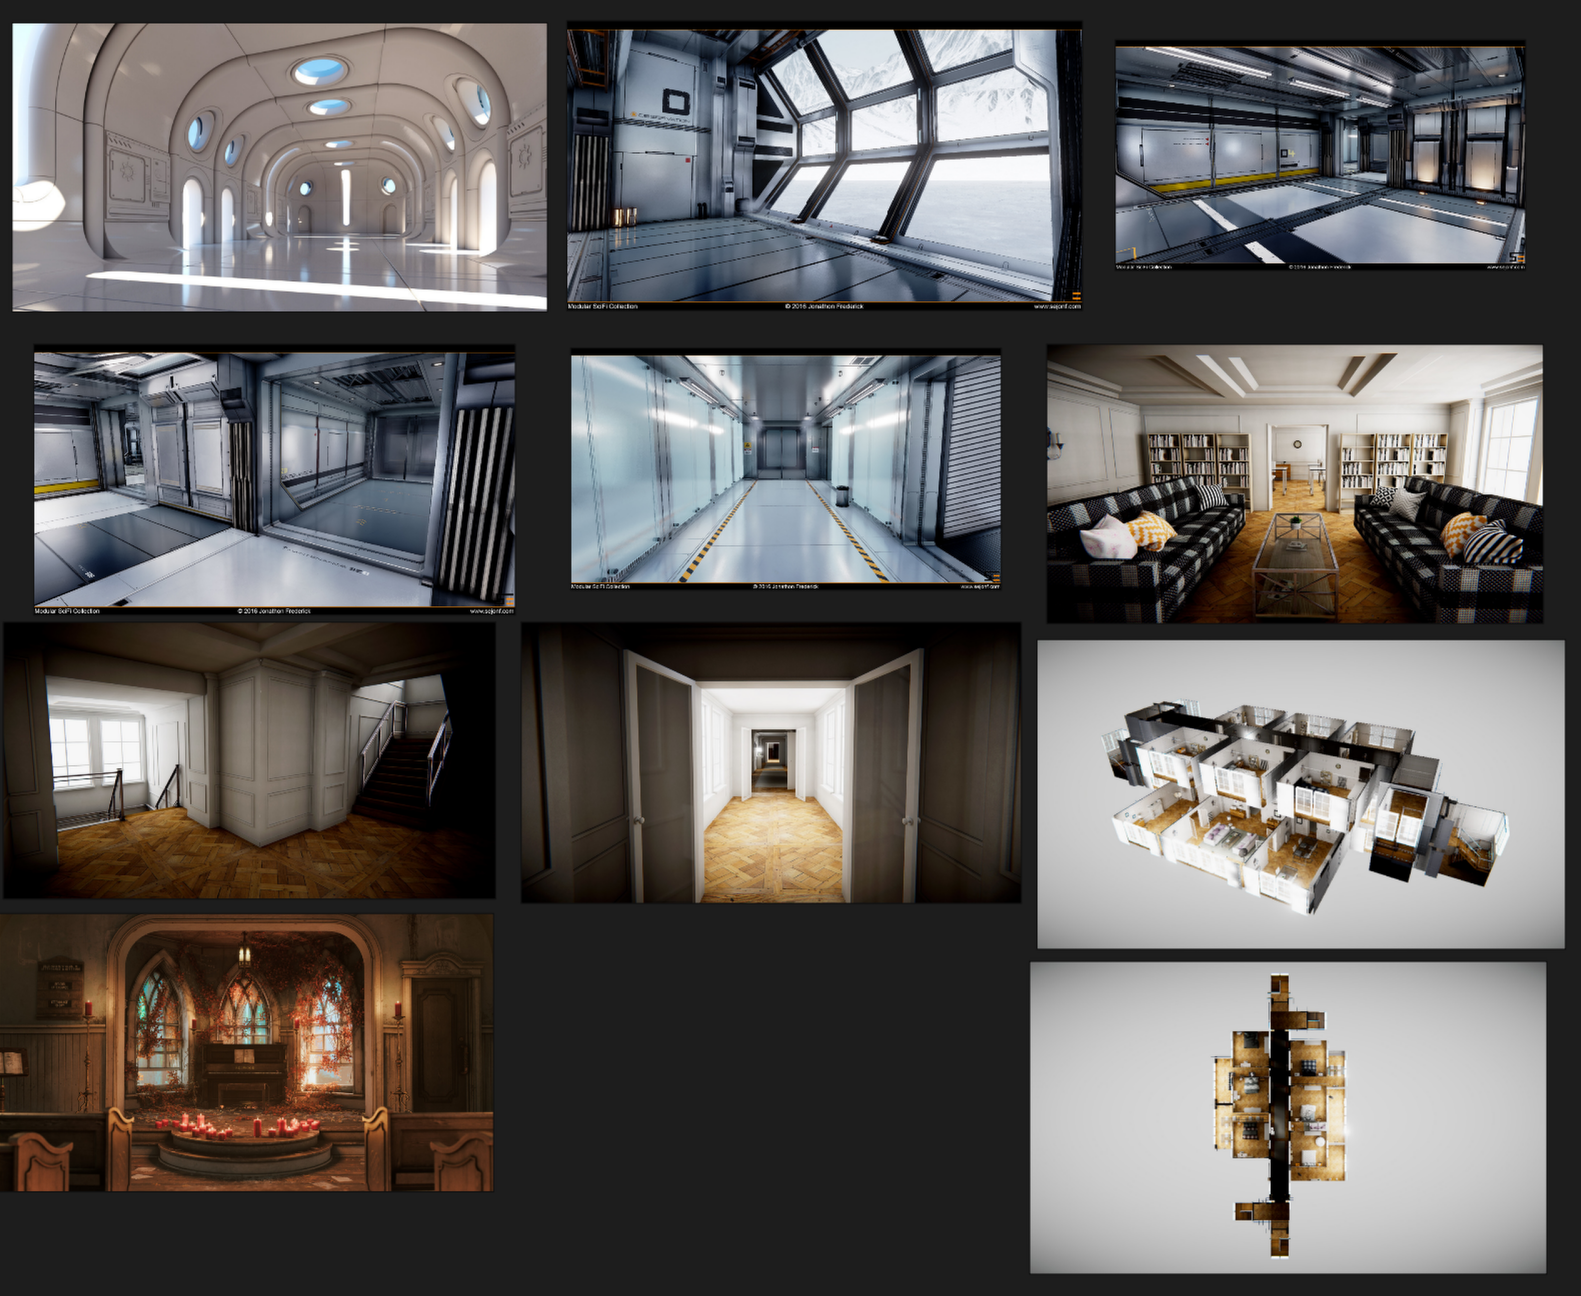](https://docs.bugjam.dev/uploads/images/gallery/2026-02/VPkimage.png)
##### **Solar Punk Future**
[](https://docs.bugjam.dev/uploads/images/gallery/2026-02/qqsimage.png)
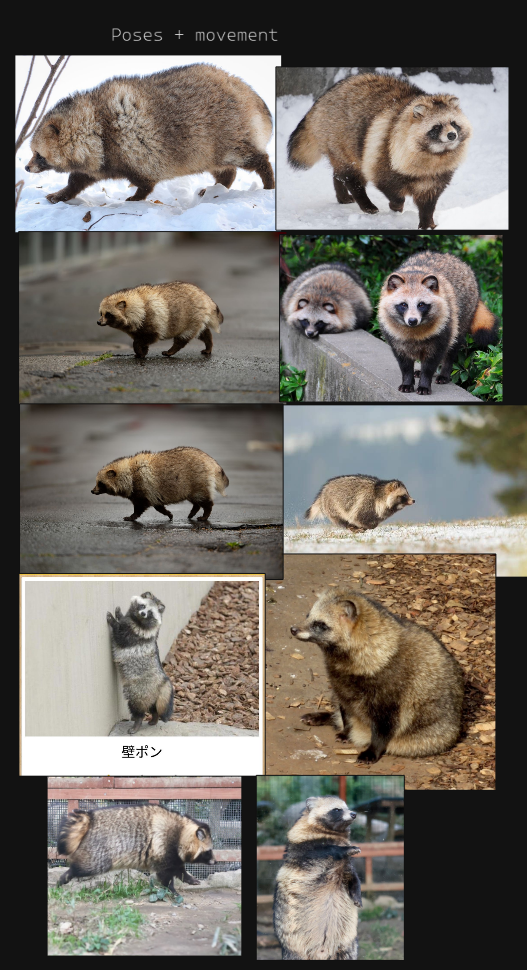
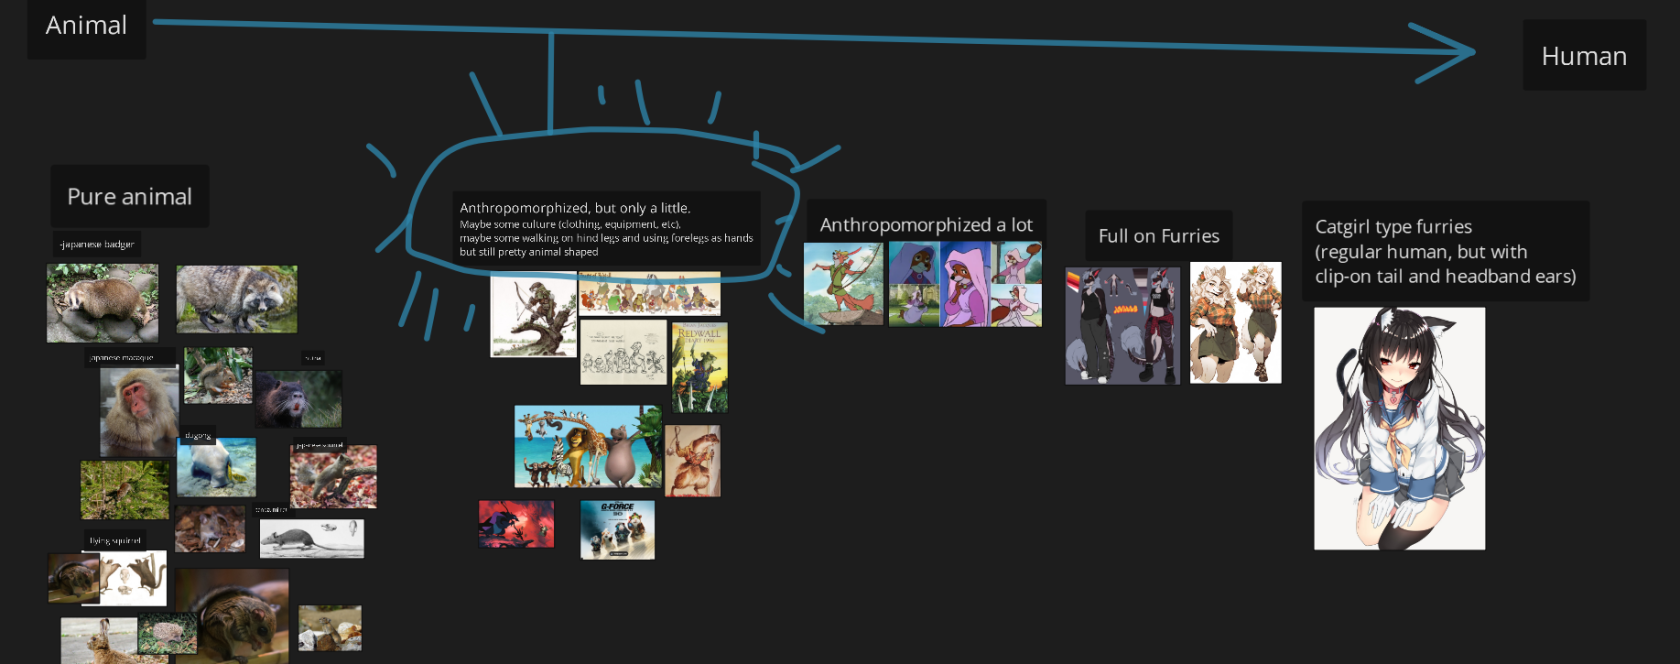
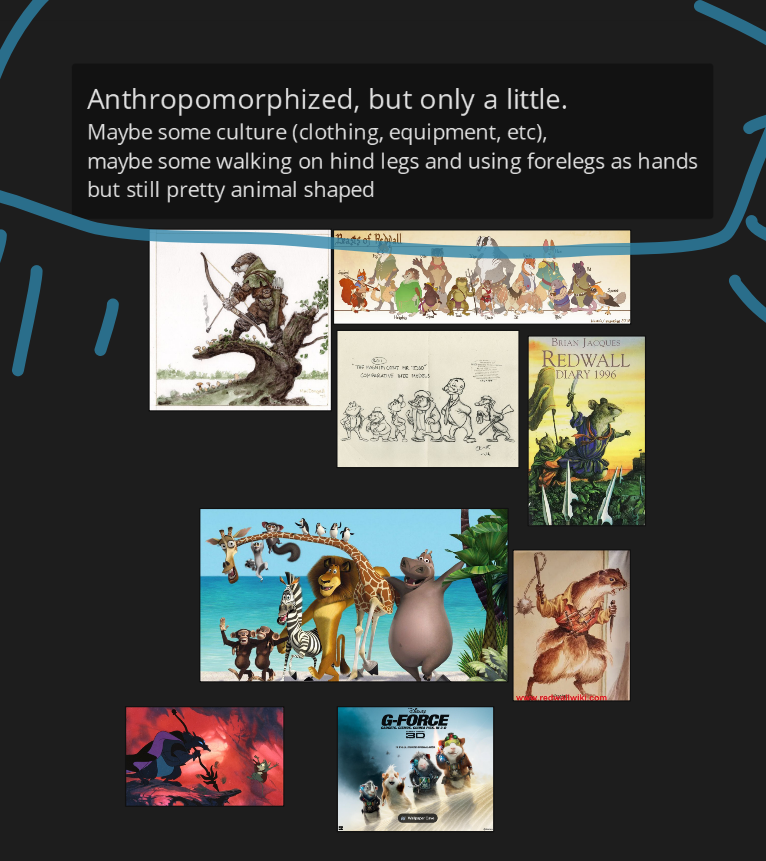
##### Animal to Human Spectrum
[](https://docs.bugjam.dev/uploads/images/gallery/2026-02/dKHimage.png)
#####
[](https://docs.bugjam.dev/uploads/images/gallery/2026-02/pRkimage.png)
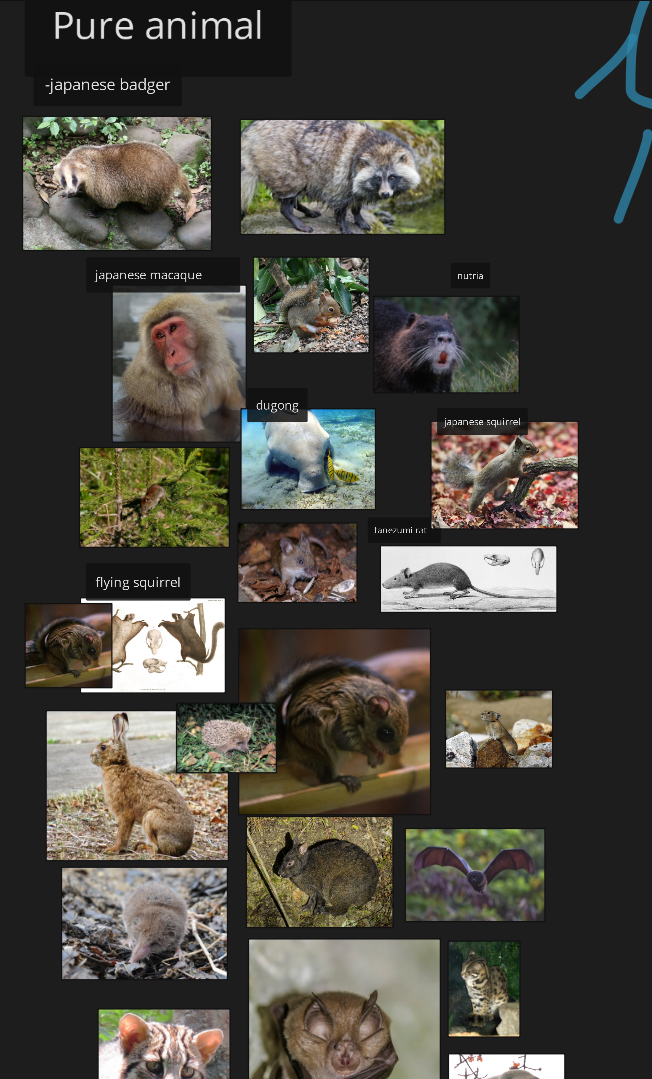
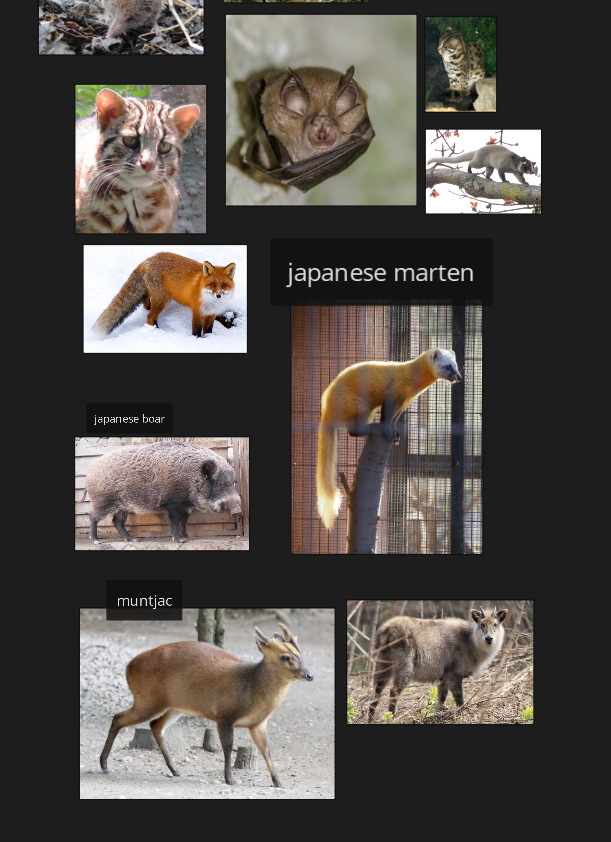
Animals of Japan
Tanuki implies animals from a similar biome range would be about. Is there a post-human culture here? What are the other animals up to? Is there some sorta Redwall-like society of raccoon dogs, stoats, mice, rats, badgers, feral cats and dogs, rabbits, etc?
[](https://docs.bugjam.dev/uploads/images/gallery/2026-02/KNVimage.png)
[](https://docs.bugjam.dev/uploads/images/gallery/2026-02/uetimage.png)
TECH ART NOTES: Within this idea, still a good practice for scope to have a limited number of "template" rigs, AKA a ferret rig that also works on an otter, weasel, etc. Less strain from multiple rigs, less work, rerigging, and most of these guys are in a rough archetype anyway. A rat and a mouse can use the same rig, just make the rat bigger.
#### Robotz
[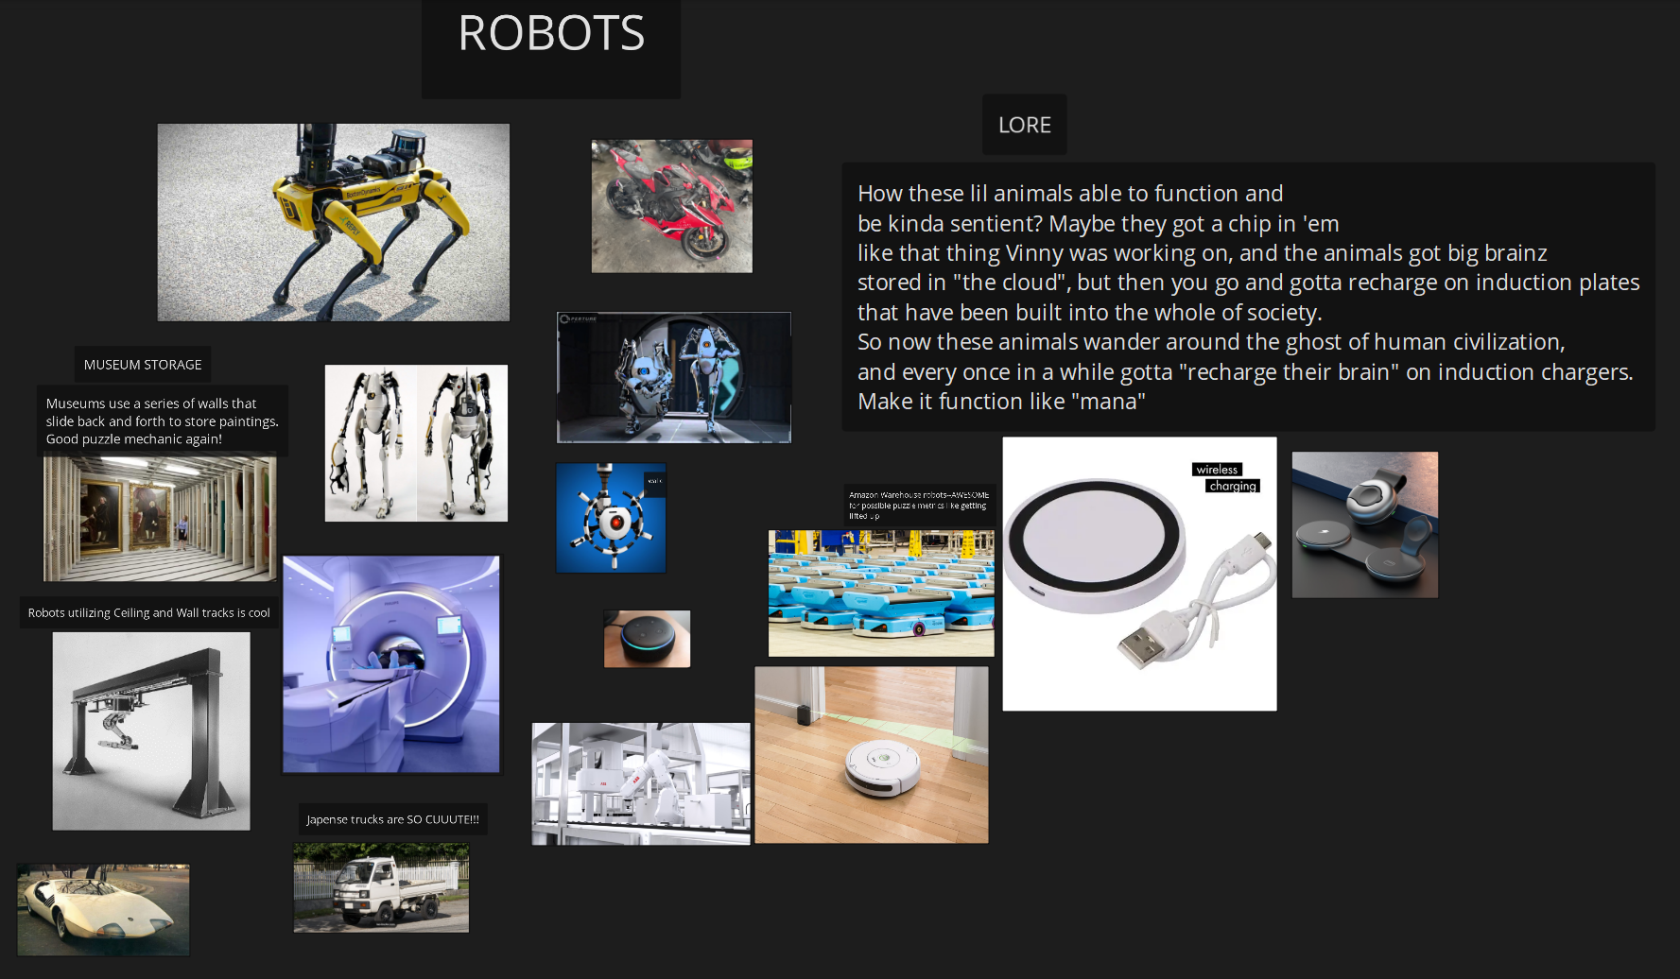](https://docs.bugjam.dev/uploads/images/gallery/2026-02/7ykimage.png)
### Mind Map
\n
\n \n \n \n \n \n \n \n \n \n \n \n \n \n \n \n \n \n \n \n \n \n \n \n \n \n \n \n \n \n \n \n \n \n \n \n \n \n \n \n \n \n \n \n \n \n \n \n \n \n \n \n \n \n \n \n \n \n \n \n \n \n \n \n \n \n \n \n \n \n \n \n \n \n \n \n \n \n \n \n \n \n \n \n \n \n \n \n \n \n \n \n \n \n \n \n \n \n \n \n \n \n \n \n \n \n \n \n \n \n \n \n \n \n \n \n\n"}" id="bkmrk--16" style="max-width: 100%; border: 1px solid transparent;">
**This is a one-way conversion!!!**
That means that you should be *pretty sure* that your CSG layout is how you want it before exporting it from Godot.
Depending on the changes you want to make, it could be easy or difficult to port them back and forth.
It lives under **Scene** **→** **Export As... → glTS 2.0 Scene...**
[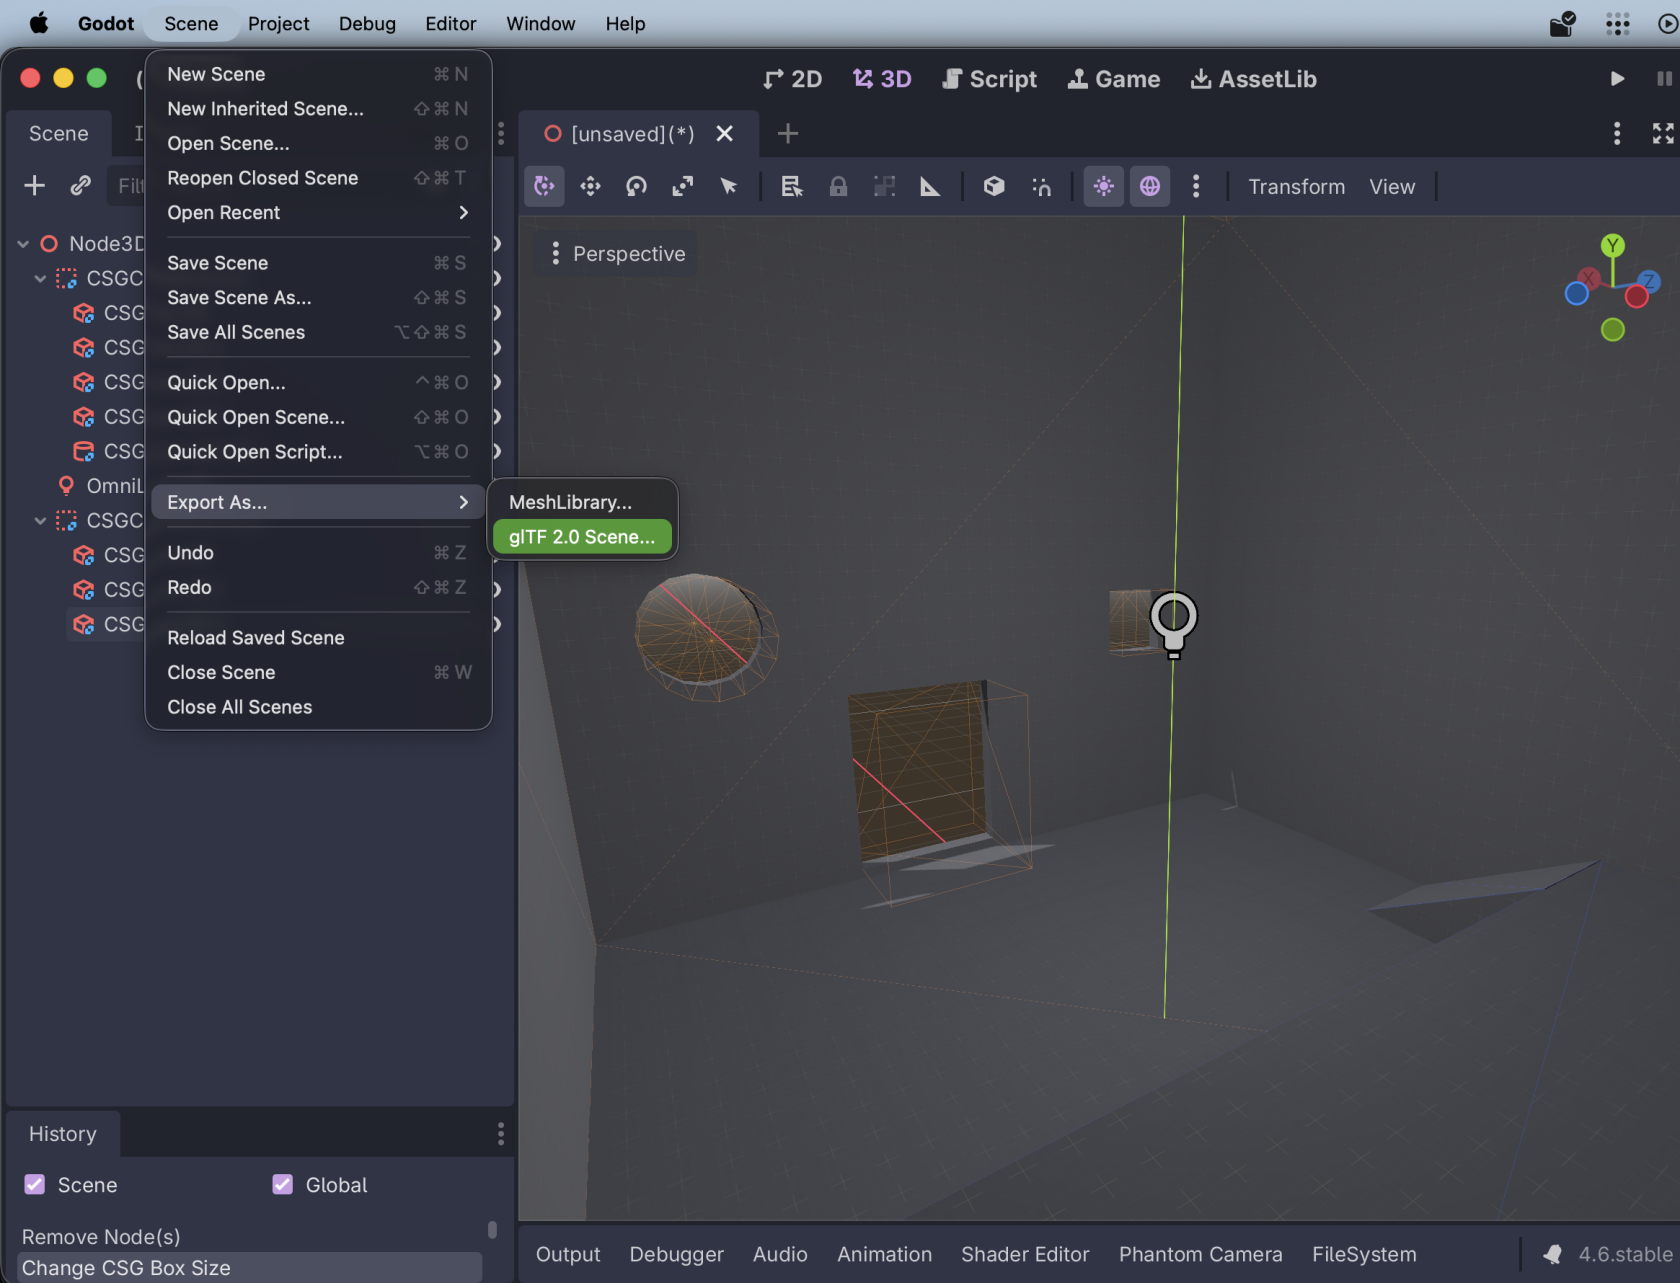](https://docs.bugjam.dev/uploads/images/gallery/2026-02/screenshot-2026-02-15-at-5-51-13-pm.png)
The settings you choose here don't *really* matter:
[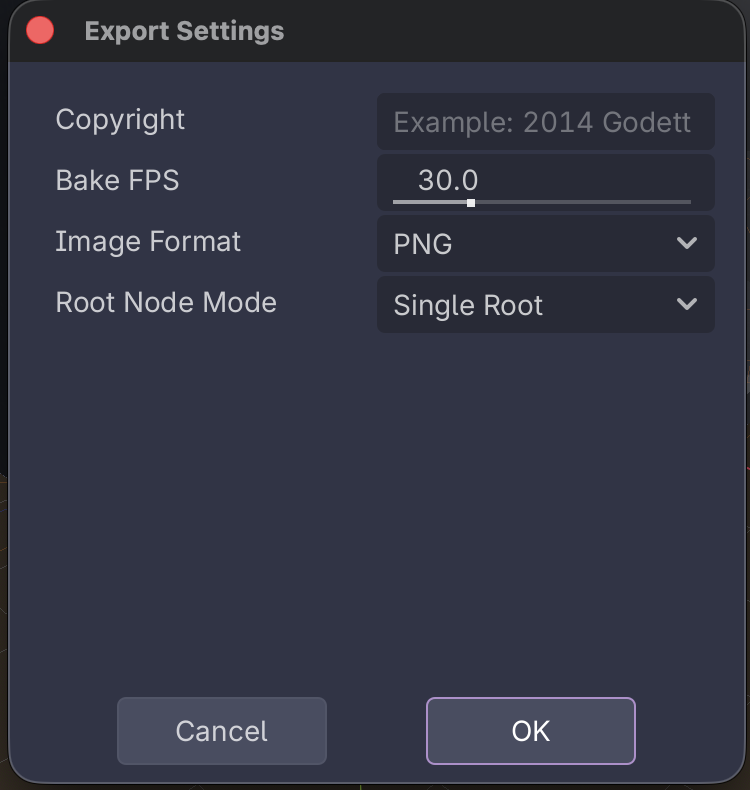](https://docs.bugjam.dev/uploads/images/gallery/2026-02/screenshot-2026-02-15-at-6-01-17-pm.png)
You will then be prompted for where to save the scene.
### Import glTF to Blender
Over in Blender, create a new file and sacrifice the default cube 🔪🧊
Then, go to **File → Import → glTF 2.0 (.glb/.gltf)**
[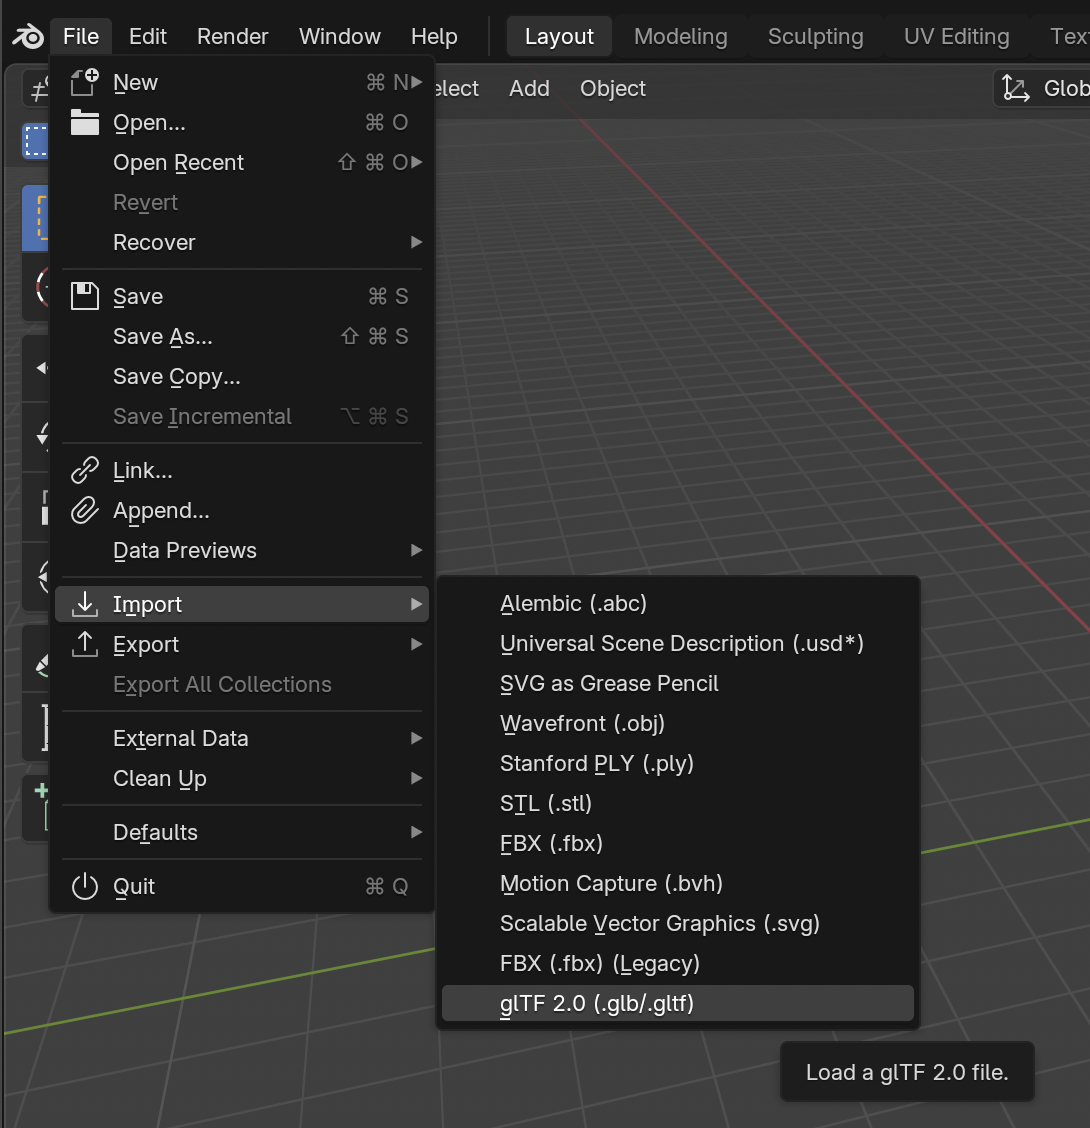](https://docs.bugjam.dev/uploads/images/gallery/2026-02/screenshot-2026-02-15-at-6-05-48-pm.png)
After importing, you'll see your CSG mesh
[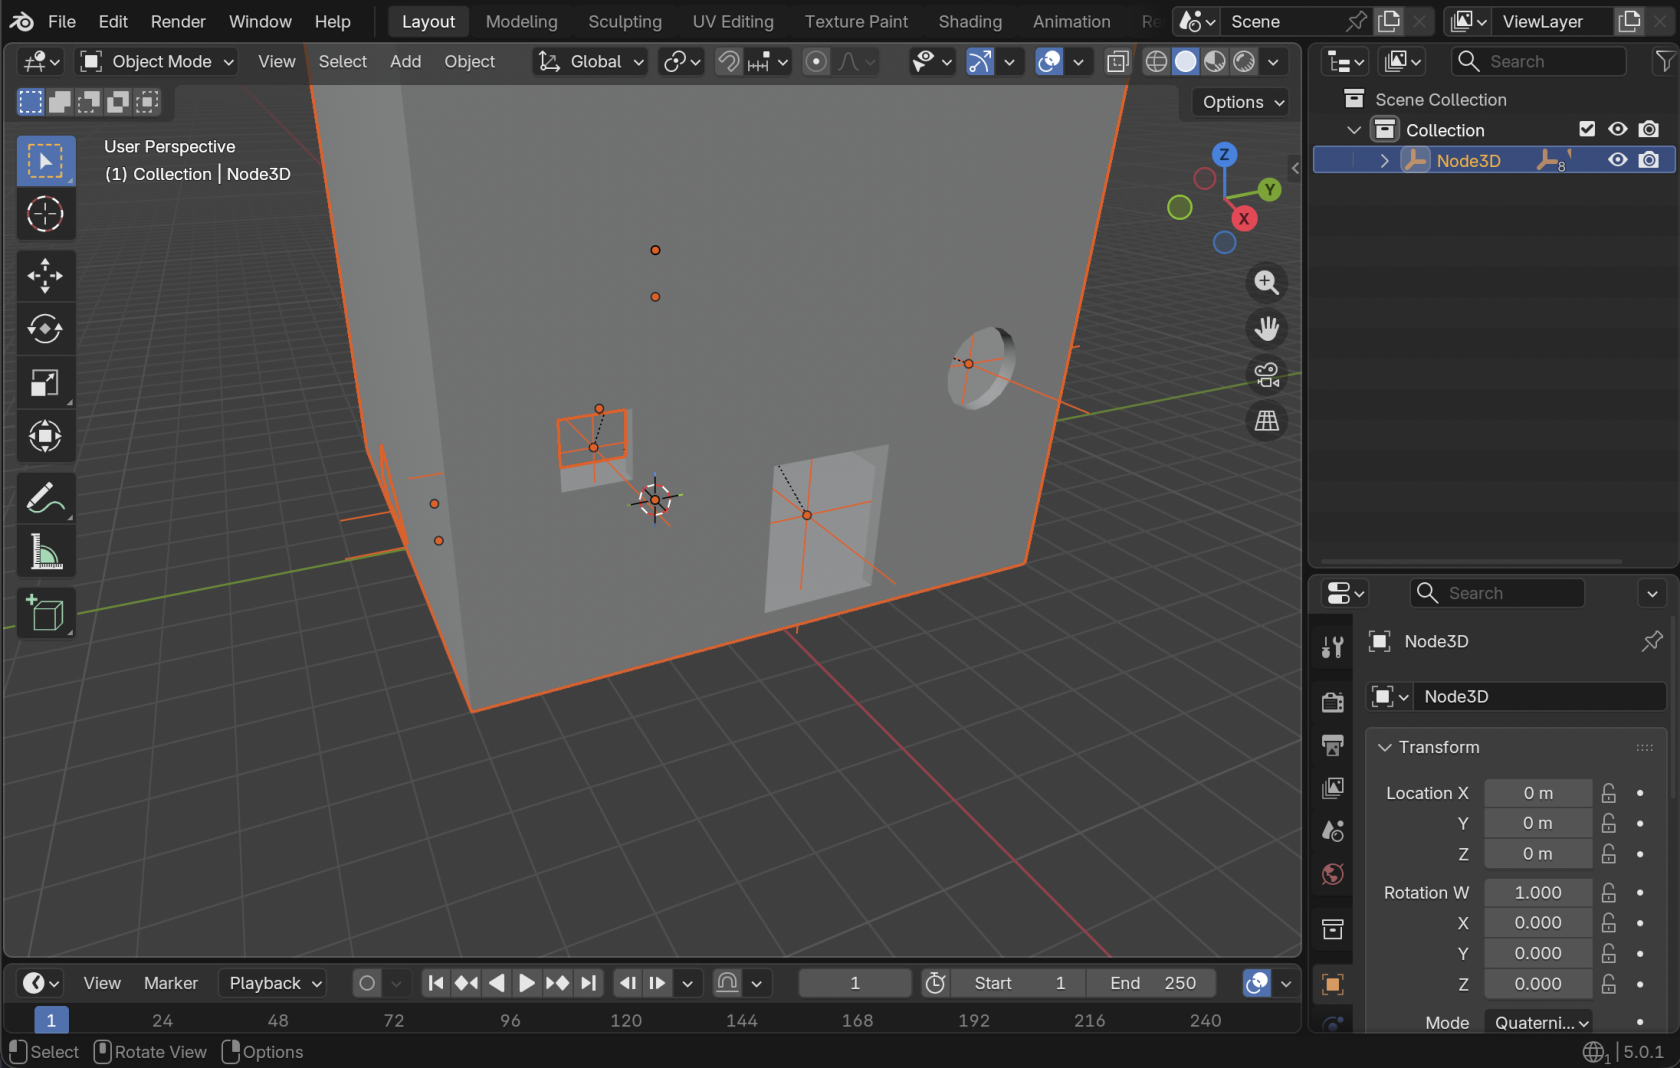](https://docs.bugjam.dev/uploads/images/gallery/2026-02/screenshot-2026-02-15-at-6-52-15-pm.png)
Note that materials, lights, etc. that were in the scene get imported as well! Delete anything you don't want.
[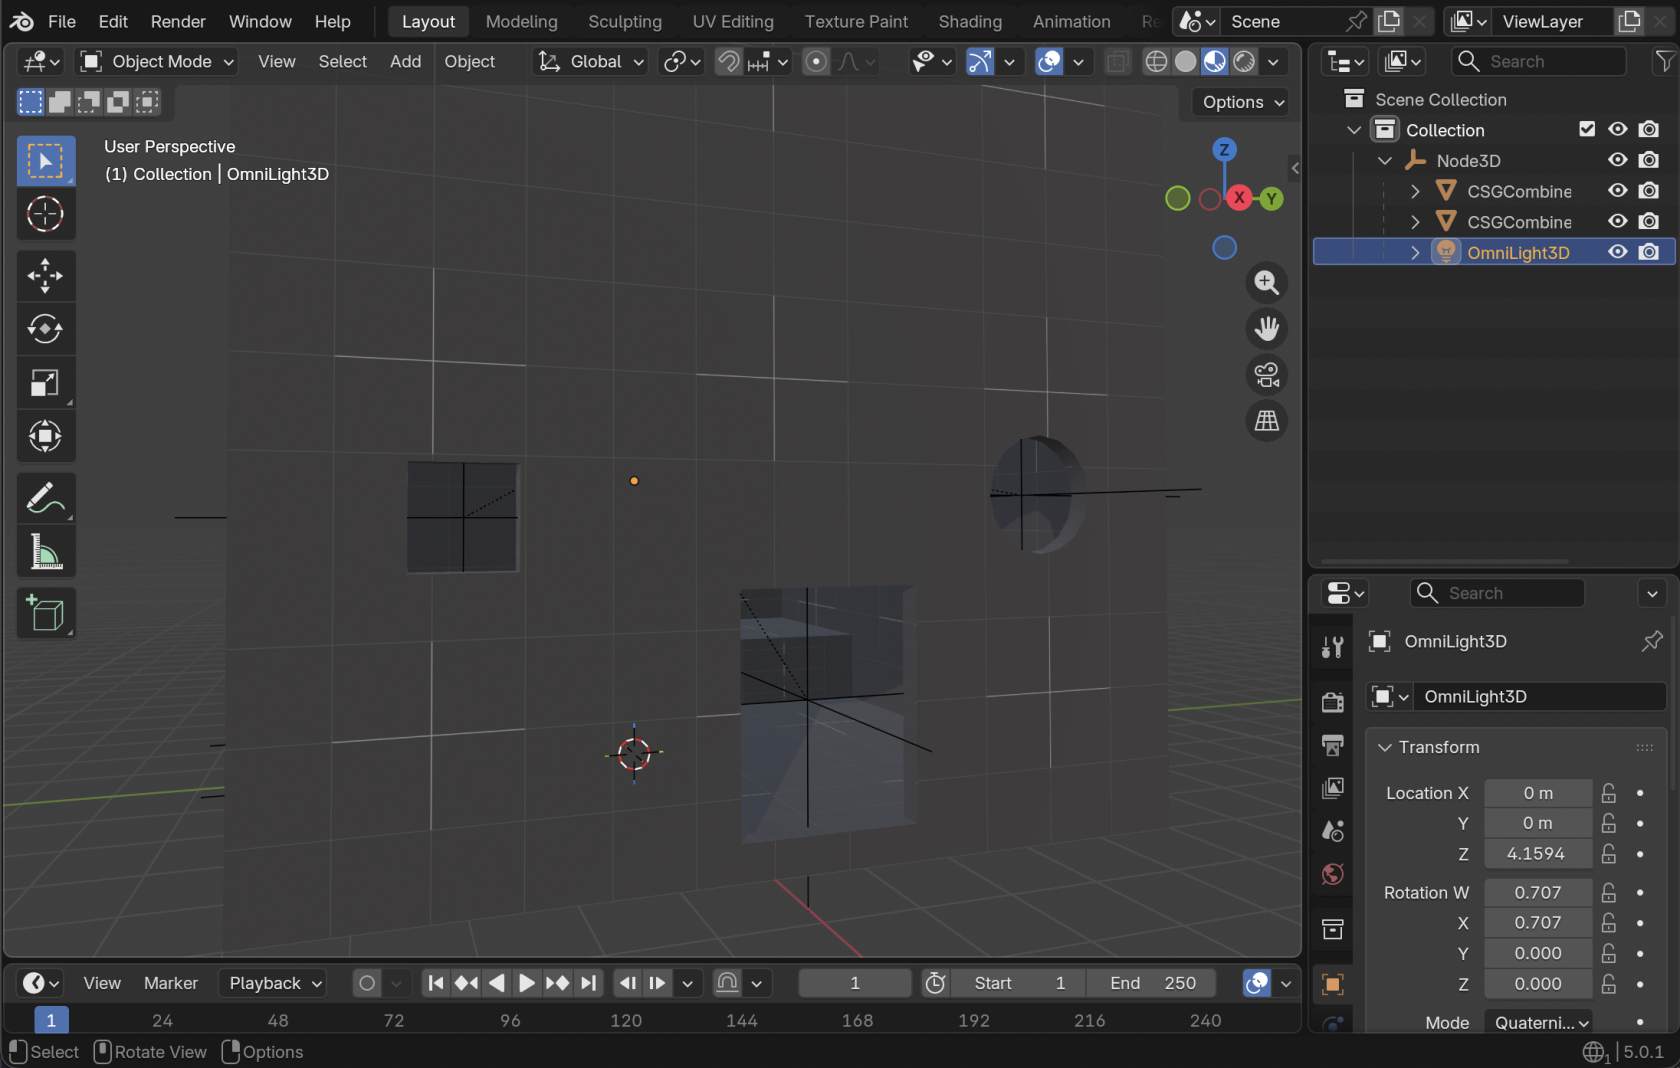](https://docs.bugjam.dev/uploads/images/gallery/2026-02/screenshot-2026-02-15-at-6-54-09-pm.png)
#### Cleaning up the imported glTF
Note that for each CSG node that you added, there will be an "**Empty**" object. You can delete these.
[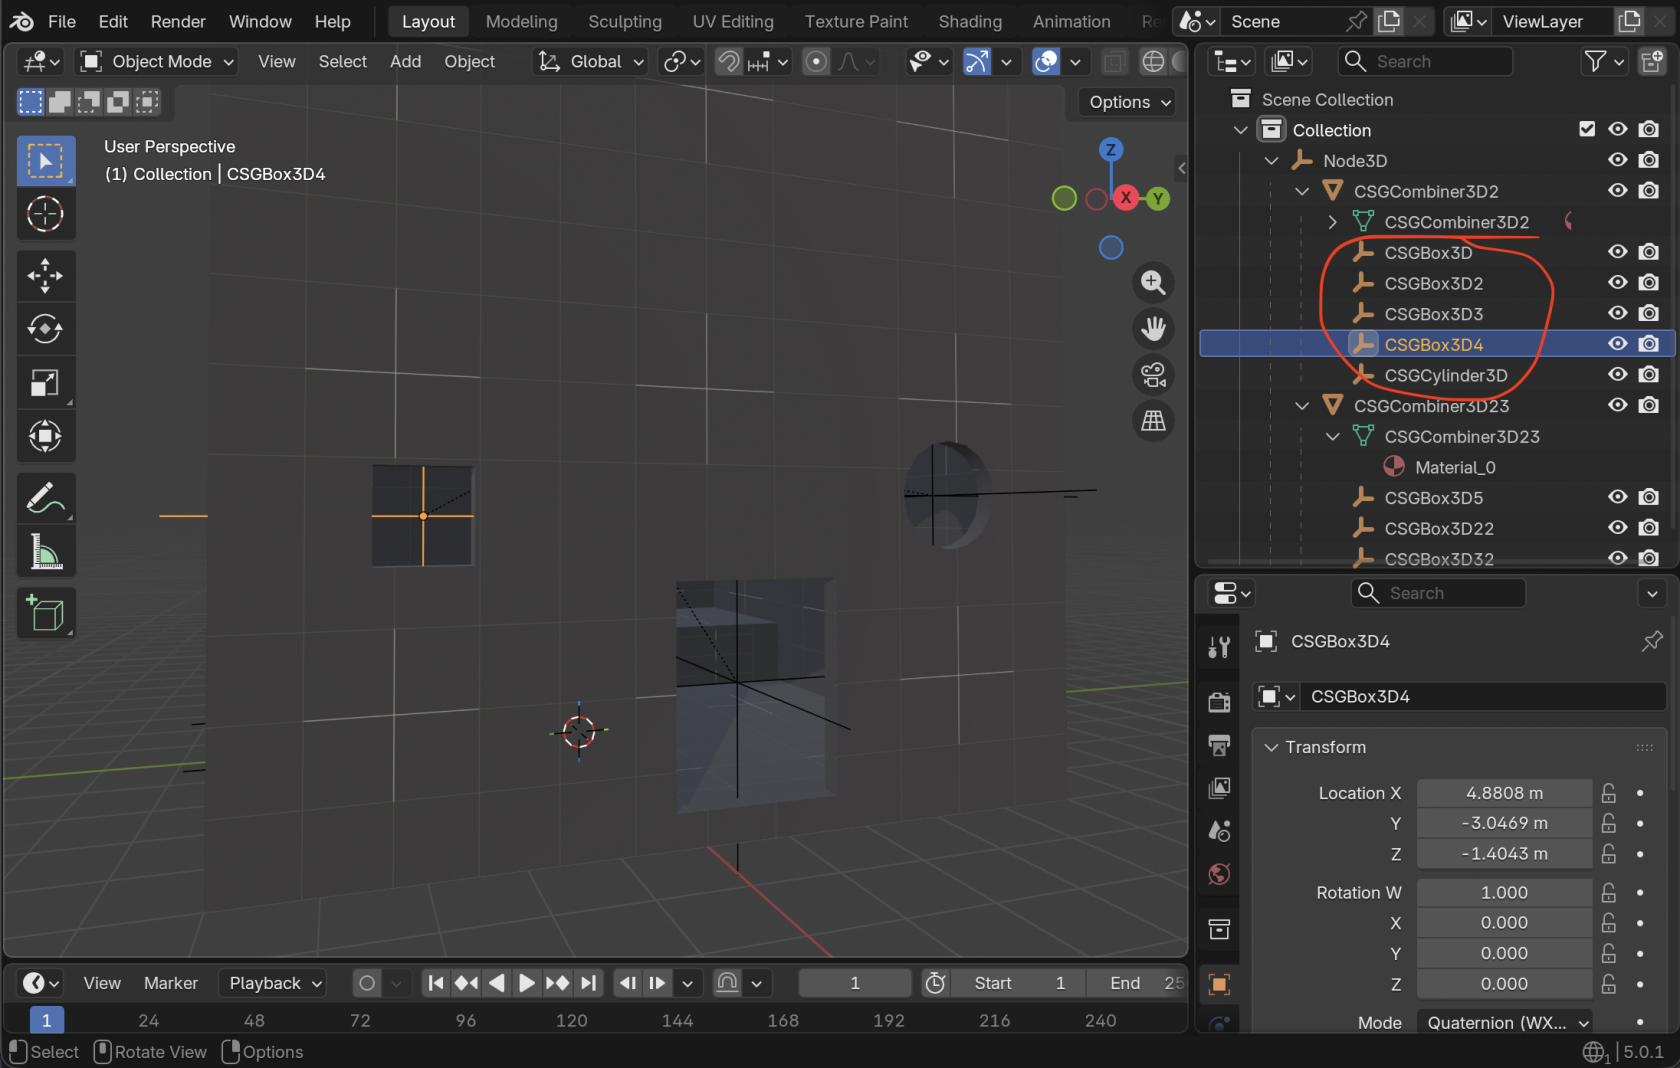](https://docs.bugjam.dev/uploads/images/gallery/2026-02/screenshot-2026-02-15-at-6-55-24-pm.png)
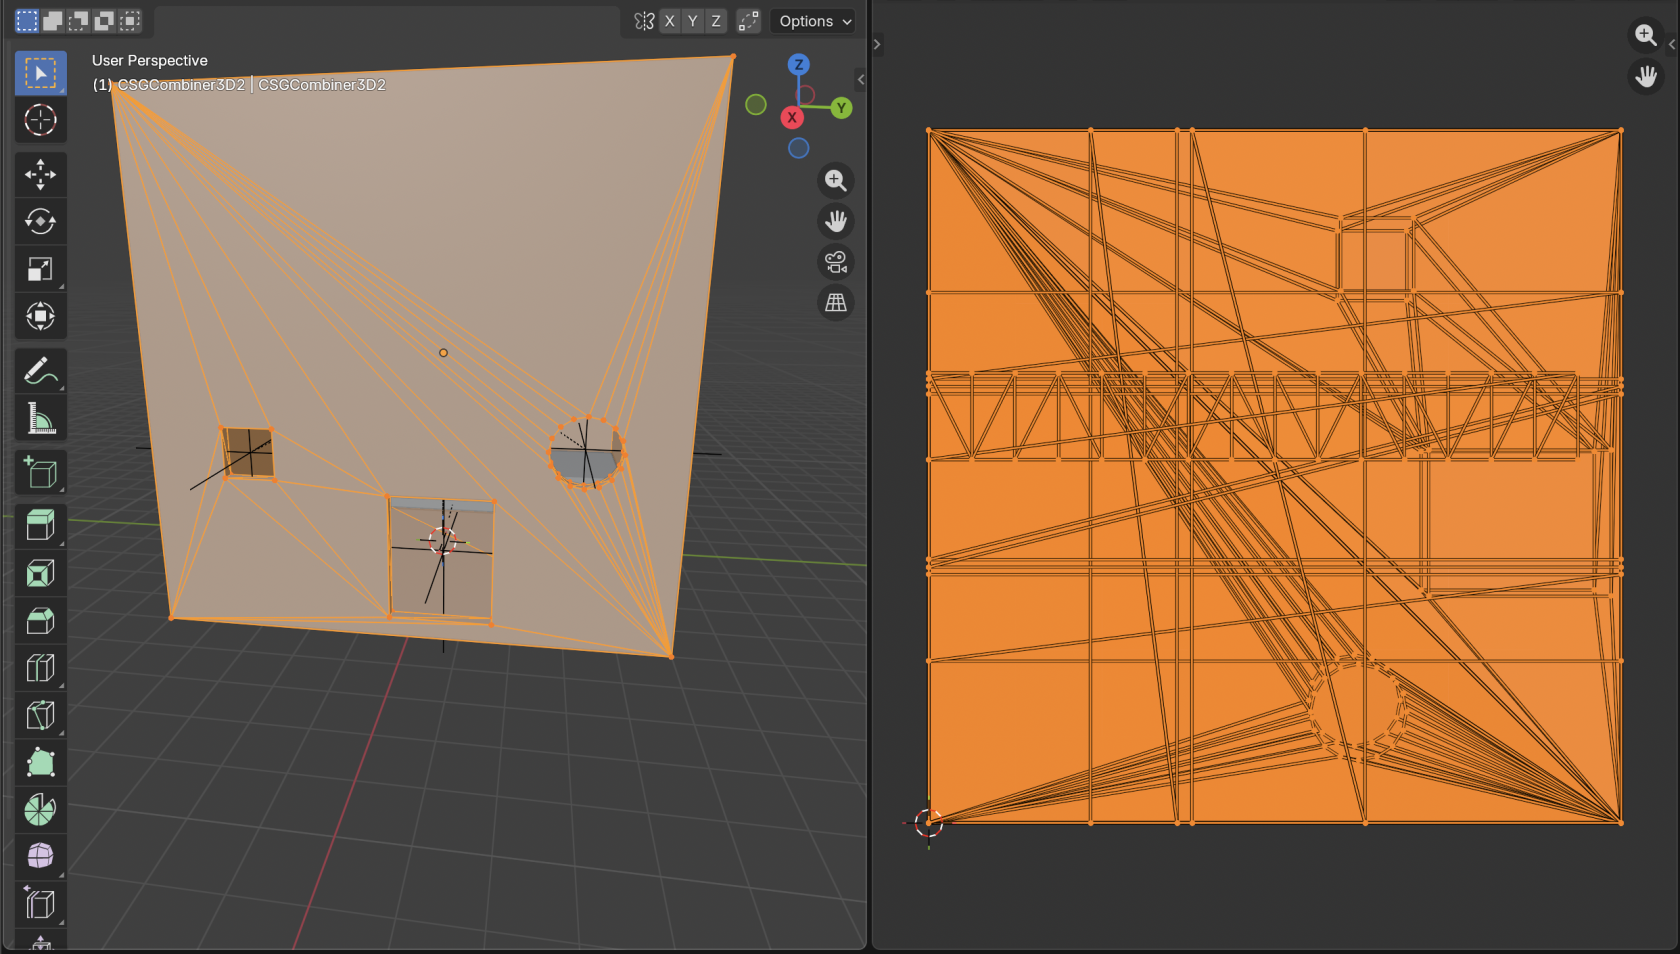
Also **very** important here, *none of the vertices are connected* in the exported mesh! As an example, check out this one vertex that is actually 5 vertices together 😭
[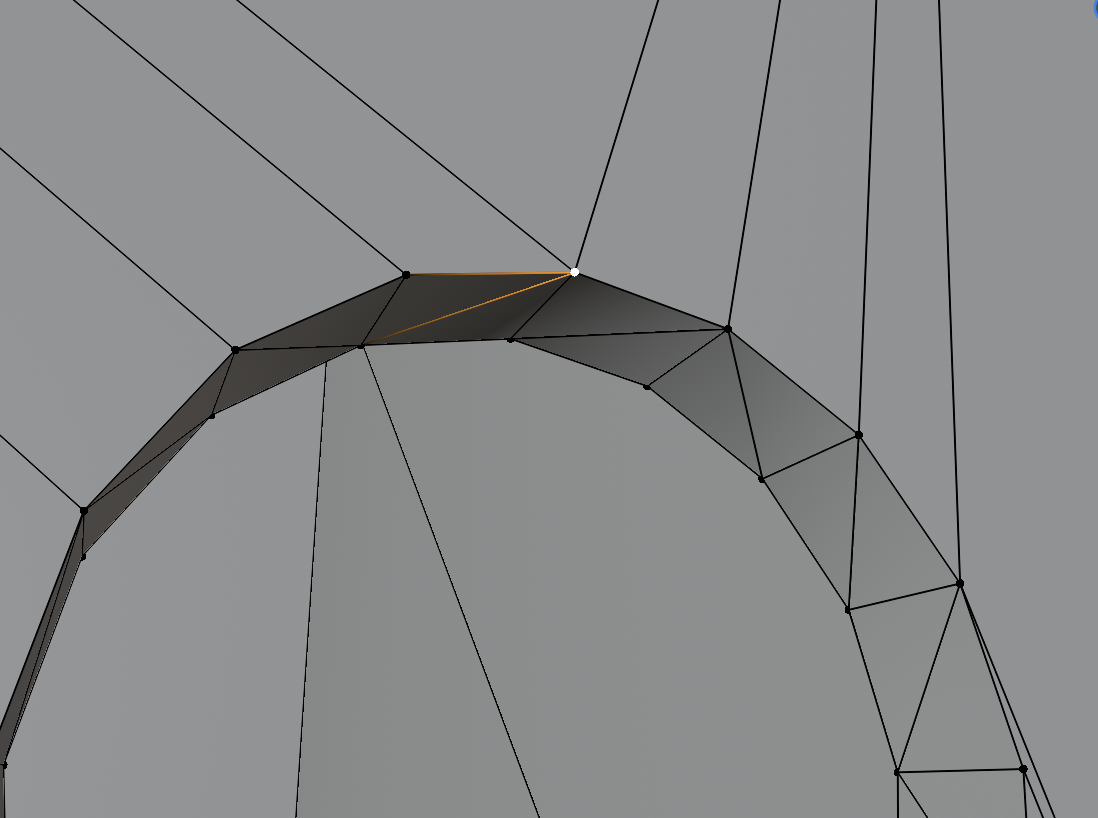](https://docs.bugjam.dev/uploads/images/gallery/2026-02/screenshot-2026-02-15-at-6-59-17-pm.png)
[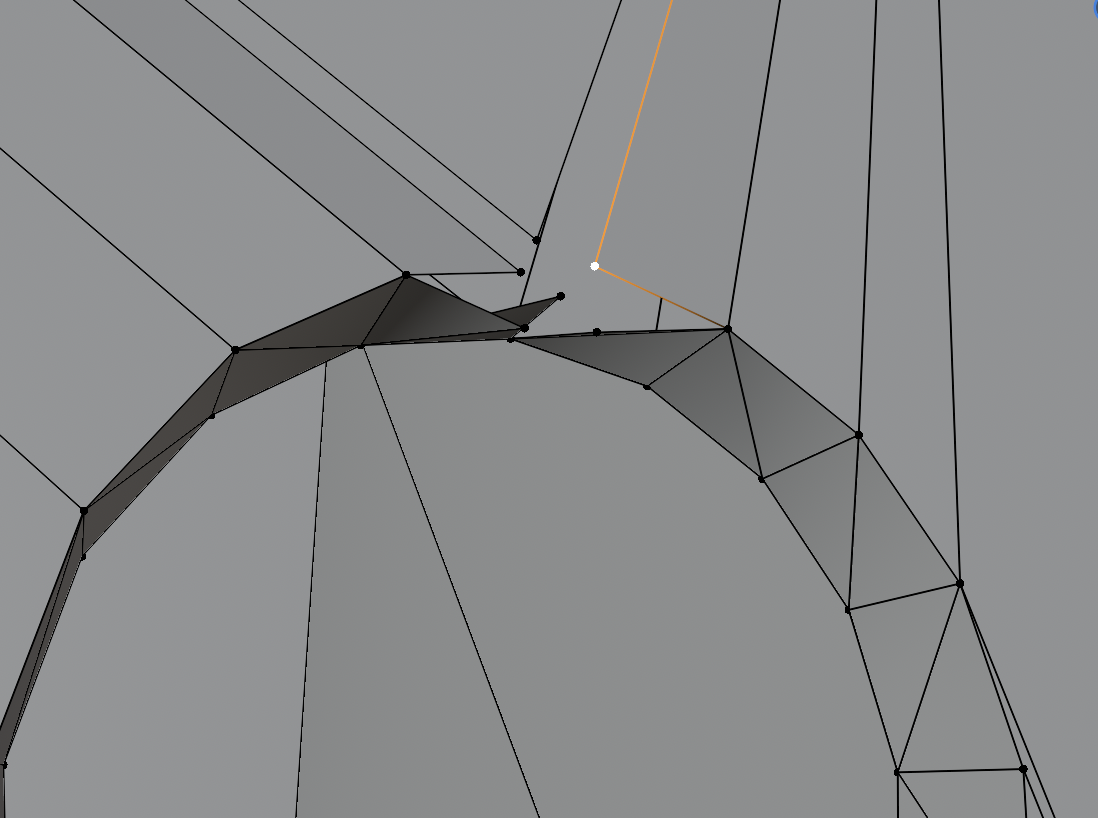](https://docs.bugjam.dev/uploads/images/gallery/2026-02/screenshot-2026-02-15-at-6-59-59-pm.png)
To fix this **hit "A" on your keyboard to select all vertices**, then go to **Mesh → Clean Up → Merge by Distance**
[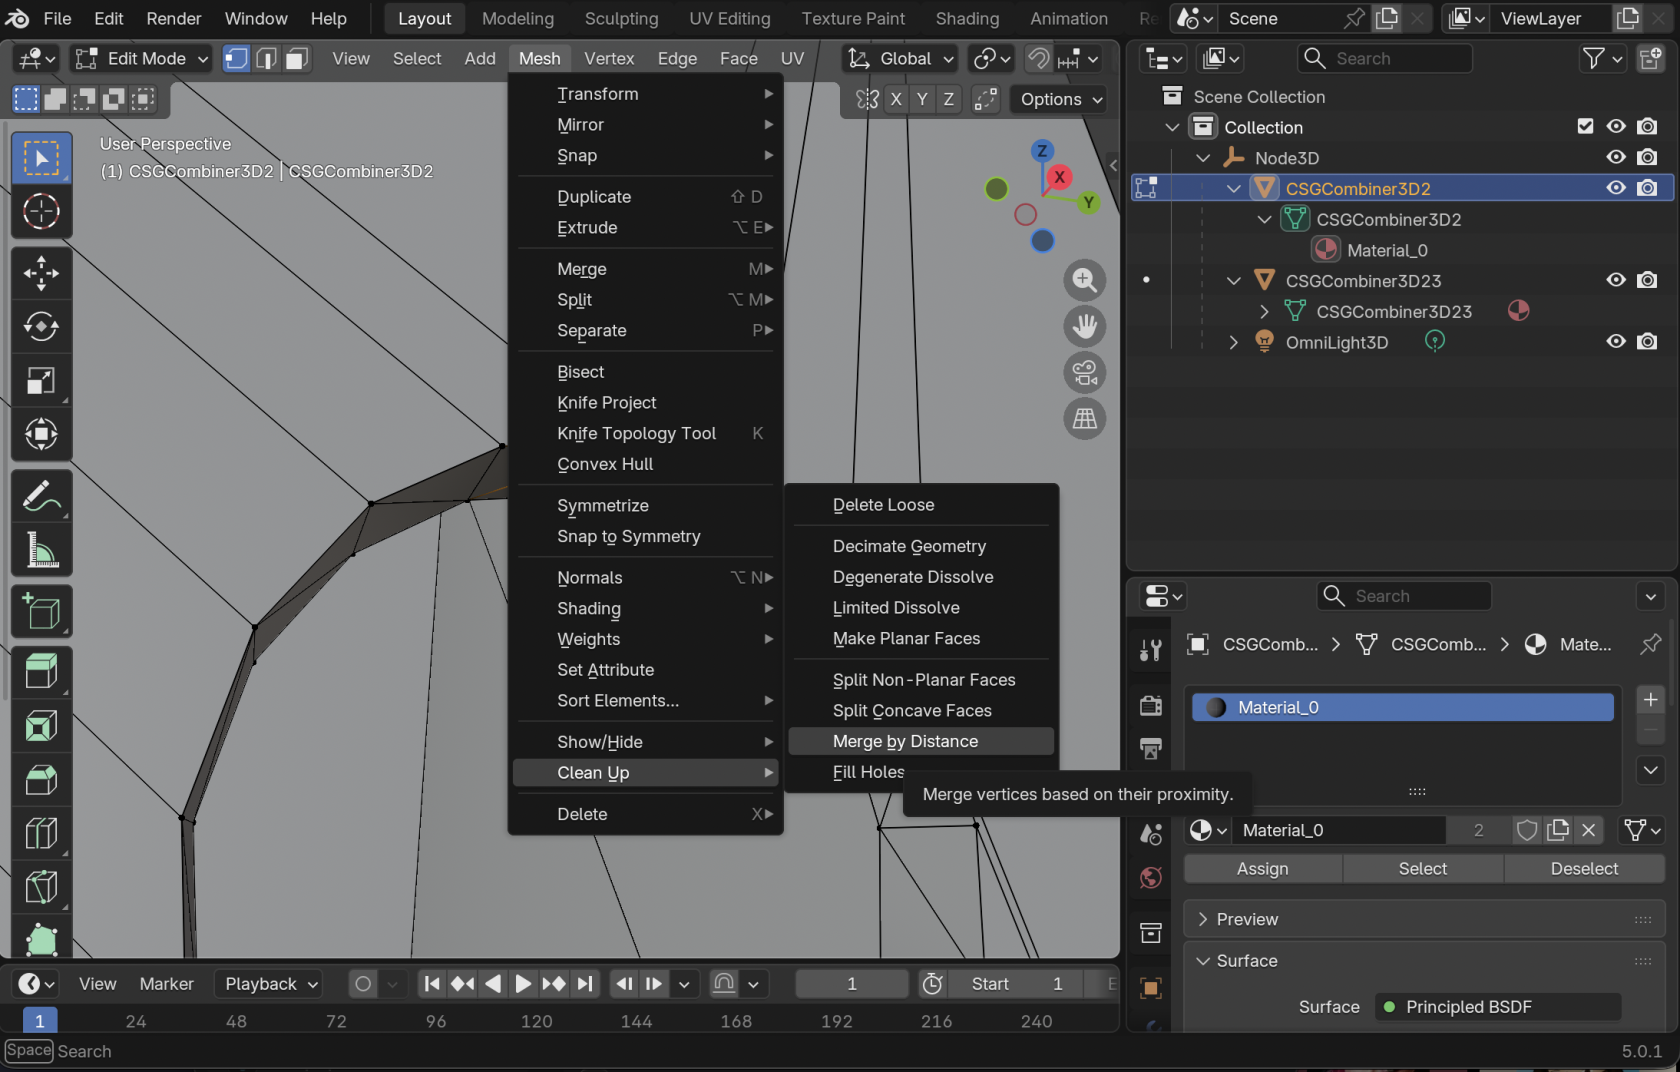](https://docs.bugjam.dev/uploads/images/gallery/2026-02/screenshot-2026-02-15-at-7-01-30-pm.png)
You should see a number of vertices removed at the bottom of the window.
**You will have to do this for each individual CSG mesh that was exported.**
[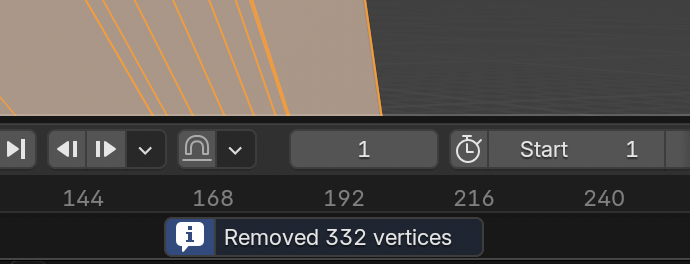](https://docs.bugjam.dev/uploads/images/gallery/2026-02/screenshot-2026-02-15-at-7-02-46-pm.png)
For a little bit of extra clean-up you can also go to **Face → Triangles to Quads**.
[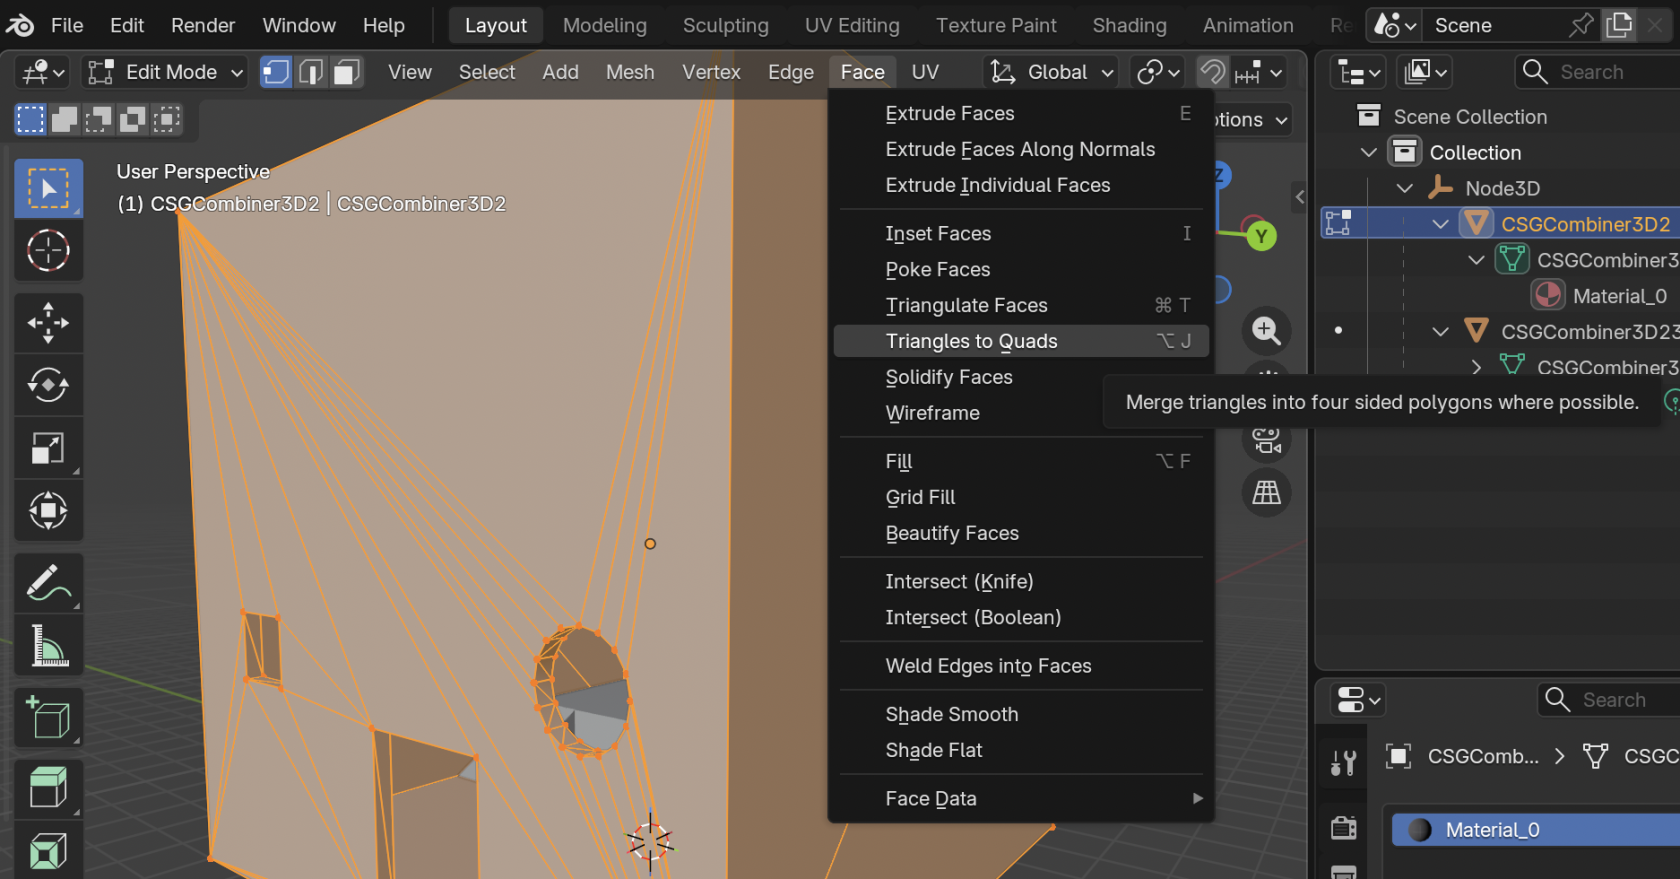](https://docs.bugjam.dev/uploads/images/gallery/2026-02/screenshot-2026-02-15-at-7-04-51-pm.png)
The topology here is not great, but you can at least get the overall shape of what you're working with. You can either edit this mesh directly, or build another mesh on top of it that has better topology.
The UVs here will also be a total mess - you may want to mark seams and unwrap it manually.
[](https://docs.bugjam.dev/uploads/images/gallery/2026-02/screenshot-2026-02-15-at-7-12-48-pm.png)
### Back into Godot
After making changes to the mesh, export it back to glTF using our art pipeline and then import that back into Godot.
As an example, I added some super simple bevels around the windows here:
[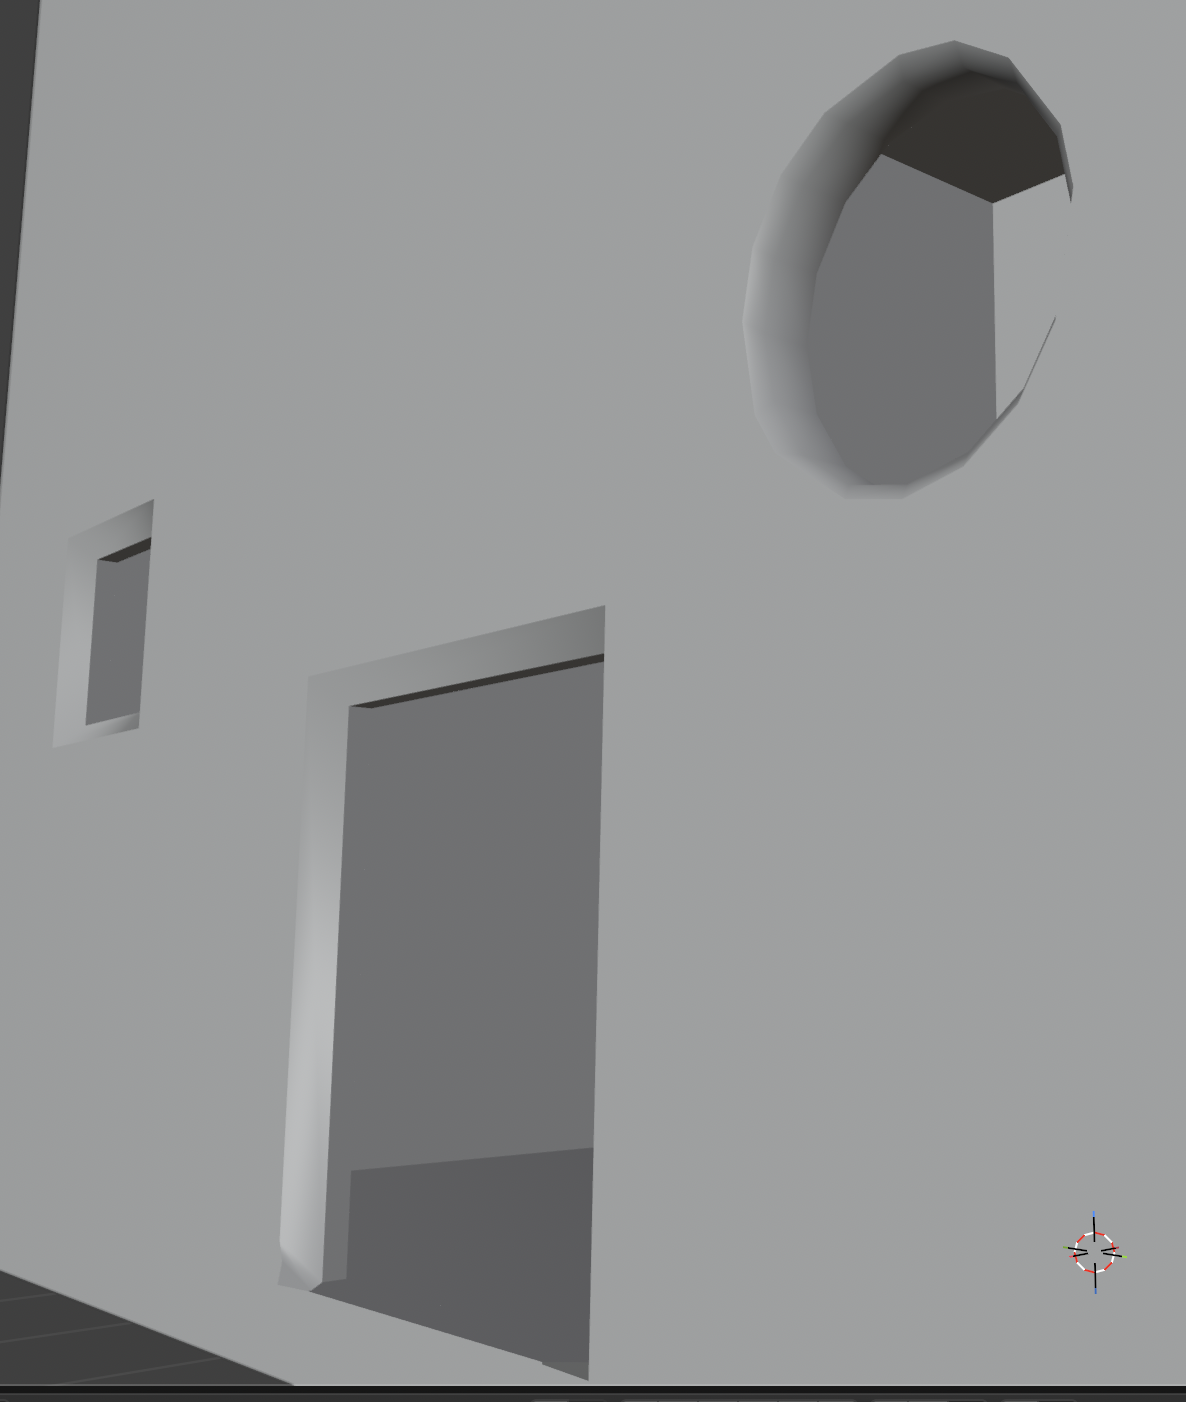](https://docs.bugjam.dev/uploads/images/gallery/2026-02/screenshot-2026-02-15-at-7-16-23-pm.png)
Create a new scene in Godot.
Add a `StaticBody3D` to the scene. Underneath that `StaticBody3D`, add your new mesh that was exported from Blender:
[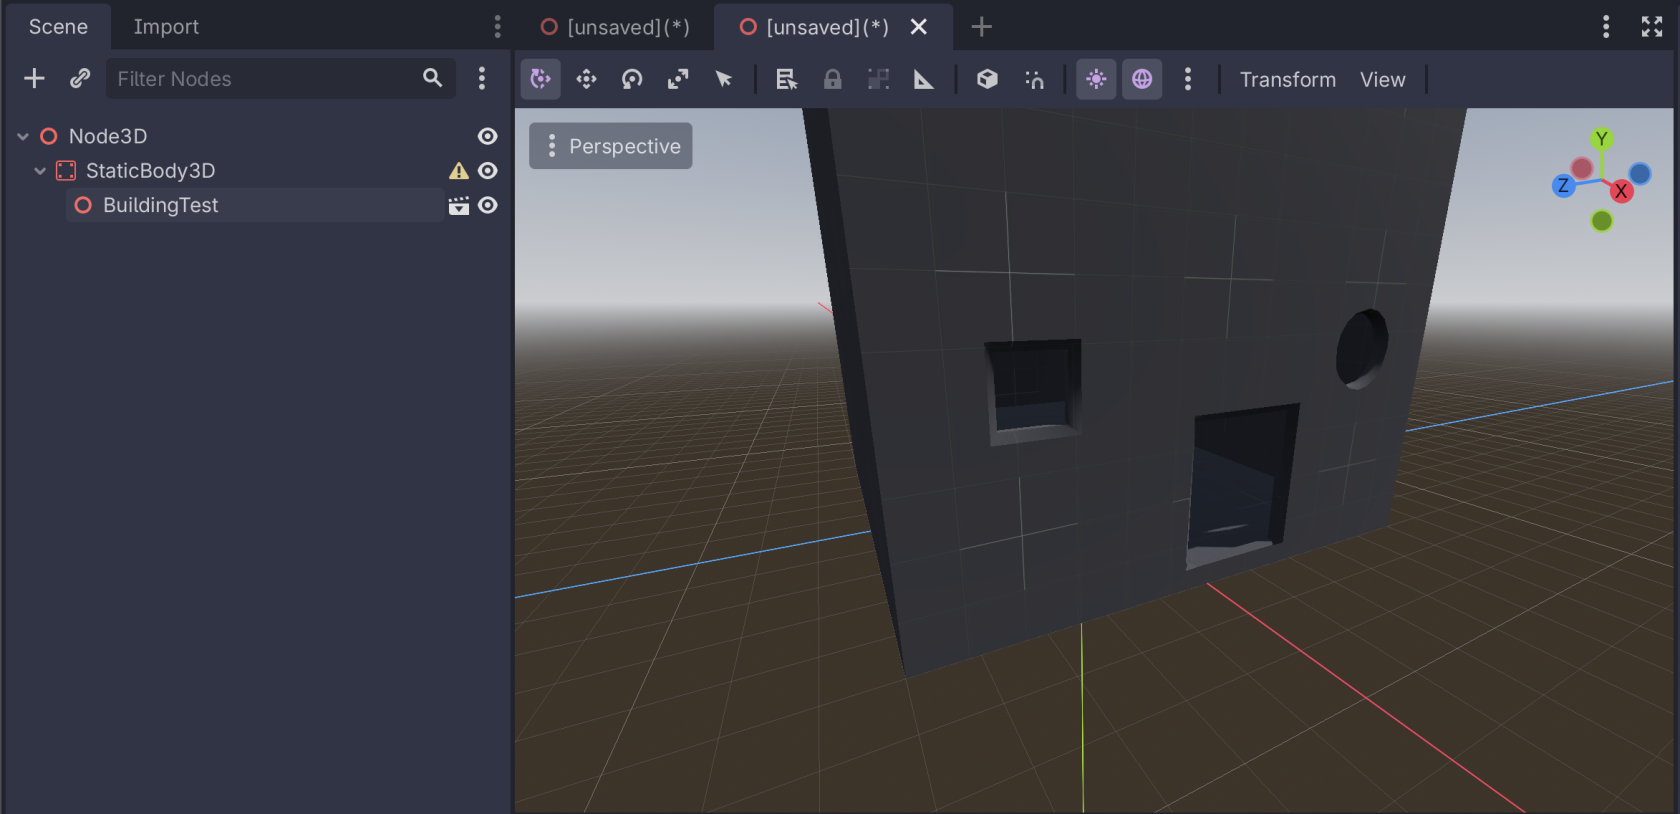](https://docs.bugjam.dev/uploads/images/gallery/2026-02/screenshot-2026-02-15-at-7-18-19-pm.png)
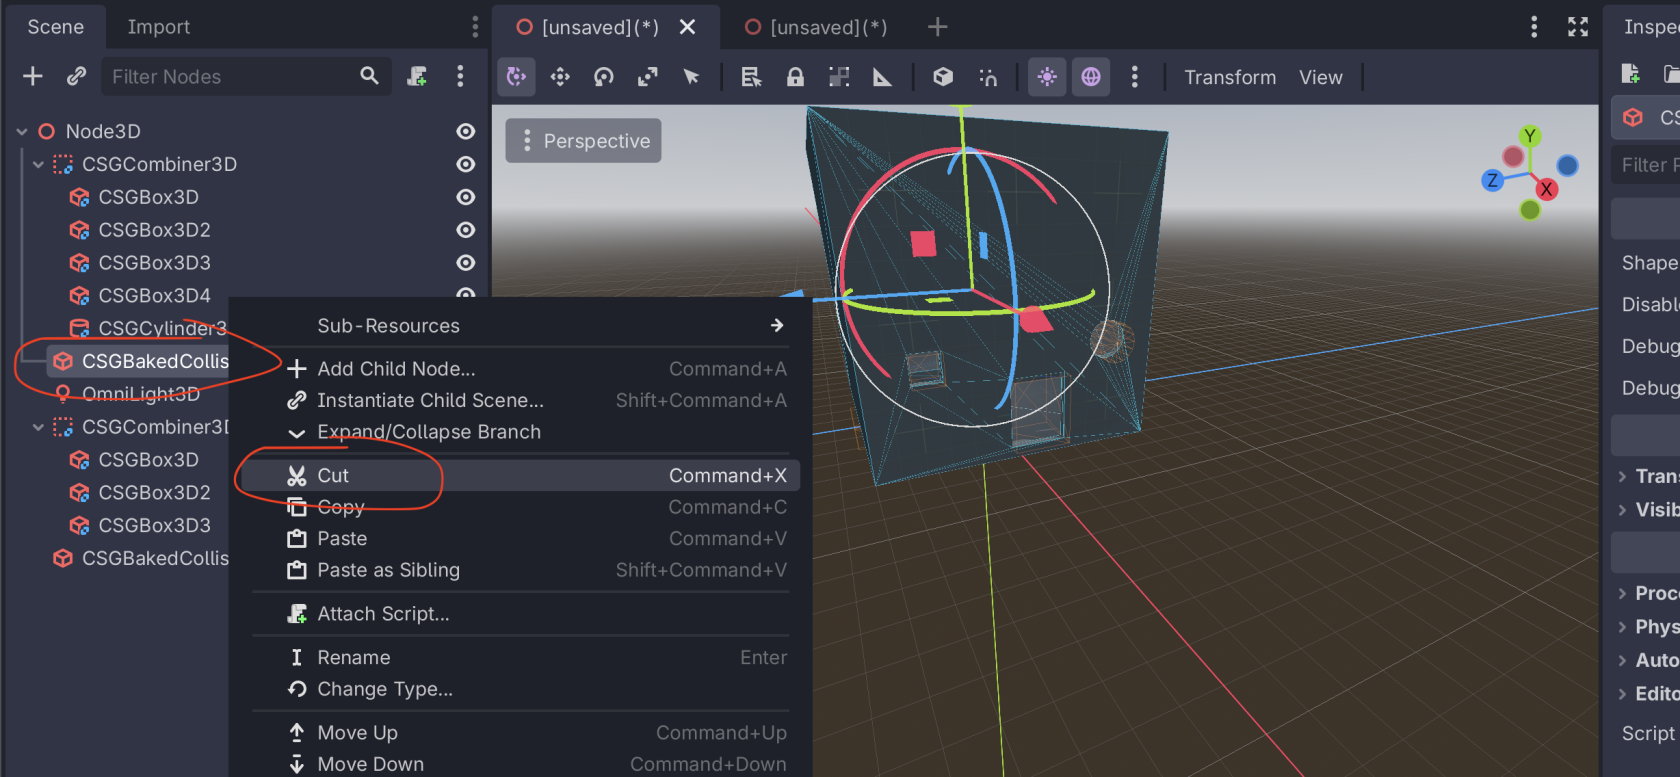
Back in the scene with the CSG nodes, select the root `CSGCombiner3D` and select **CSG → Bake Collision Shape**
[](https://docs.bugjam.dev/uploads/images/gallery/2026-02/screenshot-2026-02-15-at-7-19-52-pm.png)
This will add a node called `CSGBakedCollisionShape3D` to the scene. Cut this node and then paste it in your new scene as a child of the `StaticBody3D`. If you have mulitple `CSGCombiner3D` in your scene, do this for each one.
[](https://docs.bugjam.dev/uploads/images/gallery/2026-02/screenshot-2026-02-15-at-7-23-22-pm.png)
[](https://docs.bugjam.dev/uploads/images/gallery/2026-02/screenshot-2026-02-15-at-7-22-42-pm.png)
Then, your scene is ready to go! You have your mesh imported from the glTF file and the collision generated from the CSG nodes.
[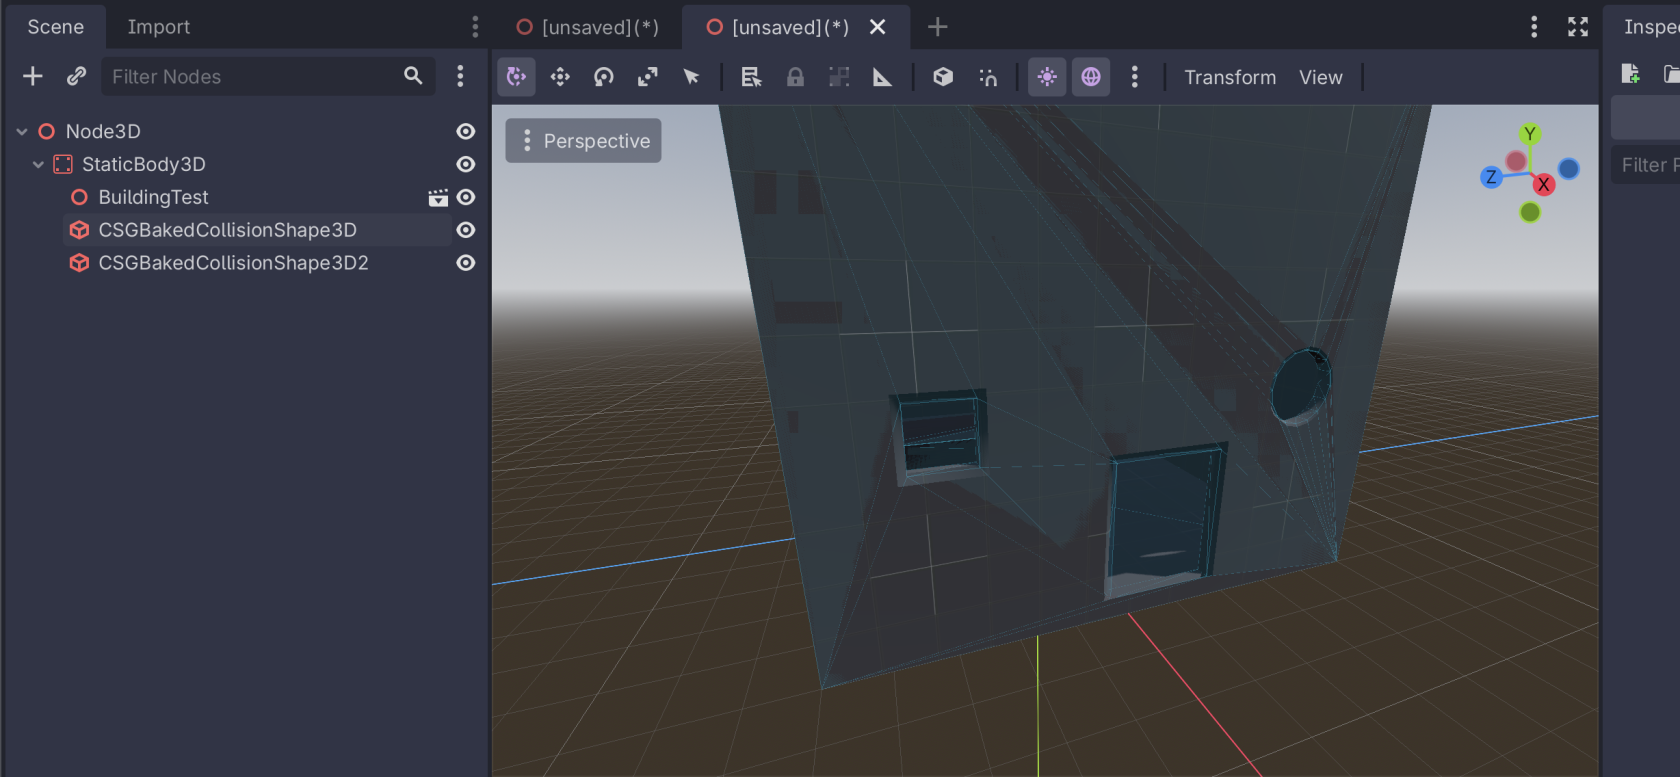](https://docs.bugjam.dev/uploads/images/gallery/2026-02/screenshot-2026-02-15-at-7-24-03-pm.png)